The concept of a screed layer for floors
Screed is an intermediate layer when constructing floors.
Many people underestimate the importance of such an element as the screed layer. However, it performs a number of important functions, without which the operation of the facility would be impossible.
Necessity and purpose
Main functions of the screed:
- Makes the surface of the subfloor even. Floor slabs are manufactured in factories or poured at the construction site. There are permissible deviations in overall dimensions from the norm, which affects the degree of evenness of surfaces. Often, roughness, differences in height and other factors are observed in the horizontal plane, which make it impossible to install a decorative floor layer without additional leveling. This is what the screed layer is used for.
- Arranges a slope in rooms where it is necessary. On a flat horizontal surface, water will not flow into the drain, resulting in stagnation (for example, in showers). Using a screed, you can arrange the required slope accurate to a degree.
- Improves sound insulation. In apartment buildings there is an urgent need to not hear your neighbors. The problem of good audibility can be seen most clearly in panel high-rise buildings. Due to cracks in joints and between slabs, acoustic and structural noise can be transmitted from neighbors, machinery, equipment, etc. The screed improves sound insulation.
- Allows you to hide communications. In modern new buildings, utility networks such as heating, electrical, underfloor heating, etc. are located in the floors. The screed layer covers and protects these communications.
- Improves thermal insulation. A large percentage of heat escapes through the floors. This is most problematic for residents of the lower floors. The screed allows you to close cracks and crevices in the ceiling, thereby stopping heat loss.
- Extends the life of the decorative floor. Thanks to the even layer, the coating does not experience mechanical stress. The parquet does not start to sway or creak, which allows it to be used for a longer period of time.
The screed makes the surface smooth and improves thermal insulation.
Also, sometimes the screed layer is performed as a finishing layer, and not as a subfloor.
This is arranged in premises such as garages, production workshops, warehouses, etc.
Device
According to the device technology, there are 2 types of ties:
- Monolithic. Various grades of concrete are used here, both light and heavy.
- Team. Several types of layers that form a single structure. This includes joist screeds, dry screeds, soundproofing screeds, etc.
Determining the zero level
After choosing the method of screeding, you can begin the practical implementation of your plans. You should start by determining the zero level, which will become almost the level of the finishing surface of the floor. As practice shows, the correct implementation of the technology of this stage largely determines the quality of the entire work. It is recommended to determine the zero level using laser or water levels. Measurements start from the highest point of the base floor, which is determined visually. Then the first, main mark is applied and, using a level, transferred to each wall of the room.
It is recommended to apply several marks to make the marking more correct. By connecting the marks with a horizontal line, we obtain the floor level relative to the horizon, and not the base floor. Then it is recommended to determine the height difference over the entire floor area in order to correctly calculate the level of the screed, as well as determine the required volumes of the mixture.
In this case, you can use a strong cord that is attached near one of the marks. The second end of the cord should be pulled to opposite marks and the distance between the zero level and the base floor should be measured. The more measurements are made, the more accurately the volume of the mixture can be calculated. It should also be taken into account that the optimal thickness of the screed should be at least 30 millimeters, otherwise the screed may crack. If necessary, the zero level can be moved up.
Main types
Screeds are classified according to several criteria:
- by appointment;
- by installation method;
- according to the composition of the material;
- according to the coupling method.
According to the coupling method
The adhesion method is how the screed layer is connected to the floor slab. Screeds are distinguished:
- Related. When the layer is laid directly on top of the ceiling or base, i.e. There is no heat or sound insulation between them. Cohesion occurs through adhesion. This method is chosen in the following cases. First, you need to keep the thickness to a minimum to ensure the doors open. Secondly, the large surface area of the layer. Thirdly, when the surface should be light and the base should be fairly level.
- On the separating layer. The separators are polyethylene film, which provides vapor or waterproofing. In this case, the screed layer does not have direct contact with the base surface. This design is installed on the first floors, in bathrooms, basements, roofs, etc.
- Floating. This type is similar to the previous one: the layer is not applied to the base, but to an additional layer. Often this role is played by thick thermal insulation material. This base is suitable for laminate, tiles, parquet boards and linoleum. This design is used when good heat and sound insulation is needed, as well as when people plan to make heated floors.
According to the method of adhesion, a distinction is made between tied, on a separating layer and floating screeds.
By installation method
The installation method is the way the work is done. There are 4 types:
- Solid. The most classic and famous method. It uses a cement-based liquid mortar, which is poured by hand and then leveled along the beacons. The disadvantages are the following: high labor intensity, long process duration, weight of the resulting structure.
- Semi-dry. This screed contains much less water, and fiber is also added, which acts as reinforcement. Pouring is done not manually, but mechanized, which is faster and more convenient. The advantages of such a layer are its ability to withstand heavy loads, reduce the risk of cracks, and fast pouring speed.
- Self-leveling. This type is represented by a composition with increased fluidity, which is applied to a sealed base and, under the influence of its own weight, turns into a flat surface. The method is quite expensive, so it is used if a layer 1-2 cm thick is required.
- Dry. It is also called the team. Leveling is carried out by backfilling with fine material, such as expanded clay, followed by laying special slabs. The base must be rigid. This method is suitable in rare cases.
According to the composition of the material
Another classification of construction is by composition. The following types are distinguished:
- Cement-sand. This is the most commonly used and simplest mixture. It is durable, strong and versatile. It is advisable to put hydro- and sound insulation under it, because... moisture from the solution can be absorbed into the floor slab.
- Plaster. This material is more environmentally friendly and lightweight due to its low density, so it is also gaining popularity. Due to their high porosity, such screeds improve the indoor microclimate. They also have good heat and sound insulation. The material dries quickly and does not require additional leveling.
- Industrial. High strength concrete solutions are used here. In industrial production there are always large dynamic and static loads, so it is necessary to reinforce the floor.
Depending on the composition of the material, there are cement-sand and gypsum screeds.
By purpose
Based on their purpose, they are divided into a leveling layer and a leveling-thermal insulation layer. The first type is used to make the floor surface smooth. To the second, the function of limiting heat loss is added.
What is it for?
A screed is not only a structural element of the floor responsible for its leveling. It also performs other equally important functions - for example, it takes on and redistributes all the loads experienced by the floor covering. But still, the most important function of the screed is leveling the base. It is necessary in order to easily and correctly lay the floor covering, some types of which are quite demanding regarding the evenness of the subfloor. For example, laminate, ceramic tiles, parquet and other materials will quickly become unusable if they are used while lying on an uneven floor. They will begin to break and collapse, and when moving across the coating it will make an unpleasant squeak.
What is a floor screed
Another function that the screed performs is to increase the heat, sound and waterproofing properties of floors . It also makes it easy to raise the base level to the required level if necessary.
DIY floor screed
Criteria for choosing the type of screed
The choice of screed depends on several key parameters: weight, purpose, type of decorative floor covering and base. An important role is played by the fact whether the screed is done from scratch in a new building or redone during the renovation process.
Calculating the required number of layers, selecting materials and determining their mass are the main tasks that need to be solved.
Weight
When designing and constructing a building, the load that the floors can withstand is calculated and specified. It is different for each type of construction. The heaviest screed is made from cement-sand mortar; wooden floors may not support its weight, so it would be more advisable to choose a dry one. On the contrary, a CPR or gypsum layer will fit well on reinforced concrete prefabricated or monolithic floors.
Screed made from cement-sand mortar is the heaviest.
Waterproofing
Waterproofing must be done in rooms such as bathrooms, toilets, balconies, and sometimes kitchens. In addition, it is performed in apartments and houses that do not have a basement. Waterproofing materials come in the following varieties: rolled and liquid, in the form of mastics and paints with special additives. In wet rooms, 2 layers of waterproofing are performed - under and on top of the screed. In basements and on balconies they make 1, which is placed inside.
Noise insulation
The problem of poor sound insulation worries residents of multi-storey buildings, in particular panel buildings. The solution to this issue is a floating screed device. Its design involves the presence of a noise-insulating layer that prevents the spread of sound. In addition, the porous material separates the concrete from the walls, which eliminates direct contact of the screed with vertical structures and makes this method of noise transmission impossible.
Thermal insulation
Most of the heat escapes through the floor, which often worries residents of lower floors. A layer of insulating material can be hidden under the screed to prevent heat loss. In addition, the presence of such a layer is necessary when installing heated floors, so as not to additionally heat the neighbors.
A screed is needed when installing heated floors.
Final stage
The screed dries quickly enough, so within a day you can easily step on the surface without fear of leaving footprints. Then unused beacons are removed and the grooves are sealed (the optimal time is two days after pouring). This is done using a dried solution (gartsovka), which is rubbed with a wooden polisher. The seal adheres reliably to the main coating if rubbing is carried out within a week after the completion of the main work.
Removing beacons and repairing seams with mortar
Finally, the screed is cleaned. Surely, there are traces left from using the rule - they are removed using a simple sand-lime brick.
After finishing the work, it is necessary to check its quality. Experts suggest quality control through the following measures:
- external inspection, checking for cracks;
- measuring the floor level using building and water levels;
- tapping. If the sound is dull, it means that the solution has peeled off, but a ringing sound allows you to judge that the work was done with high quality and such a floor will last a long time.
List of required materials and tools
The design is a “pie”. The components for each type of screed are different. The general list of materials looks like this:
- The basis. This role is played by a polymer film that prevents the formation of vapors and leaks.
- Edge tape. It performs an insulating function and is mounted along the junction of the wall and floor along the entire perimeter of the room. The height should not exceed the thickness of the screed.
- Sound and heat insulating material. Apply as needed. Mineral wool, polystyrene foam, polyurethane foam, and wood fiber-based boards are used.
- Waterproofing. Used as needed. The following materials are used: rolls (hydroizol, roofing felt), bitumen mastics, dry mixtures.
- Leveling layer. The most important part of the pie. Most often, the choice falls on cement-sand mortar and gypsum mixture.
General tools for any type of screed:
- For dismantling. Before installing a new coating, you need to get rid of the old one. For this you may need a hammer drill, spatulas, chisel, hammer, etc.
- For cleaning. During the dismantling process, debris is generated that needs to be removed; for this you need: a vacuum cleaner, brooms, mops.
- For marking. This includes beacons, levels, drawing supplies.
- For painting work: aluminum rules, trowel, trowel.
- For installation: damper tape, construction scissors.
For dismantling you will need a hammer drill.
Single-purpose equipment for a given type of coating:
- Continuous: concrete pump, large containers, grinding machine, mixing attachment.
- Self-leveling: construction mixer, containers, spatula, roller.
- Dry: knife, glue, screws, screwdriver, putty.
Laying waterproofing
How to fill the floor in an apartment yourself if there are significant gaps in the base? The areas where walls meet floors are considered particularly vulnerable. Areas near communications are also considered weak. Here we lay waterproofing.
To do this, we use the following types of water protection:
- Films and rolls. These are the most common types. These are polymer membranes consisting of many layers. They also have thermal insulating properties.
- Liquid. These are great pore filling products. It turns out a thin water-repellent film
- Mastics. These are adhesive plaster mixtures. Their bases are polymers, resins, liquid rubber. The mastic forms a powerful waterproof layer.
- Powders. They use plasticizers and binders. They need to be diluted with water according to the instructions.
Do-it-yourself screed construction technology
During renovation or construction of a private house, it is possible to make the screed layer yourself. To do this you need to follow a simple algorithm.
Preparing the base
If there is an old screed layer, it must be dismantled. Then the procedure depends on the type of base. If it is soil, then the procedure is as follows:
- Remove soil.
- Make a layer of sand, compact and level.
- Arrange crushed stone preparation, compact it.
If the base is a reinforced concrete slab, then:
- Seal the gaps between the slabs with mortar.
- Apply primer.
- Perform waterproofing if necessary.
First you need to prepare the base of the floor.
Marking
Marking is done using a laser level. It is necessary to determine the correct screed height in each room. Marks are made on the walls according to the required level. Next, the perimeter of the screed is drawn so as not to use a laser every time.
Installation of beacons
Beacons are special strips that are placed at the same level so that the surface of the final structure is level. As beacons, strips made of any material are used, but most often made of galvanized steel. The main condition is a smooth surface of the product. Fastenings for lighthouses are made of gypsum or cement mortar. The plank is laid on the mortar mound and pressed until it matches the mark on the wall. The slide hardens in one day.
Leveling the solution is carried out according to the rule. Therefore, the beacons are installed at a distance equal to the length of the instrument. It is customary to retreat 30-50 cm from the walls.
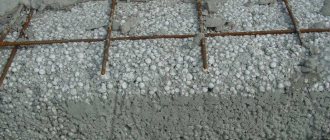
Reinforcement
The reinforcing frame is a mesh of wire and reinforcement. It is suitable for rooms with heavy loads, when installing floating screeds, heated floors, etc. The frame is laid in the middle of the screed. For this purpose, special clamps are used. Instead of a reinforcing frame, you can use fiber-reinforced concrete, which already contains elements that increase strength, rigidity and cracking resistance.
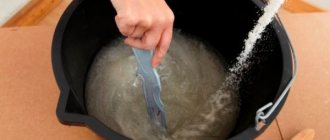
Preparation of the solution: proportions, volume, mixing
Today you can purchase a ready-made dry mixture, dilute it with water in the proportion indicated on the package, and get a ready-made solution.
The solution can be obtained by mixing the dry mixture with water.
You can prepare a thick concrete screed yourself; for this you will need:
- 1 share of cement M400 and higher;
- 2 shares of sand;
- 3 shares of crushed stone;
- 0.5 parts water.
To obtain the desired consistency, it is best to use a concrete mixer. To prepare a cement-sand mortar yourself, you can focus on the following proportions:
- 1 part cement;
- 3 parts sand;
- 1 liter of water.
The exact volume of the solution depends on the quality of the materials used, the thickness of the screed layer, and the size of the room.
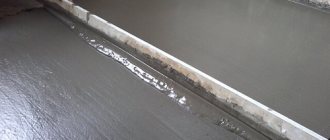
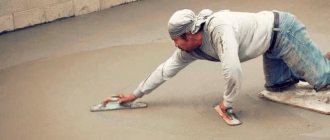
Laying and leveling the screed
The main part of the process is stacking and leveling. This is done as follows:
- Between the two beacons, the prepared solution is poured onto the floor.
- Spread evenly with a trowel.
- Pulls on itself with a rule that fits at least 2 beacons. A prerequisite is to move the tool from side to side.
Laying and leveling the screed is the main part of the process.
For convenience, the process starts from the far corner and moves towards the door.
Stage of making cement or concrete mortar
Making cement mortar is quite simple - it is only important to maintain the ratio. The cement mortar contains four parts of sand and one part of M400 cement. It is in this ratio that the ingredients need to be loaded into a large trough prepared in advance, and then mixed thoroughly.
Stage of making cement or concrete mortar
It is worth noting that for the M500 cement grade, a different ratio must be observed - 1:5.
If the cement mortar is made by hand, it is necessary to add water only after mixing. At the same time, you need a lot of water to make the solution thin enough - it’s easier to lay such a solution yourself.
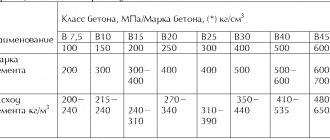
Making concrete mortar is a slightly more complicated procedure. All ratios of ingredients for making concrete mortar can be taken from the table of concrete proportions.
Concrete mixer
The ratio of water in the solution is not indicated exactly, but approximately - what matters is in what environment you prepare the solution. When preparing concrete mortar at home, many people prefer to use screenings instead of sand - in this case, leveling the surface is more convenient and it turns out smoother. Screenings replace both sand and crushed stone, so when determining the required amount of screenings, you can safely sum up the shares of these components.
cement m400 500
Useful tips and general recommendations
Key recommendations for the pouring process and care:
- You can replace the damper tape with roofing material.
- For weak floors, it is best to use a dry screed.
- A layer less than 3 cm thick will be more even and durable if the amount of sand is reduced.
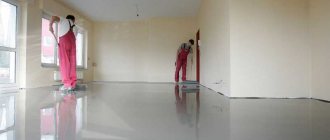
- Do not install decorative flooring earlier than 28 days.
- It is better not to use artificial ventilation for drying.
- Optimal hardening temperatures: +5…+20ºС.
If you strictly follow the algorithm and do not neglect the nuances and details, then the process of creating a screed layer will not cause difficulties.
Floor work
How to pour concrete floors and when should it be done? It is important to know one specific thing here - bedding is not required.
First we study the floor slab. If there are cracks or chips on it, we fill them with a repair compound.
When working with wooden floors, we also repair them if necessary.
We provide any overlap with waterproofing - thick (200-300 microns) polyethylene film.
Next we arrange thermal insulation. Suitable for these purposes: basalt wool. expanded polystyrene or polyurethane foam.
We put up beacons, fill the composition with a density of 10 cm. Further actions are identical to those for working with a floor on the ground. If there are any incomprehensible moments, you can watch a video of how floors in an apartment are poured over the ceilings.