Home / News / Floor screed is easy to do - with a mixer and concrete pump
One of the most important stages during the renovation of any room is floor screed. It allows you to level the surface, which subsequently significantly affects the speed of repair and finishing work. Unfortunately, it is not always possible to achieve good results using traditional technologies, so experts recommend completely mechanizing this process.
If there is a lack of experience, there is a possibility that the surface will be damaged, and this can lead to further waste of money. But the use of special construction technologies, on the contrary, will significantly reduce this likelihood.
For what rooms is floor screed used?
A mechanized screed can be used in absolutely any room, be it one of the rooms in an apartment, a garage or a warehouse. The main materials used to prepare the solution include a semi-dry mixture of cement and sand. Mix a solution of sand (on average, the size of the fraction should be no more than 5 mm), M400-500 cement, fiber fibers, plasticizers and water. Water is added in small quantities, which is one of the distinctive features of this type of screed. It is used to hydrate cement mortar. The thickness of the screed in most cases does not exceed 5-8 centimeters. But this is quite enough to reliably hide communication systems from prying eyes: heating, water supply, thermal insulation.
Conditions for demolition
Before dismantling walls made of foam blocks, you should make sure that they are not load-bearing. Such structures cannot be broken, since they bear a load-bearing load. If the building continues to be used, the dismantled walls can only be non-load-bearing.
You can break lightweight interior partitions made of foam blocks that do not take on the load from the floors. If the blocks at the base of the wall must be removed only partially in order to move the door or window opening, an appropriate technical opinion should be obtained. It will be needed if manipulations are planned in relation to the load-bearing wall.
Stages of performing a mechanized screed
All work on laying this type of screed is carried out only by construction companies that have at their disposal all the necessary equipment.
First stage
Includes preparing the surface for installation. At this stage, the floor is cleaned of dust, various debris and other contaminants. Also, the entire area of the room is pre-primed, after which the floor is covered with polyethylene film having a thickness of about 100 microns. This is done in order to prevent uneven hardening of the screed, as well as to ensure a good level of hydro- and sound insulation.
Second phase
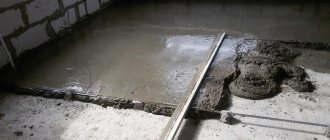
It starts with determining the level of the screed. A horizontal line is marked across the entire area of the room, or in other words it is called the “zero level”. Another horizontal line is measured from it, which is called the screed level.
Third stage
At this stage, the solution is mixed. It is recommended to carry out it at temperatures above -5 °C.
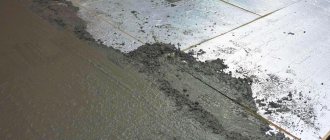
Laying the screed is carried out using special automated equipment. To achieve the best effect, it is recommended to prepare the mixture before starting work. The solution is mixed using a special mechanized device - a pneumatic blower, which simultaneously performs two functions: a mixer and a concrete pump.
All components are loaded into a special container in which the mixing process takes place, then the finished mixture is transported through special rubber hoses to the work site. Most often, a pneumatic blower is placed under the windows of a house or near the entrance to the entrance. All the necessary components are located nearby. It is best to mix the solution outdoors; this will help make the screed installation process more accurate. All preparations take on average 3 to 5 minutes.
Fourth stage
The finished solution is delivered to the installation site.
Fifth stage
After laying the mixture from a pneumatic blower, the screed is leveled using a rule (a special construction tool that is used to eliminate any specific flaws on the surface).
Sixth stage
Within a few hours after leveling, the screed is grouted with a grinding machine.
Seventh stage
At this stage, expansion joints are marked. These works are carried out in accordance with the previously drawn up project.
In rooms with a large area, these seams are made in such a way that the floor surface is divided into squares (rectangles) equal to 15-20 meters.
Pouring the foundation using a mixer
Professional builders know exactly how to pour concrete from a mixer into a foundation. This process is one of the most important for creating the entire structure, as it determines the strength of the base.
Work can only begin after you have a complete set of tools and equipment in your hands. It is unacceptable to have downtime in work - this leads to a decrease in the characteristics of concrete and a deterioration in the final result.
Pouring the base is divided into the following stages:
- Preparing the construction site. This stage includes site planning, drawing up a movement pattern for the mixer when pouring the base, and clearing the area of debris.
- The mixer must have free access to any part of the site.
- You must have a special tray on hand for pouring the foundation.
- Install the formwork.
- Inspect in detail the condition of the mixture in the mixer.
- Start pouring the concrete mixture.
- Periodically, the mixture should be compacted and processed with a vibrator - this reduces the risk of cavities forming in the body of the foundation.
- The top layer of concrete, after finishing the pouring, should be leveled with a trowel.
- Cover the created surface with a film to protect it from exposure to precipitation.
- After some time (depending on the brand of concrete and temperature conditions), several rows of bricks should be laid on the top layer of the base. This is important for optimal shrinkage of the base and displacement of voids.
- Before starting the next stage of construction, you should wait for the specified curing period.
Correctly completed pouring of a strip foundation with a mixer makes it possible to obtain a durable structure that meets the requirements of the project.
Why should you choose a mechanized floor screed?
- Minimal time costs. Thanks to the use of automated equipment, the screed laying process significantly reduces the work time.
- Saving money. Installation of semi-dry floor screed is possible anywhere, since the finished mixture can be delivered over long distances.
- High quality screed. This is achieved due to the operating principle of the pneumatic supercharger.
The process of transporting the finished solution is carried out directly into the room, as mentioned earlier. This allows you to increase the degree of adhesion of the mixture to the floor plane.
- Great end result. If all requirements for screed installation are met, the result will be a perfectly smooth coating that will serve the owners for many years.
Preparatory work for dismantling
Before dismantling a foam concrete wall, you should make sure that the structure does not have active electrical wiring. You can verify the presence or absence of communications in the partition using a metal indicator or an electromagnetic field indicator. It would be good if you had a wiring detector available. A non-contact AC voltage tester also does an excellent job.
If wires were found in a part of the wall that needs to be demolished, but there is confidence that the communications will no longer be used, the apartment must be de-energized. All sockets and switches are removed from the wall. It is also necessary to remove baseboards and other decorative elements.
If there is an opening in the wall, remove the door block and trim if possible. It will be more convenient for craftsmen to work if the wallpaper is removed from the surface. This will allow you to mark up, at least visually. According to it, it will be possible to remove individual sections of the wall in stages.
Attention! It is recommended to pre-mark a wall made of foam blocks into small rectangular or square sections. Dismantling will be carried out along them, which should begin from above.
Preparing the base
The concrete floor in the garage is made on the ground. But more often than not, the soil itself is not a reliable and dense enough foundation, so a foundation is required - a cushion of crushed stone and sand. Preliminary and mandatory work - removal of the fertile layer, down to clean soil. The fertile layer removes organic matter and most of the microorganisms, while clean soil contains a minimal amount of them.
The first stage of installing a concrete floor in a garage is removing the fertile layer
Zero level mark
As a result, you get a pit of some depth. Crushed stone and sand will be poured into it, but in order to understand whether its depth is sufficient or excessive, you need to decide on the “zero” level of the floor. It is convenient if the floor is level with the gate threshold. Often they do it just below the threshold, but then they will have to somehow drain the water, and it will definitely be there, if not in spring-autumn, in winter, from melted snow, for sure.
Mark the zero floor level along the perimeter of the walls. The most convenient way to do this is with the help of a plane builder (electronic level or level). Turn on the device to display the horizontal plane, set it at the desired level and draw along the beam.
It's easier to work with a laser level
If you don't have a laser level, use a water level. It’s not so convenient: you have to move the mark many times across all four walls. These marks are connected by a straight line; instead of a ruler, you can use a bubble level, at the same time you can check whether all the marks have been placed correctly.
The water level will have to transfer marks to all walls
Calculation of the thickness of ASG layers
As a result of this work, we have a foundation pit and a zero floor level. Now you can calculate how thick the layers are needed to reach the desired height. You need to start from the following dimensions:
In total, it turns out that the pit should be no shallower than 25 cm deep. And this does not take into account the floor covering. If you simply treat the concrete floor with impregnation or paint, then no additional centimeters are required; for any other coating, add the required thickness.
Having received a specific figure, you can plan the amount of sand and crushed stone. If the layers turn out to be very large, you can add soil to the bottom and compact it (but not the fertile layer). If the depth of the pit is not enough, we remove some more rock.
You can put marks on the walls of the garage, which will help you control the thickness of the layers. If the width of the garage is small - 2 meters or so - these marks are enough. If the garage is wider, you need to put a few more stakes in the middle and mark them too. It is clear that all marks must lie in the same plane. This is again convenient to do using a level. Another way is to take a flat plank or board and apply it to the marked marks. Place a level on top of the bar/board. If everything is set correctly, the bubble will be in the middle.
If you are planning to make a hole in the garage, now is the time to dig a pit for it. If the pit has brick walls, you can immediately pour a concrete floor in it. While you are pouring concrete under the garage, it will gain the required strength and you can lay out the walls. They can be driven out after filling the floor with a cushion of crushed stone and sand.
Materials for backfill
For a normal concrete floor in a garage, it is better to use crushed stone rather than gravel. Gravel, with its rounded edges, you will never compact to the required degree. And if the foundation under the concrete is unstable, even a thick reinforced slab will burst. That’s why we import crushed stone, medium and fine fraction. Average 60-70%, the rest - small.
The cushion consists of compacted crushed stone and sand
There are no special requirements for the quality of sand for pillows. It is important that it is free of clay inclusions, but it can (and should) be sifted before laying.
Making a pillow for a concrete floor
The first step is to level the bottom of the pit. We remove uneven surfaces, fill in depressions, and raise the level to the horizon. Do not think that the concrete floor in the garage can be damaged. It can be done, but then the slab will crack and you will have to redo it.
Now we take a vibrating platform (you can rent it) or a manual tamper and compact the soil. Along the way, once again leveling the plane. When the soil is compacted, crushed stone can be poured. They don’t fill the entire volume at once - it’s normal not to compact 10 cm. The maximum layer is 5 cm, but 3-4 is better. We fill in the required part, distribute it, level it (with a rake) until it reaches approximately the same thickness. We take a tamper or vibrating plate and tamp it.
It is better to compact with a vibrating plate
This compaction of crushed stone when installing a concrete floor in a garage is very important - a certain amount of crushed stone is driven into the ground. As a result, it becomes even more dense, the load-bearing capacity increases, and the possibility of subsidence is eliminated. Tamping is considered sufficient if you step on the surface and leave no traces. In the same way, all portions of crushed stone are compacted, bringing them to the required thickness.
Sand is poured onto the compacted crushed stone. It is also divided into parts of 2-3 cm. The peculiarity of compacting sand: it must be moistened, they also say - spilled. The wet sand is compacted, again focusing on the layers.
Now you can start forcing out the walls of the pit, if there is one. They are brought to the level with the finished floor or even slightly higher - so that you can wash the car right in the garage without fear of water getting into it.
Waterproofing
Waterproofing the floor before screed
Everyone knows about the ability of water to go down, but water can also go up due to capillary rise. The insulator can be glass roofing material, roofing felt, foil insulation, waterproofing or polyethylene film with a thickness of 250–300 microns. The waterproofing strips are laid overlapping the sand layer, with an overlap of approximately 100–150 mm.
It is better to glue the joints of the canvases together with construction tape.
The material is laid carefully, in an even layer, so that there are no dents or folds. The edge of the canvas needs to be placed on the wall, slightly larger than the height of the future floor. So that when laying and pouring the floor, the edge of the waterproofing material does not interfere and is not accidentally damaged, it is better to fix it on the wall of the garage. It is forbidden to cut waterproofing material.
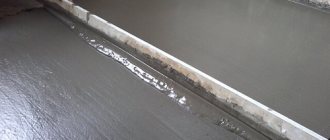
Clearance and angle
Guides (for pouring the floor in the garage, taking into account the required slope) should be positioned towards the exit gate or drainage well. The slope gradient should be 1.5 - 2% per 1 m. As guides, you can use smooth long wooden beams or rectangular metal pipes, which, after the concrete has hardened, are pulled out, filling the resulting grooves with cement mortar. Sometimes the guides are laid out with mortar, giving them the required height and angle of inclination of the future surface. With this method, it is necessary to withstand their hardening time, but after pouring they will remain inside, and the floor will look monolithic.
Before starting concreting, it is imperative to leave compensation gaps at the walls of the garage; this is especially important for a small coverage area. For this purpose, strips of polystyrene foam are used. A strip thickness of 50 mm will be sufficient.
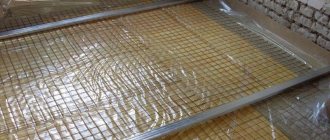
Reinforcement
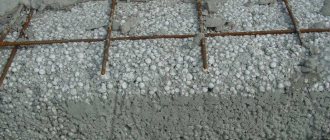
Since the loads are expected to be serious, the concrete floor in the garage is reinforced. For passenger cars, you can use a ready-made mesh made of wire 7-8 mm in diameter, the cage size is 15 cm. To obtain a single reinforcing system, pieces of the mesh are laid overlapping each other by one cage. The two meshes are connected to each other with plastic clamps or special knitting wire.
The garage floor is waterproofed with waterproofing and the reinforcing mesh is installed on the bricks.
One more point - the mesh should be located in the thickness of the concrete, approximately in the middle. Simply laying it on a film would be wrong - the metal does not corrode inside the concrete only if it is located at a depth of at least 3 cm. To ensure that the concrete floor in the garage lasts a long time and does not crack, the mesh is raised above the waterproofing by 3-6 cm. There are special stands for this, but more often half bricks are used. They are just 6 cm thick. Place them under the reinforcing mesh so that it does not sag too much.
Price for dismantling brick walls and foam block walls
If you don’t want to do the dismantling work yourself, you can use the appropriate services of specialists. Usually, the demolition of a wall is also accompanied by the removal of garbage. If there is a foam block partition, workers will be ready to demolish it for 350 rubles. per square meter. But garbage removal is paid at a rate of 250 rubles. in an hour.
In the case of a brick wall, the price may vary depending on the thickness of the masonry. If it is half a brick, you will have to pay 350 rubles per square meter. But laying 1 brick and dismantling it will cost 500 rubles. per square meter. Workers will be ready to demolish a partition of one and a half bricks for 740 rubles. per square meter.
If there is a load-bearing wall of 2 bricks, the consumer will have to pay 900 rubles for its dismantling. per square meter. Typically, a team of workers tries to use powerful equipment, such as hammer drills and tools with diamond blades. In order to deal with particularly strong partitions, a jackhammer is usually used.