An armored belt is a reinforced concrete structure that is designed to strengthen the walls of a house. This is necessary to protect the walls from loads arising under the influence of external/internal factors. External factors include wind exposure, terrain slope/hilliness, floating soil and seismic activity of the earth. The list of internal factors includes all household construction devices used in the interior decoration of the house. If you make an armored belt incorrectly, then due to these phenomena the walls will simply crack, and what’s even worse, they will corrode. In view of this, it is very important to be aware of how to make an armored belt. The types, purpose and method of installation of the armored belt will be discussed in this article.
Tools and materials
Before starting work, you should prepare the following tools/materials:
- Fittings.
- Cement.
- Sand.
- Crushed stone.
- Wire for tying reinforcement.
- Boards.
- Self-tapping screws.
- Brick.
- Shovel.
- Concrete mixer.
- Crowbar/crowbar.
- Welding machine.
To ensure that all the work you perform is done with high quality, we suggest that you familiarize yourself with the techniques for manufacturing reinforced mesh/framework and formwork.
Use of chemical anchors
To attach a wooden beam to a wall where there is no reinforced belt, you can use chemical anchors. They appeared on the market not so long ago, but have managed to prove themselves well. Chemical anchors are divided into the following types:
- Capsule design. An ampoule containing a special composition is inserted into the hole made under the anchor. After contact with air it begins to harden. A pin is driven into the prepared hole, which breaks the tightness of the ampoule. After 30-45 minutes, the composition in the hole polymerizes, forming a reliable connection.
- With cartridge. The anchor design contains a pipe filled with a polymer composition. A dispensing gun is used to supply the mixture into the hole. The polymer hardening time is about 45 minutes.
Comparison of conventional metal and chemical anchorSource ack-nn.ru
Chemical anchors, despite their high cost, are very reliable. The service life of such connections reaches 50 years. The polymer composition penetrates deep into the pores of aerated concrete, providing a high degree of adhesion.
Manufacturing of reinforcing mesh/frame
In order for the reinforced belt to be of high quality, and therefore the house to be reliable, you need to know how to properly make the reinforced mesh/frame. The connection of the reinforcement bars to each other is carried out using a knitting wire, and not a welding seam. This is due to the fact that during welding, the area near the seam being made overheats, which leads to a weakening of the strength of the reinforcement. But you can’t do without welding seams when making mesh. The middle and ends of the frame are welded, while the remaining connecting nodes are tied together.
The frame is laid in an armored belt.
The rods are fastened to fix the reinforcement in the required position when pouring concrete. For these purposes, thin wire is used; the strength of the mesh/frame does not depend on it.
For the manufacture of armored belts, only ribbed rods are used. Concrete clings to the ribs, which helps to increase the load-bearing capacity of the structure. Such a belt can work in tension.
To make a frame, take 2 wires 12 mm thick and 6 m long, while for transverse reinforcement you will need rods 10 mm thick. The transverse reinforcement should be welded in the center and edges. The rest of the rods are simply knitted. After making two meshes, hang them so that a gap is formed. Weld them from the edges and in the center. This way you will have a frame. There is no need to weld the frames to make the belt. They are laid with an overlap of 0.2–0.3 m.
Design requirements
The main requirements will be:
its strength, stability and lack of fragility;- simple to manufacture design and easy removal;
- formwork density, absence of cracks, flat surface adjacent to the concrete;
- individual formwork elements must be standard so that, if possible, they can be used again;
- the fence must be installed horizontally and level;
- There should be no gaps at the junction of the shields.
Reference! When installing the structure, a minimum of nails should be used; it is better to connect the elements with wedges or pressure boards.
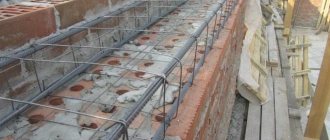
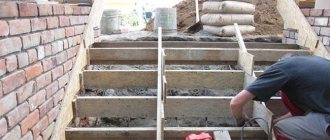
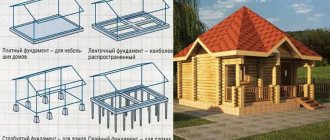
Grillage
Initially, you should determine the depth of the foundation. This parameter depends on the type of soil, the depth of its freezing, as well as the depth of groundwater. Then you should dig a trench around the perimeter of the future house. This can be done manually, which is long and tedious, or with the help of an excavator, which is quick and efficient, but entails additional costs.
After special equipment is used, the bottom and walls of the trench should be leveled to solid ground. The surface should be as hard and smooth as possible.
Now you need to form a sand cushion, the height of which should be 50–100 mm. If it is necessary to backfill sand more than 100 mm, it must be mixed with crushed stone. This activity may be necessary to level the bottom of the trench. Another way to level the bottom is to pour concrete.
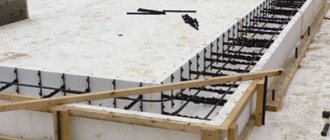
Making a frame for a grillage
After filling the sand cushion, it must be compacted. To complete the task faster, pour water on the sand.
Then the reinforcement should be laid. During the construction process, under normal conditions, you need to use reinforcement of 4–5 cores, the diameter of each rod should be 10–12 mm. It is important that when pouring the grillage for the foundation, the reinforcement does not touch the base. It must be recessed in concrete. Thus, the metal will be protected from corrosion. To achieve this, the reinforcing mesh should be raised above the sand cushion, placing brick halves under it.
Grillage for a strip foundation
If you are building a house on heaving soil or where the groundwater level is high, then the grillage should be made more durable. To do this, instead of reinforcing mesh, you should use a reinforcement cage. He imagines 2 meshes consisting of 4 wires with a diameter of 12 mm. They should be laid below and above the armored belt. Granular slag is used as a base instead of a sand cushion. Its advantage over sand is that over time, granulated slag turns into concrete.
To make the mesh, a knitting wire is used rather than a welding seam.
For the grillage, M200 concrete should be used. To ensure that the filling height corresponds to the specified value, install a beacon in the trench - a metal peg equal in length to the height of the grillage. It will serve as your guide.
Installation of permanent formwork
The easiest option for self-constructing an armored belt. The use of ready-made blocks allows you to quickly create a concrete structure.
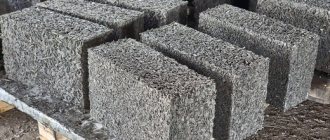
The use of polystyrene foam blocks helps to get rid of cold bridges that inevitably appear in an unprotected reinforced concrete belt.
Formwork blocks are produced in different sizes and shapes, which facilitates quick and easy installation of an armored belt of the required size. For simplicity, they are equipped with tongue-and-groove locks, this further simplifies the work.
Base armored belt
Before erecting walls, a basement reinforced belt should be poured onto the foundation. It must be poured along the perimeter of the building along the external walls, but this cannot be done along the internal load-bearing walls. The base armored belt serves as additional reinforcement of the structure. If you have filled the grillage with high quality, then the plinth belt can be made less durable. The height of the armored belt is 20–40 cm, concrete M200 and higher is used. The thickness of two-core reinforcing bars is 10–12 mm. The reinforcement is laid in one layer.
If you need to strengthen the base belt, then use reinforcement of greater thickness or install more conductors. Another option is to lay the reinforced mesh in 2 layers.
Formwork for the basement armored belt
The thickness of the basement and external walls is the same. It ranges from 510 to 610 mm. When pouring the base armored belt, you can do without formwork, replacing it with brickwork. To do this, you need to make half-brick masonry on both sides of the wall. You can fill the resulting void with concrete after placing reinforcement in it.
In the absence of a grillage, it is useless to make a base armored belt. Some craftsmen, having decided to save on the grillage, strengthen the base belt, using reinforcement of a larger diameter, which supposedly improves the load-bearing capacity of the house. In fact, such a decision is unreasonable.
The grillage is the foundation of the house, and the plinth belt is an addition or strengthening of the load-bearing capabilities of the reinforced belt for the foundation. The joint work of the grillage and the plinth belt guarantees a reliable foundation even on heaving soils and with a high level of groundwater.
Stages of foundation construction
To arrange permanent formwork during the construction of the foundation, several steps will need to be completed:
- A plan for the future structure is being drawn up. The foundation boundary is marked on the site. Particular attention must be paid to the corners. They are carefully verified to the building level.
- Dig a trench 500 mm wide. For the construction of a foundation with permanent formwork, a depth of 400 mm will be sufficient. At the bottom of the trench, the soil is leveled with all care. If this is not done immediately, subsequent attempts to level the foundation surface will be unsuccessful.
- The bottom is lined with a drainage cushion of sand and gravel. They are poured to a height of 150 mm. The layer is leveled for subsequent uniform load of the building. The pillow will additionally perform the work of the drainage system.
- Reinforcing bars are installed vertically inside the trench. They will serve as clamps for the first row of polystyrene foam blocks.
- The cushion is poured with a small layer of concrete, which will become the basis for the subsequent installation of blocks and a perfectly flat surface for the construction of the foundation.
- The first row of formwork is installed on the concrete surface. The blocks are connected by jumpers. It is advisable to form corners for pouring concrete from industrial corner blocks. They will prevent the appearance of “cold bridges” and create clearly defined angles for future walls. The installation is completed by placing the reinforcement in a vertical position in special grooves.
- All subsequent rows are fastened with a special compound, the sides are aligned exactly at the vertical level. The side surfaces of the blocks must match.
- The cavities inside the blocks are filled with concrete. It needs to be compacted, this can be done using a deep vibrator. The surface of the upper concrete layer is leveled with a trowel.
Interfloor
An armored belt must also be made between the wall and the floor slabs. It is poured along external walls with a height of 0.2 to 0.4 m. Interfloor armored belt allows you to save on door/window lintels. They can be made small and with a minimum of reinforcement. Thus, the load on the structure will be distributed evenly.
If an armored belt is installed on walls made of poorly load-bearing material, the load from the floor slabs will be distributed evenly along the entire length of the walls, which will have a beneficial effect on their strength characteristics.
Formwork for interfloor reinforced belt
Reinforcement of the interfloor belt is performed with a mesh of ribbed reinforcing bars 10–12 mm thick in 2 cores. If the thickness of the walls varies between 510–610 mm, then double-sided brickwork can be used as formwork, as for the base belt. But at the same time, backing bricks should be used for internal masonry, and facing bricks for external masonry. In this case, the armored belt will have a width of 260 mm. If the walls are thinner, the backing brick should be laid on edge or wooden formwork should be used instead, and the facing brick should be laid on the outside in the same way as in the previous case.
Video description
The advisability of using an armored belt or its absence is described in the following video:
It is recommended to fasten the Mauerlat to aerated concrete without an armored belt using anchors 500 mm long. The installation technology is as follows:
- A waterproofing layer is laid between the wall and the wooden beam. It will prevent the penetration of moisture, which leads to the development of mold. To create waterproofing, you can use roofing felt.
- The wooden beam is laid in its design position. Markings are made to indicate the installation locations of the rafters.
- Taking into account the position of the rafter legs, holes are made for installing anchors.
- The fastening element is driven until the washers under the nut stop.
- The anchors are tightened tightly, ensuring the rigidity of the created structure.
Under the Mauerlat
The armored belt can be poured under the Mauerlat only after the glue/mortar for masonry walls has hardened. The technology used to lay the reinforced belt on aerated concrete differs in the formwork design, but we will talk about this a little later. The production of wooden formwork is carried out according to a scheme already familiar to you. Concrete is prepared according to the following formula: 2.8 parts sand to 1 part cement and 4.8 parts crushed stone. Thus, you will get M400 concrete.
After filling, eliminate any remaining air bubbles in the mixture. To accomplish these tasks, use a construction vibrator or poke a rod into the liquid mass.
Mounting the Mauerlat
When constructing a monolithic armored belt, the rules for fastening the Mauerlat must be observed. During the installation of the reinforcement frame, vertical sections should be removed from it to the height specified in the project. The reinforcement bars should rise above the reinforced belt by the thickness of the Mauerlat + 4 cm. Through holes must be made in the beam equal to the diameter of the reinforcement, and threads should be cut at its ends. So, you will get a reliable fastening, which will give you the opportunity to carry out high-quality installation of a roof of any configuration.
Pouring concrete
To fill the armored belt, use a solution prepared on the basis of concrete of at least M200 grade. The mixture can be ordered from the factory or prepared independently. For concrete of a grade not lower than M200, the proportions are as follows: part M400 cement, three parts sand, 5 parts crushed stone. If concrete grade M250 is being prepared, the ratio is as follows: part M400 cement, two parts sand, 4 parts crushed stone.
It is advisable to add water to concrete in small quantities, since otherwise the structure of the armored belt in a house made of aerated concrete may not be strong enough. It is better to add a plasticizer. The water ratio should be approximately this: for 10 parts of cement, take 5-7 parts of water. When preparing the solution, it is advisable to vibrate it with a special vibrator or poke it with a bayonet made from a piece of reinforcement.
The armored belt is poured one time to ensure the solidity of the structure (we get a monolithic belt). While the concrete is setting, it must be periodically sprayed with water to prevent cracks from appearing as it shrinks.
After removing the armored belt formwork, wait for the concrete to fully gain strength (up to 28 days) and continue work: laying partitions, walls, roofing, etc.
An armored belt in a house made of aerated concrete is a mandatory structural element, which in the future will provide the building with sufficient rigidity, strength, and a long service life. Provided the work is carried out correctly using high-quality materials, it is possible to achieve the best result and protect the aerated concrete structure from any loads and external negative influences, including earthquakes.
Reinforced belt for aerated concrete
Aerated concrete is an alternative to brick, which has high thermal insulation qualities along with low cost. Aerated concrete blocks are inferior to brick in strength. If when installing an armored belt on brick walls it is not necessary to pour concrete, since the reinforcement is laid during the laying process, then with aerated concrete things are different. How to make an armored belt on wooden formwork has already been discussed above, so in this subsection we will look at how to make a reinforced belt from U-shaped aerated concrete blocks D500. Although it is worth noting immediately that this technology is more expensive.
In this case, everything is extremely simple. Place the blocks on the wall as usual. Then reinforce their central part, and then fill it with concrete. Thus, the walls of your home will be more durable and reliable.
If you still have questions on the topic, then ask them to a specialist working on the site. If necessary, you can consult with our expert about filling the armored belt. Do you have personal experience? Share it with us and our readers, write comments on the article.
Features of preparatory activities
A serious requirement when constructing a belt reinforced with steel bars is compliance with the dimensions. The width should correspond as much as possible to the thickness of the walls, representing a square section structure with a side size of at least 250 millimeters. If the construction of the building is carried out from aerated concrete, then the final row is laid with special blocks of a U-shaped configuration. This chain is a formwork for filling with concrete mortar. In a situation where the construction of a house is carried out from brick, the external contour is formed by installing bricks at half the thickness, and the internal contour is made from boards.
When constructing a frame, pay attention to its continuity along the entire perimeter of the object. The general roofing system of a house includes special elements: ridges or ridge racks resting on other walls of the building that are not permanent. In this situation, a reinforcement frame should also be built on them. Check the horizontalness of the top edge using a water level.