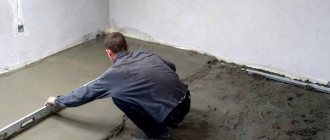
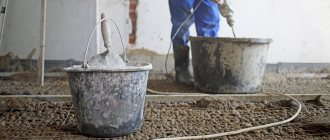
The rough or finishing floor covering - concrete screed, is the most popular type of floor for outbuildings, garages, rooms with high humidity, and also the only possible rough floor covering for residential premises in the event of destruction of the wooden floor by fungus.
Considering that the concrete for the screed can be prepared and laid on your own, a concrete screed can be called one of the most “budgetary” options for obtaining a strong and durable floor.
What is needed for the solution
To mix a classic concrete mortar for floor screed, you will need cement, sand and water. Plus, various plasticizers can be added to them to improve the plasticity and strength of concrete. But usually at home it is customary to do without these additives.
In construction, it is also common to add filler in the form of gravel or crushed stone to a cement-based solution. However, concrete for screeding a subfloor in a cottage or apartment is mixed without them.
Additives for screed
Its basis should be only a fine-grained cement-sand mixture (sand concrete, CPS). Inclusions larger than 1.5 mm are not allowed here. Moreover, if a mixture is being mixed for pouring a cement screed in a garage, then adding small crushed stone to it is permitted. In living rooms it is possible to use only expanded clay, and then only as a thermal insulation bedding underneath.
Features of preparing cement mixture
To reinforce the floor screed, a metal mesh or polyethylene fiberglass measuring 12–18 mm is used. The first option is laid on the floor for further pouring with a cement mixture, and the second is added directly to the CFB when mixed in a proportion of 0.3 to 1.5 kg per cubic meter of concrete.
Tools for preparing screed mortar will require:
- trowel and shovel;
- construction mixer or drill with an attachment;
- bucket or other container for mixing.
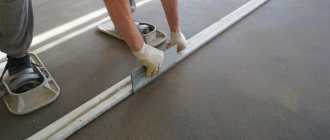
To directly pour and level the mortar on the floor, you also need a rule and a grater. Plus, to perform a monolithic screed you need a building level and beacons. It doesn't hurt to have a tape measure with a pencil on hand.
Ingredients for concrete screed
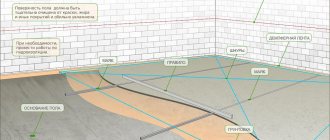
Arrangement of beacons and guides at zero level
The guides are set using metal profiles. It is better to use galvanized U-shaped or T-shaped material that is resistant to bending. This will provide a solid basis for moving the rule.
The most effective installation methods:
- using self-tapping screws - an accurate and simple solution. Starting from the far wall of the room, a chop cord is stretched between the opposite enclosing structures. A distance from the corner of 250-300 mm is maintained. The reference point is strictly at the zero level. The cord should not sag;
- At the intersection of the bevel and the guide line closest to the wall, drill a hole, hammer in a dowel, and insert a self-tapping screw. The top plane of the cap must correspond to the zero level. Such actions are duplicated on the opposite side of the room closest to the exit;
- Thus, two self-tapping screws define the guide line. They are connected by a tightly stretched beating cord running along the top of the caps;
- in this segment, mark and drill holes for dowels in increments of 350-400 mm;
- The heads of the screws must coincide with the tensioned cord. Construction level control is required. If necessary, adjustments are made;
- in the same way, a line of self-tapping screws is arranged along the opposite guide, then on the intermediate ones. The level check is carried out horizontally, in the transverse, longitudinal direction;
- when a single zero level is reached in all areas, the cords are removed;
- mix a thick concrete solution;
- the solution is applied in slides along the line of screwed-in screws, then a profile is applied, which is pressed into the solution. The transverse flange of the guide should rest against the screw head. The profile should “sit” on the solution evenly on all sides.
You can start reinforcing and pouring the screed when the solution has hardened and the guides have been fixed.
Composition and proportions of concrete
To calculate the consumption of components for screed mortar and their proportions, you must first determine the required class of concrete. At a minimum, according to SNiPs, it should be B12.5 (M150), but it is better to initially mix its more durable analogue B15 (M200). At the same time, such a mixture for floor screed can be prepared from different brands of cement, the choice of which directly determines the amount of sand required. If the mixing technology is not followed, the strength and wear resistance of the screed may suffer. For concrete B15 (M200), the optimal proportion of mixed components is the ratio of sand to cement M300 or M400 - 3:1.
Calculation of proportions for concrete screed
Moreover, if you add more of the latter, the solution will set faster. It is more difficult to work with such a mixture, and the slightest delay in its preparation will inevitably lead to the solidification of the liquid composition in the bucket. And if you don’t add a little bit of cement, the floor screed layer will be less durable.
According to the standards, the minimum grade of concrete should be as follows:
- M150 – for leveling layers;
- M200 – for pouring polymer coatings from above;
- M200 – with underlying heat and sound insulation.
Material consumption and proportions for screed
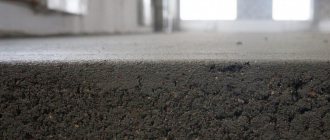
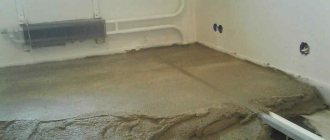
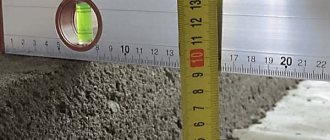
According to building regulations, the thickness of the cement screed must exceed 20 mm. But if it involves laying pipelines for a water-heated floor or water supply, then the concrete layer increases the diameter of these pipes by at least 45 mm.
The final choice of characteristics and thickness of the cement-sand screed depends on the purpose of the room, the type of finishing coating and the characteristics of the base. For the floor in an industrial building, it will have to be made as strong and thick as possible. In a private house and apartment, the loads are completely different. Here you can save a little on the rough layer by making it thinner and from concrete of lower strength.
Advantages of different types of screeds
Preparatory work
If you cheat at the preparatory stage, further work may go down the drain.
Each stage of installing a concrete floor in the garage is important. There are no trifles in this matter. The quality of further work largely depends on how correctly the preparatory work is completed.
Step 1. Calculation of the pit depth. On average, to fill a floor with a thickness of 10 mm, you will need to go 20-30 cm deep into the ground.
Step 2. Marking the floor level. Using a level, find a point 10 cm above the level of the existing floor in the garage. Focusing on it, horizontal lines are drawn along the walls (or marks are made) with chalk or a marker.
Step 3. Preparing the pit. Includes a set of works for excavating soil to the calculated depth.
Step 4. Level the bottom using shovels.
Step 5. Compact the soil using a vibrating plate or heavy objects. If necessary, dig a pit for an inspection hole. Its parameters:
- width 75-80 cm + thickness of waterproofing layer 30 cm;
- depth - they are guided by the height of the person who will be repairing the car + 30-40 cm;
- length is equal to the length of the car + 120-150 cm.
Requirements and recommendations for floor screed
If the proportion of DSP components is incorrectly selected:
- adhesion of the solution to the base decreases;
- the wear resistance of the screed decreases;
- the strength of the concrete layer deteriorates;
- the risk of cracking of the rough coating increases.
If the plastic pipe for water in the bathroom is incorrectly selected, this can lead to leaks immediately when the tap on the riser is opened. And if you mix the cement mixture for floor screed incorrectly, problems may appear several months after pouring. In this case, both detachment of the screed from the base and its banal destruction are possible.
In order not to make a mistake with the proportions, it is recommended to take ready-made mixtures with cement as the main binding component. The content of all components in them complies with the requirements of building codes. It is enough to add water and the concrete composition is completely ready for pouring.
Proportions for preparing the mixture for screed
Reinforcement
To prevent the concrete from sagging under the weight of the machine, the floor screed is always reinforced. Reinforcement allows:
- strengthen the base of the floor;
- increase the compressive strength of the screed;
- reduce the amount of mechanical loads on the floor;
- reduce the appearance of cracks.
Reinforcement is carried out using reinforcing mesh with a rod diameter of 9 mm, and the size of the mesh cells is 15 mm. The reinforcement is placed on special supports, since the mesh must be inside the concrete screed. The mesh is overlapped and connected to each other with a special wire.
Features of preparing the solution
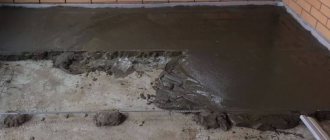
Self-preparing a floor screed solution is done in four steps:
- A mound of sand is poured onto an iron sheet or moisture-resistant plywood.
- At the top of this pile, an indentation is made into which the cement is poured.
- Then water is added there in a ratio of 0.45–0.55 per 1 volume of CPS.
- Afterwards, kneading is carried out with a shovel or trowel until a homogeneous composition is obtained.
Preparation of concrete mixture for screed
To simplify the work, the solution can be mixed in a bucket with a drill or in a concrete mixer. Liquid plasticizers are added to water before it is poured into the cement-sand mixture, and fiber fiber is added at the last stage after obtaining a homogeneous concrete mixture.
Recommendations for preparing the mixture
Before mixing, sand and cement must be sifted. There should be no lumps, foreign inclusions of clay or earth, as well as organic matter, etc. left in them. Any such inclusion will become a stress point in the concrete layer. And the floor screed there will inevitably begin to collapse over time.
You should mix as much concrete at a time as can be leveled in an hour. You cannot keep the prepared solution longer; it will set and harden. Afterwards you will have to throw it away. And this is a consumption of materials unforeseen by calculations. If when connecting a dishwasher to the water supply, it is extremely difficult to overuse pipes, then when working with concrete you need to be very careful. The slightest delay threatens to harden it and throw it away.
Ready-made mixtures for concrete screed
Waterproofing
A flooring with moisture-proof properties is necessary to prevent capillary rise of moisture to the concrete slab.
A waterproofing agent can be:
- hydroisol;
- P/E film – 250/300 microns;
- roofing felt;
- folgoizol;
- glass roofing material
Recommendations for work:
- regardless of what material is chosen for the work, it is laid with an overlap;
- the overlap should be 10-15 cm, it extends onto the walls and remains at the height of the future floor;
- joints must be sealed with construction tape;
- the material should be applied smoothly, without folds;
- The material is carefully folded in the corners; it cannot be cut.
The overlap provides a decoupling between the concrete monolith and the walls and allows you to obtain the required thermal compensation gap.
conclusions
In the article we touched on the main issues related to self-mixing concrete. Now you can prepare it yourself and, taking a proportion of 1:2:3 (cement-sand-crushed stone fractions 5-20) with a W/C of 0.6 - 0.65, you can’t go wrong with strength. In conclusion, one more piece of advice from FORUMHOUSE:
This “folk” method is practiced when laying facing bricks, where high strength is not required from the mortar, but it is completely unsuitable for concrete. To increase the mobility of rigid concrete, use plasticizers. They are inexpensive, and you will see the effect immediately and without compromising the quality of concrete in the long term.
Everything you need to know about self-mixed concrete is collected in one topic: Do-it-yourself concrete: calculation of proportions, reinforcement, formwork.
Source
In what order should you pour the self-mixing ingredients into the concrete mixer?
The volume of Lipon's concrete mixer is 180 liters. He loaded the pear like this:
During the mixing process, we look at the density of the concrete. Add water from the remaining liter. At the finish we throw in 10 liters of crushed stone. The components were poured into 10 liter buckets.
FORUMHOUSE member 7profy shared the proven composition of concrete and the algorithm for pouring components into a concrete mixer.
I make concrete grade M250 in a 180 liter concrete mixer. Concrete composition by weight:
Now, the same concrete volume in 8 liter buckets:
I load the ingredients into the concrete mixer like this:
The mixture does not flow out of the pear. The output from one batch is up to 70 liters of concrete. The mixture is hard. Filled with a deep vibrator. If the crushed stone and sand are completely dry, then add 0.5 liters of water. If there is sand and gravel after rain, then I reduce 0.5-1.0 liters of water. If the mixture in the concrete mixer is overflowing and not overflowing, then there is enough water.
After experimenting, I came up with the following composition: 1 bucket of cement + half a bucket of water + 2 buckets of river sand + 3 buckets of crushed stone with a fraction of 5-20 mm. After gaining strength, the concrete rings when hit by a hammer. But without a plasticizer you cannot mix a rigid mixture. Take this into account!
Self-mixing concrete: blitz answers to the most popular questions from FORUMHOUSE users
1. What should you pour into the concrete mixer first: cement, crushed stone and sand, and then add water, or pour water first?
It seems to me that the components in a concrete mixer should be mixed dry and only then poured with water. So it is possible?
Try it! With this sequence, the mixture will turn out to be lumpy and the kneading time will increase greatly. If you start with water, then everything happens easier and faster.
Exactly! If you pour the dry mixture into a damp pear after the first kneading, it will stick to the walls and will not be washed away with water. You have to pick it out with a shovel.
First pour water, then add crushed stone, cement and sand. Look what happens: water washes away dust and dirt from the crushed stone. The cement is then crushed and mixed with crushed stone and water into a homogeneous slurry. Then everything is mixed with sand. With this method of mixing ingredients, no lumps or unmixed mixtures are formed. Just don’t add all the sand at once, but in small portions and make sure that the previous portion is mixed well.
2. How much concrete will a concrete mixer produce at one time?
I have a 63 liter concrete mixer. How much concrete will he mix at a time and how many components should he load into the bulb?
If you have a concrete mixer with a regular pear, then its useful volume is less than half. Even 30 liters is inconvenient to stir.
In a gravity-type concrete mixer, divide its total volume by 3. If the volume of the pear is divided in half, then excess concrete will fall out of the pear.
I read the following recommendations in the book “Concrete Worker’s Memo” for 1955: “Measure cement by weight, and the remaining parts by volume.” For 1 cubic meter of concrete it will take:
3. Should I bayonet or vibrate the concrete?
Bayoneting concrete is a useless exercise. I poured down the pillars and thought to make do with the means at hand. I attached a rod to the hammer drill and turned on the impact mode. Nothing at all. I bayoneted it, a little better, but still not the same. I went and bought the cheapest deep-throat vibrator. I poured concrete into the hole, turned on the tool and the concrete immediately went down and filled the entire volume. I recommend!
I also poured fence posts. The workers say: “We will pierce it in such a way that a vibrator could not even dream of!” Fine. They dumped 4 buckets of hard concrete into the hole. I tell them: “Bayonet!” They fought with concrete until they were blue in the face. They managed somehow. They swear that the mixture will not be compacted any more. He turned on the vibrator and wow, the concrete went down. A minute later they dumped another half bucket of concrete into the hole. Since then, the workers have cooled down to bayoneting.
Laying thermal insulation
Not every garage is heated in cold weather. Most often, such objects are classified as unheated. However, the operation of the premises does not stop in winter. To eliminate high energy costs (reduce heating costs by 20%) and make the garage more comfortable, you should insulate the floor . This stage is especially relevant when the garage is adjacent to the house.
Most often, the heat insulator is high-density extruded polystyrene foam, 8-12 cm thick . This material is specially designed for such work and functional load. The panels are tightly fitted to each other, the seams are fixed with construction tape.
Preparing the base for a concrete floor in the garage
In the garage, the concrete floor is made directly on the ground. Of course, this is not the best choice, since the soil is not stable enough to make the floor reliable. You must first make a good foundation, reliable and resistant to mechanical stress. You will need to remove the fertile layer, and then pour a cushion of a mixture of sand and crushed stone. In addition, with a layer of fertile soil, all organic matter unnecessary in the garage is eliminated, and the surface is thoroughly compacted.
Marking the zero level
When it’s time for you to dig a pit, it’s time to mark the zero level. The depth of the trench is measured from this, into which you will then lay a cushion of crushed stone and sand. You will also have to take care of water drainage.
The zero level is marked along the perimeter of the walls. You will need a level, an electronic level. The device must be turned on to display the horizontal plane, and then set at the desired level. After this, you can make markings along the beam literally instantly.
Of course, not everyone has electronic or laser levels. It is not necessary to purchase such a device. You can also use a water level. But then you have to work hard. The mark will need to be moved several times, along all four walls. Then the applied marks are connected with a straight line, and the correctness is checked again with a level.
Calculating the thickness of the layers of PGS
When the pit has already been dug and the zero level of the floor has been designated, it is time to accurately determine the optimal height of the trench and the thickness of the sand cushion. Remember some important points.
As a result, it turns out that the depth of the trench must be at least 25 cm. At the same time, we have not yet had time to take into account the floor covering. When you're just going to stain and stain your concrete garage floor, you don't have to take the dimensions of the coating into account.
When you already know what the depth of the pit and the thickness of the sand cushion will be, you can calculate how much crushed stone and sand you will need. When there is a lack of mixture for the pillow, soil can be used for backfilling. It must be compacted well. Just remember: under no circumstances should you fill the fertile soil back.
Tip: make markings
Experienced garage workers offer this solution: a good option is to make markings directly on the walls of the garage. If you mark the thickness of all layers, it will be much more convenient for you to pour the required building material later.
And there is one nuance here. When the width of the garage is approximately 2 meters, markings on the walls will suffice. If the room is wider, you need to additionally place several beacon pegs in the center of the garage, and also make marks on them. Of course, all markings must remain in the same plane. Use a level to check the accuracy of the marks.
Don't have a level? It's not scary either. You can use a method that is common and proven. Just take a plank or board of sufficient length. Apply it to your marks, and place a level on top of it. If the bubble is in the center, you have marked everything correctly, your signs are on the same level.
Materials for the pillow
If you want to make a high-quality floor in your garage, it is better to use crushed stone rather than a gravel mixture. The problem is that gravel has rounded edges, making it much more difficult to compact well. But the main task is to make the base under the concrete stable. Otherwise, even a fairly strong reinforced slab will burst over time.
Take crushed stone of small and medium fractions. You will need approximately 60% medium-fraction crushed stone, and the rest should be fine. Then you will be able to perfectly compact the base under the concrete floor. You need sand without clay inclusions. In addition, it is advisable to sift it before installation.
Laying a pillow under a concrete floor
First of all, you will need to thoroughly compact the bottom of the trench. All irregularities are eliminated, the depressions are filled up, and the level is brought to the horizon. It is important to do everything flawlessly right away so that there are no problems with the floor later.
how to prepare walls for bark beetles indoors
It is advisable to compact the soil using special equipment. You will need a hand tamper. It is best to use a vibration platform. Take care to level the plane. Once the soil is well compacted, it is time to fill in the crushed stone.
Note! The crushed stone does not need to be filled in all at once. Sprinkle it in small layers, about three centimeters each. Carefully level each layer with a rake and then compact it. This is the only way you can achieve the desired result. This is the method of compacting crushed stone that must be used to ensure that your concrete floor is reliable and durable. Crushed stone is partially driven into the soil, it becomes denser, and its load-bearing capacity increases sharply. This way you prevent subsidence of the base of your future concrete floor.
Check that you have compacted the layer well. Just step on it. If no traces remain, the work can be considered completed.
When the crushed stone is completely compacted, it is time to fill in the sand. It is also poured in layers of about 2-3 cm. When compacting the sand layer, it must be wetted. Wet sand compacts much better. When arranging the pillow, do not forget to focus on your markings.
Damper gap
A concrete floor is usually called “floating” if it is laid on the ground. The whole point is that the floor is not connected to the walls of the garage. This is very useful for providing additional stability to the floor. Walls and floors can sag independently of each other, but their integrity will remain intact.
To ensure such mobility, it is desirable to make a damper gap. You will need a special damper tape for this. It needs to be laid around the perimeter of the garage. The strips should be made to protrude slightly above the finish of the concrete floor. Then everything unnecessary is simply cut off.