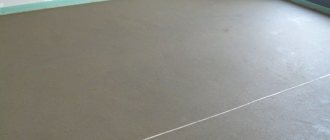
Many technologies and materials are used to install floors and floor coverings, the choice of which depends on the purpose and operating conditions of the room or facility. The universal materials for performing this type of work are cement-sand mortars and concrete.
When choosing, you should take into account the various characteristics of the material for leveling, one of which is the density of the cement-sand screed in kg/m3. This indicator determines the total weight of the screed and the load on the base of the foundation or interfloor ceilings, exceeding which can lead to a decrease in the overall reliability of the building.
Sequence of working with cement screed.
Composition of semi-dry solution
The basis of the semi-dry mortar is sand, cement and water.
This is the base from which floor leveling can be done in many cases. Fiber fiber, various additives and plasticizers are not primary in the composition. Their absence in certain cases is not critical. And, to be honest, you shouldn’t bother yourself with them. Imagine - an ordinary screed in ordinary new buildings - what kind of fiber? - maximum plasticizer (not a fact). And will this make the screed worse for ordinary household use? Of course not. Another issue is the additional financial costs and the need for use. If you can afford it, then using additional components is somewhat acceptable. And only in those cases where it is necessary. Let's look at the main (and not so basic) components that make up a semi-dry floor screed:
- The basis of the foundation is cement. The brand of cement is not so important. The main thing is to maintain the proportions for a specific brand of solution. The higher the grade of cement, the less it will be required in volumetric terms.
- Sand without impurities. To prepare construction powder, quartz, river or construction sand with a fraction of no more than 3 mm can be used. Sand of larger fractions is not desirable with the semi-dry method.
- Water.
- Fiber fiber. Polypropylene fiber acts as a reinforcing mesh, which gives the layer special strength and resistance to mechanical stress. The use of additional components has already been mentioned above. However, I would like to once again dwell on the absurdity of some information, which, unfortunately, is at the top and publicly available. Here is one of the gems: “But, unlike a metal frame, fiberglass is not subject to corrosion and destruction.” Essentially, high-quality (non-rusted reinforcement) placed in mortar or concrete, if used correctly, will outlive the great-grandchildren of the “great” construction experts.
- Plasticizer for semi-dry floor screed. Plasticizers are modifiers for concrete and mortar mixtures designed to increase the fluidity and workability of the mixture. As a rule, these additives are used to reduce the water-cement ratio, as well as for self-compaction of concrete and mortar mixtures.
SNiP cement-sand screed
As for the most common capital method of organizing a coating, the characteristics here are virtually the same as those made using the semi-dry method. And the point, of course, is that the same cement and sand are used here and the addition of the same impurities is allowed. So:
- the thickness of the cement-sand floor screed
should not be less than 2-2.5 centimeters (the larger limit can vary to significant values from 100 mm or more if reinforcement or plasticizers are used); - the weight of cement-sand screed per 1 m2
with a minimum layer is 40-50 kg (higher ones can be lightened with various additives, for example, polystyrene foam granules); - the strength of the cement-sand floor screed
is enviable, like that of any other capital structure (the tabular indicators of a conventional mortar after hardening are from M150 to M180 - this is quite enough even for moving heavy equipment); - the density of the cement-sand screed (thermal conductivity)
is on average 2000 kg/m3 (if everything is done in compliance with the necessary details).
All of the above indicators are completely optional for people whose professional activities are far from construction. Contact us and entrust all calculations to our specialists. You can be sure that they will offer the most profitable and technologically advanced solutions in any specific case. Everyone who contacts us will always have the opportunity to take advantage of:
- attractive prices;
- prompt execution of work;
- many years of experience of employees;
- professional consultations;
- official quality guarantee.
Call! You will like our conditions!
To create a high-quality and durable foundation for any finishing floor covering, it is necessary to determine the load-bearing capacity of the entire structure.
The weight of the screed is quite large, and therefore it puts a lot of pressure on the base of the structure.
In cases where the work is not carried out using a ready-made mixture purchased in construction stores, but a composition prepared independently, accurate calculations should be made taking into account the characteristics of the materials used.
Calculation of the amount of material and proportions
There are two types of mixtures used in construction: regular and ready-made. Conventional mortar is used to level not only the floor, but also to level the walls. The simplest standard solution of self-leveling floor screed is prepared using M300 grade cement and clean sand, which has a medium-grained fraction. The third component is water.
All components are mixed as follows: take 1 part of cement and add 1.5 - 3 parts of medium-grained sand. But the amount of water is calculated based on how many kilograms of cement were taken. For 1 kg of cement take 0.5 liters of water.
Now on the construction market there are a lot of modifiers and fillers that are added to the sand-cement mixture. Why do they do this? To increase frost resistance, reduce the time for hardening, and also reduce the likelihood of cracks and delamination.
Conventional mortars, like backfill for dry floors, are sold on construction markets. Their use will reduce the time spent on repairs. In such mixtures, all components are ideally selected and in ideal proportions. The manufacturer produces each type for one or another type of connection to the floor.
The video shows the consumption of PCB per 1 m2 of screed:
The weight depends on the proportion of the components that are included in the composition: on the amount of water, on the power of the screed and on the brand of cement used. The maximum thickness of the screed usually does not exceed 7 cm, otherwise the foundation of the house will have to be strengthened so that it can withstand such a large load. Depending on the thickness of the layer, choose the type of bond:
- the screed will be connected to the rough foundation and to the walls;
- will not be associated with any structures;
- an insulating layer is used, as a result it will be a floating layer.
Weight of cement-sand screed per 1m2
On average, 1 cm of central fiber has a specific gravity of 22 kilos. To calculate the consumption, you should multiply the height of the screed by 22 kg, then multiply the resulting amount by the total meters of the room. The resulting result must be compared with the capabilities of the main floor. If the mass is larger or comes close to the reserve, it is necessary to reduce the layer height or not use the DSP. This could cause an accident. Dry weight of CPPS is 1800 kg per m3. This is the standard.
We must remember that the volumetric weight also includes various kinds of additives that
:
- Increase adhesion;
- Improves moisture resistance;
- Makes the structure stronger.
Based on their quantity, the specific gravity also changes. Coated thread is suitable for marking while working. Screed grade M150 is well suited for pouring. Also an excellent solution for baths is the leveling mixture CPR.
Classification of screeds.
According to the method of adhesion to the floor, there are the following *types and types of screeds*:
- Related to the base;
- On the separating layer;
- On an insulating layer (“floating”).
Rice. 1. Types of screeds according to the method of adhesion to the floor
Tied ties are those that are tightly coupled to the base. In other words, there are no separating layers between the base and the screed. This type of screed can withstand heavy loads, but the shrinkage of tied screeds is uneven and can often result in cracks. And the humidity of such screeds depends on how saturated the ceiling is with moisture. The use of screeds on the separating layer will help prevent the screed from adhesion to the ceiling. The role of the separating layer is usually performed by the following materials:
- Bituminous paper;
- Oiled paper (glassine, roofing felt);
- Polyethylene films.
In order for such a screed to be strong enough, its thickness should be at least 30 mm. If special waterproofing is required, then a screed is applied to the separating layer.
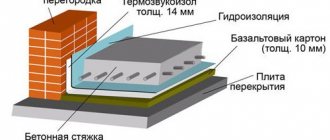
“Floating” screeds on the insulating layer are not connected to the base. This is an independent building structure. The layer - bedding between the floor concrete and the “floating” screed is made of the following heat and sound insulating materials:
- Stone wool;
- Mineral wool;
- Foamed polystyrene;
- Cork board;
- Fiberboard.
The smallest thickness of a “floating” screed is 50 mm. The use of screed on the insulating layer increases the thermal and sound insulation of the floor. In addition, the moisture contained in the screed will not depend in any way on the concrete floor. But this design scheme has low compressive strength and also has increased thickness. In this type of screed, in most cases it is necessary to additionally reinforce the top layer.
Rice. 2. Reinforced screed
Prefabricated screeds are elements that are ready for installation and are designed to be connected with seams. Installation is made from large-sized sheets, as well as slabs - plywood, chipboard, fiberboard, gypsum fiber (GVL) sheets. The elements of prefabricated screeds are not heavy, so even one person can easily install them. There are no “wet” processes when working with prefabricated screeds, which makes it possible to lay face coverings immediately after installation. It should be noted that prefabricated screeds cannot be used for every face covering.
Rice. 3. Dry screed diagram
SNiP dry screeds
The option when the base is organized not by pouring, but by laying materials intended for this purpose, deserves special attention. Here the criteria are somewhat different and very much depend on which components are used:
- the thickness of the dry floor screed
is directly related to the sheet covering used - chipboard, gypsum, OSB, and so on (the level of its elevation must be calculated in each case separately - the indicator is determined by many factors); - the strength of dry floor screed
is much lower than cement screed (but it is used mostly in residential premises, where it is more than enough); - the density of the dry screed
should be calculated from the same properties of the sheet special material (OSB, gypsum and plywood have different values, but you are unlikely to find critical differences, because each of them was made for the same purpose).
minimal (also depends on the characteristics of the consumables used, but it is significantly less than the lightest concrete pouring option);
Varieties: cement screed
- Messenger
. Typically used in high-rise buildings - the DSP here serves to level the floor slabs. To create a reliable base, you need good adhesion - connection - between the poured layer and the old one. That’s why the type of screed is called – connected. Its minimum layer is 3 cm. - Incoherent
. With this type of base, the new layer is not bonded to the old floor. For example, installation on a concrete base that has been previously polished or on a layer of insulating material. The minimum thickness of the screed is 5 cm. - Floating
. If the floor needs to be made warm, it is impossible to achieve a rigid adhesion of the screed to the base. When the insulating material changes its dimensions, the concrete layer placed above also lowers/raises. That’s why this screed is called floating. To create rigidity, which requires a minimum thickness of the cement-sand mass in this version of the screed, at least 6.5 cm.
All of these types of CPS have their own installation characteristics, but they are united by the use of sand-cement mortars. Sometimes, to increase reliability, reinforced fibers are added to the composition. This is usually fiberglass; there are additives from small parts of steel wire, but they are not used often. Reinforcement of the solution is required when the concrete layer is large.
According to building rules, the minimum thickness of the screed is 3 cm. With the thinnest layer during the period when the mortar dries, the canvas will crack and the base will be unreliable. At the same time, concrete has a lot of weight: per 1 m2, a 10 mm layer weighs approximately 20 kg. And since the minimum thickness is 3 cm, then the minimum weight of 1 m2 of screed will be 60 kilos. Not every foundation is capable of supporting such a load without consequences. This can cause the foundation to shrink and crack. To reduce the weight of the screed, light binders, for example, expanded clay, are included in the solution. The mass of 1 cm of expanded clay concrete is 16 kilos. With volumetric footage being poured, the difference is significant.
Features of the technological process when pouring a monolith
To create the right base, you need to take into account the weight of the material. So, the rough base weighs within 90 kg/m² - i.e. has a significant mass. At the beginning of work, it is important to analyze the load-bearing capacity of the structure. The most suitable would be a concrete and stone base.
The process of creating a monolith provides for mandatory technological features: layer thickness - from 3cm to 7cm.
If the first condition is not met, the structure will crack. Increasing the thickness is not effective for economic reasons and is characterized by high material consumption. The approximate weight of 1 m2 of cement screed is 22 kg. The table below shows the weight depending on the thickness of the screed. Weight of 1 m2 of sand screed depending on thickness
| Thickness of cement-sand screed | Weight m2 of sand screed (kg) |
| 1 cm | 22 |
| 2 cm | 44 |
| 3 cm | 66 |
| 4 cm | 88 |
| 5 cm | 110 |
| 6 cm | 132 |
| 7 cm | 154 |
| 8 cm | 176 |
| 9 cm | 198 |
| 10 cm | 220 |
| 11 cm | 242 |
| 12 cm | 264 |
| 13 cm | 286 |
| 14 cm | 308 |
| 15 cm | 330 |
The basic fill has the following shapes:
- As a connecting component between the wall and the rough base (no more than 4 cm layer).
- As a separate element (layer - 5cm).
- Like a floating slab, separated from the walls and floor by a foreign layer (layer - from 5 to 7 cm).
- Setting up a reference system
- Moisturizing the base coat surface
- Mixing components to obtain a homogeneous creamy solution
- If necessary, reinforce the base coat
- Filling the surface with the solution (taking into account the properties of the planting, it is necessary to fill 1 cm above the reference point)
- Compacting the cement mortar, adjusting it to the reference level (it is important to get rid of excess air)
- Adjustment using a measuring level
- Removing landmarks and traces of them
When performing work, each form of cement-sand pouring has technological differences and requires careful preparation of the base. Common workflow stages include:
Mixture preparation and consumption
To obtain a mortar for grade 150 screed, you need to mix cement (M400) with clean, washed and sifted sand without foreign inclusions (usually clay) in a ratio of 1:3, in other words, for 1 shovel of cement and 3 shovels of sand. These proportions are always indicated on the packaging of a specific brand of cement. If necessary, plasticizers and other additives are added. The resulting mixture is thoroughly mixed and adjusted with water to the required consistency.
Semi-dry screed technology eliminates shrinkage, deformation, and the appearance of cracks. To visually check the compliance of the technology, the prepared solution can be squeezed tightly in your hand and not a drop of water should come out of it.
When adding fiber, the following proportion must be observed: per 1 cubic meter of solution there should be at least 600 grams of polypropylene fiber.
In the question of screed consumption and calculation of the necessary components, we turn to the table of cement consumption per cubic meter of solution:
| Maka cement | Brand of solution | Cement consumption per 1 m³ of solution |
| M400 | M200 | 490 kg. |
| M500 | M200 | 410 kg. |
| M400 | M150 | 400 kg. |
| M500 | M150 | 330 kg. |
Let's calculate the required composition of semi-dry screed for a room with an area of 20 square meters. We will use cement (M500). The cement/sand proportion for mortar grade 150 is 1/4, respectively. The thickness of the screed is 4 cm or 0.04 m (minimum permissible value).
Calculation:
- 20 (sq.m.) * 0.04 (m.) = 0.8 cubic meters of mixture is required.
- From the table above, the consumption of cement (M500) per cubic meter of solution (M150) is 330 kg.
- We make up the proportion: x/0.8 = 330/1; where x is the required cement consumption for a volume of 0.8 cubic meters. mixtures. Accordingly, the required amount of cement (x) = 330 * 0.8 = 264 kg.
- Based on the proportion of 1/4, sand will be required - 264 * 4 = 1056 kg.
This calculation will allow you to calculate with a certain degree of accuracy all the components that you will need for the screed.
Shrink seams
Expansion joints
cut into areas of 50 m2. The seams are cut in a freshly laid semi-dry screed solution.
Shrinkage joints are necessary to prevent random cracking of the screed during the hardening process. They allow you to create straight planes of slack in the solution. As a result, the screed cracks in a given direction. Shrinkage seams must be cut along the axes of the columns and connected to the corners of the seams running along the perimeter of the columns.
Floor maps formed by shrinkage joints should be as square as possible. Elongated or L-shaped cards should be avoided. The length of the card should not exceed 1.5 times the width. Shrinkage joints should be straight and, if possible, without branches. In aisles and driveways, shrinkage joints should be located at a distance equal to the width of the screed. Paths wider than 300-360cm must have a longitudinal seam in the center. When concreting in open areas, the distance between joints should not exceed 3 m in all directions. The general rule is that the smaller the card, the less likely it is to randomly crack. The cutting of shrinkage joints is carried out after finishing the surface treatment of the solution.
Typically, the seams are cut with 6x6 m cards in the same sequence in which the concrete was laid. The seams should be cut to a depth of 1/3 of the thickness of the screed. This creates a zone of weakness in the screed, and when the concrete shrinks, it cracks in this zone, i.e. cracks directionally, not randomly. In this case, the edges of the resulting crack have a certain roughness, which eliminates their vertical displacement until the crack becomes too wide.
Construction joints act as shrinkage joints - they allow small horizontal movements, but not vertical ones. It is desirable that the construction seam coincides with the shrinkage seam.
Construction joints are placed where the day's mortar work has been completed. The shape of the edge of the tie for a structural seam is usually done according to the tongue-in-groove principle; sleepers (slats) laid across the seam can be used. The slats should be installed in the middle of the depth of the screed at the correct angles to the seam. One end of the lath must be lubricated with bitumen in order to move freely in the screed.
Advantages and disadvantages of semi-dry screed
The choice in favor of this technology is justified by a number of its advantages, which did not go unnoticed by builders of all levels.
Semi-dry screed has the following advantages:
- A small amount of water added to the mixture. Its penetration into the ceiling is almost completely eliminated. A reduction in the weight of the poured material is achieved.
- Reduced setting and complete drying time. Ability to continue working without a long break.
- Creating a perfectly flat surface at the formation stage without the use of self-leveling solutions and additional leveling.
- Minimizing the likelihood of cracks and shrinkage after curing of the solution. No risk of internal voids forming.
This method also has disadvantages:
- Impossibility to do without special equipment. It is necessary at the stages of preparation, distribution and compaction of the mixture.
- Difficulty filling internal corners. You have to spend time and effort on this, sealing such places manually.
- Restriction on the minimum thickness of the slab. It is 30 mm, provided compaction is carried out with a powerful pneumatic spreader.
- Fast setting. On the one hand, this is a plus, and on the other, a minus, since the solution can harden without sticking to the base.
Work order
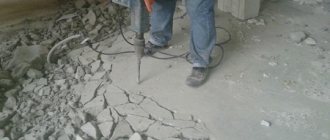
Actions must begin by preparing the foundation.
To do this, the floors are cleared of the previous floor covering, the room is cleared of construction debris and construction beacons are placed, having determined the horizon using a level.
The installation of a sand-cement screed is possible in any room where the base temperature does not fall below +5 ͦ Celsius.
Having installed the beacons, start pouring the screed from the farthest corner
The beacons are installed on a pre-laid layer of waterproofing, which can be used as a polyethylene film. The edges of the canvas are placed on the wall so that they protrude at the level of the screed.
They begin to pour the screed from the most inaccessible places in the room, but if it has a door, then it is important to make sure that the doorway is not blocked.
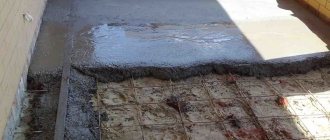
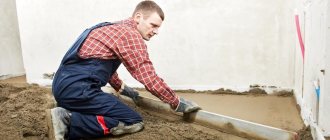
After the solution on which the beacons are installed has hardened, the prepared mixture is poured onto the base, filling one strip with it. Using the rule, the solution is leveled, and only after the first strip is ready, they begin to pour the solution into the second. After 12 hours, the beacons are removed and the resulting space is filled with a solution, which will take about 15 hours to completely harden.
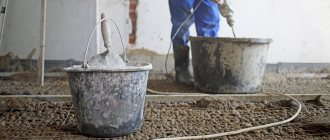
Now prepare the grout mixture and perform the manipulations associated with grouting the surface. You will need a dry or wet mixture consisting of equal parts of sand and cement. Rub the surface using special equipment or manually using a floor polisher or grater. For all the details of the process of pouring concrete on beacons, see this video:
After completing all the work, you will get a smooth, slightly rough surface, which must be rolled with a damp roller and covered with plastic film. Moisten the screed for at least seven days, after which the film is removed.
Handmade cement floor screed in a bathhouse
To level the floor slabs, use a tie screed. In apartment premises, the floors between floors are usually made of reinforced concrete slabs. This sand-cement screed is also suitable for a bathhouse building on a slab foundation. But only when waterproofing and insulation are not needed.
This type of screed is also suitable for
:
- Porches;
- Tambura;
- Verandas, etc.
The main task of preparation in this case is to create the best possible adhesion of the concrete layer to the base. To do this, you need to very well clean the surface of debris and dust. It is better to do this by using a vacuum cleaner - a brush cannot remove all the dust. There is no need to level out uneven areas; on the contrary, if there are smooth areas, it is necessary to make grooves/pits in them. Correctly seal only very deep cracks, and do not even out the surface. After all dirt has been removed, the surface is generously primed.
The primer must be allowed to dry for at least 8 hours; drying time depends on the humidity and temperature conditions in the room. After drying, you can install the beacons and pour the mixture (cement, sand) with your own hands. In order to prevent the destruction of the screed or vertical surfaces due to different amounts of expansion when changing temperature conditions (different densities), a damper tape must be installed around the perimeter of the room. This especially plays a role when the vertical surfaces are wood, which is almost the rule in bathhouses.
The tape must be rolled out and attached to the walls. It is usually larger in height than the screed, but when the cement sets, it must be cut to the level of the floor. If waterproofing of the DSP is required, it will no longer be cohesive. Here the preparation is different. Waterproofing material is placed on a clean and flat surface. If the base is uneven, for example, the surface of the foundation slabs in a bathhouse, then it must be leveled. For this purpose, the leveling connection DSP described above is used.
After drying it, you need to lay out the waterproofing and pour another layer of concrete (a special tape will also be required). Due to the fact that the base does not absorb moisture during such installation, cavities and pores may appear. Therefore, the solution must be processed with a vibrator. By increasing the thickness of the floor surface screed to 100 mm, the problem resolves itself, but the costs and weight are greater.
It is important that the filling technology is followed
Installation of floating cement-sand screed
This type of screed can usually be found when making floors in country houses and baths. Floating CPS is also used when installing water-heated floors and some types of electric floors. It is this that makes it possible to make a floor surface in a bathhouse on the ground. The thickness of the layers of the cake and building materials are selected individually, based on the climate in the region, but the principle is the same.
There can be many and varied layers here, but the main distinguishing feature is that there is no connection with vertical surfaces or the base. Such a floor does not react to shrinkage of the foundation or timber frame. Therefore, these are the right floors to install in a newly installed bathhouse. Although, it is still better to wait until the shrinkage is carried out.
Experts give some advice
:
- The recommended minimum thickness is 65 mm.
- First of all, you need to lay a layer of 2 cm and leave it for 24 hours.
- Leveling the rest of the part will not be difficult, since the first layer will be compacted under its own weight.
To increase strength, a high screed should be reinforced before cementing. Fiber fiber is often used. For baths, the consumption of a mesh with a cell of 200 mm is quite suitable. After the screed has set, you can install tiles on the floor or make a wood floor - pourable (unsealed) or sealed. During installation, it is important to follow the rules of SNIP and the proportions according to the diagram. If you are laying tiles, then grout is needed.
Types of concrete screed
With reinforcing mesh
Concrete screed is used most often. To construct it, a metal mesh is used, which is covered with 4-5 cm cells. Low supports are installed throughout the floor and the mesh is laid on them. This increases strength and wear resistance. Among the disadvantages of use it should be noted:
- due to the metal's susceptibility to corrosion, the mesh will gradually deteriorate, the concrete screed may delaminate, which adversely affects the service properties. This process takes many years, so the prevalence of the method has not decreased;
- cracks may form.
Fiber screed
Due to the constant development of construction technologies, fiberglass has recently begun to be used in laying concrete screeds. It is placed in a concrete solution instead of a reinforced mesh. It is a thin synthetic substance - microfiber made from polymer granules.
By making concrete more flexible, fiber fiber adds resistance to cracks. The advantage is that the use of such material is easier and more economical than metal mesh by 6 times per m2. In addition, do not forget about such a plus as the effect of reinforcement. The disadvantages include strict adherence to proportions and calculations when using the material. A mistake will turn the concrete into crumbs.
Minimum screed thickness
Let's start our acquaintance with the physical properties of the structure in question with the fact that the thickness of the floor screed in an apartment is not allowed to be less than 20 mm. Otherwise, its destruction is inevitable due to poor wear resistance. That is, you should calculate it at the lowest point so that it is even thicker.
A completely different matter is the thickness of the screed for a water heated floor. There should be enough here to hide the pipes. In addition, it is recommended to make a heat-insulating pillow from expanded clay. Accordingly, the level increases significantly.
Features of working with different types of screeds.
Different types and types of screeds imply individual characteristics of their installation.
Manufacturers of screeds indicate the degree of strength of the coating in the instructions for their products. But the manufacturer does not do the installation itself, so the warranty only applies to the material. As a result, the packaging often overstates the strength of the original screed. There is a conflict of interest. The manufacturer is interested in having the material he produces laid on a super-hard screed; the buyer wants to buy a quality product at an affordable price. If the buyer fulfills the requirements of the flooring manufacturer and makes the screed with a strength of up to 300–400 kg/cm², he will retain the warranty. If he does everything according to the requirements of SNiP, then he can be sure that everything was done correctly and reliably. The conditions of SNiP 2.03.13-88 “Floors” are as follows:
1) The strength of the screed based on cement binder for all types of floor coverings should not be less than 150 kg/cm²;
2) If it is necessary to level the screed with self-leveling mixtures - at least 200 kg/cm²;
3) The strength of gypsum screed for all types of floor coverings should not be lower than 100 kg/cm²;
4) For polymer “self-leveling” - no less than 200 kg/cm².
The screed for self-leveling mixtures is usually made the strongest, because the “self-leveling” mixture sets the fastest, which contributes to the development of high internal stress. There will be no cracks, but a weak bottom tie may be “pulled” and torn from the base.
You also need to take into account that a complete replacement or installation of a new screed will put all its weight on the reinforced concrete floor slabs. Reinforced concrete floors in old houses have limitations on load-bearing capacity, which is equal to 400 kg/m² - permanent load and plus 150 kg/m² - temporary load. For example, every centimeter of a screed with a volumetric weight of 1800 kg/m³ will press on the ceiling with a weight of 18 kg/m². If the screed is 5 cm thick, then each square meter of flooring will receive a load of 90 kg. These figures prove that such a screed will take 25% of the entire load-bearing capacity of the floor.
If it is necessary to increase the thickness of the screed or replace the screed material with one that is heavier, everything will have to be coordinated with the load-bearing capacity of the floor, and therefore approved by local authorities.
Old house, the floors were wooden, we removed the joists and boards, we want to fill the screed.
It turns out you need a thickness of 10 cm, perhaps even more.
Is it possible to pour screed of this thickness in an apartment?
The decision is made individually, the following points are taken into account:
What kind of floor slabs are installed in your house, for example, these
But there are floor slabs with a permissible load of 800 kg or more per sq.m.
The age of the house, it is advisable to conduct a construction examination in order to know exactly the permissible load on the floor slab; the older the house, the lower this figure.
Screed weight, cement-sand screed weighs on average 220 kg sq.m.
The weight of the finishing floor covering, for example, tiles with glue, weighs much more than linoleum or carpet.
The weight of the furniture (this is a constant load).
The weight of the users living in the apartment (not a constant load, but it must also be taken into account).
Next, the floor slab is affected not only by your screed, but also by the weight of the ceiling plaster of the neighbors below.
That is, go down to your neighbors and determine how they repaired the ceiling.
The presence of partitions 9 in the same room (this is also a load on the floor slab), if there is a partition, then what kind, for example, a partition made of brick weighs much more than a partition made of gypsum board.
Further, when raising the floor by 10 cm, problems may arise with the heating radiators, or more precisely with the distance from the floor to the radiator; they will have to be raised higher.
Reinstall interior doors, otherwise the door leaf will touch the tie when opening.
Taking all this into account, a decision is made.
If we are talking about a house from an old housing stock, then most often there were joists on the floors and then a floorboard; here you can do without reinstalling the doors and raising the radiators higher; the boards were removed, the joists were removed and the screed was poured.
If the load on the floor slab is acceptable, then in principle it is possible to pour a 10 cm thick screed in the apartment.
Screeds of this thickness are reinforced and do not forget about waterproofing under the screed and installing a damper tape around the perimeter of the room before pouring it.
Before laying the final floor covering, the screed must be completely dry and gain maximum strength.
Calculation of material needs
When preparing to start work, it is important to calculate your material needs. Thus, the volumetric weight of a cement-sand screed in dry form is 1800 kg/m³. Typically, the solution is mixed in a ratio of 1:4, so the weight of a cement screed of 1 m3 will consist of 0.25 m³ of cement and 1 m³ of sand.
Among other things, various components are mixed into the screed. To improve adhesion and moisture resistance - methylcellulose additives (culminals, tylose and natrasols). Accordingly, the specific gravity of the cement screed varies depending on the amount of impurities.
| Material | Density, kg/m 3 | Thickness, cm | Thermal conductivity, W/m K | Approximate price, $/m3 (ton) | |
| 1. Screed made of cement-sand mortar | 1500-1800 | at least 5 | 75-90 | 0.9 | 60-110 |
| a) Granulated slag | 600-1200 | by calculation | 30-60 | 0.15-0.2 | (8-15) |
| b) Expanded clay | 450-700 | by calculation | 22-35 | 0.07-0.12 | 40-70 |
| c) Expanded perlite | 45-200 | by calculation | 2.2-10 | 0.06-0.11 | 50-80 |
| d) Expanded vermiculite | 75-200 | by calculation | 4-10 | 0.045-0.056 | 150-200 |
| 2.1. Thermal insulation screed made of cement-vermiculite mortar (ready dry mix Vermiizol) | 600-700 | by calculation | 30-35 | 0.19-0.25 | (800-1000) |
| 2.2. Thermal insulation screed made of cement-perlite mortar (ready-made dry mixture Perlite) | 600-700 | by calculation | 30-35 | 0.15-0.19 | (800-1000) |
| 2.3. Thermal insulating screed made of cement and foam glass (ready-made dry mix Ivsil Termolite) | 350-400 | by calculation | 18-20 | 0.1-0.12 | (1500-1800) |
| 2.4. Thermal insulation screed of cement-expanded polystyrene mortar (dry mix Knauf Ubo) | 600-700 | by calculation | 30-35 | 0.1-0.12 | (450-550) |
| 3.1. Dry screed made of gypsum fiber sheets (GVL) | 1000-1300 | at least 2 | 20-26 | 0.22-0.36 | 250-300 |
| 3.2. Dry screed made of soft fiberboards (Fibreboard) | 100-400 | at least 2 | 2-8 | 0.05-0.09 | 180-250 |
| 4.1. Floor plank layer | 500-600 | 2.8 — 3.5 | 12.5 | 0.1-0.15 | 450-700 |
| 4.2. Plywood floor layer | 600-900 | no less than 1.4 | 8.4-12.6 | 0.15-0.24 | 400-600 |
| 4.3. Chipboard floor layer | 550-750 | 1.6, 1.8 | 8.8-13.5 | 0.2-0.3 | 200-250 |
| 4.4. OSB floor layer | 600-700 | no less than 1.6 | 9.6-11.2 | 0.13-0.2 | 400-500 |
| e) Expanded polystyrene (foam) | 10-50 | 2, 3, 4, 5, 10 | 0.5-2.5 | 0.035-0.042 | 40-60 |
| f) Glass wool | 10-12 | 5, 10 | 0.5-0.6 | 0.038-0.047 | 15-40 |
| g) Basalt wool | 20-60 | 5, 10 | 1-3 | 0.04-0.06 | 60-100 |
Notes:
1 - Thermal insulating screeds usually require additional leveling with a regular screed or self-leveling self-leveling floors.
2 - The density of bulk thermal insulation materials depends on the size of the grains - fractions; the finer the grains, the greater the density and the greater the thermal conductivity coefficient. In addition, for almost all thermal insulation materials (except polystyrene foam), the thermal conductivity coefficient depends on humidity; the higher the humidity of the material, the greater the thermal conductivity coefficient. The lower the thermal conductivity coefficient, the better the thermal insulation properties of the material.
3 - If the thickness of the thermal insulation should be determined by calculation, then the load on the floor is indicated for a layer thickness of 5 cm so that the indicators can be compared.
Now let’s take a closer look at the presented options; the option with heated floors is not considered, since the additional costs for floor heating will be constant (during the cold season) and this does not allow us to correctly compare the presented options.
Screed made of cement-sand mortar over a layer of insulation.
A conventional screed made of cement-sand mortar over an insulation layer is both a leveling and reinforcing layer, so the thickness of such a screed is taken to be at least 5 cm for technological reasons - so that the screed does not crack. A layer of bulk thermal insulation can be made not only from granulated slag, expanded clay, expanded vermiculite and perlite, but also from other materials, but the materials shown in the table are the most common. Features of the implementation of cement-sand screed are presented separately.
Thermal insulation screeds.
Thermal insulation screeds can be made using not only ready-made dry mixtures, but you can mix cement, water and heat-insulating filler yourself. In this case, expanded clay can also be used as a filler. However, in this case, the thermal conductivity of the resulting screed will greatly depend on the proportions of cement and thermal insulation filler; the more filler, the lower the strength of the screed; the more cement, the higher the thermal conductivity of the screed. In addition, due to the relatively large size of the filler, heat-insulating screeds have low leveling ability; the larger the filler, the lower the thermal conductivity and the more difficult it is to level the surface of such a screed, therefore, under floor coverings made of PVC tiles, linoleum, carpet, and sometimes laminate or parquet boards require additional leveling with a heat-insulating screed. The rules for making a heat-insulating screed are almost the same as for a regular screed.
Dry screeds.
So-called dry screeds can only be made on a flat base, i.e. It is impossible to lay gypsum fiber sheets or fiberboard directly on hollow-core floor slabs installed with differences in height and with protruding mounting loops. First you need to level the base of the floor with a regular screed. Another disadvantage of dry screeds is their low water resistance. Saturation of gypsum fiber or fiberboard boards with water leads not only to an increase in thermal conductivity, but also to the gradual destruction of thermal insulation materials.
Wooden floors with thermal insulation.
To insulate wooden floors, you can use not only rolled or sheet thermal insulation materials (e, f, g), but also bulk thermal insulation (ad) and thermal insulation screeds (2). Theoretically, it is not at all necessary to lay thermal insulation between the logs, since air is one of the best thermal insulators, which is part of all the thermal insulation materials listed in Table 1, and the more air there is in the thermal insulation material, the better the thermal insulation properties of the material. However, air itself as a heat-insulating material has significant disadvantages, the main one of which is mobility. For example, if there are cracks in building structures, then the air will work not as thermal insulation, but as a coolant.
When performing thermal engineering calculations of wooden floors, it should be taken into account that the thermal insulation layer will not be continuous, but will consist of strips separated by joists. Those. you need to separately calculate the heat loss on the log and on the thermal insulation strip, or to simplify the already confusing calculations, introduce a correction factor that takes into account the distance between the logs, the width of the logs and the thermal insulation material, for example, with a log width of 10 cm and a distance between the axes of the log of 100 cm, you can increase the thermal conductivity coefficient foam by 1.05-1.1, and with a log width of 10 cm and a distance between the axes of the log of 50 cm, you can increase the thermal conductivity coefficient of the foam by 1.25-1.3. When using bulk thermal insulation or thermal insulation screed, no coefficients are needed, since the thermal conductivity coefficients of bulk thermal insulation materials are close to the thermal insulation coefficient of wood.
When insulating floors above ventilated unheated basements, thermal insulation is usually performed in several layers, i.e. The floor slab is thermally insulated both above and below.
Do-it-yourself semi-dry screed step-by-step instructions
The entire scope of preparatory work does not take much time and consists of preparing the base for the screed and preparing the working solution.
The coating is carried out on a completely cleaned surface. In addition, it is necessary to carefully eliminate all chips in the base and deep cracks. All delaminations in the base require cleaning followed by puttying. After all work completed, a zero level mark is set.
- All work can be described in the form of step-by-step instructions:
- Preparation of working solution
- If you plan to use fiberglass, then a mixture of sand, fiberglass and cement must be poured into the pneumatic hose blower. After thorough mixing, water is added and the solution is mixed again.
- If it is necessary to use a reinforcing mesh, the solution is prepared from Portland cement and sifted sand. This composition allows you to prepare the mixture directly at the workplace. The addition of plasticizers makes the working solution more elastic and easy to use.
- In addition, it is possible to use ready-made mixtures with a specially selected and optimal composition. Such mixtures can only be diluted with water in accordance with the instructions and kneaded thoroughly.
- Do-it-yourself semi-dry floor screed is performed in accordance with the “floating screed” technology and consists of the following steps:
- high-quality cleaning and priming of the base;
- laying a special edge tape;
- laying a two-centimeter starting layer followed by compaction;
- laying reinforcing mesh;
- laying four centimeters of semi-dry mixture;
- leveling the poured solution using a laser level and installing beacons;
- grouting the surface with a trowel and thorough grinding;
- the frozen surface is wetted and a cement-sand mortar is laid out on it, which is rubbed using a wooden or polyurethane trowel;
- leveling;
- dismantling beacons and grouting their installation sites;
- final grinding of the finished surface.
If a working solution that already contains fiberglass is used, then there is no need to use a reinforcing mesh.
So, to summarize, the first thing you need to do is carry out preparatory measures in your apartment or house. To do this, you need to set the zero level and pour the mixture over it. The base of the floor must be thoroughly cleaned of dust and dirt, and all existing cracks must be repaired. These factors influence the production of a smooth surface.
To obtain a solution, you should use a ready-made mixture. Add water to it in the amount indicated in the instructions. Of course, you can prepare the mixture yourself, but then you will need a concrete mixer, and the amount of liquid will have to be determined by eye.
When receiving the mixture, make sure that it turns into a lump and water appears, but does not drip. The next stage is the installation of insulating material and beacons. For insulation it is necessary to use polypropylene film.
To level the surface, it is worth installing beacons that will serve as the upper level. In this case, it is necessary to use T-shaped slats. At the final stage, concreting is carried out. The finished solution is distributed along the guide beacons. Be sure to compact the mixture and grout it.
Tips and tricks
In order for the semi-dry screed to set more efficiently and effectively, it is necessary to cover the completed surface with a layer of plastic film. The main drying process takes about twelve hours.
To install ceramic flooring, the semi-dry screed should be left for at least four days, and laying laminate flooring or parquet can be done after twenty-eight days.
The technology of semi-dry screed with the addition of fiber is based on the minimum amount of water used, which is necessary exclusively for high-quality hydration of the cement mixture.
A semi-dry screed allows you to hide most communications, achieve ideal horizontality under a decorative coating, and increase the heat and sound insulation of floors. This coating is very popular when it is necessary to reduce the time for leveling.
Screed density and specific gravity of cement and sand
To construct a cement-sand screed (CSS), depending on the criteria specified by the operating conditions, various types of material can be used, differing in composition, density and strength:
- concrete with heavy filler;
- concrete with light filler;
- cement-sand mortar;
- dry mixes.
With heavy filler - granite screenings
The filler based on granite crushed stone screenings is the final product of the production of commercial crushed stone with a fraction of up to 10 mm. Concrete screed with granite filler is highly durable, frost-resistant and is used in industrial construction. In civil and residential construction it is used for premises with high operational loads - for basements and ground floors, garages, utility and storage spaces.
The density of concrete prepared using granite screenings is 1400-2200 kg/m³, which classifies it as heavy. The volumetric weight of a 5 cm thick screed for the specified density range ranges from 70 to 110 kilograms per 1 m2, which is a significant additional load on interfloor ceilings, floors with a soil or wooden base.
Light types of solutions - perlite, polystyrene, granules
In many cases, using a light screed will be more effective. It is used in cases where a large difference in heights is eliminated by leveling, when laying pipelines and communications in the floor, and also when it is necessary to obtain additional heat and sound insulating properties of the floor using a screed.
The density of light screed mortars ranges from 500 to 1800 kg/m³, depending on the type of filler and filler, and their proportions in the mixture. In terms of strength, light screed is inferior to mixtures with heavy filler, so sometimes it is used as an intermediate layer with final leveling with stronger solutions.
Several materials are used as fillers for light screeds, the addition of which to the mixture allows one to obtain various technical characteristics:
- Perlite is a porous rock that has good heat and sound insulation, high absorbency, fire resistance, and chemical inertness. For the preparation of building concrete and mortars, expanded perlite obtained by heat treatment of raw materials with a density of about 100 kg/m³ is used; the density of the mixture, depending on the composition of other components, ranges from 400 to 1000 kg/m³.
- Vermiculite is a natural mineral with a layered structure; expanded rock is used in construction. As a filler for mortars and concrete, it has properties and characteristics similar to perlite.
- Expanded clay with a volumetric weight of 150 to 800 kg/m³, obtained by firing clay or shale. Its characteristics are high strength, frost resistance, chemical resistance, non-flammability, and environmental friendliness. Expanded clay crushed stone with a fraction of up to 10 mm is used as a filler or serves as a raw material for the preparation of expanded clay sand.
- Granulated polystyrene foam (from polymer raw materials). The density of CPS based on it ranges from 150 to 600 kg/m³; they have a high degree of sound and heat absorption, frost resistance, but low strength compared to other lightweight solutions.
How to make a calculation
First you need to determine what kind of cement will be used. For a coating with a large expected load, you need to take a high grade. A universal way to prepare a working solution is to gradually mix cement with sand in a ratio of 1: 4.5-6. You can choose the final option by knowing the brand of cement. After this, fiber and water are added to the mixture.
The approximate amount of fiber fiber is calculated in the proportion of 35-40 g per square meter of flooring. The thickness of the screed is 5 cm.
So, to carry out a dry floor screed, the calculation will be as follows:
- Cement - 15 kg;
- Sand - 0.065 m3;
- Fiber fiber - 35-40 g;
- Water - 2.5-3 l.
There is a practical way to determine the readiness of the mixture. Take one tablespoon of the mixture into your fist and squeeze: a little water should come out of a strong lump. Professionals advise additionally using a plasticizer: its consumption is 50 ml per 1 sq.m.
If you need to correctly calculate how much mortar is needed for a dry floor screed for a room of 200 m2, the calculation is as follows:
- cement: 15*200 = 3 t;
- sand: 0.065*200 = 13 m3 of sand;
- fiber fiber: 35*200 = 7 kg.
The calculation is slightly different when using M300 sand concrete. The area of 200 m2 must be multiplied by 6 (layer thickness) and by 18. Then divided by the weight of one bag (40 kg): 200 * 6 * 18:40 = 540 m.
Waterproofing the floor, base and sources of moisture.
Waterproofing is always necessary in bathrooms, showers, toilets, roofs, basements and ground floors (if there is no basement). On roofs, a waterproofing carpet is installed along the screed, which protects the roof screed and the building itself from precipitation.
In basements, waterproofing is necessary to protect floors from moisture in the ground. In this case, the soil is first backfilled and compacted, then a leveling layer is made (of concrete or compacted sand), after which waterproofing is done (preferably with rolled elastic fused materials). After waterproofing, the floor is thermally insulated from the ground using effective thermal insulation, on top of which a concrete screed (or other flooring options) is installed.
The rule for installing waterproofing is that the floor waterproofing must protect the entire screed from moisture. That is, waterproofing on the ground is placed under the screed; on the roof on a screed; on the floor of the bathroom, shower and toilet on a screed.