0
5338
18.11.2014
Don't know how to fill the floor on the balcony? This article will help you understand all the features and subtleties of this interesting work.
How to fill the floor on the balcony
Do-it-yourself repairs are possible if you follow step-by-step instructions that can be obtained from professional builders or people with extensive experience in this or that type of repair. This is especially true for such a difficult and attentive task as pouring the floor on the balcony.
In order for the renovation in the room to look high-quality and neat, you need to take good care of the floor covering. You can create coziness and comfort on the balcony using a poured floor. This method allows you to make the floor surface smooth, stable and reliable to any influences characteristic of a balcony space - changes in temperature, humidity, etc.
As a rule, pouring a balcony is done using concrete. This is the best option that will help achieve maximum results.
Balcony area measurements
As with any other type of repair, before starting construction and repair work, it is necessary to take measurements. Whether you buy the right amount of building materials depends on the correctness of your measurements. So how do you make the right calculations? First, you should measure the balcony area. To do this, the width and length of the balcony are measured, then the results obtained are multiplied by each other.
Rice. 2 Measuring the floor on the balcony
The resulting number is in turn multiplied by the desired flooring height. The final result is your guide for the future amount of the solution to be mixed.
Preparing the work area
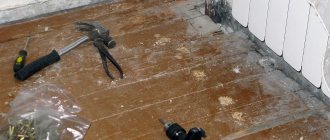
Before you start mixing the material to fill the floor on the balcony, you need to carefully prepare the surface for future events. Of course, you should remove all unnecessary things that were stored on the balcony. Then you should begin dismantling work, that is, get rid of the previous coating. As a rule, dismantling is a fairly dusty and dirty task, so you should take care of your safety in advance - wear goggles and a respirator.
Preparing the work area
Construction dust can seriously affect your health, so take the issue of protection responsibly. After preparation, you can begin to destroy and eliminate the old coating. To do this, you will need to prepare a number of the following tools, without which dismantling is simply impossible:
- scrap;
- hammer;
- nail puller;
- chisel;
- and an iron scoop or shovel.
It is worth noting that dismantling can be complete or partial. It depends on the quality of the old coating. If it is in more or less decent condition, then it can be safely used as the basis for a new coating. But professional builders recommend getting rid of the consequences of previous renovation work in order to achieve the spectacular desired result that will last for many years.
Helpful advice for more comfortable dismantling: before starting work, moisten the floor and walls of the balcony with water. This will help the dust settle and dismantling will be much more convenient.
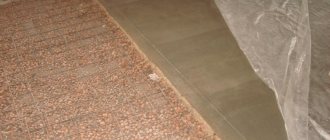
Prepared surface for pouring screed
- The linoleum on the balcony is cut into strips with a knife. Each of them is removed from the floor with a scraper or spatula.
- Ceramic floor tiles are removed using a hammer drill.
- Old floor joists are removed using a nail puller.
- If a dry screed was laid on your balcony, then all the screws are removed from the covering slabs, after which the slabs are dismantled, and the expanded clay is poured into buckets with a shovel.
- All existing paint and varnish coatings and primers are removed with solvents.
After the removal of the old coating is completed, it is imperative to clean the area under repair. This is not done for aesthetic reasons, but to ensure that the floor filling is effective. The fact is that if you pour concrete mortar onto a dusty foundation, this will lead to the fact that the building material will not be able to securely fasten. Therefore, it is worth carefully preparing the space for the next stage of renovation work.
Selection of materials
What material to choose depends on whether the balcony is glazed, insulated or completely open. For each option, the material is selected individually.
For a glazed, non-insulated balcony
If your balcony is glazed, but does not have heating systems and there are no plans for such in the future, then it is necessary to select moisture-resistant materials. Despite the fact that the balcony is closed from precipitation, condensation will still form during temperature changes.
In this case, the following types of materials are suitable for leveling:
- moisture-resistant plywood;
- drywall;
- gypsum fiber sheet (GVL);
- cement bonded particle board (CSB);
- cement strainer;
- oriented strand board (OSB).
Finishing materials:
- moisture-resistant laminate;
- tile;
- linoleum;
- carpet
For an open balcony
The most difficult case when choosing materials is an open balcony due to constant precipitation and low temperatures in winter.
In this case, the following materials are suitable:
- cement strainer;
- oriented strand board (OSB);
- cement bonded particle board (CSB).
Finishing materials:
- terrace board;
- porcelain stoneware;
- ceramic tile.
Note!
The balcony slab should not be overloaded. If you plan to raise the floor by more than 5 cm, it is better to use lightweight materials and structures such as wooden beams (joists) or dry screed instead of cement.
For a glazed and insulated balcony
If your balcony or loggia is glazed, has or will have in the future a radiator, a heated floor system or one of the existing constant heating systems, then you can use materials that are used when leveling and finishing rooms in an apartment.
Drawing conventional boundaries
When all the necessary surfaces are clean, you should apply conventional marks to the walls - boundary guidelines for concrete pouring. To do this, you should think in advance about the height of the floor you would like to see on your balcony. This parameter can be influenced by many factors: the total height of the balcony, its planned load, the presence of furniture, etc. Having considered all these questions and determined the desired height, you can begin to apply marks. This is done in several places on each wall of the balcony.
As a rule, the balcony floor is made of reinforced concrete slabs, so it is relatively flat and does not require additional leveling measures. But, if you want to get the perfect result of your work, it is recommended to use such a popular tool among responsible builders as a level. By using it to connect all the marks made on the walls, you can determine whether they are at the same distance from the floor base.
Types of screeds
The final floor covering is laid on the poured screed. There are three filling methods:
The solution is prepared from cement with sand or crushed stone, and then poured onto the prepared surface of the balcony slab. The drying process lasts about a month. To crystallize the solution, the surface is regularly moistened with water.
The balcony slab is covered with a layer of expanded clay or other bulk material. Special materials are laid on top. This screed is quickly installed, but has the disadvantage of low resistance to moisture. This limits its use for unglazed balconies.
There are special mixtures diluted with water. Leveling the surface of the slab occurs due to the spreading of the liquid composition of the mixture. Such a mass has a limited action time, so installation is carried out at an accelerated pace. The mixture cannot be laid on a frozen balcony slab. After a week, you can apply the topcoat.
Self-leveling compounds are available in several types:
The balcony slab does not withstand every screed. Due to its weight, wet, dry and self-leveling screed is suitable for the first floor balcony. Dry and self-leveling screeds do not have significant weight, so they are suitable for balconies on any floor.
Installation of guide beacons
According to the markings, guide beacons should be installed for pouring the screed, which are perforated metal (or wooden) profiles mounted on small piles of cement mortar. The distance between the guides is assumed to be equal to the length of the rule (slats for leveling the screed). The profiles are leveled horizontally using a building level and a rubber hammer. When the cement under the beacons has set, you can begin mixing the mortar and pouring it.
Preparation of the solution
Mixing concrete mortar can be done in two ways: using an electric drill with a “mixer” or an ordinary shovel.
Mixing the solution
Balconies are a small space, so you can mix the product needed to fill it without the help of electrical appliances.
The issue of proportions is important. In order to mix a solution of the correct composition and consistency, it is necessary to carry out this work in the following proportions: 2 parts sand, 1 part cement and 1 part crushed stone.
Applying cement mortar to the balcony
Water is also used for mixing. It is added after combining all the ingredients. It is worth adding it in small portions, since carelessness can make the solution too liquid and not suitable for the planned work.
Surface reinforcement to improve quality characteristics
Filling the screed
After mixing the solution, you can start pouring. Please note that you should start doing this from the far corner so that by the end of the work you will be near the front door and can safely leave without damaging the new hardening surface.
- Fill the solution between the beacons.
- We take the rule (bar) and move the excess cement without tearing the rule away from the beacons.
- In this way, we fill the entire area of the balcony, moving the solution towards the door and achieving a perfectly smooth surface.
- For three days, we constantly moisten the surface of the screed to prevent cracking (you can sprinkle the screed with sawdust or sand, and after a week sweep them away from the surface of the screed).
- After about 5-7 days, you can remove the beacons from the screed and fill the resulting grooves with cement mortar. But this procedure remains only at the discretion of the owners of the balcony.
Since balcony slabs are not designed for excessive loads, it is recommended to replace the standard cement mortar with modern lightweight, quick-drying mixtures with a high content of gypsum or foam inclusions.
If you carry out all stages of the work correctly and according to the instructions, the result of your work will delight you for many years.
Preparing the base
To complete this step, the old floor covering is removed from the surface of the slab. The slab itself must be processed, removing all loose and cracked pieces. This can be done using a regular hammer. If the condition of the balcony slab is deplorable and it was necessary to remove the concrete down to the tension reinforcement, the metal must be coated with oil paint or primer. This must be done, otherwise rust may appear through the screed. The resulting chips and irregularities should be repaired using cement-sand mortar or tile adhesive.
USEFUL INFORMATION: Do-it-yourself floor repair, quickly and inexpensively
Then you need to remove all debris and thoroughly prime the slab. To do this, it is recommended to use a deep penetration primer. It is usually applied in two layers: the second time it is primed only after the first layer has completely dried. Further work can begin in approximately 7-8 hours. This is exactly how long it takes for the soil mixture to dry completely.