Construction of a bathhouse is a task whose importance is not disputed by any owner of a private or country house.
The main and most important part of the work is the creation of a reliable and high-quality foundation.
The choice of foundation type is determined by the size and material of the future building.
Most owners opt for a strip foundation, the most common and popular type among all available options.
Let's consider its features and construction order.
Why you should choose a strip foundation for a bathhouse
A strip foundation is a continuous strip of concrete located under all load-bearing walls of the building.
It occupies a leading position among alternative methods of building a foundation for a number of reasons.:
- First of all, it has a high load-bearing capacity with relatively low consumption of building material. If we consider the comparative need for materials of different types of base, the tape type represents the “golden mean”, optimally combining costs and results.
- The strip base has several options for creation and allows the use of various building materials. During construction, both monolithic concrete casting and ready-made blocks (FBS), brick or stone strips, and other methods are used.
- The depth of immersion in the soil can be either lower or higher than the winter freezing level, which allows you to choose the best option depending on the hydrogeological conditions of the site.
- The properties and features of a strip foundation have been studied better than other types of foundation; the design allows, if necessary, to carry out repair work, waterproofing or other repair and restoration work.
The design of the strip base is simple and understandable to all users. All these features together determine the primacy of the tape over other methods of creating a foundation .
Design
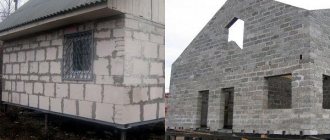
To build a foundation with your own hands, you need to start with the design process. As mentioned above, for a bathhouse made of any type of building material, a strip foundation design is suitable. For a heavy bathhouse made of logs and brickwork, it is necessary to carry out a design that will withstand a heavier and more stable structure.
For structures made of foam concrete and aerated concrete blocks, you can use tape, which is designed for lighter structures.
Important! In any case, you need to draw up a step-by-step plan for carrying out construction work.
Tape width
In order to create a strip foundation for a bathhouse, it is necessary to determine the width and thickness of the strip. You need to use basic parameters that are suitable for equipping any soil:
- The width of the tape should be 40-60 centimeters.
- The height of the tape above the ground is from 30 to 50 centimeters.
- The height of the part of the tape underground should also be from 30 to 50 centimeters.
- The depth of the trench should be 70-80 centimeters.
Reference! In the latter indicator, it is important to take into account the height of the underground part and the thickness of the future sand cushion.
Laying depth
The optimal height when arranging a strip foundation for a bathhouse is divided into that which is above the ground and below it. The level that will be underground must be oriented according to the groundwater level. It is also important to consider what the freezing point of those same waters is.
Since the liquid inside the soil will constantly freeze and thaw during the spring, this will lead to ground movement. If the tape is installed at the wrong depth, the structure can be severely damaged. It is optimal to leave 30-60 centimeters above and below the ground.
For bath structures, a shallow foundation is most often used. Often, when equipping a strip foundation, builders advise digging a trench 2 meters deep, but a shallow foundation implies a rise of 20-30 centimeters, and a descent of 40-60 centimeters.
Concrete grade
The grade of concrete directly affects the quality of the building material, and, consequently, the quality of the foundation itself. You should choose it based on what basic material will be used to build the bathhouse. Concrete mix packages have markings that indicate their special qualities.
Reference! The M300 marking means that a base made of such a concrete mixture will withstand a load of 300-325 kg.
True, such marking has one main drawback, which is its inaccuracy. The marking indicates the approximate load per square centimeter, with a step of 25-50 kilograms being made, which is a significant error.
Class indicators indicate the strength of concrete. But when making a concrete mixture yourself, it is impossible to determine the strength class without special equipment.
It is the marking that will help determine what kind of concrete is needed for a strip foundation and the construction of a specific structure.
Advantages and disadvantages
The advantages of a strip base include:
- The cost of materials and labor is relatively low.
- The speed of work production distinguishes the tape from other types of monolithic base.
- The design of the tape is simple and can be created even by novice builders.
- The load-bearing capacity allows the construction of buildings of several floors.
- It is possible to build on different, even problematic types of soil.
There are also disadvantages:
- When calculating the depth, it is necessary to take into account the type of soil, which is best done in consultation with specialists.
- Construction will require preparation and considerable excavation work.
- After pouring, you will need to wait a certain time for the concrete to completely harden.
The disadvantages of a strip foundation are determined by its design and construction technology, therefore they are treated as construction features.
They do not create any fundamental difficulties, and the beneficial qualities of the foundation significantly exceed some of the negative aspects.
General installation diagram
The use of wood is a traditional way of building a Russian bathhouse (6x6 or 6x4). The timber allows you to get strong and warm walls that do not have much weight and do not create excessive loads on the base.
This allows the use of a shallow version of a strip foundation, which requires less excavation and does not require a large amount of building material .
The only external condition for choice remains the hydrogeological situation on the site, soil composition and other conditions.
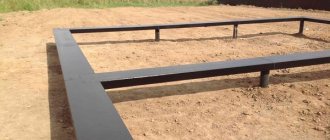
The configuration of the tape in plan follows the contours of the load-bearing walls of the bathhouse, as well as the internal walls that strengthen the structure and take on most of the loads.
The foundation for the furnace is built separately and is not mechanically connected to the common base.
To create the foundation you will need to perform a number of works:
- Site preparation. The top fertile layer of soil is removed and the site is leveled.
- Marking with pegs.
- Digging a trench.
- Preparatory work before installing the tape (so-called concrete footing).
- Installation of formwork.
- Creation of a reinforcing frame.
- Filling the tape.
- Exposure, removal of formwork.
IMPORTANT!
All work is carried out in the specified sequence and requires care and compliance with technological requirements. Any deviation or negligence leads to a decrease in the load-bearing capacity of the tape, fraught with destruction of the building.
Marking
Marking work is carried out based on the existing project. The standard dimensions of the bathhouse are 6*6 m or 4*6 m. To do this, you will need to use a building level and a cord to mark the external and internal boundaries of the bathhouse walls:
- Using a vertical plumb line, drive a peg into one of the outer corners of the building;
- Drive in the next three stakes in the same way, making sure the corners are accurate;
- Mark the diagonals using a string. They must be equal;
- The cord must be placed at the height to which it is planned to pour the foundation;
- Having retreated from the pegs at a distance equal to the width of the foundation, drive in the stakes at the locations of the internal corners. Repeat the steps with the cord, controlling the diagonal with a plumb line and the corners with a square;
- Using a cord, mark the installation locations for partitions in the bathhouse and the space under the stove.
Having finished applying the markings, you can proceed to the next stage.
Excavation
The first stage of excavation work is the removal of the top layer with simultaneous leveling (leveling) of the site. For this purpose, it is best to use a bulldozer, although for small buildings located on a flat area, manual preparation is also allowed.
The prepared area is carefully marked using wooden pegs. They are stuck at corner and intermediate points that define the contours of the future trench . After marking is completed, a trench is dug to the calculated depth.
The excavated soil is transported off-site or stored nearby for later use.
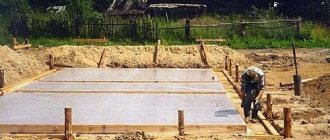
Pillow under the foundation
After completing the excavation work, it is necessary to create a bulk cushion (concrete footing) that performs a drainage function. The pillow usually consists of two materials - river sand and crushed stone. First, a layer of sand is poured, the thickness of which is determined by the hydrogeological conditions of the site and the depth of the trench (usually 20-30 cm).
It is carefully compacted with water. A layer of crushed stone of the same thickness is poured on top and compacted as thoroughly as possible.
A leveling sand layer of about 5 cm is poured over the crushed stone, spilled with water and compacted again with maximum care..
CAREFULLY!
Poor compaction of the footing layer can result in subsidence of the backfill layer, sagging and destruction of the concrete strip.
How to correctly calculate the depth and width
A complete foundation calculation is a complex engineering task, accessible only to a trained specialist.
It is required to perform a comprehensive study of the soil, calculate the weight of the bathhouse without and with a foundation, and take into account a large number of special quantities, coefficients and indicators.
For outsiders who do not have the appropriate education and experience, such a calculation will not be possible.
The solution to the problem will be to contact specialists who professionally deal with such calculations. This option is optimal, but will require certain financial investments.
Another possible way is to use online calculators, of which there are many on the Internet . The results obtained using this method must be duplicated on other resources in order to be able to check the data obtained and select the most reliable values.
Installation of formwork
To create formwork with your own hands, edged boards with a thickness of 25-40 mm are used.
There are other materials, but wood is more accessible, cheaper and easier to work with . In addition, after completion of the work, the boards can be used for other purposes.
The thickness of the boards directly depends on the height of the tape.
The formwork is assembled in stages:
- Assembly of shields. The height is 5-10 cm greater than the height of the tape; the length of the boards is determined by the length of the walls or the size of the boards.
- Installation of shields in the trench. They are fastened together by support strips that determine the thickness of the future tape. On the outside, the shields are reinforced with supports that prevent the mass of concrete from pushing the walls of the formwork outward.
- If the boards are low (up to 20 cm), supports can be omitted, securing the walls from the outside with pegs.
NOTE!
When assembling the boards, gaps between the boards should not be larger than 3 mm (ideally, there should be no gaps at all). If gaps appear, they are filled with tow or slats.
The installed formwork is a structure whose interior is the exact shape of a concrete strip. After assembly, all dimensions should be checked to eliminate the possibility of errors.
Nothing can be corrected subsequently, so the assembly process must be monitored with the utmost care.
The floor in the bathhouse is on screw piles
The method of arranging the subfloor and finished floor depends on the assembly method and material. If a bathhouse on stilts is built from ordinary timber or logs, then only a subfloor is installed in the room.
Laying of the finished floor begins only after completion of the shrinkage processes. If the frame and load-bearing elements of the bathhouse are assembled from glued profiled material, then rough padding, insulation, waterproofing and the finished floor can be laid within a couple of months after completion of construction.
The level of packing of the lag beams of the subfloor is selected below the plane of the timber frame of the screw piles. The difference in height can be calculated by adding up the thickness of the padding boards, insulation and waterproofing membrane. After laying the sandwich on the floor, the plane of the foam insulation slabs should coincide with the piping line of the screw piles, as in the video
Bathhouse on screw piles: floor insulation
To assemble the subfloor of the bathhouse, an off-grade board is used; you can even use chain link or unedged lumber. The condition of the screw supports is not affected by the subfloor, the main thing is that the material is of the same thickness.
The boards are nailed onto the joist beams with ordinary nails, no screws, the fasteners are hit at the ends of the inch, moving 10-15 cm from the edge.
Sheet polystyrene foam is best suited for insulating the floor of a bathhouse on screw supports; you can take penoplex or technoplex. For middle latitudes, you can insulate the subfloor of a bathhouse with sheets 50 mm thick; if frosts in winter are more than 40°C, then it is best to lay two layers of foam insulation.
Advice! Before laying the insulation, craftsmen advise laying a wooden strip with a cross-section of 20x30 mm around the perimeter of the subfloor. Thanks to it, the surface of the slabs forms a drain slope towards the hole, the water will not stagnate and drain much faster.
Waterproofing the floor in a bathhouse on stilts
Before laying waterproofing on the subfloor in slab insulation, it is necessary to cut a hole for the outlet of the bellows cup of the water drainage system. The diameter of the hole in the polystyrene foam should be equal to or 1.5-2 mm larger than the cross-section of the corrugated or plastic pipe.
After installing the corrugation, film insulation can be laid. The best option for a bathhouse floor on screw piles is the EPDM rubber membrane. The material is rolled out as a single sheet over the surface of the insulation, and applied to the walls 25-30 mm per side.
To hold the waterproofing sheet around the perimeter of the washing or steam bath room, an aluminum threshold is stuffed, pressing the material against the insulation.
At the drain point, a hole with a diameter smaller than the internal diameter of the drain is cut, after which the upper flange of the drain device is installed and the structure is tightened with a mounting screw.
Shower floors in a bathhouse on stilts
The next stage of building a bathhouse is installing the finishing floor. Metal mounting “moths” are first attached to the walls, on which the finished floor joists are laid. The distance between the beams depends on the size of the steam room of the bathhouse; the screw foundation ensures high rigidity of the base, but experts recommend installing the floor in the bathhouse on stilts with a step of 50 cm between the beams.
Floor boards are laid on the logs, usually 25-35 mm thick floorboards are made removable on wooden pins. The boards themselves are sanded and chamfered to avoid splinters and chips.
Between the floorboards there are gaps of 1.5-2 mm, this scheme ensures reliable drainage of water even with a large number of washes, and the removable floor of the bathhouse on a pile-screw foundation allows you to periodically remove the boards and clean the lower level.
Selecting reinforcement and its diameter
Selecting fittings is a procedure that in any case will have to be done independently. If concrete or other material can be purchased ready-made, the frame of the tape is made on site, so you need to choose the best option.
There are two types of reinforcing bar:
- Traditional metal rod with fins.
- Composite reinforcement made of fiberglass or other similar material.
Composite reinforcement is 9 times lighter than metal. In addition, it is approximately 20% cheaper, which gives it a significant advantage. But metal rods are capable of bending, which fiberglass does not allow.
In addition, the coefficient of adhesion of fiberglass to concrete is lower than that of metal. If you plan to assemble the frame using a welded method, it is possible to use only the metal type.
The consumption of reinforcing bars for foundations is high, so the opportunity to save is seen as a big advantage. If you plan to assemble the frame using the knitting method, and there is no need to bend the rods, the best option would be to use a fiberglass rod.
For a bathhouse, the recommended diameter is 10 mm, if the structure is large - 12 mm.
Foundation reinforcement and reinforcement tying
The reinforcement cage is designed to compensate for the tensile forces that the tape experiences under bending load. Concrete can easily withstand high pressure, but it cannot work in tension, so installing reinforcement is a necessary procedure.
The frame design is a spatial lattice, the main elements of which are longitudinal rods. They are held in position by vertical rods of smaller diameter with a smooth surface . They are needed only to support the main rods until pouring.
The frame is connected by welding or by knitting with annealed steel wire. Welding is not always available, but knitting provides some elasticity to the structure, which allows it to maintain its integrity with small movements.
The knitting process is not complicated and does not require much time, but it does require some skill..
Auxiliary stages of construction of a columnar base
The most economical option for creating a base is columnar. It takes less time to create it and less money.
Marking is carried out in the same way as described above. And then, along the resulting corners, you should dig holes for the pillars. Since this type of base is used only for light buildings, the depth remains at 80 cm. And often even less - only half a meter.
In addition to the main corner holes, it is worth making several auxiliary ones. This will help distribute the load more evenly on the soil of the entire structure. The distance between the pillars should be at least 3 meters for a small building. But for a building with a large area, it is worth making pillars at a distance of 2.5 m from each other. The calculation is carried out from one of the corners of the future building.
Pouring the foundation
A sand-cement mortar is used for pouring. You can make it yourself, but most builders prefer to use ready-made mortar delivered directly to the site in a mixer.
It is necessary to use concrete grades M 200 or M 300. The best option is to pour the entire strip at once, which makes it possible to obtain a monolithic foundation with the same properties along the entire length.
You cannot pour material into one place, expecting it to spread along the entire length of the tape. It is necessary to pour at several equidistant points, this will speed up the work and ensure a uniform structure of the concrete.
If pouring concrete for any reason was interrupted for more than a day, it can be continued only after the previous portion of the material has completely hardened.
The surface of the poured tape must be leveled with a rule or a spatula . Drying must be done under a layer of polyethylene, with watering every 4 hours for the first 3 days. Then, for 7 days, watering is carried out 3 times a day.
The formwork can be removed after 10 days, and complete drying is considered completed after 28 days.
Laying blocks with your own hands.
How high should the foundation for a bathhouse be?
Scheme of a columnar foundation made of blocks for a bathhouse.
The foundation in this case consists of expanded clay concrete blocks standing on concrete pillars. To begin with, we mark the directions for the blocks by driving 4 pegs along the outer perimeter of the future bathhouse. Pull and level the cord to the height of approximately the first block. If you made basement formwork when pouring concrete, the masonry is carried out according to its dimensions, placing the blocks on concrete pads.
Lay two blocks at a time, filling the seam with mortar. Lay the next row perpendicularly, the edge of the expanded clay block or foam block should touch the cord. Blocks are mainly used to raise the height of concrete foundations above the ground or when the site has a large slope. Lay the required height and leave it to dry. During laying, place studs between the blocks to secure the frame.
Waterproofing
There are many ways to waterproof a strip foundation. The most popular and simplest option is to apply hot bitumen or ready-made bitumen mastic, which does not require preheating.
The material is applied in at least two layers. Additional waterproofing is often used using roofing felt, densely distributed along the internal walls of the formwork before pouring . The main task is to ensure complete tightness of the waterproofing layer, continuity and uniformity of application of the material to the surface of the foundation.
Preparing the reinforcement frame
After the formwork for the foundation is ready, the next step is to lay the reinforcement. When constructing a bathhouse, metal rods with a diameter of 10-12 mm can be used as reinforcement. This is enough to make the structure strong and durable. The installation process should proceed as follows:
- The rods are connected to each other with metal wire, 4 pieces each, so that a square structure is formed.
- Ready-made metal structures are laid horizontally in trenches, and vertically in wells for piles.
- It is advisable to either cut the corner reinforcement using a grinder, or bend it at an angle.
- The rods should not rise above the pouring surface, so the frame should not be higher than the formwork.
In order for the foundation for a bathhouse to last a long time, it is necessary to carry out additional waterproofing before installing the fittings. To do this, fairly dense polyethylene is placed on the bottom of the formwork, which prevents the oxidation of the metal rods.