During a major or cosmetic repair, it is very useful to know how to repair a crack in a wall, because without rough preparation, further work is useless. Even a small crack requires special attention, since over time it will increase, leading to serious consequences. When starting to eliminate a crack, it is important to take into account its width and depth, the material of the wall, since the methods and tools used in each individual case may differ. In addition, after eliminating the defect, the restored surface must be properly cared for.
Required tools and materials
To seal cracks you will need the following material:
- wood glue in the consistency of thin sour cream, mixed with tooth powder or chalk chips;
- strips of cotton fabric, gauze, medical bandage, soaked in PVA glue (they can be replaced with fiberglass tape);
- cement mortar mixed with paint prevents moisture penetration;
- lime-cement mortar reinforced with mesh;
- sandpaper for grouting;
- primer;
- sealant;
- putty mixture;
- polyurethane foam;
- plaster for finishing.
Preparation of cement mortar for sealing gaps, cracks, seams
Tools you will need:
- brush;
- brush;
- putty knife;
- construction mixer;
- foam sponge;
- gun for sealant and polyurethane foam.
Tools needed for putty
In some cases, the work will additionally require a hammer, chisel and a hammer drill with attachments.
How to repair a crack: types of mixtures
In order to choose what to cover cracks in the wall with, you need to take into account the features of the coating:
- To eliminate damage in concrete and brick walls, a cement-sand mixture and its varieties are used, but it is better to add plasticizers to it.
- To restore the coating of plastered walls, plaster and putty compounds are used, the most popular of which are cement and gypsum.
- To eliminate small gaps, acrylic-based sealants are used.
You can get rid of a small crack using sealant - Cracks in drywall are sealed with a putty mixture, and in wooden surfaces they should first be caulked, then a special wood putty should be applied.
What is better to use
The choice of composition for repairing a concrete surface depends on how the defective surface is located: vertically or horizontally. This is also influenced by the operating conditions of the concrete structure and the time of year when you plan to make repairs.
You can cover up cracks on a horizontal surface with almost any solution. If the problem appears on a vertical wall, then use thick and viscous solutions. An alternative would be to use self-expanding cords.
How to dilute the solution yourself
Cracks in walls can occur both outside and inside the building. Therefore, there are two main types of mortar - plaster for external and internal work.
I. Mortar for sealing cracks outside the building
Restoring the integrity of the surface of the walls outside the building is carried out using cement mortar plaster. It is prepared as follows: use cement and sand in a ratio of 1 to 3, add PVA glue, dilute with water to a medium-thick consistency. You can use ready-made dry solutions, which just need to be diluted with water in the ratio indicated on the package.
II. Interior solution
For interior work, lime mortar is used: lime and sand are mixed in a ratio of 1 to 4, diluted with water. The consistency should be such that when thrown onto the wall, the mixture forms a dense “pancake” and not a lump.
Visual differences
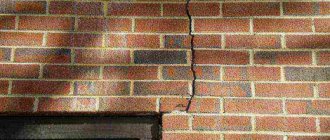
It is important to understand the depth of the defects. The cracks may be at the very top of the brick, almost scratches. There are very deep defects that go through the entire masonry. The last option is the worst possible. Visually, cracks can be:
- Vertical;
Vertical cracks - Horizontal;
Horizontal crack - Sloping;
Oblique crack - Straight;
Straight crack - Curvilinear;
Curvilinear crack - Closed;
Closed crack - Through;
Through crack - Superficial.
Surface cracks
Repairing cracks also begins with determining their size. And it could be:
- Wide if the gap is wider than a centimeter.
- Medium dimensions, parameters from 5 to 10 millimeters.
- Small, such cracks measure up to five millimeters and are considered the most harmless for the general condition of the brickwork.
It is also worth checking each crack for the level of stabilization and the possibility of expansion in the future. This is done using special tear tests. For the examination, you will need several plaster beacons, as well as plate elements with a special scale. Stabilization is determined by simply gluing paper to the defect or applying a cement strip to the crack.
Regulatory beacon on a crack
Repairs to cracked walls should only be done if they do not continue to expand. First, the process must be stopped and only then all the resulting defects must be corrected.
When the reasons are identified, the shrinkage process is completed, and the cracks no longer widen, the final repair process begins. After applying a strip of paper or a little cement to the defect, you should wait a while. If the item remains intact, then you can begin work. If the deformation continues, then we do not recommend starting any action; it is necessary to resolve the issue with a construction expert.
Using polyurethane foam
Large gaps in walls, for example, made of brickwork, can be sealed using polyurethane foam. The gap is first cleared of debris, filled with primer, then foam. When the polyurethane foam “sets,” it is cut to a depth of about 20 mm, and cement mortar or adhesive is placed in this gap.
Foam is also used to seal through gaps in temporary buildings.
Question:
What nuances do you need to know when using polyurethane foam to repair cracks?
Answer:
When working with polyurethane foam, you should remember that too much of it leads to an increase in the crack, and its remains should not stick out out of the gap. It is added not as a single filling, but in stages, for those areas where it is not enough. Excess foam is cut off, the gap is waterproofed, the outside is covered with cement mortar, and the inside is plastered.
Foaming a large gap between the wall and the ceiling
Causes of cracks
Without knowing the real reason for the occurrence of splits in the facing layer or even in the masonry of the wall that spoil the appearance of the building, you will never be able to stop the process of destruction of the structure. If the fight is not started immediately, the house will eventually lose its strength, become cold and unusable.
The main reasons for the destruction of the structure:
- Incompetent soil examination at the construction site causes errors during the development of the type and depth of the foundation. An insufficiently strong foundation cannot withstand the shrinkage of the structure.
- In the first years there is a strong shrinkage of the house. If the owner of the building decided to make an extension to the main building during operation and did not complete the expansion joint, cracks will certainly appear between the existing building and the new one.
- A sharp increase in the load on the walls and foundation as a result of the construction of a previously unplanned additional floor.
- Using low-quality mortar for the construction of walls or violating the technology of constructing a brick building.
- Failure to comply with the installation technology of the facing facade.
As soon as you notice the appearance of the first crack, it is necessary to carefully examine the entire structure in order to detect and be sure to eliminate the cause of the violation of the integrity of the building’s structure.
Important! There is no point in repairing cracks if you don't know why they are spreading. It is necessary to begin repairing the cracks themselves only after the growth of the crack and the deformation of the walls have completely stopped.
Crack sealing method
Repairing cracks in walls is carried out using different methods, depending on the type of surface. Let's consider the details of eliminating gaps on surfaces made of various materials.
In brickwork
Repairing cracks in brick walls is carried out in different ways, depending on the size of the damage. If the width of the defect is up to 5 mm, you can get rid of it using cement mortar or regular tile adhesive. The gap is widened with a spatula or hammer and cleaned of dirt. The gap is treated with a primer, then filled with cement or adhesive mortar.
To eliminate cracks 10-15 mm wide, a cement-based solution is also used, but with the addition of fine sand. Sickle tape is glued over the repaired area and putty is applied.
In a plastered wall
Plaster can crack both outside and inside the house.
In any case, the restoration procedure begins with widening the cracks and deepening them with a spatula or a sharp knife. Next, the gap is cleaned of contaminants and primed with a deep penetration solution. When the primer has dried, the plaster mixture is placed inside the gap to its entire depth. Without waiting for the solution to dry, reinforcing tape is glued over the crack and covered with plaster. For repairs, it is recommended to use a gypsum mixture. When the plaster layer dries, it is rubbed with sandpaper for complete leveling.
On sheets of drywall
Cracks in drywall may appear due to too thick a layer of applied plaster or a violation of the thermal regime when it dries. Vertical and horizontal cracks occur at the joints between sheets due to weakening of the metal frame of the wall or the absence of reinforcing tape.
Reinforcement with metal tape
In the first case, the cracks form a “web”. To get rid of it, you need to remove the damaged layer of plaster and apply a new one, but no more than 2 mm thick. Each layer of plaster must dry thoroughly.
In the second case, you need to carry out a number of actions:
- Use a sharp knife to widen the cracks at a 45-degree angle.
- Fill the gaps with gypsum mortar.
- Apply reinforcing tape over the filled crack.
- The surface is leveled with plaster and sanded with an abrasive mesh before applying a decorative coating.
Repairing cracks between sheets of drywall
Technologies for eliminating major damage
There are several technologies that can help repair major damage in concrete structures.
Injection
This technology is used to restore the integrity of structural elements in basements, tunnels, foundations, especially block-type ones. Its essence is that the gap is filled with repair mortar under strong pressure. For this purpose, special equipment is used - injection pumps (manual models are produced for everyday use), packers - tubes. With their help, the filler is introduced into the hole.
For such repairs, one of three compositions is used:
- Polyurethane or epoxy resins . These products are effective in sealing small cracks and form a seamless structure with the thickness of the concrete. One of their advantages is fast setting. Resins have waterproofing properties and help eliminate leaks. Epoxy compounds are used when the structure is constantly in contact with chemically active media.
- Polycement mixtures (microcements) . These preparations are made on the basis of finely ground Portland cement. Auxiliary components include sodium carbonate filler, lime and other additives. Microcements are indispensable for major damage in a concrete structure.
- Waterproofing solutions . Polyurethane mixtures are suitable for restoring constantly wet areas, especially in sewer and water supply systems. Acrylic gels, when reacting with water, increase in size several times. They not only cover the cracks, but also dry the concrete a little.
Self-expanding cords
The use of bentonite cords is another way to repair cracks caused by shrinkage and deformation of concrete structures.
Bentonite cord.
The rope is made from sodium bentonite and rubber. This material is often used for waterproofing joints. Under the influence of water, it increases 16 times, and tightly closes even the smallest cracks.
Cords are produced in various widths with a length of up to 40 m. The cross-sectional shapes are square, rectangular, or round.
You need to choose the right harness parameters. The quality of the repair will depend on this.
The advantages of the material include:
- environmental friendliness;
- low cost compared to other repair compounds;
- ease of installation;
- resistance to dynamic loads;
- chemical passivity;
- resistance to low temperatures;
- long service life.
Installation features
Prepare cracks for repair as described above. Check that the cord is completely dry. It is placed in the middle of the hole or closer to the side that gets wet more.
The cord is attached to dowel-nails and self-tapping screws. The distance between the fasteners should be about 45–50 cm. If this method of fixation is not possible, use a polymer adhesive solution (recommended at low temperatures), sealant, or rubber mastic.
The cord pieces are overlapped (4–5 cm), for which they are preheated.
Connecting ends is also practiced. To do this, the ends of both cords are cut so that the contact area is as large as possible and secured with polymer-based glue. The edges are trimmed and joined to the transverse previously installed elements, forming a closed system.
The empty space is filled with sealant, preferably polyurethane based. Then the surface to be repaired is leveled, and excess mixture is removed.
Expert opinion
Levin Dmitry Konstantinovich
This technology is convenient because work can be carried out even in the cold.
Shotcrete
This method is used for foundations, underground parts of buildings, facades. Shotcrete involves filling the damage with a jet of sand-cement mixture supplied under high pressure. Repairs are carried out using dry and wet technology.
Scheme for sealing cracks in concrete using shotcrete.
For this method, shotgun installations have been developed that supply the solution at a speed of 80 m/s under a pressure of 50–350 kPa. Upon contact with the surface, the solution compacts and covers all cracks.
Dry method
The shotgun installation uses two sleeves. One by one, a dry mixture based on Portland cement, modifying additives, and fine aggregates is supplied. In other words, water. The components are combined in a nozzle, and the finished solution is supplied to the surface to be repaired. The dry method is convenient because it does not require pre-mixing the solution.
Wet method
In this case, the ready-made mixture enters the installation. Despite the fact that kneading takes a lot of time and effort, this method has its advantages. The advantages are reduced dust formation and minimal loss of composition due to reduced rebound of the working solution from the surface.
For each method, their own models of torquet equipment are produced. In addition, the dry method requires certain professional skills. Even a beginner can do wet torquetting.
The technology is used not only for concrete structures. It is effective in restoring brick and stone masonry.
Have you ever had to seal cracks in concrete?
It happened, it didn't happen
In a concrete wall
Cement mortar is used to fill gaps on concrete walls. The surface is prepared, cleaned of dirt, the remains of old plaster are removed, then the cracks are carefully filled with mortar. Experts often recommend that before filling a gap with cement mortar, lubricate its internal cavity with PVA glue.
In case of large defects and through cracks, the cracks are filled with mounting foam, sealed from the inside with gypsum mortar, and from the outside with cement-sand plaster. Defects less than 5 mm wide can be sealed with sealant.
Preparation of concrete structures for repair
Before choosing a repair method, inspect the structure and determine the extent of the damage. Based on the results, the technology and composition for repair are selected.
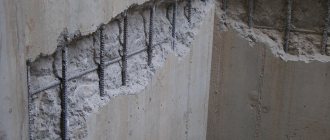
At the next stage, the crack is widened. Remove fragile elements, dust, and small debris from the hole. To do this you will need a brush or vacuum cleaner. Exposed fittings are cleaned of rust.
Stages of repairing cracks in concrete.
Small cracks are opened to such an extent that the solution can be poured inside. Large cracks are prepared for strengthening: grooves are cut in the walls across the holes, into which reinforcing wire is then installed.
The inner surface of the crack and the adjacent areas are treated with primer, which enhances adhesion.
What to do if the crack is long and deep
How to repair a crack in a wall if it is deep? Slots wider than 15 mm are considered dangerous because... may cause wall destruction. If such gaps appear on the brickwork, the defective area is dismantled and replaced with new masonry. In this case, the bricks are laid in a special, interlocking way, strengthening the rows with pieces of reinforcement.
New masonry will help such a crack
You can protect the wall from destruction due to significant cracks by installing lintels or making metal reinforcement. This method is effective for monolithic concrete walls: metal corners are tightened with long bolts, sometimes it is necessary to install reinforcing belts along the entire perimeter of the room or building. The reinforcing belt is installed before sealing a crack in the wall - under the roof, above the foundation, sometimes in several rows.
Such a crack should be sealed with foam, cement, reinforced with a reinforcing belt
A wide and deep gap in drywall can be filled with gypsum plaster
If the gypsum boards are cracked
The plasterboard wall cracks mainly at the seam. A problem arises when the technology for installing the metal frame and securing the gypsum board sheets is not followed. To install the sheets correctly, you need to study the rules for installing gypsum boards. Another common mistake is that the seams in the drywall are not sealed correctly. However, sometimes other cases occur, for example, a sharp temperature change in the room, severe dampness or a flood. When interacting with water, drywall is susceptible to deformation, and when it dries, it cannot be corrected. This ensures its complete replacement in case of flooding.
Typically, cracks in plaster appear in the seam area.
It is possible to eliminate a gap in a plasterboard wall using the following methods: expand it and seal it with acrylic or putty intended for plasterboard. As an option, fiberglass is glued over the seam, followed by putty, sanding and further painting or wallpapering. This method is more labor-intensive and financially expensive, but has greater reliability. It should be borne in mind that both methods are used if the metal frame for drywall is firmly attached to the wall and does not wobble.
How long does it take for the solution to dry?
You can begin finishing the wall only after the repair mortar has completely dried. Drying time depends on the material used. Gypsum plaster dries in about three days. The cement-lime mortar will need from 24 hours to two days. The cement mortar dries in 24 hours, and for facade plaster it will take only 8 hours.
When the material dries, special conditions must be created to prevent repeated cracking: air temperature not higher than +25C, absence of drafts and direct sunlight.
Installation of beacons
Experts recommend installing beacons on cracks in the wall immediately after detecting a defect and observing the result for 8 to 10 days while all the necessary materials are prepared to prevent further destruction. Plaster and solutions based on it, special devices and strips of paper are used as beacons.
Before installing beacons on a crack in the wall, you need to clean the place where they are attached. Otherwise, the beacon will slide off along with the plaster.
Paper strips are stretched across the break and glued on both sides. When the walls move, they tear.
Gypsum beacons are placed indoors. Mix the plaster with water until it reaches a thick putty consistency. The composition is made into something like a dumbbell with wide edges and a narrow middle. A beacon is attached across the defect. You can put marks on it on both sides at a certain distance. Then use them to measure the size of the displacement.
For external use, a cement-gypsum mixture is used. It is less susceptible to moisture.
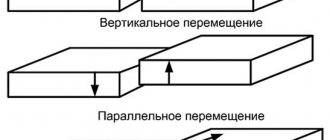
Professionals are armed with various instruments, including micrometers that are mounted on the wall and record the slightest displacement in hundredths of mm in both directions.
Finishing
The final finishing after repairing cracks and cracks is carried out after the solution has completely dried. The dried mixture is sanded well, leveling it with the rest of the wall surface. Then the primer is applied until it stops being absorbed into the restored area of the surface. After this, you can begin decorative finishing - painting, wallpapering, applying textured plaster, etc.
Finish grout
The consistency of the finishing putty should be dense, but not too thick.
How to repair
Container with mortar and spatula
Required tools:
- A small spatula for applying and mixing the solution.
- A container that will contain a solution for sealing cracks.
- Construction trowel.
- Hammer.
- Brush.
- Scarpel for stone processing.
Boaster - Putty knife.
- Polyurethane foam.
- Cement.
- River sand.
- Rolled metal.
- Fittings.
Armature - Dowels.
Dowels - Anchor bolts.
The list varies depending on the type of crack. First, the surface is cleaned of all unnecessary debris, dirt, dust, etc. Next, moisten all cavities with liquid and wait until they dry.
Each crack is initially treated with putty or cement plaster.
Next you need to lay the reinforced tape. An additional layer of cement is applied on top, or putty can be applied.
Very small cracks can simply be rubbed, others need to be treated with cement mortar. When the thickness of the crack does not exceed one centimeter, you need to:
- Dismantle all areas of brick that have cracks or other defects.
- Clean from dirt or dust.
- Prime the surface.
- A step with a width of 25-50 centimeters is created, holes are drilled, and dowels are inserted.
- A metal mesh is placed, the cell size is 5x5 millimeters. Attached on top with screws.
- A strong and reliable plaster solution is prepared; it is better to mix it with sand. Apply on top in a dense, thick layer, evenly and smoothly.
- Finishing materials are applied.
When the cracks are very wide, more than one centimeter in diameter, you need to:
- Inspect the entire exterior wall for cracked bricks and then remove them.
- Using a specially constructed scalpel, any dirt or dust is removed from the treatment site.
- Cement mortar is created and new masonry is laid.
- A metal anchor is a plate on which there are two pins, a kind of anchor. For this method, it is better to order services from construction expertise companies.
Cracks larger than one centimeter are no longer just a defect, they are a critical problem. It must be eliminated using instrumental methods, and not by simply sealing it with putty or cement mortar.
How to care for a restored wall
A wall restored after repair, first of all, must be protected from various mechanical influences - do not move furniture too close to it, hammer nails into places where cracks have been repaired, and protect it from being hit by a door.
You need to wipe the walls carefully so as not to damage the decorative layer of the coating. If the decorative coating is durable, it will be able to protect the wall from various influences that could cause repeated cracking, provided that the crack was repaired efficiently and the plaster was completely dry before decorative finishing work. Therefore, methods such as coating decorative plaster with colorless varnish, applying waterproof paint to the surface of walls, using wooden, plastic, gypsum panels, and non-woven wallpaper are used.
Controlling the increase in crack size
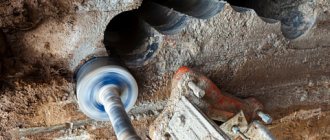
FILLING AND SEALING CABLE CHANNELS
1. First, using a sponge, lightly moisten the area of the wall around the open cable channel (fines), otherwise the dry plaster will take moisture from the putty mixture, which will lead to cracking and even the applied layer falling off. The wiring must be in a corrugated plastic pipe.
2. Using a small spatula, place the required amount of prepared putty on the trowel (trowel). Using a trowel makes it easier to work with thick putty. Place the putty on a spatula in small portions and fill the crack to its full depth.
3. The cable channel is filled in sections. The putty is applied from top to bottom and smoothed in a circular motion. Particular attention is paid to the connection to the mounting box for a socket or switch.
4. The filling of the cable channel is carefully compacted. When the entire groove is completely filled, the resulting seam is passed several times with a wide trowel to completely level it with the surface of the wall.
You can use a sharp kitchen opener or similar construction tool to remove old wood plugs and even plastic dowels.
Videos on repairing cracks in walls
The main stages of sealing a crack in a plastered wall in a video:
You can find out what materials to use to cover cracks from this video:
The appearance of cracks on the facade of a house or inside it can be caused by various reasons: shrinkage of the foundation, improper rough finishing, disruption of the bricklaying process, the use of low-quality or inappropriate materials, and many others. It is important to notice their appearance in time and take all necessary measures to eliminate defects. A fine network of cracks in the plaster is usually not associated with the danger of wall destruction, but in any case, the process of the appearance of new gaps must be controlled, as well as the increase in their size
Main causes of defects
Despite its high strength characteristics, any concrete structure is susceptible to destruction. The main factors that contribute to this:
- Temperature changes. If the poured surface is not protected with frost-resistant mortar or insulation material, then constant temperature changes will negatively affect the concrete composition.
- As a result of frequent cycles of freezing and thawing, moisture enters the voids in the material. At negative temperatures, it expands, as a result of which it begins to destroy the concrete product from the inside. Cracks of different sizes gradually spread throughout the material, as a result of which the strength of the concrete decreases significantly.
- Carbonization of the material also leads to the appearance of various defects. The material begins to absorb carbon dioxide, which does not affect the strength of the structure of the concrete product, but contributes to the destruction of the reinforcement. It is part of many concrete structures. Saturation of cement with this gas leads to the formation of lime, which creates an alkaline environment in the material, leading to corrosion of steel reinforcement. It increases the volume of the latter and increases internal tension. The result is the appearance of cracks in the material and exposure of the reinforcement, which gradually rusts.
- Exposure to sulfates (salts of sulfuric acid) leads to the gradual appearance of cracks and destruction of materials. These substances react with other chemical elements, resulting in the formation of chalk and other components. All of them lead to the fact that the concrete begins to increase in size. The result is the appearance of faults and destruction of the product.
- Table salt also leads to the expansion of concrete, the appearance of cracks and further destruction of the structure. Deformations that have arisen due to this substance can be distinguished by standard white smudges. Further destruction can be prevented by treating the material with hydrophobic compounds or polymer impregnations.
The appearance of cracks on a concrete surface can be associated not only with the influence of external factors, but also with non-compliance with the technology of pouring the structure. The reasons in this case are the following:
- During the preparation of the working composition, more water was taken than required. Excessive amounts of moisture negatively affect the strength of the concrete surface.
- At the stage of pouring the structure or structure, a low-quality composition was used. It is possible that cement of poor quality was purchased to prepare the composition, or the required part of this component was incorrectly adjusted.
- Concrete gains strength only in a moist environment, so we should not forget about the need to retain moisture in the freshly laid material. It will take approximately 28 days to reach the required strength. After the working mixture is poured, it needs to be irrigated with water for the first 3 days. It is also important to thoroughly compact the solution when pouring it into the formwork - this will reduce the porosity of the concrete and give the structure uniformity.