During the renovation process, plastering walls with cement mortar is an important part of finishing the room. Despite its simple composition, this solution is able to reliably hide wall imperfections. In this way, structures in old houses with brick or concrete walls are strengthened. Plaster is used to improve the thermal insulation and fire resistance of premises. This material is often used due to its moderate cost, and a wide choice of further decoration ensures that plaster is in demand in the field of construction and renovation.
Functions of cement-sand plaster
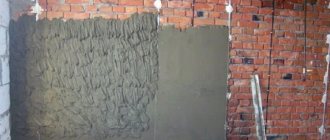
A cement-sand mixture, or CSP, makes it possible to level the surface: eliminate cracks, chips, potholes and gaps between the brickwork. This solution has good adhesion; it adheres to aerated concrete blocks, bricks and concrete surfaces.
Various types of mixtures with different additives are produced, which allow the use of a cement-sand mixture for leveling facades and interior surfaces, including those with high humidity, such as swimming pools and bathrooms.
Interesting! Cement-sand mixture is used in the repair of unheated and commercial premises, which makes it a universal material.
Plastering technology suggests that application can be done using two methods:
- manually in two layers with a layer of special primer
- mechanical
Finishing work
As soon as the walls covered with plaster mixture have completely dried, the final stage of repair begins - finishing. It is performed in several ways:
- using spraying, they form the original texture of the wall surface;
- the walls are painted with compositions of different color shades;
- The surface of the wall is made rough.
The required finishing option is determined taking into account the individual wishes of the developer.
Advantages and disadvantages of cement plaster
Cement-sand plaster has many significant advantages:
- relatively low cost
- easy to prepare the solution: just add water and mix with a construction mixer or a screwdriver with an attachment
- Once you understand the theory in practice, even a beginner can handle DSP, especially when repairing small surface defects
- DSP helps save money by reducing the thickness of finishing coatings
- does not absorb moisture
- improves heat and sound insulation
- available material
- good adhesion to blocks, bricks, cement
- high-strength coating, not afraid of temperature changes
And yet, even such time-tested material may have some disadvantages:
- practically no adhesion to wood, ceramics and painted surfaces
- even a reinforcing mesh will not completely solve the previous problem
- the color is not white, which creates difficulties when painting
- a large layer of CPS can float down under its own weight even before drying - you will have to control this process
- may crack due to shrinkage
- cannot act as a finishing surface, too porous
Additional components
In some cases, additional ingredients are added to the formulations:
- Ground quartz. The fraction of this material can be from 0.1 to 6 mm. It is added to enhance the decorative properties of plaster and improve its resistance to acidic environments.
- Barite sand. This material protects surfaces from exposure to radio frequency waves. Plasters with such a substance are needed in areas with high background radiation, in various enterprises and in medical institutions.
- Crushed marble. This substance increases the strength characteristics of the composition, as well as its decorative properties.
- Mica. Makes the coating immune to ultraviolet waves.
- Metal shavings. Significantly increases compressive strength, but is susceptible to corrosion, so its use is not always justified.
- Expanded polystyrene. This material is added to plaster to increase thermal insulation performance.
What is included in cement-sand plaster?
The cement-sand mixture already contains both components, as you might guess from the name. All that remains is to add water and mix the required amount of solution mechanically.
Interesting! Different types of plaster contain different grades of cement. It could be M100 or M500, the information will be indicated on the packaging in any case.
The brand of cement affects the strength of the coating and its purpose. It all depends on the finish coat and the location of application. For facades, values in the range M250-M500 are recommended. For most interior work, a cement-based mixture M100-M250 is quite suitable. Exception: working with tiles.
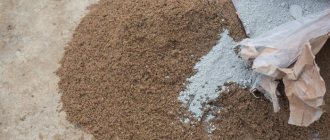
Various types of sand are added to the cement-sand mixture. Sea sand is rarely used in the finished mixture, so usually the choice is between river sand and quarry sand. Professional builders prefer river and sea. Many parameters of the finished mixture will depend on the quality of the sand: color, reliability of adhesion, strength, shrinkage, tendency to crack and final wear resistance.
If you still manage to purchase a mixture based on sea sand, then you can expect it to be free of impurities that can reduce the adhesion of the solution to the surface. DSP based on sea sand, as a rule, is more expensive than samples from river or quarry sand.
Usually the following proportion of sand in relation to cement in the mixture is used: 3 to 1. However, the composition will also contain other components with different purposes. Here are some of them:
- plasticizers: make the solution more plastic, facilitate application and especially leveling with a rule and a spatula
- copolymers: including improving thermal insulation
- redispersible powders: hinder moisture absorption and increase adhesion to the substrate
Specifications
The thermal conductivity and strength of a material depend on density . In their pure form, without any additives, the solutions are heavy; in the solidified state, their density is 1600-1800 kg/m3. The result is a durable coating, suitable even for floor screed. Due to high density, high thermal conductivity. Gypsum is porous, and plaster has a thermal conductivity coefficient of 0.9 W (m*K).
The walls in the room must absorb excess moisture, removing it outside so that condensation does not form. Therefore, when choosing a material, vapor permeability is taken into account. For cement mortar this figure is 0.09 mg/mhPa.
At temperatures up to +25 degrees, a layer two centimeters thick takes on average fourteen hours to dry. With a larger layer, of course, the drying time also increases. To be sure, it is recommended not to touch the plastered walls for a whole day.
You also need to pay attention to the consumption of plaster. Dry CPPS are cheaper than gypsum, but their consumption per square meter is higher. Usually the packaging indicates how much material will be needed to create a layer for one square meter.
For what purposes is DSP with additives used?
DSP varies in purpose depending on the additives:
- rough leveling work, including installation of reinforcing mesh
- for filling depressions, cracks, chips, potholes
- special mixture with additives against the development of fungus and mold for wet rooms
What are the application methods for beginners: options for how to quickly plaster
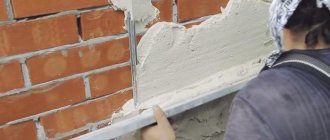
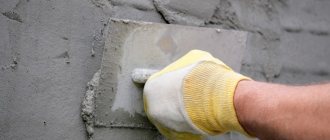
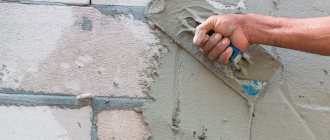
In plastering work, two main methods of applying mortar are used: throwing and spreading.
- Throwing (cape) comes down to the fact that the master forms a plaster layer with sharp throws. This method is used in the first stages of work. It is quite difficult for beginners, since correct and refined movements are important in the cape process. A beginner will drop a large amount of solution on the floor and on his hands.
- Spreading involves rubbing the plaster into the surface. It is more convenient to spread with more plastic mixtures, for example, with gypsum compositions. When spreading, the tool is brought to the wall, pressed and moved from the bottom up until all the plaster is on the surface.
How to properly mix plaster mortar
It all depends on the volume in which the work with plaster will be done. On large projects a construction mixer is used. For small spaces, a screwdriver with an appropriate attachment and a construction plastic bucket will be sufficient.
The bucket is cleared of dust and debris, a little cement-sand mixture is poured into it, making sure that the mixture looks homogeneous in a loose state. If this is not the case, then mix it with a trowel even before adding water.
Cold, clean water is gradually added to the dry mixture so that it can be conveniently stirred with a tool. It is important not to overload the screwdriver with a mixture that is too thick in consistency, which will simply “screw” onto the attachment. Also, when mixing, you should be guided by two principles: the mixture should not be too liquid, so as not to drain under its own weight; and the mixture should not be too thick so that it is difficult to level.
Advice! Do not knead a large amount of the mixture at once. Its plasticity will change for the worse already 20 minutes after preparing the solution.
Before you start creating a new portion of the solution, you should thoroughly clean the plastic bucket from clots of the used mixture.
Let's sum it up
As you have already seen, cement plaster is not only an effective, but also a fairly cheap way to level walls. In addition, this is a very good option for preparing a particular surface for subsequent finishing, in which decorative coatings or other cladding can be used.
To install the material, expensive tools are not required. The process itself is extremely simple.
If you have any questions, you can always watch the video: installing wall cladding - many unclear points will be immediately revealed.
Preparing walls before applying plaster
Owners of cement walls will have the best luck, as this minimizes preparation. It will be enough to remove dust and possible construction debris from the surface. No primer is required, both materials adhere well to each other.
With a brick wall, everything is somewhat more complicated and depends on its condition. Smooth brickwork will only require a primer to prevent liquid from being drawn out of the cement-sand mortar. Then apply a coating up to 3 cm thick.
Uneven brickwork will require the application of a rough layer of cement-sand plaster, reinforcing mesh and a leveling layer. You will also have to beat off the protruding parts of the mortar that was used to adhere the brickwork.
Wood and other surfaces that do not adhere well to cement-sand mortar will require a metal mesh to continue work.
Tool
To apply plaster to a brick wall, prepare:
- Master OK;
- ladle;
- steel spatulas (wide, narrow);
- grater;
- rule;
- trowel (for decorative work);
- level, plumb line or construction laser;
- roulette;
- pencil;
- mixer;
- containers;
- rags;
- masking tape;
- devices or tools for removing old coating;
- individual protection means.
Rules for applying cement-sand plaster indoors
Before applying cement-sand plaster, a beacon system is installed. They can be metal or plastic; in the latter case, they can be left inside the hardening mixture. Their purpose is to serve as guidelines for subsequent leveling of the mixture.
When installing beacons, you must adhere to the recommended values: installation height in relation to the surface, distance between adjacent beacons. Most often they are placed directly on the mixed solution.
The wall is moistened and “sprayed” with quick, precise movements using a trowel: the solution is literally thrown onto the wall.
Next step: leveling. The following tools are usually used: a wide spatula.
A primer must be laid between the layers of DSP. The finishing layer is sanded in a circular motion.
Necessary equipment
Before plastering the walls, it is recommended to prepare everything you need to complete the work. The kit looks like this:
- trowel or ladles;
- rule;
- grater and grater;
- construction level;
- lighthouses;
- a shovel and a container of a suitable size for making a batch (for large volumes of work, it is allowed to use a concrete mixer);
- buckets;
- spray bottle for moistening walls;
- fishing line or cord;
- hammer, chisel, brushes.
What affects the strength and hardening time of plaster
The application process and the primer between layers should not be ignored if you want to get a truly durable and durable coating. Under no circumstances should you try to dry layers of plaster using any artificial methods or heating devices, as this may cause cracking. Drafts in the room where repairs are being carried out can lead to the same disastrous result. Curing time is affected by humidity and temperature.
In addition, the cement-sand mixture must be promptly removed from the construction bucket, trowel, rule, screwdriver attachment and other tools that are in contact with the mixture. This will help to avoid frozen “pebbles” getting into the plastic fresh mixture.
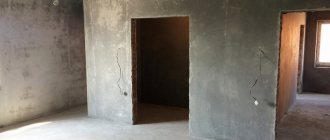
Finally, cement-sand plaster is by no means the final option for finishing a room. It would be correct to cover it with putty or other selected materials.
Installation of beacons
Beacons are metal profiles that are installed vertically along the wall. Using these simple devices, the master is guided in regulating the layer of plaster during the process of applying it. This process is important and responsible. Immediately after this, you can start cement plastering the walls.
Brick wall with installed beacons
Beacons can be removable or permanent. The first type has a diameter of no more than 6 mm. After applying the base layer, they are carefully removed. To hide traces of the use of beacons, grout is used. Devices with a diameter greater than 6 mm are usually left in the wall.
Installation of beacons begins with marking. The first of them will be at a distance of no more than 20 cm from the edge of the wall. Then the gap increases to 40 or 50 cm. First, the master applies a small layer of plaster to the intended installation site. Then the beacon is slightly pressed into the base strictly vertically. To ensure that there are no distortions anywhere, level measurements must be made in all directions: vertically, horizontally and diagonally.
Although this process is considered painstaking, plastering walls in beacons is the easiest way to apply the mixture in an even layer over the entire wall.