The foundation for a brick fence is the basis without which it is impossible to create a truly durable fence. It is impossible to erect a fence with brick pillars without a foundation, since it is this support that allows you to correctly distribute the load on the ground. In addition, it is important to remember: the more massive the fence is to be erected, the stronger the support should be.
Foundation under the fence of a country house
Types of base for a brick fence
Before making a foundation, you should decide which type of foundation will be optimal. The foundation for a fence with brick pillars can be of three types:
- Tape - chosen for barriers no more than 2 m high and 0.5 brick thick. In this case, the occurrence of groundwater must be at a sufficient depth. In addition, the terrain is also important. A strip foundation for a brick fence is chosen if the landscape differences are no more than 0.5 m.
- Columnar - used for a fence that is planned to be built not only from brick, that is, the gaps between the columns are filled with a metal profile, mesh, forged or wooden elements. The basis of such a foundation for a brick fence is a pipe placed at the required depth in the soil. The depth of the support for the column depends on the depth of soil freezing, mobility due to sand, and also on the depth of groundwater.
- Column-and-tape is suitable for fences that are higher than 2.5 m, installed on moving soils, where the occurrence of groundwater is quite close to the surface. It is also used where the climate of winter is very low, which means the soil freezes very deeply. If there are sharp and abrupt changes in the landscape, then steps can be built for such a fence.
Country version of a fence with brick pillars
Materials for masonry
In order for the fence to look beautiful and the supports to be strong and reliable, it is necessary to use high-quality materials.
Brick selection
The bricks used for laying pillars vary not only in grade and workmanship, but also in appearance. So which brick to choose for fence posts? It can be an ordinary clay stone with smooth ends and internal voids to lighten the weight. It is affordable for most developers and has an attractive appearance.
Decorative products with a textured end surface look more original. In addition, such bricks are characterized by higher strength, durability and high resistance to environmental influences.
However, such material costs much more. Therefore, you can often see options for the combined use of ordinary clay bricks and decorative textured stones, which are placed every 2-3 rows or in another order.
Preparation of the solution
The optimal ratio of M400 cement and sand for preparing masonry mortar is 1:5. An increase in the amount of cement will lead to an unreasonable increase in the cost of purchasing materials, and a decrease will reduce the strength of the building structure.
To improve plasticity, you can buy a plasticizer or add liquid soap at the rate of 25 grams per bucket of solution. Adding soot will allow you to obtain a black mixture, which will look more original in the masonry.
The quality of the masonry depends on the thickness of the prepared cement-sand mixture. The solution should not be too liquid, but it should not be too dry either. When preparing the solution, water must be added gradually until the mixture of the required thickness is obtained.
Table of solution proportions.
To check, place a small amount of the prepared solution on a flat sheet and make a not very deep cross cut on top. Then shake the sheet slightly. For a good mixture, the cut lines should converge, and the solution itself should not spread across the surface.
Stages of building a foundation for a fence
The construction of the base for the fence includes several stages, after which the brick pillars can be built directly.
Stacked fence posts are shown in the photo below.
Concrete pillars
Marking
This stage is necessary for planning the space.
For marking work, pegs and rope (string) are required.
The pegs are placed on the inner and outer sides of the planned trench, and then a rope is pulled between them. This method allows you to create an exceptionally smooth tape. The width of the foundation should be from 50 cm.
Foundation laying technology for a sliding structure
Installing a foundation for gates with movable leaves with your own hands is a process that requires a significant investment of effort and time. But if you make the calculations correctly and adhere to the technology for performing the work, you can build a high-quality and functional entrance group with your own hands. Let's consider this using the example of laying a frame-monolithic foundation.
Scheme development
Work begins with determining the size of the foundation. To do this you need to know the following indicators:
- opening width;
- dimensions and weight of the gate;
- soil type.
The optimal width of the foundation is from 0.5 to 0.7 m, the depth is 1.5-2.5 m (the exact indicator depends on the freezing of the soil), the length of the base is more than ½ the width of the opening. In this case, it is necessary to make an indent on one side of the entrance structure to allow the canvas to roll back. All this data should be displayed on the diagram.
Attention: a drawing with all dimensions will allow you to calculate the materials required for the construction of the foundation and correctly organize the work on its construction.
Preparatory work
Preparation for the construction of a foundation for a sliding structure includes a number of works. Among them are leveling the territory, clearing it of vegetation and roots. According to the drawn up diagram, they dig a trench with the required parameters. A dense gravel-sand cushion is formed at its bottom.
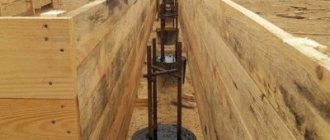
Manufacturing of metal frame
How to make the foundation for sliding gates strong and reliable? To do this, it is reinforced with an embedded element. It is a U-shaped frame, the racks of which are formed from d12 reinforcing bars and a horizontal channel, the width of which is at least 20 cm. Its purpose is to uniformly distribute stress throughout the entire structure.
The length of the embedded element depends on the dimensions of the opening. According to standards, it should be at least ½ the width of the gate. For a sliding structure 4 m long, a metal frame 2 m long is constructed.
The embedded element is strengthened with transverse reinforcement, which is performed in increments of 0.3-0.4 m. The frame is assembled in two ways:
- by welding a frame from reinforcement followed by fastening the channel;
- by welding corners/rods to a metal strip.
Bandaging of reinforcing bars is carried out using steel wire or welding. Metal pins are positioned so that their upper part does not protrude above the ground surface. The horizontal installation of the embedded element must be checked with a level, otherwise there is a risk of distortion of the structure.
Pouring concrete
For this you will need a solution. It is prepared from cement and sand in a ratio of 1:3. You can increase the strength of the structure by pouring crushed stone into the solution. How to pour the foundation correctly?
Filling the trench with concrete is carried out so that the mixture covers at least 2/3 of the height of the reinforcement. This will help ensure the gate is installed correctly. The pillars for the entrance structure are installed in advance. Technologically, the foundation for the gate must cover not only the opening, but also the cantilever supports. The entire plane that the movable doors will occupy is subject to concreting.
In this case, it is necessary to avoid possible distortion of the frame. The surface under the roller mechanism must be flat and wide enough for the structure to function properly.
Note: to obtain a high-quality and reliable base, cement of a grade of at least M 500 and crushed stone with a fraction of 30-40 are used. Hardening of the foundation lasts about 2 weeks; according to SNIP standards, it is necessary for it to stand for 28 days.
It is not difficult to build a foundation for a sliding gate. But at the same time, it is necessary to correctly calculate the structure and strictly adhere to the technology during its construction. Only in this case will the automatic system work properly, and the sliding gates will be functional and last a long time.
Construction of brick columns
Often, brick pillars for fences are made of 1.5 or 2 bricks, that is, the cross-section is 38x38 cm and 51x51 cm, the height can reach 3 m. The masonry is carried out offset - the seam formed at the bottom is covered with the brick of the top row.
Speaking about the order of work, it is worth noting that it begins with the fact that a double layer of roofing material is spread. This is necessary so that the brickwork does not absorb moisture from the soil, which can cause it to crack.
After this, the location of the columns is marked. According to their dimensions, a layer of mortar with a thickness of slightly more than 10 mm is applied, on which the first layer of masonry is laid - the base.
Installation diagram for a fence with brick pillars
The material is leveled on all sides using a hammer with a rubber working surface. Experts advise: before starting construction of the base, the brick must be placed in water for a couple of seconds so that the mixture dries more slowly and inaccuracies can be easily corrected.
Possible problems and their solutions
The main problems that may arise when laying pillars with your own hands are changes in size and “twisting”. Both defects arise from insufficient control.
When laying pillars with your own hands, often the top rows become much wider than the bottom ones. This happens gradually, a millimeter or even less is added, but in almost every row. As a result, at a height of 2 m the width of the column is 400 mm or even more. This is instead of 380 mm. The fix for this error is to control the size of each row.
It is not enough to control the dimensions of the pillar using the building level alone. Basically, a household tool (yellow) is used, and it has a fairly large error. And if the level is 60-80 cm long, you simply will not see minor vertical deviations. Therefore, they additionally use a tape measure - measuring each row. To reduce the time it takes to control, you can make a template according to the size of the column (for example, from even planks) with which to check for deviations.
The fence posts are laid around a metal reinforcing pipe, verticality is checked after laying each row
Laying pillars on your own without experience in such work can lead to another mistake: the edges of the pillar can shift, causing the pillar to twist around its axis. This drawback is much more unpleasant: try attaching spans to such pillars. There will be many problems. Therefore, when laying each row, you must strictly ensure that the corners are located strictly one above the other.
You can make the task easier by using two corners screwed to opposite corners. They are temporarily attached to the lower rows (with bolts or self-tapping screws in the seam) and then used as a guide, placing the bricks strictly in the corner.
Cost of building a foundation
The price of the base for barriers depends on the perimeter along which the foundation will be laid, that is, their length is fundamental in the cost of materials. The cost is also affected by what kind of foundation will be used as the basis for the fences. So, for example, to calculate the cost of a fence, the following price parameters are used:
- concrete grade B20 – 3800–4000 rub. for 1 m3;
- if reinforcement with a diameter of 12 mm is used to equip pillars, then the price of this material is 38,000–40,000 per 1 ton.
Beautiful fence with powerful brick pillars
If you need to install a foundation with a turnkey section of 25x40 cm, then the price is for 1 linear line. m – 2600–2800 rub.
Technological features of the sliding system
The mobile mechanism is represented by rollers attached to the bottom of the canvas frame, thanks to which it moves along special guides. This gives sliding gates a number of advantages:
- they have no height restrictions;
- can be additionally equipped with an automatic control system.
they have low windage (hard to be influenced by wind);
Note: a sliding structure is more expensive than a regular one, has more weight, and requires a strong foundation.
Additional measures to protect against heaving forces
If you live in a region where frost heaving forces work wonders and break records, take note of the following information. In order to protect the pillars from bulging, you need to take care of eliminating at least one of the factors - the presence of water or exposure to severe frosts. That is, you need to protect a certain space near the pillars from saturation with water and/or freezing. Of course, compared to conventional methods, this is more labor-intensive. But for some, such actions will help save the fence and protect themselves from unnecessary expenses in the future.
You can limit the flow of water using a drainage system, similar to the one used to drain water from the foundation. And reduce the impact of frost by insulating the soil around the pillars using polystyrene foam. Not all builders and home owners know about these secrets. Wrap it around and apply it.
Waterproofing
As mentioned earlier, in warm and dry regions, waterproofing under the fence is sometimes not done, but one feature of the cement mixture must be taken into account - its strong absorption of moisture. Waterproofing is designed to ensure the reliability of the foundation, especially on heaving soil and soil containing a large amount of moisture. To ensure that the foundation for a fence with brick pillars is reliable and that the fence lasts for many years, it is recommended to follow construction technologies and take care of high-quality waterproofing.
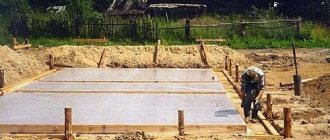
Formwork is installed on the prepared cushion, into which the cement mixture will be poured. Then polyethylene or roofing felt sheets are laid on the bottom with an overlap of 10-15 cm. The insulation layer should rise above the level of the foundation. This will create optimal microclimate parameters and protect the reinforcement frame from premature destruction.
A reinforcing frame is placed in the prepared bed. For fences, reinforcement with a cross section of 1.2-1.4 cm is used. The principle of the arrangement of rods in the frame is 2 rods at the bottom and 2 at the top. The structure is fastened with transverse strapping from pieces of reinforcement equal to the width of the frame.
At the joints, the rods are overlapped by 15-20 cm and secured with wire. When constructing formwork, it should be taken into account that the optimal distance of reinforcement for the foundation is approximately 5 cm from the surface in all directions. To do this, special supports for the reinforcement are placed under the lower bars.
This will help prevent moisture from penetrating the rods and subsequent corrosion of the frame.
Which ones are better?
Of course, each type of support has its own advantages and disadvantages. The same plastic, with its convenience, versatility and ease of installation, although it creates an imitation of a brick pillar, can never compare with it in strength.
Stone products have other advantages, for example:
- Durability.
- A huge number of facing materials provides a pleasant appearance.
- During operation, they require virtually no repairs.
- You can make them with your own hands, showing not only skill, but also creative qualities.
- Flexible pricing policy - if you lack funds, you can choose a cheaper type of stone or use artificial options.
And in this case, making it yourself will take much more time.
In addition, they need special processing, just like wooden ones. Only proper protection will protect them from corrosion and rotting. Used pipes, such as tubing, must be reprocessed.
But you don’t need to take care of them, and water only makes them stronger. Their price is more than affordable.
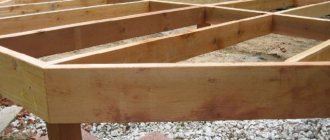
Installation of formwork
The task of formwork is to form a beautiful and even foundation. The formwork is made of durable lumber, it is acceptable to use dense moisture-resistant plywood, and do not forget to wrap the structure in polyethylene if you plan to use the boards in the future. The side is assembled inside the trench; how much it will protrude above the ground depends entirely on the design decision.
To prevent the formwork from spreading, you need to press it down with pegs from the outside or tie it together with wire. That is why it is important to use fairly dense wood, otherwise it will simply fall apart under the weight of the cement mortar, and the geometry of the foundation for the brick fence will be disrupted.
Foundation for a fence with brick pillars: step-by-step instructions and price
The foundation for a brick fence is the basis without which it is impossible to create a truly durable fence. It is impossible to erect a fence with brick pillars without a foundation, since it is this support that allows you to correctly distribute the load on the ground. In addition, it is important to remember: the more massive the fence is to be erected, the stronger the support should be.