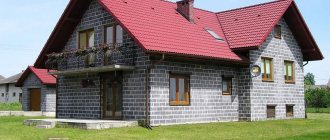
To build a cinder block house, you do not need to have special education or extensive experience in the construction industry. To begin the construction of the building, the cinder block must be prepared in advance. You can buy it at a specialized building materials store or make it yourself. Due to the huge size of the blocks, a residential building can be built in a short time. The basis of the material is slag, together with other components it forms this durable brick.
How to choose cinder blocks?
Construction will require a certain number of cinder blocks. You can make them yourself. This will require special forms in large quantities, since drying will take place directly in them. Using filler, water and cement, a mixture is created that is distributed into molds. To form voids in the blocks, you can use glass bottles or metal and wooden blanks.
The entire manufacturing process will take about a month. Therefore, if the speed of construction is important to you, and you also have the necessary funds, then it is better to purchase ready-made material. It must be certified and have the appropriate documents. Experts recommend paying attention to the following points:
- Use of environmentally friendly fillers in the production.
- These include shell rock, shavings and crushed stone. All bundles with cinder blocks must be identical and without defects.
- You should carefully study the quality characteristics, such as resistance to low temperatures, strength, thermal conductivity, so that building a house from a cinder block with your own hands will bring maximum results.
- Take an interest in the manufacturing technology. When purchasing material for the construction of a residential structure, pay attention to the use of a vibration compacting machine. If other devices were used during production, then such cinder blocks are suitable only for outbuildings.
- Pay attention to the color of the blocks. Gray indicates a large amount of cement. If a different shade predominates, then this is a sign of using a large amount of filler, which is unacceptable for such a building material.
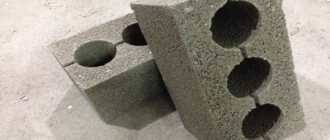
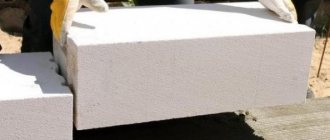
Construction experts advise checking the quality before building a cinder block house with your own hands. This can be done using a regular 1.5 cm nail. If it goes into the bottom of the block, then its quality is in doubt. You can also drop it from a height of 1.5 meters. A reliable cinder block will remain intact or its corners will be slightly knocked off. If the material has crumbled or broken, then it should not be used for construction.
Quality blocks
Concept of cinder concrete
In order to find out the main features of a future structure built from slag concrete, you should first get acquainted with the material itself and understand what qualities it has.
Material composition
Initially, the main filler for cinder blocks was blast furnace slag, ash and other fuel combustion waste. However, such products had a reduced frost resistance and were characterized by increased hygroscopicity.
This is what blast furnace slag looks like
That is why, over time, the material began to be modernized, introducing more and more new formulations, by changing the type of filler and adding chemical components.
A little about the composition, recipe and the influence of the proportions and types of components used on the production result:
- Slag concrete contains aged slag of a certain fraction. The size of the filler grains affects the properties of the future material.
- In most cases, the main binder is cement; its grade, in accordance with the recommendations, should not be less than M400.
- Lime is also used as a binder.
- The most common cinder concrete recipes involve adding brick, cement, concrete chips, perlite, crushed stone screenings, ash and some other materials to the mixture.
Perlite, photo
- In order to give future blocks greater strength, smaller stone-like fillers are used in production. At the same time, weight also increases.
- But increased thermal efficiency is achieved by using a larger filler fraction.
- Slag-alkaline concrete deserves special mention. It contains blast furnace slag for concrete or expanded clay, and, more precisely, the material is produced on their basis. The general composition looks like this: sandy ground slag, alkaline solution, fine or coarse aggregate.
Note: The alkaline additive increases frost resistance and reduces hygroscopicity. This material is actively used in the construction of structures under difficult operating conditions.
- Chemical additives are extremely individual. Each manufacturer chooses the component for himself. With their help, they improve the properties of the finished product, accelerate setting, increase the plasticity of the solution, and so on.
Cinder concrete compositions
Note! The conclusion suggests itself. The performance of the finished material depends on its composition. The thing is that, as we found out, not only slag, but also expanded clay, sawdust, ash, gravel, crushed stone and much more can be used as a filler. The filler largely determines future characteristics. This is especially true for thermal conductivity and density.
Properties, scope of application and types of slag concrete
Both light and heavy concrete are used in production.
The type of cinder block can be:
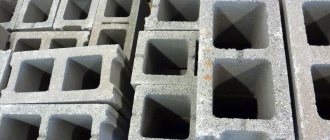
- Hollow. It is characterized by increased thermal efficiency and reduced density. Such blocks are used in the construction of houses, bathhouses, extensions, and so on.
Hollow cinder block
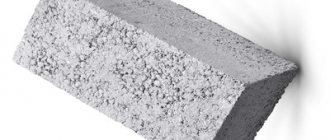
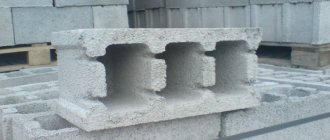
- Full-bodied. Wall and partition blocks may not have voids. However, their most significant representatives in full form are foundation blocks and blocks intended for the construction of load-bearing and other supporting structures.
Solid block
- Private. They are used in the construction of walls and partitions. They need further finishing.
Ordinary blocks
- Facial. They have one or two textured sides, which makes it possible to do without external decoration when constructing walls.
Facing cinder block
The last two types, classified by purpose, are divided into types depending on the main binder.
They can be:
- Slag (SKS);
- Limestone (SKI);
- Cement (SCC);
- Gypsum (SKG).
The following types of cinder block products are most often used in construction:
- Block based on heavy concrete. Their main advantage is their high resistance to loads, weathering and mechanical influences. With their help, load-bearing structures are erected, which will subsequently be subject to serious loads. The only negative is the high thermal conductivity coefficient.
- Block based on lightweight concrete. They are also called “warm”. They are actively used in private housing construction. They are characterized by high thermal efficiency. Sawdust, expanded clay, slag, sand and other types of fillers for lightweight concrete are used in production.
If we talk about standards, then in accordance with GOST, a cinder block has the following size, weight and other parameters:
- Whole stone based on lime, cement or slag binder: size – 39*19*18.8 cm. Its weight varies from 8 to 31 kg, strength grade can correspond to values of 25, 35 and 50.
- Whole stone based on gypsum binder. Size – 39*19*18.8; weight – from 16 to 23 kg; brands correspond to the above.
- Whole stone based on gypsum binder: size - 41 * 21.5 * 19 cm, weight - 20-27.6 kg, brands - the same.
Cinder block sizes
There is also an assortment of cinder blocks, intended mainly for the installation of partitions. They are called the longitudinal half. The main difference is less weight and width.
Longitudinal half
As for technical characteristics, cinder block is classified as follows:
- In accordance with the frost resistance grade (15-50 cycles), there are grades: 15, 25, 35, 50.
- Water absorption is about 75%.
- The fire resistance limit is 800 degrees.
- Depending on the thermal conductivity and average density, the material is distinguished: effective, the density of which is less than 1400 (kg/m3), conditionally effective, with a density of D1400-D1650, and heavy, the density of which exceeds the value of D1650.
Characteristics of cinder block in comparison with other materials
Calculation of the number of blocks
The result of building a house from slag concrete with your own hands from scratch largely depends on the correct calculation of building materials. It should be borne in mind that masonry can take place using different technologies:
- to the floor of a stone (20cm);
- in one (40 cm);
- in two (80 cm);
- one and a half (60 cm).
This choice will depend on the climate zone. In a temperate climate, half a stone may be sufficient, but in regions with harsh winters a thickness of at least 60 cm will be required.
The required number of cinder blocks is calculated using the following algorithm:
- First you need to calculate the cost of building materials per meter of wall. The standard area of one cinder block is 0.08 m². That is, 12.5 blocks are required per 1 m. If you lay a cinder block house with your own hands in two rows, then we multiply the resulting figure by half.
- Next you need to calculate the area of the entire building. To do this, its perimeter must be multiplied by its height.
- To find out the final number of cinder blocks, you need to multiply the number for one meter by the resulting area.
When making calculations, you should not take into account window and door openings. This will be a reserve, since rejection or damage to building materials is possible.
Types and sizes
Thanks to the calculations of technologists and developers, standard sizes of cinder blocks have been created, as in Fig. (3). Moreover, such material can be solid or have different forms of hollowness (from 28% to 40%). The different percentage of voids affects the weight of one block and its technical characteristics. For the production of partitions, blocks are made with a smaller thickness.
READ ON THE TOPIC:
Reviews about the building material - cinder blocks.
Laying the foundation
When building a cinder block house with your own hands, it is worth laying a fairly high foundation. This is due to the fact that under the influence of moisture the blocks can collapse, resulting in damage to the entire structure. The minimum height should be 70 cm. The best option is a strip foundation.
The main stages of laying the foundation:
- A pit is being dug out. In cases where a basement is planned, it should be deep.
- A cushion of gravel and sand half a meter thick is laid.
- The sheathing and metal frame are installed.
- Cement mortar is poured.
If you plan to build a basement, you can start it a week after pouring. The house itself is erected after complete drying. This may take about a month. Important! It is necessary to take care of waterproofing between the plinth and cinder blocks to prevent their damage from moisture.
Construction of the foundation and basement of a cinder block house
The project is the basis of all work
Often, beginning builders avoid preliminary preparation, preferring improvisation. Such an approach will require the reconstruction of individual elements, additional investments and the risk of defects in the structure due to incorrect selection of the foundation. For a small room, it will not take much time to draw up plans and drawings.
Many novice builders are often intimidated by this word, believing that it will take a lot of time to create a project
A cinder block garage project will require minimal time investment. It is recommended to draw on a sheet of paper an approximate view of the completed structure from the outside and inside. A visual representation will help speed up the process and quickly understand the supply of communications, the location of inventory and tools.
Before starting design, you should decide on the purpose of the building:
- for car repair. A garage with a basement is ideal for maintaining the condition of the car;
- for car storage. If you have 1 car, a standard box will do without any additional modifications. A 2-car cinder block garage may come in handy, even if you don’t have a second car but have plans to purchase a vehicle in the future;
- for work. If it will house a workshop, the installation of numerous equipment will be required; the building should be expanded to allow free movement of the master.
Walling
At this stage, the most important nuance is alignment. Therefore, after laying the first row, it is necessary to carefully check this point using a level.
As for laying cinder blocks, it is done quite quickly. You should have a mallet on hand for tamping, a trowel for removing excess mortar, and a spatula.
Laying cinder block walls
It is necessary to monitor the thickness of the applied solution. It should not exceed 1.5 cm. Otherwise, the thermal characteristics of a cinder block house built with your own hands will deteriorate. To increase the strength of the mixture, a plasticizer is added to it. It will also help slow down drying, resulting in new mortar needing to be mixed less frequently.
The blocks must be laid at a temperature not lower than 15°C in dry weather. The rows are laid offset to the floor of the block. To increase the strength of the structure, you can use reinforcement that is inserted into specially prepared recesses in cinder blocks every 4 rows.
A little about the history of the issue
Previously, the blocks were made using blast furnace slag, a by-product of the metallurgical industry. Despite the popularity of the material, there was one significant drawback among consumers - industrial waste could not boast of environmental friendliness. Therefore, the finished blocks were kept in the open air for about a year and only then were they put into construction.
Blast furnace slag is not the “cleanest” material
Today, thanks to the development of technology, cinder blocks meet all safety requirements and continue to attract both individual developers and large construction companies.
How to insulate a house?
Since external insulation is much more effective than internal insulation, it is worth taking care of this already at the construction stage. In addition, installation of insulation will create reliable protection for cinder blocks. The most economical and fairly effective option is foam insulation. If you carry out internal insulation using this material, a vapor barrier will be required. It is not needed for external thermal insulation.
Construction of house walls
You need to do the following:
- Putty the walls.
- Secure the insulation. This can be done on a metal strip, the role of which can be played by drywall profiles. The foam should be laid tightly so that there are no gaps between the seams.
- Apply a reinforcing mesh to prevent the appearance of defects due to mechanical stress.
- Level the surface and finish. Finishing work is carried out using bark beetle or decorative plaster.
- Paint the walls.
It is also possible to insulate with mineral wool. In this case, you can cover the house with siding. If financial capabilities allow, you can purchase polyurethane foam. This insulation is applied by spraying, as a result of which there are no joints, therefore, the thermal insulation characteristics are improved.
What insulation materials are suitable?
The same materials are used to insulate the walls outside and inside the building. To choose the best one, you need to build on its properties.
Polystyrene foam or polystyrene foam
This material is most often used for the exterior of the house. Has advantages:
- High thermal conductivity, this is the most effective insulation on the market. Its standard thickness of 10 cm is enough for thermal insulation of external walls.
- Hygroscopic, absorbs less than 4% moisture relative to its own volume. To protect it from moisture, you can use simple waterproofing, for example, film.
- High density. It withstands finishing with wet materials (plaster) well and is not afraid of mechanical damage.
- The surface is not susceptible to attack by microorganisms. This property does not depend on treatment with fungicides and remains until the end of its service life.
- The cost is affordable, the installation technology is simple.
- A light weight. Thanks to it, there is no additional pressure on the wall.
Flaws:
- Fire hazard. Simple material can easily catch fire.
- Over the years, styrene begins to release the toxin. Therefore, it is not recommended for internal insulation.
- Maximum protection from sunlight is required, they destroy its structure.
- Polystyrene foam is fragile and does not like solvents.
Mineral wool
A type of thermal insulation that is more suitable for interior design.
Advantages:
- Flexibility. With its help, you can not be afraid of uneven surfaces and correct them for further finishing.
- Resistance to the appearance of microorganisms.
- Fire safety. Not afraid of heating or temperature changes.
- Optimal vapor permeability, prevents the formation of condensation on the walls.
- Soundproofing properties.
- Environmentally safe, absolutely natural material, does not emit toxic substances.
Disadvantage: hygroscopicity. Vata is afraid of moisture; when wet, it ceases to perform its functions and begins to rot. Careful hydro and vapor barrier is required.
For installation inside a building, stone or basalt wool is used. They have better characteristics and do not produce waste during operation. For walls, mineral wool P-125 and PZh-175 is recommended; it has optimal rigidity and excellent sound insulation properties.
Sprayable solution
This type of insulation can be used inside and outside the building.
Advantages:
- service life up to 10 years;
- simplicity and speed of application;
- no need for fastening material, applied directly to the wall and connected to it;
- creates a solid surface that can be immediately covered with facing material.
Flaws:
- its price is much higher;
- installation equipment required.
It is rarely used due to the difference in price with other insulation materials, but this is one of the advanced methods of insulation.
Roof
You need to install a roof on the finished frame of a cinder block house with your own hands in a short time. This is necessary to protect cinder blocks from negative atmospheric phenomena. This process can be carried out simultaneously with insulation.
Assembling the rafter system
The most common roofing option is the gable roof. The installation process includes the following steps:
- To begin with, a mauerlat is mounted, the so-called base, on which the rafter system will rest. Here you should think about waterproofing to prevent wood from rotting from rain and snow.
- The rafter system is being assembled. This process is standard. The rafters form the shape of the letter A. But in the case of cinder block houses, it is necessary to use additional posts and beams so that the walls are not under constant tension.
- Next, the ceiling beams are installed.
- Then the trusses are installed. It is important to choose the right size so that they can withstand the roofing material. It is also necessary to ensure that they are identical.
- After this, the hydraulic barrier is tightened. A special membrane is used for this.
- The sheathing is installed and covered with roofing material.
- The final stage is insulation. It will help reduce heat loss by another 15-20%.
The final stage of roof construction
Disadvantages of construction
Knowing all the shortcomings of a building material, you can more accurately understand whether this material meets your needs. Unfortunately, cinder block has them too.
- High level of thermal conductivity. The house requires mandatory insulation. If you don't do this, your fuel costs will shock you.
- Increased degree of hygroscopicity, that is, the material is too porous. This means that the walls will catastrophically absorb any moisture. This will lead to damp and cold indoors in winter. To avoid this, you will need exterior plaster and wall waterproofing agent. The latter must be used even when the façade of the building will be insulated from the outside using wet technology.
- Low level of environmental friendliness. Of course, manufacturing companies convince that this building material does not contain anything bad. However, no one can guarantee you that radioactive slag was not used in its production.
The list can be continued for a very long time. You can add individual nuances that make the process more complex. But in reality, all this is not important if the builder is armed in advance with modern and reliable high-quality tools.
Features of ceiling insulation
When installing a ceiling in a bathhouse, it is necessary to take into account not only the fact that it accounts for up to a third of heat loss, but also the fact that the accumulation of condensation on the surface reduces any insulation measures to nothing. Therefore, vapor barrier from the inside is required here much more than for walls, actually going to first plan. This type of work in this case requires much more effort than a similar one in a sauna.
Initially, it is recommended to cover the ceiling with hewn and dried boards 40 mm thick
The wider the boards you can find, the more beautiful they will look, no matter what type they are. Even with knots, it will be even more beautiful. It is not advisable to use lining; it may lead
Large thickness of boards is not desirable due to the accumulation of a large amount of cold during periods of absence of heat. This leads to the appearance of condensation on the ceiling while heating the steam room. A layer of waterproofing must be placed on them; this can be a regular greenhouse film or other vapor barrier material. Everything can be covered with a 15 cm layer of dry sawdust or put mineral wool and covered with ordinary clay on top. This is a very good method that our grandfathers used. If it is glass wool, then an additional fiberboard plate is placed on it
It is not advisable to use clapboard; it may move. Large thickness of boards is not desirable due to the accumulation of a large amount of cold during periods of absence of heat. This leads to the appearance of condensation on the ceiling while heating the steam room. A layer of waterproofing must be placed on them; this can be a regular greenhouse film or other vapor barrier material. Everything can be covered with a 15 cm layer of dry sawdust or put mineral wool and covered with ordinary clay on top. This is a very good method that our grandfathers used. If it is glass wool, then an additional fiberboard plate is placed on it.
Panel ceiling
Panels for such a ceiling are usually sold with all the necessary layers of waterproofing, insulation and moisture resistance. The standard width of the mineral wool layer contained in ceiling tiles is about ten centimeters.
Since such panels have considerable weight, it is better to lift them first and then connect them in parts at the top.
Fixed ceiling
The basis for insulating a false ceiling is the attic frame. A waterproofing layer should be placed in these floor beams, which will eventually cover the entire internal surface. The next layer is the installation of wooden flooring. Then the required amount of insulation, such as mineral wool, is placed in the spaces between the beams.
After insulation, it is necessary to ensure moisture insulation using foil material. Now you can cover the ceiling with wood paneling.
Flat ceiling
Deck ceilings are independent of the attic frame. Because they are mounted directly to the walls. For its construction, wooden boards about thirty centimeters wide are used.
Insulation is carried out from the attic side. All necessary materials (vapor barrier, insulation, waterproofing, as well as plywood flooring) are placed on top of the floor ceiling. This method of ceiling insulation is the fastest, but is only suitable for a small bathhouse.
Successful examples
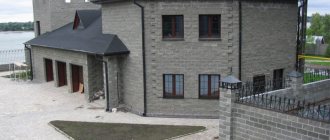
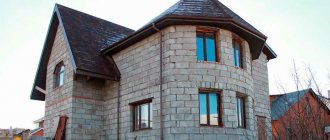
From cinder block you can build a luxurious two- or three-story cottage with a high angular roof with several slopes. It is permissible to decorate such a structure with a combination of red and white bricks, and use dark gray tiles as the roof.
These blocks will make a spectacular one-story L-shaped house with an exterior finish of wood panels or brick. You can lay a contrasting soft roof on the roof, and the lower part of the house can be finished with white panels.
An unfinished cinder block house with two floors will look stylish if you cover it with a high cone-shaped roof in a dark shade, put large windows with black frames, and put Gothic-style street lamps on the front lawn.
To learn how to make a cinder block at home, watch the following video.