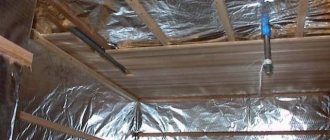
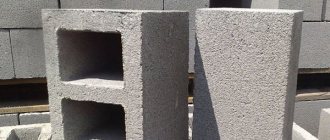
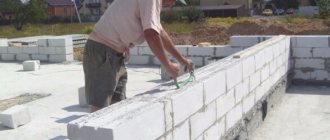
Aerated concrete blocks have become a trend in individual housing developments. Increasingly, they are also used in multi-story construction, when they are used to lay out internal as well as external walls in frame-block buildings.
Attention: this material discusses aerated concrete. Another material with a similar name is used in construction - gas silicate concrete (gas silicate). This is a completely different material both in components and characteristics. It contains very little cement, only 14%. Therefore, all recommendations for aerated concrete blocks are unacceptable for it - there is practically no adhesion to cement-sand mixtures.
Aerated block is a compact and lightweight building material. Its masonry when constructing walls does not require special skills, which allows people without special construction education to build warm and inexpensive housing with their own hands. At the same time, this material is very “capricious” in matters of finishing.
Features of aerated concrete in terms of plastering
The peculiarities of aerated concrete lie in its production technology. This is the only building material that has small channels through it, which create two serious problems for walls:
- easily blown by moderate winds;
- have high vapor permeability.
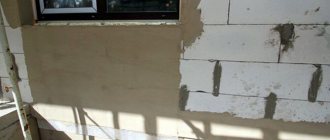
The first problem can be solved by finishing the walls both indoors and outdoors, and therefore the question “is it necessary to plaster walls made of aerated concrete blocks” disappears by itself. High vapor permeability can only be achieved with the proper use of finishing technologies.
Here, even minor mistakes due to ignorance of the nuances of finishing work can have fatal consequences. For example, the order in which walls are plastered inside and outside a building directly determines its durability, which will be discussed below.
When preparing to plaster the surface of walls made of aerated concrete blocks, the following points must be taken into account:
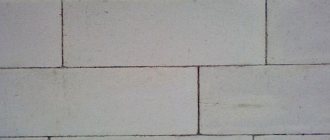
- Even the densest aerated concrete under concentrated impacts, for example, with a hammer on a chisel, breaks off and cracks. Therefore, the preparation of such walls for plastering differs significantly from the same work in relation to brickwork.
- The presence of open pores in aerated concrete blocks does not allow the use of putty to finish walls - a thin layer of it simply will not stick to them, although the quality of the surface allows this method to correct minor errors in their laying. Therefore, it is necessary to plaster with a layer of at least 5 mm.
- The low adhesive properties of porous structures, which include aerated concrete, require the mandatory use of either expensive primers or fiberglass reinforcing mesh (other materials dissolve in the alkaline environment of hardened plaster).
- The high vapor permeability of the material dictates the following order of work on plastering walls: first, the plastering is carried out indoors, and then, after the inner layer of the mortar has dried, outside. If the order is reversed or work is carried out simultaneously on both sides, then moisture will be trapped inside the wall, which will destroy it during frosts.
Fiberglass plaster mesh.
Promotes vapor permeability of walls
The components contained in aerated concrete contribute to the vapor permeability of the building material. However, this factor requires the selection of a certain composition of mixtures for carrying out repair and finishing work on the walls of the building. To do this, it is necessary to carry out plastering in such a way that the inner wall is vapor permeable or, on the contrary, vapor barrier. In a house with such a wall, the microclimate will self-regulate. In addition, fungi or mold will not grow in the wall.
Return to contents
How to plaster aerated concrete
How to plaster aerated concrete walls inside a house? There is no clear answer to this question. If you buy ready-made plaster mixtures, then there are no problems other than the financial component. Dry plaster on various bases is always available for sale:
- lime and cement - the most popular mixture for plastering aerated concrete walls;
- liquid glass (silicate mixture) - the cheapest type of dry mortar, but incompatible with decorative plaster based on acrylic, silicone, latex;
- silicone - the highest quality plaster mixture with, naturally, the highest price;
- cement and mineral chips that replace sand.
For reference: there are also acrylic mixtures on sale, but they are best used for decorative plaster.
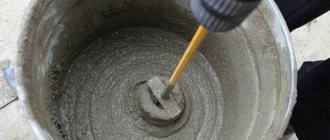
Buying ready-made plaster will seriously affect the family budget, so you need to consider options for preparing the solution yourself. So which plaster is better for plastering aerated concrete walls? There are two blocks of answers here, depending on the type of prepared adhesion between the wall and the plaster.
- The plaster mortar is applied directly to the wall, pre-treated with a penetrating primer with the slots cut with a chainsaw (the slots are necessary for better adhesion of the mortar to aerated concrete).
- Plastering the wall is done using a plaster mesh mounted on a special glue, which has become fashionable lately.
In the first case, it is necessary to take into account the characteristics of the material:
- the presence of cement and lime components;
- porosity;
- high vapor permeability.
This unusual combination of properties near the wall immediately removes cement mortar and sand from the list of mixtures. It adheres very poorly to such a surface, even when applying a high-quality primer.
Here you need to use:
- gypsum with light perlite sand;
- gypsum with lime;
- lime with cement, fine sand, aggregates and plasticizer.
In the second case, any combination of mortar components is allowed, including cement and sand in a ratio of 1 to 5.
Video description
Watch the video comparison of facade plasters for aerated concrete:
Farbe silicone plaster. It has one of the best price-quality ratios on the market. The plaster has a high vapor permeability coefficient - 0.035 mg/m2 h Pa. It can be tinted in 2500 colors, that is, you apply a mixture already tinted in the desired color to the façade. The plaster is resistant to atmospheric influences - due to computer tinting, the color retains its saturation for many years. It is worth noting that the plaster is impact-resistant and also environmentally friendly. Sold in two textures: “Lamb” and “Bark Beetle”.
Calculation of material consumption
When starting work on applying a plaster layer, it is important not to make a mistake with the amount of material purchased. Let us immediately note that it is impossible to calculate absolutely exactly how much of something will be needed - it is impossible to take into account all the differences in height of the wall surface, as well as the presence of a vertical wall. But, with a slight error in any direction, calculations can be made.
You should start by determining the area that needs to be plastered. To do this, multiply the length of each wall by its height and add the results together. From the resulting number, subtract the area of doors and windows. We multiply the final result by the average thickness of the plaster, resulting in the amount of mortar in m3.
For reference: the last multiplier is the average result of adding the thickest and smallest layers of plaster, which is determined during the installation of the beacons.
Calculating the number of components of the mixture, given the total volume of the solution, is not difficult.
Video description
For detailed video instructions on applying Farbe silicone plaster, see the following video:
The company also provides the opportunity to order free samples of Farbe plaster - this will speed up the process of selecting colors for the facade, and will also help you ensure the quality of these products.
Silicone facade plaster “Bark beetle” and “Lamb” Source myfarbe.ru
Baumit Silicone Top. A high level of adhesion and ductility is achieved thanks to the base of the mixture - silicone resins. The coating remains decorative for a long time due to its dirt-repellent properties. Wide choice of material color palette (up to two hundred shades).
Weber.pas silicone. Mixture based on silicone emulsion. It is possible to select the appropriate grain size. Optimal resistance of the material to moisture, temperature, and dirt.
Baumit Silikat Top. Silicate type of plaster. The coating is durable and has good vapor permeability. The composition has different grain sizes and up to two hundred tinting variations.
Primer of the surface before plastering Source en.aviarydecor.com
Tools required for work
To work you will need the following tools and accessories:
- stepladder (you can prepare a special portable platform - sawhorses);
- Phillips screwdriver or screwdriver;
- metal profiles for lighthouses;
- roulette;
- plumb line;
- rule with a level 2.0-2.5 m long;
- metal scissors (grinder);
- hammer:
- paint brush (spray gun or roller);
- primer tray;
Attention: experienced professionals use two rules. A short one, no more than 1.5 m, is more convenient for leveling the applied plaster, a long one is for checking the quality of the work performed.
- construction (bubble) level;
- steel brush or scraper (another name for cutting);
- container for preparing plaster;
- hacksaw or chainsaw;
- falcon;
- trowel, also has other names - trowel, plaster spatula;
- grater;
- grater;
- fry;
- ironer;
- set of spatulas.
Attention: details about the purpose of each tool and their photos can be found in the material “How to plaster a brick wall.”
Surface preparation
Plastering aerated concrete walls indoors should begin with preparing the surface. The durability of the plaster largely depends on the quality of the preparatory work. Many years of experience show that work should be performed in a clear sequence:
- all general construction and installation work on installing the floor, installing door and window units, etc. are completed;
- the walls are cleaned of old plaster, paint, wallpaper and whitewash;
- wall blocks are repaired (if necessary);
- various types of contaminants are removed.
Attention: the technology for performing the above work is described in detail in the material “Preparation of surfaces for plastering”.
Sealing cracks.
The next, most important stage of work when plastering aerated concrete is ensuring adhesion (adhesion) of the plaster to the wall. There are two options: apply the solution to a primed wall or to a plaster mesh. The second option is gaining popularity, so we will consider it in more detail.
To work, you need to buy a deep penetration primer for aerated concrete (Ceresit), tile adhesive (for ceramic products - Knauf, Yunis 2000, etc.) and fiberglass plaster mesh.
Deep penetration primer.
The step-by-step instructions are not very complicated.
- Two layers of penetrating primer are applied to the wall. For the first layer, in order to saturate the aerated concrete with moisture, the soil is diluted with water in a 1:1 ratio. For the second layer, its consumption should be in the range of 150-180 g/m2. To apply the solution, you can use all known methods: roller, brush, garden sprayer, compressor, etc. The second layer is applied only after the first layer has completely dried.
Padding.
- The diluted glue is applied to the dried primer with a trowel. The work is carried out from the bottom up, with a width slightly larger than a roll of reinforcing mesh. The thickness of the layer after leveling should be within 5 mm.
Attention: dilute tile adhesive and work with it in strict accordance with the instructions printed on the package.
- A mesh cut to length, flush with the ceiling, is sunk into the glue, and then the same is done below, near the floor. Using a spatula with teeth 5-6 mm long, the plaster mesh is pressed as deep as possible into the glue. Work is carried out from top to bottom. At first, the movements of the spatula can be chaotic, but in the final stage they can be strictly horizontal. This is necessary to form horizontal ordered strips about 5 mm high from the glue squeezed out through the mesh, which will serve as an ideal connecting element between the wall and the plaster solution.
Plaster mesh embedded in glue before passing through with a spatula.
Missing the glue surface is not allowed. Work is carried out one by one on each mesh sheet. Each subsequent mesh should overlap the previous one by 10 cm. For ease of joining, several vertical stripes are drawn along the edge of the glue-treated strip with a spatula (later, during the work, they should be converted into horizontal stripes).
Plaster grooves.
How to plaster aerated concrete walls inside a house when reinforcing the wall with plaster mesh and tile adhesive? This combination of reinforcing mesh with glue allows the use of any type of plaster currently used in construction.
When can plastering begin after masonry?
When building a house from aerated concrete, you should not rush to finish the walls both inside and outside the building. Even when placed on glue, the blocks will still shrink - this is their property. There is no need to explain what will happen to the plaster on the wall that has shrunk - continuous cracks and a complete replacement of the plaster layer.
Experts say that after the construction of the wall, you must wait 7 months, and only after that begin plastering work. However, we cannot agree with this recommendation. Simply erecting walls does not lead to their shrinkage - there is no pressure on the blocks. Only after the roof is erected does the full shrinkage process begin. Therefore, the countdown should be carried out from the moment the roofing work is completed.
Types of finishing
The main types of finishing for cladding an aerated concrete building and their components:
- plastering. Often the use of cement-sand or gypsum mixture;
- wallpapering;
- painting;
- plasterboard finishing;
- wooden lining;
- plastic panels;
- ceramic tiles.
These are the main types and methods of finishing aerated concrete walls.
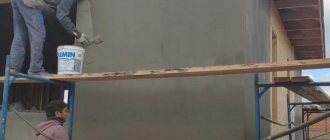
Plastering technology
How to plaster aerated concrete walls indoors? The technology for plastering aerated concrete walls indoors is the same as for other types of walls.
For reference: in the overwhelming majority, beacons are not installed for walls made of aerated concrete. This is due to the flat surface of the wall after laying the blocks - the strict geometry of the material and the thin connecting seam make it easy to maintain the vertical. Beacon guides are used only when there is a loss of verticality, which occurs as a result of settlement of the foundation. The process of installing them on the wall is described in the work “How to plaster a brick wall.”
- The solution is mixed in small portions.
- Before work, the plaster should “rest” for a few minutes.
- When applied to a bare wall, plastering work is carried out in three layers, on a mesh with glue - in two (primer and covering).
- The spray solution is prepared in a 1:2 ratio to the consistency of sour cream.
- Applying plaster begins from the lower left corner. They lead from bottom to top, from left to right. The thickness of the spray is 4-5 mm. It is applied with a trowel by sharply throwing a small amount of mortar onto the wall.
Throwing plaster.
- The soil is placed with a thicker solution (approximately like bread dough) and a different ratio of cement and sand - 1:5. Apply after the spray has completely dried. The thickness of the soil should not exceed 2.0 cm. It is applied to the wall with a trowel. Then the rule is leveled. The final treatment of the soil is carried out with a trowel. They can work left and right, up and down. If the soil layer thickness exceeds 2 cm, then the correct solution is to apply it twice.
Alignment by rule.
- The covering is applied to the well-dried second layer. The solution is made liquid and preferably only from cement. When mixed with sand, the parts should be equal, and the components should be sifted on a fine sieve. Apply with a trowel in a layer of 1-2 mm. It is leveled with a trowel and a smoothing iron.
- The final work is grouting, done with a float. You will also need a small amount of solution to eliminate minor defects.
Grouting is done with a trowel in a circular motion. Some specialists do this with vertical movements - “acceleration”, which is much more difficult.
Subtleties of the workflow
To achieve greater vapor permeability when finishing aerated blocks, you can use plasterboard panels. It must be taken into account that, according to the approved rules, it is impossible to finish the building on the inside with vapor-permeable building materials, and on the outside with vapor-proof materials. The durability and reliability of the finish will directly depend on how high-quality materials are used in construction and finishing. According to experts, even high-quality plaster is unlikely to adhere to low-quality aerated concrete.
Builders also advise using the following useful tips:
- When driving nails, the plaster will crumble if there is no wallpaper on the walls. You can avoid this if you apply adhesive tape to the place where the nail will be hammered.
- If the plaster layer lags behind, it can be further strengthened. It is necessary to drill several holes in the layer, then pour in glue using a syringe and secure the plywood on top.
- Before sealing the holes with plaster mortar, it is necessary to drive several nails around the perimeter. This patch will be more reliable.