The desire to rationally use the entire volume of a house or other building, regardless of its size, leads to the development of premises that were traditionally considered technical. The functionality of basements and ground floors tends to infinity: dry storage rooms, saunas, gyms, laundries, workshops, home theaters and billiard rooms, garages, etc. This situation leads to the fact that finishing requirements increase, careful preparation of surfaces becomes necessary, An obligatory step of which is plastering the basement walls.
Causes of excess moisture in the cellar
A common problem that people face when deciding to improve the basement of their home is high humidity. The reasons for its occurrence lie in the design of the building. Basement is a tier of a building, buried more than half the height into the ground. The walls of the cellar are in contact with the internal air from the inside, and with the ground from the outside. This proximity to two environments with different temperature and humidity indicators can lead to two possible outcomes.
There is a simple way to install inside or outside the publication to look for the causes of excess humidity. We fix a piece of polyethylene on the surface of the wall, pressing it tightly. After 5 - 7 days, we look at which side the moisture has formed.
If it is on the side of contact with the wall, then the reason is poor-quality waterproofing, but if it is on the surface facing away from the wall, we are solving problems indoors. Waterproofing plaster of the walls in the basement or cellar will also partially help in solving such problems.
Condensation Formation
If the reason for the wetness of the enclosing structures lies inside the building, then we are talking about insufficient ventilation or incorrectly calculated thermal insulation.
Basements cannot boast of good natural ventilation, which is characteristic of the above-ground part. The maximum laid down at the design and construction stage, especially if no premises other than a storage room were planned, are vents and other small windows. The influx of fresh air is small, the structures breathe, the moisture contained in the building materials evaporates, and people who have a habit of breathing and sweating periodically enter.
At some point, the amount of water dissolved in the basement air exceeds the critical norm, and the excess settles on surfaces in the form of condensation. This problem needs to be corrected, starting with the design of supply and exhaust ventilation, which will ensure air exchange.
If we are talking about incorrectly performed thermal insulation, then we are faced with the concept of “dew point”. This is the temperature at which water vapor contained in the air begins to settle in the form of condensation (dew). It seems nothing terrible, and even romantic. Problems begin when this value is reached not in the air, but in the thickness of the wall. For example, consider this situation: winter has begun.
The room is heated, but outside it is already a sure zero, the ground is frozen or has reached positive, but low temperatures. The very design of concrete (and many other materials that are used as foundations or basement walls) assumes the presence of pores filled with air. The outer edge of the wall is cooled by the soil, while the inner edge is heated.
Diagram of dew point formation in a wall
In the thickness, the temperature changes along a certain curve. At some depth (calculated value) the temperature reaches the dew point value. Water vapor located in this place settles and spreads through the pores under the action of capillary tension forces throughout the structure. The material gets wet, heat transfer increases, and the area where condensation appears grows.
Types of solutions
Before plastering the basement walls, it is necessary to study the compositions of different materials. Waterproofing mixtures are divided into 2 groups:
The first includes compositions based on cement grade M400 and higher. They contain quartz sand (fine-grained, sifted), stone flour, crushed coal. To impart plasticity to the mixture, polymer additives are used. Plaster gains moisture resistance thanks to components such as water repellents. Liquid glass, sodium aluminate, ceresite, etc. can act in this capacity.
Asphalt mixtures are used less often in domestic conditions, which is due to the high price and complexity of applying it to the walls. For these reasons, it is not advisable to use materials of this type in a private home. Asphalt plaster contains petroleum bitumen, asbestos dust, mineral fillers, and sand.
Mixtures are characterized by different properties. In addition to water resistance, other positive qualities are noted:
There are sanitizing plasters. They are characterized by a porous structure. Moreover, the pore volume can occupy up to 1/2 of the volume of the mixture. Thanks to this feature, moisture does not penetrate deep into the supporting structure, and if condensation forms, it quickly drains from the wall. Often such compositions are used to dry surfaces that are heavily moistened.
How to get rid of excess moisture
The fight against excess humidity must begin with identifying the causes of its occurrence.
The algorithm of actions is as follows:
- We determine whether the cause of the problem lies outside or inside the premises.
- If outside:
- determine the presence and size of cracks in masonry or monolithic concrete;
- we are trying to find out the condition of the external waterproofing and the fact of its presence or absence (project documentation, communication with work performers, former owners of the building, etc.);
- We carry out structural repairs, restore the waterproofing layer, internal waterproofing can be done using penetrating compounds.
- If inside:
- check the condition of ventilation;
- we collect information about the “pie” that makes up the walls, not forgetting about the air gaps;
- We develop a supply and exhaust ventilation project that takes into account the functionality of all basements, perform thermal engineering calculations, additional cladding of basement walls may be required.
- Often the problem of high humidity in basements has both internal and external causes.
- We drain the room by pumping out water, water vapor, drainage systems, heat guns and fans.
- Only after eliminating the causes of excessive moisture do we begin finishing work.
What kind of plaster is used in the basement
When finishing basement walls, one of the following types of plasters is used:
- Cement.
- Moisture resistant.
- Waterproofing.
- Sanitizing.
The desired option is selected based on operating conditions and further finishing.
Cement option
General construction cement plaster mixtures can only be used in rooms where there is no excess moisture, if they do not have walls in contact with the ground. A prerequisite is high-quality external waterproofing so that the structures under the plaster layer in the basement remain dry.
Summarizing
The space in the basement or ground floor can and should be used effectively by arranging it for your own needs. If groundwater lies below the base of the basement, or a set of waterproofing measures has been carried out, the developer can successfully use ordinary cement plaster without spending money on special mixtures. In this case, ordinary cement plaster is the most affordable and budget solution.
In all other cases, it is recommended to use special waterproofing or sanitizing (drying) compounds for plastering basement walls. These types of modern plaster mixtures make it possible to reliably insulate the walls of underground rooms from excess moisture.
There is a topic on the portal that describes how to reliably waterproof the basement and ground floor.
We recommend the articles: How to build a basement for a country house, How to make a cellar with high groundwater, and How to remove efflorescence from the facade of a brick house.
In the video - How to waterproof a basement with high groundwater level.
Preparing the wall surface
After identifying the cause of excess moisture and eliminating it, you can begin preparatory work before applying plaster.
- All peeling fragments of the wall and its covering are removed.
- Oil and bitumen stains must be cleaned.
- If there are traces of fungus, they are removed with a stiff metal brush, after which the affected area is treated with an antiseptic.
- Efflorescence is also cleaned and treated with special neutralizing compounds.
- Seams and cracks deepen, widen, and notches are allowed on the surface of the walls.
- Be sure to remove dust from the surface. This can be done with a vacuum cleaner or dust-removing compounds that bind small particles, turning them from potential culprits of peeling into soil that increases adhesion by roughness.
- The surface is primed. The soil is selected based on the conditions of use.
Step-by-Step Guide to Applying Finishes
The prepared surface is dried, then we proceed to the direct application of plaster in the basement. It is better if the compositions applied in layers are from the same manufacturer. If this condition is not met, a chemical reaction may occur between the layers, leading to destruction of the finish.
Depending on the type of plaster, the technology varies somewhat.
You need to read the manufacturer's instructions on the packaging:
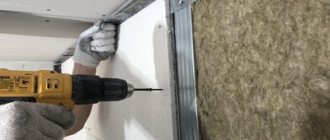
- We install beacons.
- After determining the thickness of the plaster layer, we attach reinforcing mesh to the wall surface, immersing them no more than 2/3 of the depth. This step is required in new houses, as reinforcement will reduce the load from deformation, protecting the finish from the appearance and expansion of cracks.
- Prepare the composition in accordance with the instructions so that it can be used within 1 – 2 hours. Mix thoroughly with a mixer.
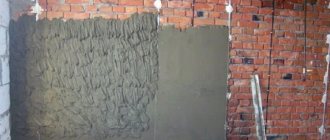
- The plaster mixture is applied in one or several layers (depending on the thickness and type of plaster). Each layer is applied after the previous one has dried.
- After application and initial setting (15 - 25 minutes), the surface is rubbed to make it smooth. When using sanitizing compounds, this step should be skipped, since the procedure will close the pores, that is, reduce the benefits of the coating to zero.
- Next, the plaster must be allowed to dry in accordance with the recommendations on the packaging. Compliance with the requirements for the maturing conditions of the coating guarantees that the resulting plaster layer will have the characteristics declared by the manufacturer. Additional care may be required at this stage (covering with films, moisturizing).
- After 7–15 days, you can begin further finishing of the plastered surfaces.
Installation of beacons
Installation of reinforcing mesh
Mixing plaster mortar
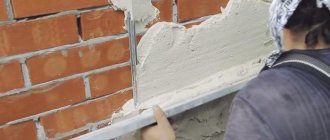
Applying a plaster layer
Grouting plaster using a trowel
Plastering foundation blocks. Plastering the plinth with your own hands: step by step procedure
Plastering the plinth and foundation of a building is designed to perform several tasks at once. Such work makes it possible to obtain high-quality protection of the foundation from an aggressive external environment, extend the service life of the structure and can become a real decoration of the exterior of the home.
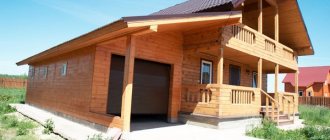
Finishing the basement of the house
Selection rules
The main plastering is carried out using cement mortar, on top of which decorative layers are often applied.
Plastering of the plinth should be carried out according to the requirements
Therefore, such a vapor-permeable material must have a high adhesion coefficient and good strength, and also meet the following basic requirements, including:
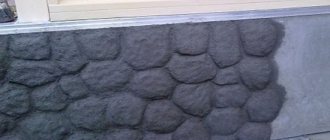
Basement finished with plaster
A correctly selected and high-quality base plaster mixture allows you to not only imitate the texture of almost any finishing material, but will also serve as additional protection to the main layer.
Decorative plaster of the base
Main types
Currently, there are various materials suitable for cladding the basement of a building, but due to its durability, reliability and quality, plaster occupies a leading position.
LNPP acrylic plaster “Classic Velor” LNPP acrylic plaster “Aurora” LNPP acrylic plaster for plinth
Type of plaster mixtureCharacteristics and featuresStandard consumption
| Mineral mixture based on white cement | It does not have sufficient elasticity and can crack; it allows you to obtain a vapor-permeable coating that becomes dirty quite easily. In addition, this species is characterized by a poorer color range. | On average, it can vary between 1.5-4.5 kg/m2. |
| Acrylic mixture based on acrylic resin. | It has good elasticity, which minimizes the risk of cracking, is sufficiently resistant to mechanical influences, has a rich and stable color, but is characterized by insufficient vapor permeability. | On average, it can vary between 1.5-4.0 kg/m2. |
| Silicate or silicon mixture based on liquid potassium glass. | It is resistant to mechanical damage, has good vapor permeability, is distinguished by a rich color palette and is highly resistant to mold and fungi. However, the composition is quite difficult to apply, and the presence of alkali makes it unsafe for people. | On average it can vary between 2.0-4.0 kg/m2. |
| Polysilicate or polysilicon mixture with the addition of silicone resin. | The composition is elastic and UV-resistant, easy to apply to the surface and quite safe to use, but has low resistance to mold. | On average it can vary between 2.0-4.0 kg/m2. |
| Silicone mixture based on silicone resin. | The created layers are resistant to mechanical damage, have excellent vapor permeability, are easy to clean and are available in a very rich range of colors. | On average, it can vary between 1.7-2.4 kg/m2. |
What to do if the material does not dry for a long time
The main temptation that you may encounter at the stage of drying the plaster of the walls in the basement is to stimulate this process. However, here you need to strictly monitor compliance with the instructions. If the leveling layer dries too quickly, cracks may form. You should refrain from drying rooms with heat guns: building mixtures gain strength gradually, and often require a humid environment for this.
You can speed up the drying process of the plaster layer only by installing supply and exhaust ventilation, which will start air circulation in the basement. In this case, drafts must be avoided.
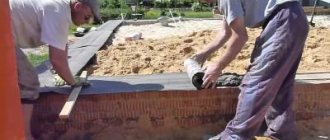
Cooking methods
When it is necessary to protect the floor, ceiling and walls of the basement from moisture, prepare a mixture of different structures. When choosing, environmental conditions are taken into account. The structure of the soil and its ability to retain moisture also play a role, which will subsequently affect the operation of the basement. Thus, the most common preparation scheme is the ratio of cement and sand - 1:3.
Then additives are introduced: plasticizers, minerals, water repellents. Their total volume should not exceed 1.5% of the number of main components. If you use a ready-made composition, you just need to mix it with water. The proportions are indicated by the manufacturer on the packaging. When preparing the solution, you must use a construction mixer. Then the finished plaster is left for a few minutes. After this, use the mixer again.
It is recommended to prepare the mixture at a temperature within +5...+30°C. Air humidity should not exceed 75%. Ready-made compositions and mixtures that were made independently are applied in the standard way: using a wide spatula, rules. Surface treatment with asphalt plaster is carried out using cold and hot methods.
In the first case, the mixture is applied using special equipment or manually. The hot surface treatment method requires heating the mixture to +180°C. In terms of reliability, this option is superior to the previously discussed one, however, special equipment must be used to apply the solution.
Processing the outside of the cellar walls
The outer part of the cellar walls must be covered with waterproofing. Most often, these are bitumen mastics or built-up roll material (for example, roofing felt) for underground parts of the foundation and waterproofing plaster on the visible part of the base. The latter allows for the preliminary application of penetrating waterproofing or the subsequent application of sanitizing compounds.
The problem of excessive moisture in basements must be solved comprehensively, since moisture accumulates in building structures and destroys them. Waterproofing is carried out both with conventional materials (roofing felt, bitumen) and with special plasters. Owners of dry basements can choose general-purpose cement plasters for leveling. Sanitating compounds can dry out structures and accelerate the evaporation of condensate. The type of plaster is selected based on specific conditions.
Interesting and useful information about building materials and technologies
WATERPROOFING WALLS
Basement walls must be protected from the effects of capillary moisture rising upward from the foundations; External walls should additionally be protected from the effects of filtration (seepage) and pressure groundwater.
Horizontal waterproofing
. The first layer of horizontal insulation in the basement walls is installed at the level of the top of the basement floor structure; the width of this layer should correspond to the thickness of the wall (including plaster), and if there is waterproofing of the basement floor, the width of the first layer of horizontal wall insulation should be such that it extends 15 cm onto the floor waterproofing layer (Fig. 31). The outer walls of the basement also have a second layer of waterproofing, located approximately 30 cm above the blind area; if the basement ceiling is located below this layer of insulation, then a third layer of waterproofing is installed directly under the ceiling.
Horizontal waterproofing can be made from: roofing felt or tar-bitumen roofing cardboard (due to the danger of exposure to living organisms, cardboard impregnated only with bitumen cannot be used!); corrugated strip copper 0.2 mm thick; synthetic elastomeric roll material, such as ethylene/propylene terpolymer rubber and butyl rubber (see above); This type of insulation material is preferable for installing horizontal wall insulation if the subsequent joining of the layer with the insulation of the basement floor is envisaged, since the “aprons” of horizontal insulation protruding from the wall are not as easily damaged during the construction process as, for example, roofing cardboard.