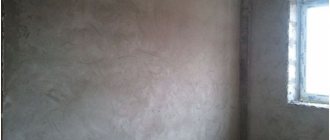
Plastering walls according to beacons As a rule, interior finishing work begins with leveling the walls. This approach allows you to quickly and efficiently get rid of various flaws in the building structure. And also, get even vertical corners and surface. To ensure a perfectly level room, when leveling with plaster mortar, special beacons are installed. Plastering walls along beacons allows you to level the surface in one horizontal and plane. In addition, throughout the entire finishing work, strictly adhere to a certain layer thickness of the plaster mass.
Choosing a mixture for plastering
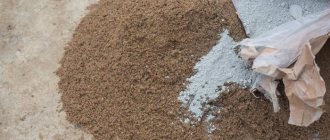
One of the most important stages of leveling walls with beacons with your own hands is choosing the type of dry plaster. There are many factors to consider here:
- type of materials from which the walls are made;
- indoor humidity;
- temperature regime;
- type of finishing;
- financial capabilities of the owners.
Walls can be:
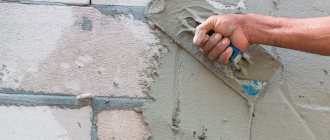
- Brick. Such walls are laid with cement mortar, which is why all plasters containing cement will adhere well to them even without reinforcing mesh. The use of gypsum and lime mixtures requires the attachment of a metal mesh for gypsum mortar and a plastic mesh for lime-based plaster (slaked lime corrodes metal);
- Concrete. For smooth concrete walls, cement or gypsum-lime mixtures are used. It is good to plaster rough concrete surfaces with a pure cement-sand mortar, without additional components. In all cases, treatment with Betonokontakt is required. The use of gypsum plaster is possible after reinforcing the wall with fine-mesh plastic or metal mesh;
- Porous materials (aerated concrete, gas silicate). After priming the wall with penetrating mixtures, you can use a gypsum or lime based solution. Professionals do not recommend using cement plaster on porous walls, even over reinforcing mesh.
- Wooden. How to align a wall with beacons in a wooden house? This type of wall is the most versatile. They can be plastered with all known types of plaster and even clay.
Concrete contact.
In places with high humidity, the use of solutions based on gypsum is excluded. Plastering walls along beacons in the bathroom, kitchen and toilet is possible only with mixtures of Portland cement, lime and sand. In dry rooms (hall, children's room, bedroom, corridor) you can use any type of plaster.
In unheated rooms (cottage, garage, workshop) gypsum plaster mixtures cannot be used. When exposed to frost, it cracks (the exception is foam gypsum, which cannot be found on sale, but can be made independently).
For finishing the following can be used:
- Wallpaper. The best option for plaster is cement-sand. In this case, ideal adhesion of the wallpaper glue to the wall is ensured;
- Dye. The paint layer adheres well to gypsum plaster. If the plastering work is done efficiently, the surface of the wall does not even need to be primed;
- Ceramic (tile) tiles. There is no alternative to cement-sand mortar.
Taking into account the financial capabilities of homeowners, we can recommend:
- Expensive ready-made gypsum mixtures;
- Optimal, in terms of price-quality ratio, cement mortars. By purchasing each component separately, you can save your family budget even more;
- The cheapest option is to use clay. However, it can only be used to plaster a wooden house.
Taking into account all factors allows you to always choose the most suitable plaster option. If you have the financial means to purchase ready-made solutions, we recommend that you look at the article “How to choose plaster for walls,” which will allow you to freely navigate the variety of plasters available for sale.
Brief characteristics of the offered plasters
Leveling walls with plaster along beacons can be done using various types of dry mortars. However, each of them has its own pros and cons.
Cement mortars are the strongest - they create an indestructible layer that holds any type of finish. Resists moisture well. Always cold to the touch.
The advantages include:
- low price of plaster components;
- long “life” of the mixture, which is very important for a beginner in the construction business;
- the ability to vary the proportions of the solution for spraying, soil and covering;
- No special knowledge is needed to apply plaster to the wall.
Flaws:
- plaster is prone to shrinkage and cracking of the surface, but this minus is relative - adding fiber to the mixture completely eliminates it;
- the process is labor-intensive and physically difficult;
- poor adhesion to smooth concrete (walls must be treated with special primers);
- the need to interrupt work to dry each applied layer, which increases the time of plastering itself;
- a long break due to cement hydration between the completion of wall leveling work and the installation of the finishing coating.
Clay plaster is used in wooden houses, as well as for plastering fireplaces and stoves.
The advantages include:
- low cost;
- environmentally friendly (can be used in rooms with allergies);
- the ability to maintain optimal humidity in the room (excess water in the air is absorbed, and when dryness appears, the moisture is returned back to the room).
Minuses:
- takes a long time to dry;
- in rooms with high humidity it sinks very slowly, but nevertheless, under its own heavy weight;
- requires, contrary to the established point of view, experience in stirring the solution and applying it to the wall.
Lime mortar is used in well-heated, dry rooms.
Positive traits:
- the ability to adhere to all types of wall materials, especially stone;
- plasticity after drying, as a result of which the surface does not crack;
- the ability of the plaster to “breathe”, which guarantees an optimal microclimate in the room;
- alkaline environment protects against fungi and mold;
- simple application technology, which allows you to do the work yourself.
However, it has several significant disadvantages:
- after drying, unevenness appears on the surface, regardless of the quality of the grout, which requires mandatory putty;
- You cannot drive nails or screws into the plaster for a long time - the hardness is very low. After a few months, the required strength will appear, but it will be an order of magnitude lower than that of the cement-sand mortar, and therefore, with random sharp blows, it will crumble (real life example: when children threw a tennis ball at a wall, they damaged the lime plaster under the wallpaper );
- in the absence of a primer, the spray is made with cement-lime mortar;
- higher price compared to cement plaster.
Gypsum plaster works well in the living room, dining room, bedroom, and children's room. It is plastic, which is convenient to use, dries quickly, and has good heat and sound insulation properties. The advantages include a large assortment of this type of mixtures on sale.
Among the disadvantages:
- high price;
- fear of water;
- quick setting, which does not allow mixing the solution in large quantities;
- softness, which leads to surface damage due to minor contacts of sharp objects with the wall.
Application technologies
The stages of plastering walls with a cement-sand mixture, as well as the other, are not so difficult to perform. The main thing is attention, diligence and compliance with instructions. The service life of the coating and its appearance will depend on this.
The technology for applying plaster consists of 3 steps:
- The solution is sprayed. The main purpose is to ensure good adhesion to the main surface. The finished product has the consistency of thick sour cream;
- Leveling the primer mass over the surface, which must be applied after the top layer has completely dried;
- The third and final stage is covering. It is performed with a thick, creamy solution containing fine sand. The main purpose of the procedure is to ensure a perfectly flat surface. For good adhesion, it is better to wet the primer a little before applying.
I would like to note that plastering concrete walls with cement-sand mortar or any other material requires drying of each layer before applying a new one. Beginners should pay special attention to this point and strictly follow the instructions for preparing the product.
Tools and materials
When leveling walls using beacons with your own hands, you should take care of tools, building materials and consumables in advance.
To prepare plaster you should buy:
- cement grade M400;
- river sand (when purchasing quarry sand, it must be sifted and, preferably, washed);
- PVA (accelerates the setting process);
- propylene fiber for reinforcing plaster - prevents its shrinkage and cracking of the surface;
- primer mixture “Betonokontakt” for concrete walls or Ceresit CT 16 for brick walls.
In addition, you must have access to water.
Preparing walls for plastering is done using:
- hammer;
- chisels;
- brushes;
- trays for the primer mixture;
- metal brush;
- Bush hammers (trojans or cogs).
To install beacons you will need:
- metal non-galvanized T-shaped profiles 2.5 m long (if the ceiling height is higher, you should buy 3-meter beacons) and 0.6 cm high;
- Kremmer clamps or clips;
- dowels with a diameter of 8 mm;
- self-tapping screws
Installation of beacons requires the following to be available:
- portable platform (you can use a stepladder, which is not very convenient, or a table);
- electric drill with a drill for concrete with a diameter of 8 mm;
- a hacksaw for cutting metal profiles (it is more convenient to cut with a grinder);
- square;
- screwdriver with a cross-shaped attachment for self-tapping screws;
- Phillips screwdriver;
- ruler 2 m;
- plumb line;
- marker;
- bubble or laser level;
- strong cord (fishing line).
Plastering walls along beacons cannot be done without the following tools:
- containers for stirring plaster;
- ladle;
- falcon;
- trowels;
- grater;
- graters;
- fry;
- ironers;
- set of spatulas.
Attention: those who like to do everything themselves do not always know the purpose of all types of tools listed above. This knowledge gap will be filled by the material “How to plaster a brick wall,” in which you can also find a photo of each tool.
Trowel (trowel, plastering spatula).
Requirements for plaster
The basic requirements for the quality of plastering work are set out in SNiP III-21-73. It is especially important to know them if you decide not to do the work yourself, but to hire workers. The quality of work is divided into 3 parts: for simple, improved and high-quality plaster.
- With simple plastering, vertical deviations are allowed no more than 3 mm per 1 m, but no more than 15 mm over the entire height of the room. Thus, the maximum wall deviation for ceilings of 2.5 m is 7.5 mm. Smooth unevenness is acceptable for every 4 square meters. m. - no more than 3 pieces. Their height or depth should not exceed 5 mm. Horizontally, the maximum deviation is 3 mm per 1 m.
- SNIP for improved plaster requires stricter compliance with tolerances. Vertically - no more than 2 mm per 1 m, but no more than 10 mm over the entire height of the room. The presence of smooth irregularities is acceptable - no more than 2 pieces. for 4 sq. m., less than 3 mm deep. For each meter horizontally, a deviation of no more than 2 mm is permissible.
- The most stringent requirements in SNIP are specified for high-quality plaster. Vertical deviations should be less than 1 mm per 1 m, but not more than 5 mm per room height. The maximum allowed presence of 2 irregularities per 4 square meters. m., less than 2 mm deep. At 1 m horizontally, a deviation of no more than 1 mm is permissible.
Calculation of plaster consumption
The consumption of dry mixture when plastering walls with your own hands using beacons depends on the curvature (unevenness) of the wall surface. The greater the vertical slope, the more ready-made mixture or its components will be required.
Calculating the required number of mixture components is not very difficult. After installing the beacons or forming the plaster plane, key points are determined from which calculations will be carried out. They must be marked along the lines of the beacons at the same level from the floor.
Important: when determining the area of a wall, you should always take into account the dimensions of door and window openings.
The more points, the more accurate the calculations. Then the distances of each point from the surface of the plaster or beacons are measured. The values are recorded and then summed. The resulting number is divided by the number of control (key) points. The result obtained gives the average thickness of the plaster. Multiplying it by the area of the wall, we get the amount of solution in m3.
But this figure will be required when mixing the solution yourself, when you buy the components. To do this, you need to know the amount of binder in the solution and the ratio of the mixture components.
In accordance with construction tables, 1 m3 of plaster should contain:
- Portland cement M400 - 240 kg;
- slaked lime - 215 l (since slaked lime has a specific gravity of 2.3-3.2 t/m3, it is not possible to indicate the exact weight);
- clay - 250-500 kg (the specific figure is determined by the fat content of the clay);
- gypsum - 850-1000 kg (depending on the degree of its looseness - a denser composition has more weight).
The ratio of components of various solutions is shown in the table below:
| Solution | Ratio of components in parts | ||
| Splash | Priming | Covering | |
| Calcareous (lime: sand) | 1:(2-3) | 1:(2,5-4) | 1:(1-2) |
| Cement (cement: sand) | 1:(2-3) | 1:(2,5-4) | 1:(1-2) |
| Clay (clay: sand) | 1:(3-5) | 1:(3-5) | — |
| Lime-clay (lime: clay) | 0,2:1:3 | 0,2:1:5 | 0,2:1:3 |
| Lime-gypsum (lime: gypsum: sand) | 1:1:2 | 1:0,5:2 | 1:1:5 |
| Clay-gypsum (clay: gypsum: sand) | 1:0,25:3 | 1:0,25:3 | — |
When purchasing ready-made mixtures, it is enough to know the area of the wall and the average thickness of the mortar. Then everything is simple: manufacturers must indicate on each bag the consumption rate of the mixture per 1 m2 with a plaster layer thickness of 10 mm (1 cm).
We multiply the wall area in m2 by the average thickness of the plaster in cm and the consumption of the plaster mixture in kg per 1 m2. Divide the resulting number by the weight of the bag. The result is the number of bags of dry mortar.
Variety of compositions
Plastering walls with cement-sand mortar is a classic renovation work. The main components here are sand, cement and lime. The modern market offers a huge number of mixtures where additives regulate plasticity, the setting process, the quality of adhesion, and more.
Often, such products are sold dry, and their original state can be easily changed by adding liquid and further stirring until smooth.
The rather high cost can be considered a disadvantage, so many builders prefer simple components from which they can independently prepare working material.
Cement mixtures with the addition of gypsum are very common on the construction market, differing in both application and recommended location of application.
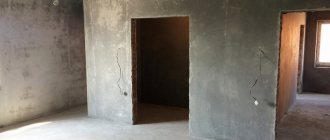
Preparing the wall for plastering
The process of plastering a wall begins with its careful preparation. If you ignore this type of work, the plaster will begin to crack and fall off after a short time.
You should start by removing the previous coating from the wall: paint layer, wallpaper, tiles, etc. Next, if provided for in the repair plan, replace windows and doors, inspect the electrical wiring (if necessary, install it in grooves). Complete the re-laying of utilities.
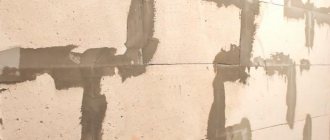
Remove dirty stains and dust from the walls, embroider masonry seams in the brickwork, repair small cracks and chips in concrete walls, apply notches to the brick and concrete with special tools for better adhesion of the plaster mortar to the wall. Treat with special primers. Install shingles on wooden walls.
To avoid repetition, we will refer everyone who wants to learn more about the technology of preparatory work to the work posted on our website: “How to prepare walls for plaster.”
How to get to hard-to-reach places?
A developer who plasters walls with cement mortar with his own hands should know that in the most difficult places it is better to work at the final stage of the process, when the main surface of the wall has dried. Such areas are the corners of walls, abutments to the ceiling, spaces surrounding the elements of the heating system.
When plastering corners, you must initially apply the solution in the usual way, then press down the thrown mass with a rule, the corner of which is cut off. In this case, the lighthouse installed first from the corner is taken as a landmark.
The mortar mixture is poured into the openings near the pipes with a spatula or trowel, and grouting is done with them. It is recommended to finish the areas near the ceiling on the second day after completion of the main work. When leveling the layer, they are usually placed vertically, and are oriented not towards the lighthouse, but towards the dried plaster layer.
To prevent the layer of cement-sand plaster from cracking in the future due to rapid drying, several techniques are used:
- eliminate strong heating of the room and the possibility of drafts;
- during plastering work, the wall surface and working tools are often moistened;
- grouting is carried out several times;
- the surface of the plaster layer is coated with a moisture-repellent composition.
Each method increases the drying time of the wall surface, while maintaining the evenness of the coating, which, after such finishing, can withstand any negative impact.
Beacon device
The most important and difficult stage during plastering is the installation of beacons. This can be done in the classic way (by hanging) or using a “spider”. The "spider" method is simpler, although errors of 1 mm are possible. Experienced professionals avoid this drawback by re-calculating the thickness of the plaster after fixing the hardware heads under the beacon profiles.
The work is carried out step by step as follows:
- In the left corner, 10 cm from the adjacent wall and 0.2 m from the ceiling, a dowel is driven in. A self-tapping screw is screwed into it. 4-6 cm are left on the surface (during further work they will all be screwed in and out);
- A plumb line is attached to the head of the screwed-in hardware (if you have a level with a laser, the work will go faster);
- At a height of 0.2 m from the floor, along the plumb line, a dowel is driven in and a self-tapping screw is screwed into it until it aligns with the upper hardware;
- Similar work is carried out at the other end of the wall;
- Having retreated 10 cm inside the wall from the resulting lines, the lines of the outer beacons are formed, for which self-tapping screws are screwed into the dowels at a distance of 0.2 m from the ceiling;
- The distance between the extreme lines of the beacons is measured and divided into equal spans of 0.8-1.50 m - we get intermediate beacons;
- We mark them with chalk (marker, pencil) and screw in self-tapping screws in the upper part (20 cm from the ceiling);
- We stretch vertically, and very tightly, the fishing line (string, thin cable) between the outer screws;
- We connect both lines with twine;
- Moving the thread up and down along the fishing line, we take measurements along each line of the lighthouse and along the wall as a whole. The task is to find the most convex place on the surface of the wall and, similarly, on one of the lines of the lighthouse.
After finding the highest points on the wall and on one of the lines of the lighthouse, we carry out calculations in order to construct the planes of the plaster and the heads of the screws for the lighthouses. Upon completion of the calculations along the lines of the beacons, we screw in the hardware and bring them into one mirror with the upper screws. Work at this stage is best done manually, using a screwdriver. The work is completed by installing the beacons on self-tapping screws using mortar or special fasteners.
The horizontal thread moves up and down to detect height differences on the wall surface.
Detailed instructions for installing plaster beacons are given in the material “How to place beacons under plaster walls.”
Possible difficulties
Many people are trying to find out how to quickly complete plastering work without spending extra time and money on it. In a hurry, repairmen neglect some rules, and the consequences after this become very dire.
It would not be superfluous to talk about the mistakes made by beginners who do not have proper experience in plastering work. This mainly relates to the process of preparing the mixture, observing the ratios of the components used for this. If you add more cement than is required according to the norm, you will get a solution that does not have the necessary plasticity. This means that at the drying stage, during shrinkage or under the influence of unfavorable factors, cracks will appear on the surface of the layer and its partial collapse will begin.
If an inexperienced craftsman, in pursuit of the goal of saving money, adds more sand to the solution than is required according to the norm, the composition does not adhere well to the surface, and after drying a lot of dust will form in the room.
The problem can be determined visually using a spatula - a mixture with excessively added sand does not stay on the tool, and plaster with excess cement sticks to the working surface and is difficult to clean off.
It is recommended to carefully examine the previous covering layer of the surface. The cement mixture is applied boldly without preliminary cleaning if the coating was previously made of a similar material.
Please note that this plaster composition is not used on gypsum or lime coatings.
It is important to first apply a layer of spray to the wall surface if painting is planned in the future. If this condition is not met, the mortar mass dries unevenly, shrinks, and all defects become clearly visible after applying paintwork materials.
Instructions for plastering walls
How to plaster walls using beacons? If you clearly follow the step-by-step progress of work, then there is nothing difficult or incomprehensible even for a beginner. Level the wall using:
- splash;
- soil;
- covers.
They are applied to the wall sequentially, after the previous layer has dried.
Spray. The main task of this layer is to ensure good adhesion of the plaster to the wall, which is achieved by changing the ratio of the components of the solution (table above) towards increasing the amount of cement, gypsum or lime in its composition. The mixture should have a consistency similar to sour cream. A spray of 4-5 mm thickness is applied.
Before starting work, if no primer has been applied, the wall is wetted: a dry surface will take some of the moisture from the solution and disrupt its proportions. As a result, the chemical process of cement stone formation, called hydration, will be disrupted.
Work begins from the left corner, proceeding from left to right, from bottom to top, in a stripe between the beacons. Only after completing the work between the first and second beacons do they move on to the next passage, etc.
Plaster can be applied using two methods:
- The plaster mixture is poured onto the falcon and brought to the surface of the wall. A small amount of solution is taken from it with a trowel and applied to the wall with an energetic movement away from you (hence the name “spray”). The movement should be performed by the hand, not the arm. Plaster slaps are placed next to each other until they fill the space between the beacons. No omissions are allowed. After this, the second row is sprayed, etc. Having completed the span, the strongly protruding mixture is removed, but the layer of solution is not leveled;
- The solution is poured onto the falcon, brought close to the wall and spread over it with a trowel. This is the so-called spreading. In this option, you can spread the solution with a grater, which is faster.
Priming. The second layer is applied after the spray has dried (the approximate drying time for plaster layers is given in the table below). They level the wall.
| Types of solution | Average curing time for plaster layers | Drying time for the solution before finishing | |
| For spraying | Each layer of soil | ||
| Cement based | 2-3 hours | 6-12 hours | 6-7 days |
| Lime-cement: | |||
| skinny | 0.5-1 days | 1-2 days | 19-20 days |
| fatty | 9-12 hours | 0.5 days | 15-20 days |
| Lime based | 1-1.5 days | 2-3 days | 20-30 days |
| Lime-gypsum | 0.5-1 days | 0.5-1 days | 15 days |
| Lime-clay | 2-3 days | 1-2 weeks | 1-1.5 months |
The solution is brought to the consistency of bread dough. The permissible thickness is 2.0 cm (if it is exceeded, the plaster slides). If a thicker layer of soil is required, the operation is performed in several stages.
The plastering technology is simple: with a trowel, the solution is applied from left to right, in the direction from floor to ceiling, into the recesses left after spraying. The work is carried out in small sections, usually along the spans between the guides.
The applied solution should cover the surface of the profiles. Excess plaster is removed using a rule that is pressed tightly against the surface of the profiles and, moving upward from the floor, cuts off the layer of mortar protruding beyond the beacons.
The plaster that falls on the rule does not return back to the surface of the wall, but into the prepared solution. If after the first leveling there are depressions left, they are filled with mortar and the procedure for cutting off excess plaster is repeated from the beginning.
The work is completed by leveling the soil with a trowel. The main task of this technological operation is to fill the holes, voids and depressions remaining after the rule.
The mortar is applied to the wall with a trowel, and then rubbed into the ground with a trowel, up and down or in a circular motion, filling all surface defects. Excess plaster from the trowel must be regularly removed and returned to the general solution. If such plaster is returned to the wall, it will fall off due to dehydration.
Covering. The third layer is applied after the previous layer, the primer, has completely dried. The solution is prepared from cement and river sand sifted through a fine sieve. Water is added until the consistency of heavy cream (flowing sour cream) is obtained.
Using a ladle or bowl from the utensil set, the plaster mixture is poured onto the wall. As a result, we get not a pile of solution, but a wet spot, which is immediately treated with a grater soaked in water. It presses tightly against the surface of the wall and rubs the liquid solution into the ground in a circular motion. If there is not enough solution, you can safely add it.
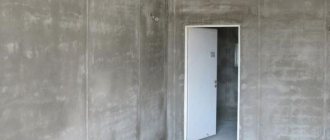
Plastering walls using beacons ‒ Preparatory and finishing work
The main task of the preparatory work is to prepare the surface for plaster, thoroughly cleaning it of old coatings, various dirt and cement stains. Before aligning the wall with the beacons, it is necessary to complete all engineering work on laying communications. And also, install all windows and doors. After this, the surface must be well primed with a deeply penetrating mortar. Next, if necessary, securely fasten the reinforcing mesh.
Installation of beacons
As practice shows, the correct location of the beacon slats guarantees the quality and correct position of the plaster plane. The procedure for installing beacons with your own hands is as follows:
Marking for beacons
- Retreat 100 mm from the upper left and right corners of the wall and fasten screws with a length of at least 100 mm into the dowels. You need to make sure that the screws protrude 50-60 mm above the wall surface.
- Near the head of each screw, hang a plumb line on a string. But we make sure that it does not reach the floor, by 100-200 mm.
- Below, along the plumb line, screw in 2 more self-tapping screws, to which you need to tie the lower end of the cord.
- At a distance of 100 mm from the fixed cords, draw vertical lines. Along them, we fix the 2 outer beacons on hardware.
- We divide the plane between the outer slats into several equal vertical spans, at least 1.5 m wide. Thus, we get lines of intermediate beacons.
- We tie 2-3 horizontal twines to the vertically stretched laces. Next, by moving them slowly, up and down, we determine exactly the most convex place on the wall. After this, we find out the exact position of the required vertical plane. Then, we place the beacons and calculate the approximate consumption of building materials.
Installation of beacons
Beacon slats, as a rule, are fixed at the edges with ordinary self-tapping screws. In the middle part, they are fixed mainly with cement mortar. In this case, plaster cannot be used.
Plastering walls along beacons ‒ Applying plaster mortar
Plastering a wall along guide beacons is mainly carried out in 3 stages:
- Spray;
- Priming;
- Covering.
The stages of plastering work are carried out in strict sequence and only after partial drying of each previous layer.
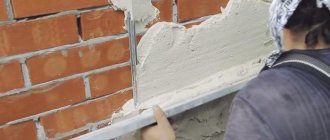
The thickness of the spray is usually from 30 to 50 mm. The consistency of the mixture is made to be medium thick – thicker than full-fat kefir. Such a solution is, as it were, slapped onto the moistened surface of the wall, from bottom to top and from left to right. Separately for each lane, between the lighthouses. They throw such a solution substance onto the surface with a trowel, taking it from the falcon.
Spray and slap with solution
Using soil, as a rule, all rough leveling is performed. The thickness of the mortar mass resembles soft dough. The recommended maximum thickness of one layer is about 20 mm. If this thickness is insufficient, then the soil is applied in several passes, after some setting, of the previous layer.
Scheme for leveling a plastered wall
As a result, the mortar mass should slightly cover the surface of the fixed beacon profiles. To achieve this, excess plaster is removed using a rule. It is supported on neighboring beacons and, vibrating, is pulled from the bottom up.
The final, third layer, covering, is intended for final leveling and securing the surface. The thickness of the mortar mixture corresponds to liquid sour cream. It is simply whipped out onto the surface from the ladle and rubbed in with a wet grater. This way, you get a flat plane, without visible defects.
The correct technology, installing beacons, significantly simplifies plastering corners. Since two perfectly vertical planes will definitely ensure an even angle.
Plastering walls according to beacons - The final stage of work
At the final stage of finishing work, all guide beacons are removed from the plaster layer. If this is not done, then as a result of corrosion, dark spots may appear on the walls of the room. Next, the resulting grooves are carefully covered and well leveled. Afterwards, the surface and wall structure are washed with water.
Grouting the surface
The washing process is quite simple - liquid is splashed onto the surface of the structure and rubbed well. As a rule, troweling is carried out using a fairly soft polyurethane trowel. Such simple actions correspond to grinding the finished plane. They significantly facilitate and speed up puttying - the final stage of do-it-yourself plastering work.
PS To sum up the above, we can say with confidence that high-quality plastering of the surface with your own hands is not at all an easy task, but it is a completely solvable task. The main thing is to strictly follow the plastering technology, follow the guide beacons and listen to the recommendations. And then, your plastering actions will allow you to get beautiful and cozy rooms.
Final work
After an 8-10 hour pause, the plaster is washed. Clean water is poured from a mug onto a small section of the wall. You should start from the top and work downwards. The wet surface is rubbed with a polyurethane trowel (no plaster solution is used, only water and a trowel). This way the wall is sanded. Experienced craftsmen are able to achieve a smooth and velvety surface that does not require putty.
It is better to remove the guide profiles before the plaster is completely dry. The destroyed plaster layer is repaired either with mortar or putty.
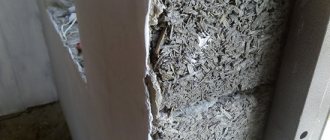
Repairing cracks
If there are cracks in the cleaned walls, they must be eliminated. Otherwise, the defect may appear on the new coating.
Repairing a crack in the wall
Cracks are eliminated as follows:
- A small crack is widened to its full depth, thoroughly cleaned of dust and treated with a primer. Then the defect cavity is filled with putty flush with the wall surface.
- Thin and not deep cracks can be filled with sealant or silicone. This is convenient thanks to the nozzle included with the cylinder.
- A wide gap is often sealed with foam or mortar.
How to prepare the solution?
We recommend leveling the walls using a ready-made plaster mixture , because it already contains all the components in the required ratio and no special additives are required. The temperature of the cooking water should vary between +5-20 degrees.
Pour water into a container, then add the dry mixture there. It is important to use a clean container without any old plaster residue. First, mix the components with a spatula, then bring to a homogeneous consistency with a drill mixer.
Features of plaster mixtures
Before plastering the wall, you need to choose the right plaster solution based on the characteristics of its components.
- So, for exterior decoration and rooms with high humidity, such as a garage, loggia and balcony, a solution of cement and sand is ideal. This option is perhaps the most popular among craftsmen. And, not unimportantly, it is distinguished by the availability of components and low cost.
The cement-sand mixture is characterized by high strength, resistance to mechanical stress and moisture. Even a beginner can handle preparing such a solution: you need to combine sand with cement in a 3:1 ratio and add water. This mixture does not set for a long time, which makes it possible to prepare it in large quantities at once. You can also purchase a ready-made composition at a hardware store and prepare it following the instructions.
- Gypsum plaster is suitable exclusively for indoor use. After all, gypsum tends to absorb moisture, so such a solution is categorically not used for exterior finishing. In addition, it has a number of advantages such as strength, resistance to mechanical stress, and breathability. Therefore, if you don’t know how to plaster a wall indoors, you can choose this solution option.
Important! The gypsum solution sets quickly, so it is not recommended to prepare it in large quantities.
- For rooms with high humidity, such as a basement, bathhouse or unheated garage, use a solution of sand and slaked lime. The recipe for such plaster is simple: you need to mix sand and lime in parts of 5:1 and, adding water, mix until smooth.
How to apply?
To work, you will need a smoothing iron and a narrow spatula. Experienced specialists use a cape to apply it, but for a beginner this method can be difficult. The first layer of mortar (rough) can be applied in the following ways.
Plaster trowel
Method number 1 . The mixture is applied with a spatula and then leveled using a trowel. It is better to apply the solution on top - this way the excess will not fall onto the finished surface, and the seams will not be so noticeable.
Method number 2 . The mixture is placed on a trowel and then rubbed over the surface. It is important that the iron is at an angle of 45° relative to the wall. The plaster at this stage is laid roughly, that is, without finishing leveling.
Applying plaster with a cover
Having filled the space between the beacons, level the layer with the rule. Place the latter between the beacons and pull in a zigzag manner from bottom to top, removing excess mixture. You can use the plaster left on the rule in other areas.
Note ! If bubbles and unevenness appear, it means that the solution did not reach the base. Remove the plaster in such places and re-install it.
Leveling the covering using the rule
Treat the strips near the ceiling and floor last, when the composition on the wall has hardened. Remove the beacons before the plaster hardens by picking it up and pulling it out with a screwdriver. Don't forget about the screws - be sure to unscrew them. After removing the guides, cover the resulting voids with solution.
Removing a beacon