Beton-House.com
Website about concrete: construction, characteristics, design. We combine the experience of professionals and private craftsmen in one place
Concrete path in the garden
Winter cold, and then a sharp thaw in spring, late frosts in March or heavy rains in May are one of the reasons why garden paths and paths lose their original appearance.
At the end of planting for the new season, when the time for planting seedlings of heat-loving crops in the ground has not yet come, it is the best time to repair concrete paths. And the article will tell you how best to do this.
- Repairing cracks in the walkway
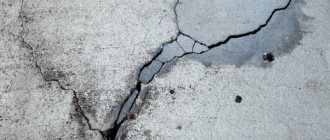
Repairing cracks in concrete: how and what to repair on the street
Concrete is a universal building material with affordable cost and high strength, which is widely used for the construction of various objects. Sooner or later, a structure made of this material is subject to destruction under the influence of atmospheric phenomena. This process begins with the appearance of small chips and cracks. If such problems are not corrected in a timely manner, the service life of the building or structure may be significantly reduced.
Types of damage
The choice of method for repairing structures depends on the type of cracks. They are:
- by degree of penetration: superficial - shallow and deep, through;
- by size: hairline (up to 1 mm), medium (from 1 to 10 mm), wide massed (11 mm or more);
- in relation to reinforcement: without exposure, with complete or partial exposure;
- by location: local, spread over all surfaces, corners, edges;
- by impact on the structure: no effect, reducing strength by 5–50%, destroying when strength is less than 50%.
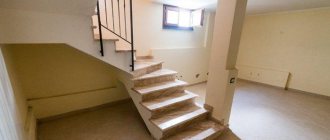
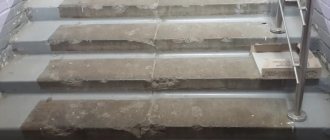
Repairing a chipped step edge
1. Cleaning the damaged area. Using a plumber's chisel, held horizontally, chip away the damaged concrete along the entire edge of the step. Don't forget your safety glasses.
2. Deepening the groove. Holding the chisel at an angle, deepen the groove until it becomes a V-shape (inset). Also do this work while wearing safety glasses. Remove dust and keep the prepared area damp, preferably overnight.
3. Applying the solution. Thoroughly mix 1 part cement with 3 parts sand with water and binder to obtain a paste-like mortar that holds its shape. Let the solution sit for now. Prepare a formwork board with a width and length equal to the height and length of the step, and press it against the step with bricks or other heavy objects. Coat the edge of the step with cementitious agent (as in repairing wide cracks, step 3), then immediately fill the V-groove with mortar, leveling and smoothing it with a steel float.
4. Shutdown . Allow the mortar to set for about an hour and round the edge of the step with a rounding tool, then carefully remove the board. Keep the solution wet for at least a week and do not walk on the steps for another 5-7 days.
5/5 — (6 votes)
Repair compounds for concrete
In order for the restoration of artificial stone to be successful, before choosing a repair composition, a thorough inspection of the destroyed structure is carried out and an analysis is performed. The mixture is selected taking into account the following factors:
- the degree of loading of the structure, its load-bearing capacity;
- depth of damage;
- operating conditions of concrete (humid environment, temperature conditions, degree of exposure to aggressive environments);
- accessibility to the damaged area;
- expected scope of work.
If you are repairing the concrete surface in a visible area, it is important to take into account aesthetic requirements.
Major Damage Repair
The large damaged area is filled with new concrete mortar. First, the surface of the structure is cleaned of loose pieces and dust. A clean, solid base of good quality concrete should remain.
Filling is carried out with a cement composition with complex additives that improve its performance characteristics. Good results are achieved by fast-hardening polymer mortar or fiber-reinforced concrete.
For concrete repair with cement mortar to be successful, it is important to create conditions for its reliable adhesion to the base being restored. Two methods are usually practiced:
- Continuous filling of the entire area of the structure is carried out with a solution more than 100 mm thick. If partial restoration is carried out, the concreting site is deepened.
- Better adhesion between old and new layers occurs when a steel reinforced mesh is attached with dowels to the base being restored.
Before pouring the solution, the surface of the structure being repaired is treated with epoxy, acrylic or other adhesive compounds that provide better adhesion.
Dry mixtures for concrete repair
All dry mixes for concrete repair contain cement, which ensures optimal compatibility with the concrete structure being restored. There are many compounds from different companies on the construction market.
The most popular is Osnovit.
Apply the repair composition in a layer 5-50 mm thick on horizontal and vertical substrates. To restore the ceiling, it is optimal to maintain a mixture thickness of 30 mm. Better adhesion is ensured by pre-treatment of concrete with a primer or primer.
concrete repair mixture OSNOVIT
According to the type of application, dry mixtures are divided into the following types:
- for work at temperatures above +5°C;
- at negative temperatures;
- for waterproofing and providing protective properties;
- for repairs that do not change the geometry and load-bearing capacity of the concrete structure.
The scope of application of dry mixtures is wherever quick repairs are required to eliminate defects.
- good adhesion to the old base;
- high mechanical strength of the frozen composition;
- due to additives, the mixture does not shrink;
- possibility of eliminating defects up to 100 mm deep.
The disadvantage is the high cost and short shelf life.
Thixotropic mixtures
In essence, these are analogues of conventional dry mixtures, but with improved characteristics. Popular manufacturers are: MAPEI, BASF, Sika. The thixotropic composition for concrete repair is based on cement, sand, and complex additives. Mixtures with polymer fiber are considered the most effective.
Sika concrete repair mixture
Unlike conventional dry mixtures, thixotropic compositions are applied without installing formwork on a horizontal, vertical or ceiling surface.
The optimal layer thickness is from 10 to 30 mm. The mixture is used when repairing monolithic and prefabricated concrete structures, for sealing seams, and restoring protective layers.
- resistance to mechanical loads and abrasion;
- good adhesion to the base;
- resistance of the frozen composition to moisture and low temperatures.
The downside is the high cost and inability to use at sub-zero temperatures.
Epoxy and polymer compounds
The main purpose of the compositions is the repair of self-leveling floors, injection work, and the organization of protection of a concrete structure from the effects of destructive factors. Popular, "Technoplast", "KrasKO".
polymer composition for concrete repair Elakor
Acrylate compounds are used to repair cracks in concrete, seal chips, and treat the base to improve water resistance. Epoxy mixtures help restore the load-bearing capacity of artificial stone and repair cracks.
Sometimes the composition is applied to improve the adhesion of the base to the new repair layer. Polyurethane mixtures eliminate leaks and prevent the influx of water.
- resistance to mechanical and chemical stress;
- good wear resistance;
- high adhesion to the base;
- good waterproofing properties.
Repair of wide cracks
1. Removal of damaged concrete. Wear safety glasses and use a chisel to cut out the concrete in the damaged area to a depth of about 20mm.
2. Edge processing. To ensure a strong bond and to prevent the mortar from lifting, use a chisel to trim the edges of the damaged area to create an inward bevel (inset). Carry out the work wearing safety glasses. Remove all dust and debris. Wet the area (you can use a hose) and keep it wet overnight.
3. Surface treatment. Thoroughly mix 1 part cement with 3 parts sand and water with a binder such as PVA or synthetic latex until you get a paste mixture that is easy to work with a trowel. Let the mixture sit for now. Using a brush, cover the area to be repaired with a binder diluted with water in accordance with the manufacturer's instructions and proceed to step 4. The repair must be completed before the binder dries.
4. Filling the crack with mortar. Fill the crack with mortar, making sure to get the mortar into all corners. Smooth the solution with a steel trowel until it begins to harden, then run the trowel back and forth several times, lifting the leading edge (bottom). The curing of the solution is described on the previous page.
Briefly about the main thing
In order not to have to decide how to repair the blind area, you must initially follow the technological process.
Before restoring the screed, you need to find out the root causes.
The seam between the blind area and the plinth can be sealed, the cracks can be expanded and tightened, and finally rubbed with cement mortar.
If the cause of the damage is a poorly prepared foundation, then it is better to redo everything.
Write in the comments what you think - is there any point in repair work with a blind area, or in any case is it better to disassemble everything and redo it again?
Restoring the step angle
1. Restoring the shape of the damaged area. If a step corner is crumbling or missing, clean and moisten the damaged area. Mix 1 part cement with 3 parts sand with water and binder to obtain a paste-like mortar that holds its shape. Apply the binder to the damaged area, then apply the solution until the step is restored to shape. Allow the solution to harden so that it cannot be pressed with your finger (this may take up to six hours depending on weather conditions).
2. Shutdown. Using a steel float, smooth the corner flush with the surface of the step. Allow the mortar to cure while wet for three days under plastic wrap or burlap. Water it twice a day and avoid stepping on the corner for a week or two. Alumina cement mortar will be able to withstand impacts after just a few days.
Which sealant to choose for exterior and interior use
The choice of concrete sealant depends on the following factors:
- Location of damage;
- External or internal method of application;
- At what temperature is the sealant used;
- Will the surface be painted after treatment?
After the buyer has chosen a sealant for joints in concrete, there are important points to remember:
- Volume. The consumption is determined in advance, otherwise the excess will be a waste of money.
- Best before date. There is no benefit from expired sealant; it does not perform its functions.
- The packaging must not have cracks or other damage. If air gets inside, the composition will dry out.
Note! Each concrete joint sealant is designed for a specific location and will only be effective if the instructions are followed.
Sealants are divided into types according to the place and purpose of use. These factors determine its properties and consistency.
- High temperature (heat resistant) sealant for cracks in concrete. Auto mechanics use it. Often used for stoves and fireplaces. Suitable for indoor use, so the room must be thoroughly ventilated. The damage is repaired with a construction gun.
- Water resistant. Suitable for sanitary ware (baths, sinks, showers). Suitable for both indoor and outdoor use.
- Sanitary. Repairing of chips is carried out indoors. Resistant to steam once completely dry.
- Universal. It is used both inside buildings and outdoors. It is used to repair damage to metal, wood, glass and plastic. Withstands both low and high temperatures.
- Outer. Good for sealing cracks in ceramics, concrete and metal. Insensitive to direct sunlight.
- Liquid. Fills cavities in heating systems. Self-sealing. Eliminates leaks in the system.
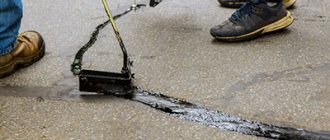
The following methods are used to repair cracks in concrete:
- injection by supplying a solution using special mechanisms into the depth of the crack;
- the use of special solutions based on CPS with polymer additives, followed by treatment of the repaired surface with polyurethane sealants;
- shotcrete using special mixtures based on CPS with bitumen additives.
The most effective way to fix the problem is injection. This method involves preliminary drilling of deep holes, which are directed at an angle to the problem area.
Using special devices, a solution based on synthetic resins is pumped into these holes, which, when strengthened, allows you to eliminate defects and significantly extend the service life of the structure.
To combat small cracks (up to 4 mm) on personal objects (dacha, apartment, balcony), repair mixtures based on DSP and epoxy glue are used. When the solution is prepared correctly, it sets quickly, as a result of which the defect is eliminated.
Placement of packers during injection.
To strengthen a structure in which a crack more than 4 mm wide is found, the use of a solution based on liquid glass is required, for which one part of cement, three parts of water and sand, and one part of liquid glass are mixed.
Technology for performing repairs using DSP
Before you begin sealing cracks in the concrete surface, prepare a list of necessary tools and equipment, consisting of:
- heavy hammer;
- chisels;
- a stiff brush with metal bristles;
- spatula;
- tassels;
- trowels;
- grater;
- vacuum cleaner;
- piece of reinforcement (no more than 10 cm).
Cement-sand mixture.
At the preliminary stage, you need to inspect the damaged area of the material and remove all emerging chips - use a chisel and a hammer. Trim the removal areas; the crack needs to be roughly processed and slightly expanded along its entire length. Next steps:
- Remove all concrete fractions from the crack using a coarse brush. Thoroughly clean the seam from dust - use a vacuum cleaner. You also need to further deepen the seam. This can be done with a spatula. This procedure is necessary to prepare the surface so that the repair solution will adhere well.
- If the width of the defect is more than 4 mm, then use local reinforcement. To do this, use a grinder to cut through transverse overlapping grooves to a length of no more than 10 cm, into which reinforcement (pieces) with a thickness of at least 4 mm are placed. You can prepare for repair work through cracks that have formed at the base of the ceiling or floor slabs, i.e. indoors.
- If, while preparing the problem area, you find that the reinforcement is coming out in some places, sand the metal parts with sandpaper. After this, treat them with a solution that should protect the metal from further rusting.
- Before applying the repair compound to the defective area, treat it with a primer.
- Prepare a solution to repair cracks in concrete. Expanding cement made from CPS with the addition of a liquid glass additive is often used.
- Apply a carefully prepared repair solution to the cracks and moisten. When covering deep defects, apply the composition several times - while waiting for the previous layer to harden.
- If you are filling cracks in a horizontal surface, keep in mind that the mixture will shrink. Remove excess mixture using a grinder.
- Once the repair compound has dried, grout the treated area and level the entire surface.
Every year, inspect the surface of the building to identify cracks and other defects. Promptly remove any gaps you find.
How to repair cracks in a concrete wall like a pro
In newly laid concrete (two hours old), cracks can be eliminated by compacting the compound a second time.
Other methods are used to eliminate cracks in hardened concrete:
- Injection – repair mixture is injected into the opening under pressure. There are mixtures for sealing cracks in concrete, which make it possible to remove moisture from the cracks. Suitable for use in water.
- Sealing . For the walls, materials are used to seal cracks in concrete with the addition of a polymer, which increases the adhesion of the base and repair composition.
- Torquetting or spraying concrete mortar onto the surface . This is an effective and global repair process. It is produced using specialized equipment. As a result, you will get a new layer of concrete that protects the structure from corrosion and further destruction.
To repair cracks, a concrete mixture is used to seal cracks in concrete; after jointing and cleaning the cracks, it is filled with a new composition.
How to repair a crack in a concrete wall using this method? A concrete mixture is used. It consists of fractional sand, water, cement and an organic additive, which can be resin, bitumen, latex. This method is not always convenient to use, since it causes an increase in the weight of the structure, and, consequently, an increase in the load.
Let's take a closer look at what it means to seal cracks in a concrete wall using various technologies.
Concrete pavement care
In order for concrete paths and paths in your garden to please you longer, you need to properly care for them with your own hands, following simple recommendations:
- Concrete sheets should be cleaned in winter without the use of salt or any reagents. They will not only destroy the coating, but can also harm plants located in the immediate vicinity of the paths;
- It is necessary to remove weeds that appear on the paths in a timely manner: they can destroy the base of the concrete pavement;
- Do not allow liquid to erode the paths. This can be prevented by installing special grooves along the edges or creating small grooves;
- You should try to keep garden paths clean, which will protect the coating from destruction and help maintain an attractive appearance for a long time.
This is a brief description of how to properly repair a concrete path and how to care for it. But it is always worth keeping in mind, in order not to invest a lot of money when repairing the coating, it is necessary not only to carry out its timely restoration, but also to ensure proper care of the structure.
Sealing cracks in concrete on horizontal and vertical surfaces, concrete repair mixture
Cracks on walls can have different directions, but most often they are vertical.
The appearance of thin cracks less than 1 mm wide indicates that during construction in the structure or at the base of the foundation there are defects in work, errors in technology, or incorrectly selected materials.
It is necessary to conduct an analysis and carry out corrective actions on bedding, waterproofing, and additional strengthening of stone structures.
Fine cracks in concrete can be repaired with epoxy resin or liquid cement mixture. The ratio of cement and the finest sand is 1:1. Sand can be replaced with stone flour, for example, dolomite.
If you use epoxy resin, the crack must be thoroughly blown out and dried before sealing. If you use cement mortar, then first the crack must be treated with a deep penetration primer or at least moistened with water, removing dust and crumbs.
Usually thin cracks are puttied. Using the end of the tool or another thin metal plate, you need to try to “push” the solution into the depths of the crack as deeply as possible. After this, the surface is leveled with a spatula.
Large cracks in concrete
If the gap is large (several mm or more), in order to save money, you can add the same amount of quartz sand, fraction up to 1 mm, to the epoxy resin.
If you use a cement mixture, you can purchase ready-made cement adhesive for gluing heavy slabs or prepare the composition yourself, as was done during the construction of artificial rock and in the article about concrete tiles (how to glue concrete tiles).
In this case, in addition to sand and cement, cellulose ethers and redispersible powder (RPP), which have already been repeatedly described in articles on the pages of kamsaddeco.com, are added to the mixture.
Cellulose ethers accumulate and retain water in the solution for a long time and give it the opportunity to carry out all the necessary reactions to obtain the required strength of the artificial stone.
RPP allows you to increase the stickiness of the adhesive solution and improve the connection with the stone. RPP is actually a dry form of latex, which is included in many varnishes and paints, as well as various impregnations. Therefore, they are sometimes added to the cement mixture, but this, as you understand, is much less effective and more expensive than using pure RPP.
Therefore, craftsmen solve this issue very differently: what repair mixture to use for concrete.
Tool for sealing cracks in concrete
Now a few words about the tools that will help and facilitate concrete repair.
If you use epoxy resin, the tool becomes disposable. Therefore, you can use scraps of plastic and thin plywood as a spatula. You can also use a syringe, but you will most likely have to throw it away after use.
It’s a completely different matter if you use cement glue as a repair mixture for concrete. It is easy to wash any dishes for further use. In this case, there are two options for using a syringe to seal a crack.
First option : use a syringe for filling machine oil or a large medical syringe, which can be purchased at a pharmacy.
Second option : use a used and cleaned tube of silicone glue. The remains of old silicone can be easily removed, as they do not stick to the plastic of the tube. The piston can also be pressed out without any problems using a metal rod or a long screwdriver.
By filling the tube with cement glue and installing it in a glue gun, we get an excellent reusable free tool.
Using such a tool, it is easy to inject a repair cement mixture to a great depth into the cavity of a crack in concrete.
This tool can also be used for decorative purposes: filling joints between tiles on paths and platforms or applying a colored pattern to a concrete surface.
Sometimes cracks in stone walls are sealed with polyurethane foam, using its properties of significant expansion and high-quality filling of the cavity. On the outside, the foam is painted to match the color of the wall. This also protects it from ultraviolet radiation from the sun.
Restoration of a concrete platform for a car
Question:
The Tajiks made a concrete screed under the car. The concrete all melted away along with the sand. It’s been crumbling for 2.5 years, what can I do now? The budget doesn't really allow for remodeling. How can I fix it on a budget?
Larisa, Shcherbinka.
Answer:
Hello, Larisa from Shcherbinka!
/At the word Shcherbinka, I always remember how your scientists from the Institute of Railway Transport placed an electric motor with a power of several hundred kilowatts and weighing about a ton for five people in two part-time working days in the supply chamber. And they planned almost half a month of work for this, dismantling the roof, hiring a crane, restoring the brickwork, etc. costing tens, if not a hundred times more than what we were paid. Here it is, the difference between theory and savvy ingenuity! However, this is an irrelevant remark./
How to cheaply fix the Tajik problem? It would be a good idea to look first, otherwise I would advise you not to look, and after another 2.5 years everything will fall apart again. And you will remember me with a “quiet, kind word.”
Therefore, I will tell you how to do it correctly, and you can think further.
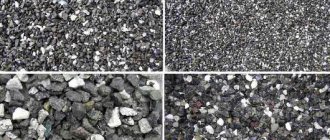
To install a parking lot, otherwise a platform for a passenger car, a layout is first made. That is, they level the surface of the soil. Remove the root system of weeds, if any. Pour a layer of sand about 10 centimeters thick. Level it and pour it with water to compact it. Then they take ready-made concrete or prepare it themselves.
Why use sand, or SGS (sand and gravel mixture), cement grade M300 - M400. With a proportion of approximately 200 kg of cement, 800 kg of sand, a little more than a ton of crushed stone. All this is filled with 200 liters of water. The result will be concrete of approximately M100 grade, the same one that is used for your type of concrete screeds. /This does not mean that you need to take exactly this amount, you must calculate it for the future volume of the site, that is, you multiply its area by the thickness of the screed and get the required figure./
The screed is made about 10 centimeters thick. For strength, a welded metal mesh is placed in it. Which should be located in the middle of the thickness of the screed.
A slope is made from the middle of the screed in all directions, or from the center of the site, sometimes in one direction, so that the water drains and does not tear the concrete when it turns into ice.
I won’t go into more detail, but if you search on my website, I’ve already answered this question several times more broadly.
Most likely your coven did something wrong. They definitely didn’t spare the sand, which can’t be said about the cement.
What to do? If you don’t radically redo it (and this is sometimes necessary, I can’t say for sure without looking), then thoroughly sweep the entire area and moisten it with water. Lay the welded mesh in cells from 5/5 to 10/10 centimeters, your choice. The grid is sold in cards two meters long and half a meter wide. Although this is not important. The cards overlap each other about five centimeters. The goal is to cover the entire parking area.
Then prepare the concrete according to the specified proportions. Or bring a purchased one by dump truck (mixer), but it will be somewhat more expensive. Fill the area with a layer of at least 5 centimeters. That is, returning once again to the required volume, for example, with a site of 5 * 2 meters and a thickness of 5 centimeters, you will need about half a cubic meter of concrete. Or a little more. This is completely approximate, because the ratio of the weight and volume of concrete is not calculated according to a proportional scheme.
I'll omit the details. After the screed hardens, and this, depending on the weather, which is preferably about plus 10 - plus 20 degrees Celsius, can last about four days to a week, the screed is able to withstand the weight of a passenger car. Although concrete reaches full strength only after 28 days.
It shouldn't rain. Otherwise the sand will be washed away. In hot sunny weather, it is recommended to spill the concrete with water to prevent it from becoming covered with microcracks. It is optimal to completely cover the concrete with a tarpaulin and pour water over it. If it evaporates under the sun's rays, water it again. And so all four or seven days in a row.
I could be wrong, but this pleasure can cost from 5 to 10 thousand rubles. Depending on many factors, ranging from the cost of materials, transportation costs, your own or hired labor and other related factors. The price is quite reasonable. Although shabashniki can charge twice as much.
That's all in a nutshell.
Good luck!
Construction in Moscow and Moscow region
We work with a guarantee! Wide range of construction services. Foundation, walls, ceilings, roofing, turnkey! +7 (905) 797-20-34
luxurykomfort.ru
Other questions on the topic of garden and sidewalk paths:
- Sidewalk paths
- Venues, parking lots
- Roads
Sidewalk paths
- Paving slabs and paths made from it
- Paving slabs on uncompacted sand
- How to seal seams on a porous paving stone path
- Sealing seams on a porous stone walkway
- Paths and concrete base
- Lay natural stone on old asphalt
- Blind area made of paving stones
- Calculation of the mixture for a concrete base for paving stones
- Technology of laying new asphalt on old
- Laying paving slabs on wet sand
- Blind area made of paving stones slope
- Technology for laying paving slabs
- Blind area and paving stones around the house
- Brick battle as a road surface
- Car load on paving slabs
- How to lay paving slabs on old asphalt
- Stains on paving slabs
- Sidewalk paths made of crushed stone
- Problem with seams between paving slabs
- What to make garden paths from
- Method of laying paving slabs
- Laying asphalt on the sidewalk
- Laying paving slabs
- DIY paving slabs
Venues, parking lots
- Parking in the garden area
- What to put paving stones on in a car parking lot
- Sealing cracks between paving stones with sand
- Concrete screed on old asphalt
- Leveling the concrete pad
- Is it possible to fill holes in damp ground with sawdust?
- Concrete car platform as a foundation for an extension
- Can you lay asphalt on concrete?
- Pouring the yard with concrete onto asphalt
- Grouting joints on paving slabs
- Wild stone paving
- Walking concrete platform with sliding gates
- Concreting the yard
- Concreting a site for two cars
- Concrete parking, yard and paths
- Finishing the entrance to the site on a slope
- How much cement and ASG is needed for parking at a dacha
- Puddle on a concrete platform
- Restoration of a concrete platform for a car
- Level out old asphalt for a tennis court
- Car parking on an old foundation
- How much cement is needed for the site?
- Concreting a site for 40 ton trucks
- How to renew a concrete pad
- Concrete platform under the log house
- Check-in to the parking lot at the dacha
- Rest area on the roof of a foam block house
- Concreting a site for a car
- How to cover a dacha parking lot
- Parking area for cars in the country
- How to correctly calculate the amount of cement for car parking at the dacha?
Roads
- Build a road on a steep slope
- Embankment of the road in front of the fence
- Old road repair
- Concreting a road downhill
Sidewalk paths
All questions to Semenych about construction
Semenych (author of materials)
Our site is regularly updated with interesting and unique materials and articles on the topics of lumber, building materials and works, the author's opinion and knowledge of a real coven with more than 15 years of experience are provided. There is a section - funny stories of shabashniks. If you would like to receive information about this, subscribe to our website's newsletter. We guarantee that your address will not be shared with third parties.
Apartment renovation in Moscow and Moscow region
We work with a guarantee!
Wide range of repair work. Professional craftsmen.
+7 (905) 797-20-34
luxurycomfort.ru
| Country house | Bath |
| For the dacha | Tool |
| Materials | Tales |
| Foundation | Log houses |
| Roofs | Insulation |
| Walls | Siding |
| Floors | Cellars |
| Attics | Doors windows |
| Stairs | Extensions |
| Wells | Toilets |
| Balconies | Loggias |
| Condensate | Flooding |
| Fences | Kennels |
| Sidewalk | Birdhouse |
| Adobe | Carts |
| Garages | Barn |
| Greenhouses | Bath |
| Swing | Brazier |
| Shower | Horizontal bar |
Mixing epoxy concrete repair mortar
Epoxy repair mortars have resin fillers and a hardener. For deeper holes up to 150mm deep, you can use deep fill repair mortar. This epoxy solution has a fairly large (up to 4 mm) aggregate in the resin and, as usual, is mixed with a hardener.
If a smooth finish is required on the surface, a regular (as opposed to deep fill) high performance repair mortar should also be used. Repair mortar for deep filling should be left at a distance of no more than 50 mm from the surface.
For holes smaller than 50mm, it is best to use a regular epoxy repair mortar. This repair mortar has a much thinner polymer aggregate.
If you want to get started on your repairs quickly, you can also use a quick-cure epoxy repair mortar.
The last repair solution that can be used is called liquid repair compound. It is mixed in the same way as both of the above solutions, but the amount that gets into the crack produces a wet, smooth, flowing mixture.
Gluing the corner of the step
1. Gluing the broken part of the step. Clean any dust from the damaged corner of the step and the broken piece. Prepare some synthetic resin masonry repair adhesive (such as epoxy) as directed and apply it to the damaged area. Press the broken piece and hold it until the glue hardens. You need to hold it for as long as the instructions require. If necessary, press the piece down with a board.
2. Shutdown. When the glue has hardened, remove any excess with a spatula. If a crack remains, seal it with a solution containing synthetic resin, not liquid cement paste. Cover the repaired corner for at least 24 hours until the adhesive has completely cured.
Main causes of defects
Despite its high strength characteristics, any concrete structure is susceptible to destruction. The main factors that contribute to this:
- Temperature changes. If the poured surface is not protected with frost-resistant mortar or insulation material, then constant temperature changes will negatively affect the concrete composition.
- As a result of frequent cycles of freezing and thawing, moisture enters the voids in the material. At negative temperatures, it expands, as a result of which it begins to destroy the concrete product from the inside. Cracks of different sizes gradually spread throughout the material, as a result of which the strength of the concrete decreases significantly.
- Carbonization of the material also leads to the appearance of various defects. The material begins to absorb carbon dioxide, which does not affect the strength of the structure of the concrete product, but contributes to the destruction of the reinforcement. It is part of many concrete structures. Saturation of cement with this gas leads to the formation of lime, which creates an alkaline environment in the material, leading to corrosion of steel reinforcement. It increases the volume of the latter and increases internal tension. The result is the appearance of cracks in the material and exposure of the reinforcement, which gradually rusts.
- Exposure to sulfates (salts of sulfuric acid) leads to the gradual appearance of cracks and destruction of materials. These substances react with other chemical elements, resulting in the formation of chalk and other components. All of them lead to the fact that the concrete begins to increase in size. The result is the appearance of faults and destruction of the product.
- Table salt also leads to the expansion of concrete, the appearance of cracks and further destruction of the structure. Deformations that have arisen due to this substance can be distinguished by standard white smudges. Further destruction can be prevented by treating the material with hydrophobic compounds or polymer impregnations.
The appearance of cracks on a concrete surface can be associated not only with the influence of external factors, but also with non-compliance with the technology of pouring the structure. The reasons in this case are the following:
- During the preparation of the working composition, more water was taken than required. Excessive amounts of moisture negatively affect the strength of the concrete surface.
- At the stage of pouring the structure or structure, a low-quality composition was used. It is possible that cement of poor quality was purchased to prepare the composition, or the required part of this component was incorrectly adjusted.
- Concrete gains strength only in a moist environment, so we should not forget about the need to retain moisture in the freshly laid material. It will take approximately 28 days to reach the required strength. After the working mixture is poured, it needs to be irrigated with water for the first 3 days. It is also important to thoroughly compact the solution when pouring it into the formwork - this will reduce the porosity of the concrete and give the structure uniformity.
What are the consequences of not taking action after identifying floor defects?
It is worth soundly assessing the risks of possible consequences and the costs that the company operating the floors in need of repair will incur.
- Increasing logistics terms. Transport moving through warehouses is forced to reduce speed.
- Industrial accidents. Ruts, holes, potholes and broken seams can cause product and warehouse items to fall and become damaged.
- Destruction of technology. The wheels of equipment that moves on a destroyed concrete base are subject to increased wear.
Slow sales of products, defective goods and broken equipment lead to loss of company funds. There is not always extra finance for additional production and replacement of equipment. Timely elimination of floor defects will be a much more prudent and rational decision.
If the defect is small, destruction does not occur very actively. However, as soon as it grows to a certain size, comparable, for example, to the size of a vehicle wheel, problems begin to grow exponentially. It is better not to let the situation get worse. Once a defect is discovered and its possible consequences are known, repairs should be carried out.