Since during construction or renovation it is almost impossible to achieve a smooth surface without slopes or flaws (cracks or bumps) on which the flooring will be installed, builders use a layer of cement-sand mixture. This layer is called a floor screed.
How to prepare the surface for screed? To do this, it is necessary to perform a number of sequential works:
- prepare the surface;
- lay hydro- and sound insulation;
- mark the base for the lighthouses;
- install beacons.
Preparing the base
For a high-quality screed, you need to thoroughly prepare the base on which it will lie. When repairing the floor, it is better to remove the old screed. Over time and use, cracks, chips, and potholes appear on it. The process of destruction is accelerated by expanded clay, which in Soviet-built houses was poured under it - the backfill becomes compacted over time, forming voids under the cement screed, which is almost impossible to repair.
The increase in cost of work when replacing the floor will result in savings later, when during the service life of the new floor covering you will not have to disassemble everything again due to deformation of the screed.
The old subfloor is removed using a hammer drill. The concrete floor is cleared of debris and dust. After this, it is advisable to vacuum it and do a wet wipe. All damage to the ceiling, chips and peeling are removed. Cracks, seams and surface damage are sealed with thick cement mortar.
It should be remembered that cement mortar will not lie on concrete without preliminary preparation of the base. He'll just fall behind after a while.
Therefore, places where concrete is damaged and seams are primed. Small cracks are opened using a scalpel or a puncher, otherwise the solution cannot be rubbed into them.
Large seams are reinforced.
Concrete primer
Repairing damage to the ceiling and seams, and then priming the entire surface is carried out using:
- cement laitance;
- water;
- special primer (Ceresit ST 17).
For reference: other types of factory primer are either more expensive, or their quality is lower, or, like Vetonit, they have a short shelf life.
The purpose of the primer is to saturate the pores of the concrete with moisture in the sealing areas. If this is not done, the solution will not connect to the concrete base.
The technology for laying screed on expanded clay is discussed in detail in the materials: “How to make a floor screed with expanded clay?” and “Dry floor screed with expanded clay.”
Dry concrete will draw water out of the cement-sand mixture and disrupt the chemical hardening process of the cement. In addition, the primer binds dust particles and creates a film that improves the mutual adhesion of concrete and cement mortar.
Laitance of cement is obtained by mixing cement with water in a ratio of 1:2. The areas to be restored are wetted 2-3 times with both cement laitance and water, but without the formation of puddles. It is advisable to speed up the saturation of the pores with moisture using a paint brush. To do this, the primer is actively rubbed into the concrete with a brush. The repair solution is applied to a damp surface (wet on wet) and rubbed thoroughly.
Priming with “milk” is much more effective than wetting it with water. The cement contained in it penetrates along with water into the pores of concrete and improves the process of connecting the cement mortar with the base being repaired.
Special primers penetrate into the ceiling in the areas being repaired and crystallize there, blocking the outflow of water from the solution. On the penetration surface they form small scales that ensure adhesion of the patch to the concrete.
Repairing floors in St. Petersburg and Moscow in pre-war houses has one feature - there are no concrete floor slabs. The interfloor ceiling is made of powerful metal T-beams. Therefore, preparing the base for the screed in such houses begins with filling expanded clay between the beams, on which a layer of cement mortar is applied.
Expanded clay base
Expanded clay is a lightweight, porous material. Ecologically pure. It is used for heat and sound insulation, as well as as a filler of spaces, to reduce the load on the load-bearing elements of the building.
Before filling the expanded clay, the base of the interfloor ceiling is covered with an overlapping polyethylene film (thickness 100 microns or more) or other waterproofing material. The seams are glued together with tape. At the walls, the film is laid above the floor level.
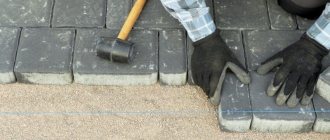
Beacons are being installed. Expanded clay is poured in and the surface is leveled with a long lath, preventing it from exceeding the beacons. We fix the leveled layer of expanded clay in this position using cement milk, which will prevent the expanded clay granules from moving when laying the screed.
Screeds in individual houses or cottages are carried out on the ground or on the subfloor.
Soil foundation
The soil is cleared of vegetation and leveled. Expanded clay is poured onto it, at least 5 cm thick above the foundation, to provide thermal insulation and a layer of sand of 10-15 cm. The resulting surface is moistened with water and compacted for dense shrinkage. This is the cheapest method of preparing a screed, and is not inferior in efficiency to more expensive options.
Wooden subfloor (subfloor)
The wooden floor used for the base of the screed must meet a number of criteria:
- do not have rotten boards;
- be firmly attached to the joists;
- do not contain traces of glue, grease or paint;
- do not creak;
- don't bend.
The shortcomings are easily eliminated. Preparing the floor for screeding comes down to replacing rotten and sagging boards. Removing dirty stains with detergents or using sanding (plane). Creaking boards are additionally attached to the joists. Places of possible leakage of the solution (under baseboards near walls, cracks, fallen knots) are sealed with parquet putty based on wood dust or oil paint mixed with sawdust in a ratio of 1:4.
Important: water-soluble putty is not used, as it can be destroyed by the moisture of the solution.
Skirting boards are removed. A thin strip is placed in their place. The gaps between the lath and the floor are sealed with putty. After installing the screed, the lath is removed, and the remaining gap between the wall and the floor will serve to ventilate the space under the floor, which will prevent rotting of the boards and joists. After laying the flooring, it will be covered with a plinth.
The next step in preparing the base for installation is hydro- and sound insulation. Waterproofing issues are covered in detail in the work: “Waterproofing the floor before screeding.”
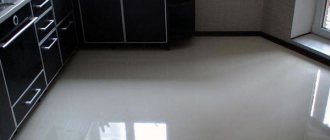
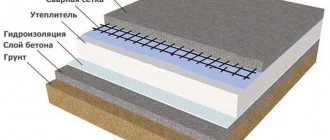
Floor screed diagram.
How to do the work yourself?
By choosing a concrete floor, you will not regret it. A base made of such material will serve for many years, maintaining its original qualities. To build such a coating yourself, you should adhere to technology.
Work should begin with the dismantling of old structures. Any tools will help during dismantling: an axe, a chisel, a hammer drill. If the old coating will no longer be used, dismantling can be done quickly. Otherwise, it will take time. Removing the old coating without damage is not easy. If you wish, you don’t have to get rid of the old base. Concrete is unpretentious. Its installation is possible on top of any coating. Wood, slab, soil - you can fill directly on them. The most important condition is that the surface must be clean. Cleaning is required.
If the concrete floor is poured onto the ground, it is important to prepare the bulk material. Level and compact the bulk layer. Next, a layer of waterproofing, a reinforcing layer, and underfloor heating elements (if necessary) are installed.
After this, the beacons are set, the rough covering is installed, and the concrete floor is finished poured. Today, the following filling options exist.
- Cement-sand without a hard layer. This is a cheap option. It is also the most common. This screed can be used in a small room and provided there are no large loads in the future. Ideal for a summer cottage.
- Reinforcement. The most expensive option. A base of this type will last a long time, can withstand heavy loads, and is suitable for rooms with large daily crowds of people.
- Screed with a special mesh. This is an affordable alternative to the second option. It is often used in residential areas.
Concrete floor screed
Waterproofing
When carrying out construction or repair work on flooring with their own hands, many people equate waterproofing work with installing a damper tape. Yes, the tape partially plays the role of a sound and waterproofer, but only at the junction of the wall and the floor. It does not protect the subfloor from moisture from the basement or leakage in rooms with high humidity (bathrooms).
Important: waterproofing the base floor is required in individual houses without a basement. Capillary moisture and evaporation of water from the soil under the building destroy the foundation, the screed, and the floor itself. The problem is aggravated if the moisture has an aggressive (acidic or alkaline) environment. By interacting with the components of concrete, it renders it unusable within several years.
There are various methods of waterproofing:
- Gravel-sand cushion. Used in private houses on the ground floors;
- Film. Suitable for all types of apartments and houses. It is simple to use, which allows a novice builder to perform such preparatory work. In terms of cost, it’s a budget option. There is only one disadvantage: it cannot be laid on a base with many pipes;
- Coating waterproofing based on rubber or bitumen. Apply in several layers. Penetrates into all cracks, which guarantees the quality of the work performed;
- Impregnating waterproofing (Penetrat). A new type of insulating material. Its peculiarity is that it can be applied from any side of the concrete - by reacting with the components of concrete, the impregnation grows special crystals throughout the entire thickness of the concrete floor. Crystals prevent moisture penetration.
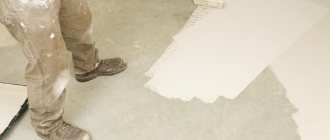
Film waterproofing.
Work technology
Concrete is a safe, cheap, accessible material for everyone. It is convenient to use. These important qualities allow you to build a coating with your own hands. Many people do the flooring themselves, saving on the services of specialists. However, without studying certain information, you cannot begin to perform such work.
The technology for pouring a concrete floor is simple but labor-intensive. It includes several important steps: surface preparation, insulation, reinforcement, formwork construction, preparation of the mixture itself, pouring, leveling and screed. The technology has been proven over the years, so do not neglect it. Violation of technology can significantly reduce the characteristics of the final coating. Incorrectly done work will lead to damage to materials, uneven surfaces, and damage to the finish coating.
The entire cycle of the listed tasks can be easily completed independently if the room is small. When there is a large amount of work to be done, it is advisable to take the help of friends. An assistant will help you get the job done faster and do it more accurately. Before performing work, it is also important to read the instructions in detail. We will present it in detail below.
Noise insulation
Sound insulation is necessary for residents of apartment buildings, starting from the second floor. Music, children's screams, loud TV, etc. become a problem for the upstairs neighbor for many years. This can be solved by laying soundproofing material on the floor. In this case, depending on the type of flooring, soundproofing material is placed under the screed on the slab (floating screed), or on the screed itself.
Various materials are used for floating screeds:
- polystyrene;
- mineral wool;
- perlite;
- expanded clay
Its device is not very complicated, but it requires certain knowledge and skills. Not applicable for certain types of floors. In such cases, soundproofing materials are laid between the screed and the floor. Instructions for soundproofing a floor screed are given in the article: “Soundproofing the floor in an apartment under a do-it-yourself screed.”
Important: carrying out soundproofing work almost always solves another problem - floor insulation.
Reinforcement
Reinforcement is used in the construction of concrete floors, which is necessary to prevent deformation from loads and to increase the service life of the concrete surface. Reinforcement technology includes the manufacture of a reinforcement structure and its installation. The reinforcement is assembled from steel rods at the construction site. The diameter of the rods must be no less than 0.8 centimeters and no more than 1.6 centimeters. In places with increased loads, a frame with thicker reinforcement is used.
It is not recommended to install the reinforcement on a substrate; a gap of two centimeters should be made. If the operation of the base does not entail large loads, you can use a soft reinforcing mesh. Then, to install it, you need to hammer in the pins along which the mesh will be stretched.
Return to contents
Marking the subfloor
The floor surface before the screed always has defects:
- slope, while in different rooms in different directions;
- bumps and protrusions in concrete that cannot be removed, etc.
To level out these shortcomings, it is necessary to find a conditional horizon above which the base of the floor will not be visible in all rooms of the room. This is achieved by drawing the zero level (horizon line), and then, with its help, the floor screed line. These lines are marked with a construction cord along the walls of the rooms or drawn with a pencil according to a strip or rule.
For information: in the work “How to check the floor level in an apartment yourself?” shows how to take measurements correctly.
The next stage of drawing is calculating the number of rows of beacons and the distance between them, marking their location on the base of the floor with chalk.
Pouring concrete
To fill, you will need a rule and a trowel. It is advisable that the concrete mixer be located in the same room where the work is being done. It is on wheels and can be moved to free space as needed.
Preparation of mortar for screed
Step 1. Unload the concrete onto the floor and spread it with a shovel between the two beacons. Start from the wall, don’t rush, add a layer of approximately the same thickness.
Step 2. Make a rough edit with a trowel. Level out the recesses and throw away excess mass on the back side of the lighthouse. Do not throw the mixture too widely, do not forget that the reinforcing mesh must be constantly raised; it may fall during work.
Adding mortar with a trowel
Step 3. Level the poured concrete properly. The rule needs to be pulled towards you and simultaneously moved left/right.
Alignment
Practical advice! If it is difficult for you to work in a bent position, then work on your knees. To avoid injury, place a flat board under your knees. As the space between the beacons fills, move the board.
There should be a strict rule for leveling concrete. The mass is heavy, you usually need to pull with great effort. If the strength of the device is insufficient, then it will bend in the middle. As a result, a gutter forms between the beacons, and this is a very unpleasant marriage. Constantly clear the beacons of stones; the width of the poured concrete should be such that it can be leveled with outstretched arms.
Another photo of the process
Step 4. Using the same principle, screed the entire room. Do not forget to manually throw and level various small niches and places where walls meet the floor.
After the floor has completely dried, we can begin further refining the floor surface.
Work should always start from the farthest wall and move towards the exit of the room. Pull the concrete mixer behind you as needed. Constantly pay attention to the position of the reinforcing mesh. There are times when all the special measures to raise it do not give the desired effect. If so, after leveling each small section of concrete, lift the mesh again. Remember that it should never lie on the base.
How to make a concrete screed with a slope - the beginning
How to make a concrete screed with a slope - continued
How to make an insulated concrete screed
Mechanized floor pouring
Installation of beacons
Preparing the floor for screeding ends with the finishing work - installing beacons. The type of beacon depends on:
- financial capabilities of the customer;
- construction experience;
- type of screed;
- urgency of work;
- availability of materials.
Properly installed beacons allow you to obtain a high-quality screed, which, in turn, guarantees a durable floor.
The work on installing beacons is discussed step by step in the article: “How to install beacons for floor screed?”
What is a cement-sand screed
Cement-sand screed, like any other screed, is designed to level the floor, hide electrical wiring and plumbing communications laid along the floor. The classic cement-sand screed refers to wet screeds, that is, to make a mortar for the screed, you need to mix (dilute) the dry mixture with water.
Important! When mixing the solution, you need to add the dry mixture to water, in proportions according to the instructions on the package, and not vice versa. After thorough stirring, the solution must stand for 2-5 minutes so that all elements of the mixture enter into chemical reactions with each other.
The advantages of a cement-sand screed include the possibility of a large thickness of screed pouring and the high thermal conductivity of the screed, which is ideal for water heated floors and heated floors with electric heating cables. Also, the cost of such a screed is low.
The disadvantages of cement-sand screeds include the heaviest weight of the screed compared to other screeds and the long period of complete drying.
- A square meter of cement-sand screed weighs 18-20 kg with a thickness of one centimeter;
- The complete drying time for this screed is from 21 to 28 days.
All these features of the cement-sand screed, of course, limit its use, but it still remains the most used for constructing new subfloors.
Let's return to preparing the floor for laying cement-sand screed
Soil requirements
Before giving preference to the construction technology of the design in question, familiarize yourself with the key soil requirements given in the following table.
Table. Soil requirements for constructing a reliable concrete floor
| Evaluation criterion | Explanations |
| Substrate moisture | The soil on top of which the flooring is planned must be dry. |
| Groundwater level | The depth of passage of these should be at least 4-5 m. |
| Soil mobility | It is strictly prohibited to build the structure in question on top of moving soil. |
Additionally, requirements are imposed directly on the building itself. It is important that the house is used for permanent residence or at least heated during the cold season. Otherwise, the ground will freeze, causing the concrete structure to deform.
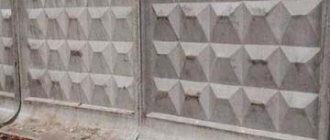
Scheme of floors on the ground for a private house, garage, utility room