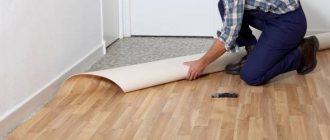
Before laying the finishing floor covering when renovating an apartment, it is necessary to prepare the base. The service life of the floor in the future will depend on this.
The base must be made strong and absolutely level. Self-leveling flooring is fully consistent with these qualities; it is a self-flowing and quick-hardening mixture.
If desired, everyone can fill a self-leveling floor with their own hands, regardless of the manufacturer, the technology is almost the same for everyone.
Self-leveling floors can be poured onto concrete, wood, metal and other substrates. After complete drying, ceramic tiles, laminate, carpet and other floor coverings can be laid on it.
Kinds
All self-leveling floors can be divided into several large types depending on the binding material:
- polyurethane;
- epoxy;
- gypsum;
- on a cement base.
Polyurethane self-leveling floors
As the name suggests, their base is polyurethane. They have high strength, immunity to chemical influences, and wear resistance. Increased elasticity prevents cracks.
Can be used in both residential and industrial premises.
Polyurethane flooring can be poured onto almost any substrate: floorboard, laminate, metal, concrete.
Epoxy self-leveling floors
The basis of the epoxy floor is epoxy resin and hardener. These are the most beautiful polymer self-leveling floors; a good craftsman can use it to create a real work of art.
The floor can be transparent with any pattern, glossy like glass or matte. It is very hard, resistant to various chemicals and mechanical stress, but is afraid of pinpoint impacts.
Epoxy floors are recommended for areas with high loads (schools, cafes, offices) and for residential premises due to their high decorative properties.
Due to the more complex manufacturing technology, it is recommended to entrust their filling to specialists.
Self-leveling cement-based floors
These are cement-based dry mixtures to increase plasticity and greater spreadability, special modified additives are added to them.
Suitable for leveling large differences, cracks and other defects on the subfloor.
Used as a base for laying the finishing floor covering on it:
- laminate,
- tile,
- linoleum, etc.
One of the leaders in the modern construction market is the fast-hardening mixture OSNOVIT SKORLINE T-45; using its example below, step-by-step instructions for pouring a self-leveling floor in an apartment will be given.
Osnovit Skorline T-45 is used for surfaces with unevenness up to 10 cm, both for final leveling and preliminary leveling. It is non-shrinking, high strength and crack resistant.
It is also suitable for those who want to install a “warm floor” system. This is facilitated by its high self-leveling and spreadability.
Founder Skorline T-45 complies with all hygiene standards in force in the Russian Federation, it is environmentally friendly and does not contain harmful impurities. When hardened and completely dry, the surface is completely smooth and does not require further sanding.
Video instructions for pouring self-leveling floor:
Leveling a concrete floor with liquid flooring
Liquid flooring or self-leveling mixtures are popular today among similar materials for uneven surfaces. This is due to the strength characteristics. Dry compounds, diluted in exact proportions with water, are capable of creating a horizontal level, which is why they are called floor levels.
According to its structure, liquid flooring is manufactured and sold in retail chains in the form of a dry mixture, which is stirred to the consistency specified by the manufacturer and specified in the instructions. There is a self-leveling agent and a self-leveling compound on sale. The first is used to level the rough base and cannot spontaneously spread over the plane, therefore it requires the installation of beacons. And the second composition, after dissolution, becomes fluid and self-levels on the prepared base.
There are differences between both mixtures in terms of pouring levels: the self-leveling leveler is capable of producing thicknesses from 1 to 30 cm, and the maximum level for the self-leveling mixture does not exceed 2.5 cm.
Features and benefits of the technology
Leveling self-leveling flooring is an innovative technique that allows the owner to effortlessly create a flat surface. The chemical and ingredient composition of the mixture is selected in such a way that, under the influence of gravity, the solution spreads evenly over the floor plane.
The advantages of leveling mixtures include:
- Low labor intensity compared to concrete screed.
- Polymers and hardeners added to the dry composition reduce the process of completely setting the floor to 10 days.
- The use of environmentally friendly building materials: Portland cement, piezoquartz sand and polymer additives.
- Small thickness of the filling level.
- Availability of assortment in the distribution network of both Russian and Western production.
Unfortunately, users also note the disadvantages of mixtures for leveling concrete floors: a high price compared to traditional concrete solutions and strength characteristics that are inferior to concrete.
Advantages and disadvantages
Below we present the general advantages and disadvantages of self-leveling floors.
Advantages:
- aesthetic appearance;
- relative ease of filling;
- hardness, high impact resistance;
- durability 10 years or more;
- high adhesion, the ability to pour on almost any substrate;
- hygiene, ease of cleaning and operation;
- there are no seams or joints;
- fireproof;
- resistant to various chemicals;
- maintainability.
The self-leveling floor will meet all the described advantages if the technology for filling it is fully followed.
Flaws:
- high price;
- complexity of technology;
- the floors “do not breathe”, regular ventilation of the room is necessary;
- cold, it is necessary to insulate;
- difficulty of dismantling.
Expert advice
Usually one bag of mixture is designed for one batch , but everything will depend on the quality of the floor surface and the presence of curved areas on it. Taking into account water, when mixing from one bag, 20 liters of solution are obtained; it is not recommended to do more at one time. Since the solution is liquid, there are no joints when pouring it; one room is filled at a time, by carrying out several pours.
To remove air efficiently, the roller with needles must be several millimeters above the fill level .
To prevent the mixture from spilling outside the room, you need to install dampers ; it is better to do this right away than to install them in a hurry later.
How to choose a self-leveling floor
The choice of type of self-leveling floor depends on:
- future load;
- the material from which the initial base is made, on which the pouring will be performed;
- presence of defects;
- thickness of the future layer;
- type of finishing floor covering.
For living rooms in an apartment, a polyurethane self-leveling floor is better suited, and in the bathroom, an epoxy floor with increased moisture resistance is recommended. Both types can be used without finishing.
An industrial self-leveling floor is suitable for administrative and commercial buildings; it has increased strength and can easily withstand heavy loads from various loads and traffic of a large number of people.
Polyurethane self-leveling floors are more hygienic, waterproof and safe and are the best choice for residential premises.
Preparation of the solution
When self-leveling floors are made in an apartment with your own hands, first of all you prepare a solution.
Important! Many people ask the question: “why does the self-leveling floor crack?” The reason is simple: it's all about excess water. Therefore, do not pour water “by eye”; follow the manufacturer’s instructions.
- In a given ratio, pour water into the container and add the dry mixture.
- Mix the solution with a mixer until you get a homogeneous mass.
- Allow 5 minutes for the leveling solution to mature.
- The technology for pouring a self-leveling floor involves checking for spreadability. The solution is poured into the lid of a shaving can with the bottom cut off, placed on a horizontal plane. The lid will lift and the solution should form a spot with a diameter of 16–18 cm. If the dimensions do not correspond to the norm, the composition of the solution is adjusted.
Important! Freshly prepared mixture must be used within 60 minutes. Portions are applied in parts with an interval of at least 10 minutes. If you look at how a self-leveling floor is made (video), you will notice that the number of workers should be at least two.
Required Tools
You can fill the self-leveling floor with your own hands using the following tool:
- bucket or other container for mixing 20-25 liters;
- needle roller;
- drill or special mixer with an attachment;
- squeegee for drawing out the solution with an adjustable gap;
- wide spatula;
- special paint shoes;
- polyethylene film;
- level.
Pouring self-leveling floor step by step instructions
As mentioned above, here are instructions for pouring the fast-hardening mixture Osnovit Skorline T-45.
Preparing the base
The base under the self-leveling floor in the apartment must be cleaned of all kinds of stains, paint, crumbling coatings, vacuumed and dry.
All further operation of the self-leveling floor depends on this stage.
Installation technology
Although the self-leveling floor does not create any particular difficulties in operation, it is necessary to strictly follow the manufacturer’s instructions; even minor violations may result in the need to dismantle the expensive cladding that has “reared up on its hind legs.” Installation is carried out in several stages.
Preparing the base
Depending on the brand, self-leveling mixtures can be used on wooden, concrete and slab bases after appropriate finishing.
Wooden floor - boards are checked for strength, if necessary, weakened segments are cut out and replaced. The baseboard is dismantled, the previous coating is cleaned off, small cracks are sanded to open, the cracks are sealed with a repair mixture. Checking the moisture content of the base is mandatory. It should not exceed 10%, otherwise defects may appear in the future. All dirt and dust are removed, and if necessary, the wood is degreased. The last step is to treat the surface with a deep penetrating compound. The primer will not only ensure adhesion of the composition to the base, but also seal the canvas.
Concrete base - when it comes to repair work, the previous coating is removed, the surface is cleaned of dust and debris. If work is carried out on a fresh screed, the level is measured, the protrusions are chipped off, cracks and potholes are repaired. At least 28 days must pass from the moment the screed is poured to the level or decorative coating is poured. As with wood floors, the moisture level of the substrate must be maintained, with most mixtures requiring a standard of 4%.
VadimXL7FORUMHOUSE Member
Don't neglect humidity. If you start pouring the polymer ahead of schedule, problems cannot be avoided. Of course, pay attention to the manufacturer's recommendations. There are materials with a humidity tolerance of 5-12%, and there are also vapor-permeable ones, where the humidity is not regulated (such floors are matte). It is better to control humidity with a moisture meter.
If you don’t have a special device at hand, VadimXL7 suggests using a proven method - a piece of plastic film measuring 1x1 meter. It is glued to the floor with tape for a day. If, after tearing off, there is moisture on the film, or the concrete has darkened due to moisture, pouring is postponed until both the film and the concrete remain dry. At the end of the preparation, the surface, cleared of dust and contaminants, is thoroughly primed.
Tiles - there is no need to dismantle the entire coating; it is enough to strengthen the peeling elements, clean the surface of dirt and prime it.
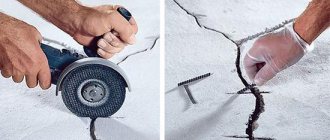
In addition to standard preparation, when it comes to pouring a polymer floor over a screed or self-leveling leveler, VadimXL7 advises using a grinder, or at home, a regular grinder with an attachment. This is done to remove the “milk” and open the pores, after which the surface is vacuumed and primed.
The choice of primer depends on the type of self-leveling floor that will be poured; for a polyurethane floor, polyurethane primer; for an epoxy floor, epoxy primer.
For highly porous substrates, several layers of soil are applied; the room must be ventilated so that the humidity does not increase. The primer is applied with a roller to the main surface and with a wide brush in corners and hard-to-reach places.
To increase sound insulation and prevent adhesion of the self-leveling floor to the walls, which can lead to deformation, a damper tape is used, as when performing a dry screed. Its width must be no less than the layer being poured; the remains are cut off after the composition has hardened.
Preparing the mixture
Manufacturers indicate exact instructions on containers with mixtures. Do not violate the proportions: if you exceed the specified amount of water, the characteristics of the floor are reduced - both strength and durability. The self-leveling floor does not tolerate dilution “by eye”; it is better to bother with a measuring cup than to spoil the expensive material and your mood. The compositions are mixed with a construction mixer. It is not recommended to prepare a large volume at once, since the solution has a short lifespan and you may not have time to use it up. An IntroCom forum member encountered a similar situation.
IntroComForumHouse Member
I recently poured a two-component polyurethane floor and it turned out really nice and hopefully durable. The only negative is the short life of the solution; I managed to fill it in the hallway, but not in the bathroom; it turned out that half of the mixture was ruined. Hence the moral: if there are two sections, you need to mix proportionally and pour them into other containers.
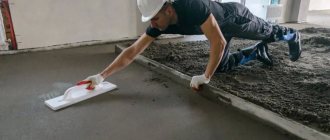
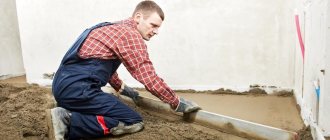
Fill
Although the base is pre-leveled and there should be no differences, in order to obtain a perfectly even coating, a level and beacons are used. A large coverage area is poured in fragments, starting from the far corner, moving towards the exit. Each portion is poured out and leveled with special devices (squeegee), the solution is “stretched” until it reaches the desired level. To remove air bubbles and prevent blistering, the mixture is rolled over the base with a needle roller. The sizes of the needles are selected depending on the thickness of the coating.
The number of layers to be poured depends on the type of floor and the desired effect. The drying time of each layer is determined by the brand of the mixture. The hardening time is on average 24 - 48 hours; there should be no drafts in the room. The last step is to apply a protective and decorative coating. As an option, a matte leveling mixture is used as a finishing layer, which, after hardening, is coated with varnish; the result is accessible and decorative.
The main enemy of self-leveling flooring is a wet base. If, after installation, the concrete slab draws moisture, even a properly poured coating may swell.
When there is such a danger, it is necessary to take care of additional waterproofing at the stage of preparing the base and use permeable mixtures when pouring.
Self-leveling flooring is popular both as a base layer for finishing materials and as a decorative coating that can turn an ordinary flooring into the seabed, green lawn or dunes. And the impressive cost is covered by versatility, strength and durability.
One of the possible bases for a self-leveling floor is described in the article “Dry screed”. The leveler will help prepare the base for the infrared heated floor. Decorative self-leveling flooring will be an excellent base for modern interior materials. And in our video, a specialist will show you how to properly make a light screed to prepare the base, including under a self-leveling floor.
Calculation of mixture consumption
The consumption of self-leveling floor components is affected by the quality of the base - the worse it is leveled, the greater the consumption. High-quality application of primer in several layers also helps reduce the required materials.
The average universal value for calculating the consumption of dry mixture is 1.3-1.8 kg per 1 square meter of floor with a layer thickness of 1 mm.
A more accurate consumption can be found on the packaging of the dry mixture; it may vary depending on the type of floor and manufacturer.
What to start from when choosing the optimal composition?
When choosing a specific composition, several evaluation criteria must be taken into account.
- Where will the floor be poured?
— In the living areas of a house or apartment, any mineral mixtures are suitable, taking into account the level of humidity in the room. Epoxy or polyurethane coatings, “self-sufficient”, that is, without subsequent finishing, are quite suitable. If a “warm floor” is planned, then this must be specified by the manufacturer.
Self-leveling polymer 3D floors have become widely used in residential premises. True, you need to carefully consider whether such a finish will soon become boring and whether it will become an irritating factor.
— In the bathroom, toilet, if you plan to cover it with tiles, then cement-based compositions (the use of combined cement-gypsum ones is allowed). Polymer compositions are also excellent - as an independent coating.
— In the kitchen, it is better to use mineral-based compositions if you plan to finish the flooring with laminate, linoleum, or tiles. Seamless polymer coatings, which can be given the necessary decorative effect, are also suitable.
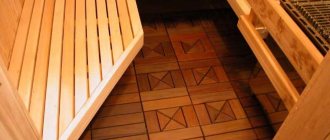
— Bathhouse - the requirements are similar to the bathroom, but it is better to exclude the use of cement-gypsum mixtures.
— Porch, balcony, pedestrian area in front of the house, etc.: the characteristics of the mixture must necessarily indicate that it is frost-resistant. Naturally, compositions with a gypsum component are completely excluded. Polymer or polymer-cement compositions that are resistant to abrasion and have a rough surface are welcome.
— Garage – the optimal choice would be a polyurethane coating. As an option, leveling is done with a cement composition, and then a thin, up to 5 mm wear-resistant polyurethane layer is poured.
- What thickness of fill is expected?
Everything is simple here - the manufacturer must indicate the range of acceptable thicknesses. And violating these recommendations means risking the strength and durability of the floor.
The range of permissible thicknesses for pouring the self-leveling compound must be indicated by the manufacturer
In addition, the initial conditions and the cost of the material should be taken into account. Filling expensive finishing compounds with a layer of more than 5 mm is extremely wasteful. Therefore, for rough leveling of the surface, you can select “simpler” self-leveling compounds, and then, after such a base has hardened, perform the finishing fill. And it’s better if these mixtures are from the same manufacturer - they are maximally adapted.
- On what basis will the pouring be carried out?
— Any composition can be poured onto a concrete base (floor slab) after appropriate preparation.
- On a wooden base or on insulation (penoplex and the like) - preliminary pouring of a floating (not connected to either the base or the walls) cement-sand reinforced screed 40 mm thick is required. After this, a thin-layer finishing composition is applied. True, the manufacturer of the mixtures may stipulate other conditions - this must be clarified in the instructions for use of the compositions.
Special self-leveling mixtures are available for sale specifically for complex bases - wooden, bitumen, hardboard, etc.
— For waterproofing (bitumen), for old tiles, preliminary pouring of a reinforced floating screed is also required. For screed, by the way, a self-leveling mixture can also be used - compositions are produced specifically for such purposes.
- What kind of external floor finish is expected?
Any mineral compositions are suitable for tiles, but must take into account the degree of humidity in the room, as discussed above.
Under other coverings (laminate, parquet boards, linoleum, carpet, etc.) any, including polymer ones. The only question is how cost-effective it will be to use expensive polymer bases in such a case.
Laminate prices
laminate
- How quickly will the coating harden?
It should be correctly understood that the terms specified by the manufacturer usually only indicate the possibility of people moving along the poured surface without the risk of deformation. But this is still far from complete maturation of the coating. It will gain final strength and readiness for full operation much later - the period can be from one to four weeks.
The fact that you can move on the floor after just a few hours does not mean it is ready. For information on the timing of full ripening, see the detailed instructions on the packaging.
Be sure to pay attention to another time indicator - the viability of the prepared solution. That is, the time during which it is necessary to distribute the mixture over the surface before it begins to set. If you plan to work alone, and even with insufficient experience, it is better to choose compositions with the highest possible indicator - 40÷60 minutes, otherwise you can simply ruin all the results.
Find out when it is necessary to repair cracks in a self-leveling floor and how to carry it out from our new article on our portal.
- Mixture consumption.
A parameter showing how much material is consumed on average to fill 1 m² with a layer thickness of 1 mm (or 10 mm - different manufacturers may have their own “standards”, but converting one to another is not difficult). On average, this figure varies from 0.8 to 2 kg/m² with a layer of 1 mm.
The maximum consumption is observed for self-leveling cement-based compounds. But this is “smoothed out” by lower cost. Knowing the “certificate” consumption rate and the parameters of the room (its area, difference in floor level, planned minimum thickness of the poured layer), you can calculate the amount of material that will need to be purchased for the work.
Our online calculator below will help you with your calculations. It provides the ability to calculate both by the known area of the room (the area for filling) and by size (for rectangular rooms). The calculation result is shown taking into account the 5% reserve.
Calculator for calculating the required amount of mixture for pouring a self-leveling floor
Go to calculations
Cracks in the self-leveling floor
If the pouring technology is not followed, cracks may appear on the self-leveling floor. They can be large all the way down to the base or superficial and small.
The main causes of cracks:
- Pouring onto a wet concrete base.
- Movable, fragile foundation.
- The required amount of water when preparing the mixture was exceeded.
- The expiration date of the dry mixture has been violated.
If small cracks up to 1 cm appear, there is no need to refill the entire floor. You can fix them by doing some minor repairs:
- widen the crack;
- remove dust using a vacuum cleaner;
- apply primer and dry;
- Fill the crack with new mortar.
Compliance with the pouring technology will make it possible to create a strong and even base for the installation of any floor finishing covering.
Pouring materials
The possibility of leveling the floor is not limited to concrete mortar. You can purchase dry construction mixtures or mix cement mortar. In addition, there is a wide range of self-leveling mixtures. Therefore, it is important not only to understand the pouring technology, but also to choose the right material.
Let's compare the capabilities of different compositions:
| Type of solution | pros | Minuses |
| Concrete |
|
|
| Cement-sand mixture |
|
|
| Dry construction mixture |
|
|
| Self-leveling floor |
|
|
Packages with ready-made dry mixtures always contain detailed instructions for application. CPS (cement-sand mixture) can be prepared independently by mixing M500 cement and sifted fine river sand in a 1:3 ratio.
The proportions of the concrete solution depend on what kind of screed is poured. The most interesting in this series are self-leveling floors. A little more about them.