Home » Building a house » Headings » Floor
Alexander Korovaev 04/30/2020
4471 Views
Over time, any, even the most durable boards become covered with fungus and rot. Floors in a house on the ground, that is, in the form of a monolithic concrete base, are free from this disadvantage.
Design Features
Layer order
When constructing a strip foundation or a foundation with a grillage of small height, it is possible to use floors on the ground - a structure consisting of the following layers:
- sand-crushed stone cushion designed to stabilize the concrete layer and protect it from underground moisture
- screeds (concrete preparation, footing): according to the recommendations of SNiP, in central Russia it is enough to arrange a layer 5 cm thick
- roll waterproofing
- insulation layer
- concrete underlying layer 1 cm thick
- clean floors: you can use, for example, tiles, linoleum or laminate; It is also possible to use a classic base in the form of wooden floors on joists
Unlike a slab foundation, the screed in floors on the ground in a private house is not made too thick. After all, it must withstand the load only of the weight of furniture, household appliances and other things in the house. 2 layers of screed: rough, laid immediately after the pillow, and finishing, top, will be quite enough. Such a foundation is made only after the construction of the structure itself.
Floating screed
There are two types of ground floors. They can:
- tie to a tape base;
- be manufactured in the form of a floating screed not connected to the foundation
Each of these designs has both advantages and disadvantages. With a rigid connection to the foundation, the screed lying directly on the foundation shrinks less and therefore does not crack. But when the foundation subsides, it can simply “hang” in the air. Although with high-quality reinforcement of the base this is not such a big problem. Backfilling, not with soil taken from the pit, but with specially imported non-metallic materials, sand and crushed stone, will help prevent the slab from sinking.
When using a floating screed, when the base shrinks or the soil moves, stress will not be transferred to the concrete slab, and cracks will not occur in the floors. However, it can “play” on its own, which often leads to defects - cracking or the appearance of gaps between them and the wall. Therefore, when pouring a floor over a foundation, the strength of the concrete solution and the use of high-quality reinforcement are essential.
Advantages and disadvantages
There are many advantages to concrete floors on the ground in a private home. Let's list the main ones:
PROS:
- Can be used on most soil types
- minimal concrete consumption and, as a result, low cost
- sufficient resistance to frost heaving forces
- Thanks to careful insulation in a house with such a foundation, it is easier to maintain positive temperatures in winter, since a screed with a heat insulator installed inside can accumulate heat well, resulting in reduced costs for heating the building; It is enough just to insulate the base and blind area well
- such floors do not require ventilation and annual drying
- unlike wooden floors, they do not require periodic replacement of rotten beams
MINUSES:
- The disadvantages include the difficulty of repairing communications. Therefore, it is imperative to lay duplicate sleeves in the concrete, in which additional sewerage and water supply systems are located. They can be connected quickly and without problems in case of clogging of the main communication systems.
- Another disadvantage of such foundations is the lack of a basement floor. However, the underground floor in a private house can be organized in another utility room.
Some developers advertising their own services claim that under such floors it will be constantly wet. But if high-quality drainage, storm drainage and removal of flood and groundwater are installed, moisture accumulation can be completely avoided.
Floor installed on the ground
Geotextiles, widely advertised in recent years, under a layer of sand cushion will not only be inappropriate, but also harmful. It will not allow the soil to compact properly, as a result of which the effectiveness of floors on the ground will be reduced to zero. The drainage properties of this material are useful only when laying communications.
Materials
Unlike foundations and grillages, which can be protected from moisture by all known methods, waterproofing a concrete floor on the ground is carried out with a limited number of materials:
- membranes;
- roll welded or glued insulation;
- polymer films;
- penetrating mixtures.
Waterproofing materials.
This is explained by the design:
- waterproofing materials are laid on top of the concrete base;
- this screed on one side provides a flat, hard surface that allows high-quality sealing of roofing material or Bikrost at the joints;
- membranes and films do not tear from the sharp edges of crushed stone, do not fall into the sand when workers walk;
- on the other hand, from below the footing protects the waterproofing layer and the floor screed located above it on the ground.
The location of the waterproofing layer inside the floor along the ground.
The weak point of the structure is the junction between the concrete base and the foundation (grillage or plinth). The horizontal layer of waterproofing under the floor along the ground must be continuous and smoothly transition into the vertical level, protecting the screed from the ends along the entire height.
The specified conditions are met only when using the following materials:
- membranes and films - they line the surface of the concrete base, the edges are placed on the side faces of the foundation to the required height;
- roll waterproofing - similar to the previous case, with the only amendment - bituminous materials are fused or glued with mastics to the specified surfaces;
- penetrating mixtures - added to concrete during its manufacture or applied to the floor on the ground after gaining strength, they change the structure of the structural material throughout the thickness of the screed, making it waterproof.
Waterproofing plasters and coating mastics are useless in this case. They can protect the horizontal surface of the footing, but when moving to the side surfaces of the foundation, the continuity of the layer will inevitably be broken, since the floor along the ground is separated from the base by a damper layer and is a floating independent screed.
Membranes
They are created only from high-density polyethylene and have profiling. The protrusions on the outside (2 cm spikes) are intended for glueless interlocking of strips of material when overlapping each other. The opposite side (front) contains the bitumen mass.
Waterproofing membrane.
Profiled membranes are expensive, but they allow you to do without a layer of concrete. Due to the high density and thickness of the membrane (0.5 - 2 mm), the sharp edges of the crushed stone are not capable of tearing the material.
Films
They are classified as flat film membranes, must be laid in two layers, and are made from several materials:
- PVC – polyvinyl chloride;
- TPO – polyolefin;
- HDPE, LDPE – high and low density polyethylene, respectively.
Waterproofing film.
Films from 0.2 mm in thickness are suitable for floors on the ground; at least 15 cm of overlap is required at the joints; tightness is achieved by welding or gluing the sheets. Mechanical strength is very low, so films are laid only on top of the concrete base.
Important! Only vapor barrier membranes can be used, i.e. those that do not allow water to pass through in liquid and gaseous states; to be more precise, not just waterproofing, but hydro-vapor barrier must be done.
Roll materials
Most often, roll waterproofing is classified according to the base material:
- cardboard - roofing felt, glassine, rubemast;
- polyester – fiber made from polyester resins for Premium class insulation;
- fiberglass is a highly elastic base, but is subject to delamination after 5 – 7 years of operation in aggressive environments;
- Fiberglass is a fragile material, but it is cheaper than other analogues; in a floor pie on the ground it is protected on both sides, so it has a satisfactory service life.
Rolled bitumen waterproofing.
A bitumen layer and a sprinkle of crumbs of high-strength non-metallic materials may be present on one or both sides.
Some manufacturers produce roll insulation without a base. For example, TechnoNIKOL has a “Floor Waterproofing” product with a self-adhesive layer, consisting entirely of bitumen coating.
Penetrating compounds
The leader among manufacturers is Penetron, which produces a range of materials for the manufacture and repair of floor waterproofing on the ground:
- Admix – a dry mixture for adding to concrete when mixing it;
- Penetron is also a dry mixture for preparing a penetrating solution, applied with a brush, increases the moisture resistance of the structural material by 8 units (for example, from W0 to W8).
Regardless of the method of application, Penetron products (and their analogues from less popular brands) react with cement stone, increasing its strength and moisture resistance throughout the life of the supporting structure.
Moreover, a broken piece of concrete treated with Penetron will also retain the specified properties until complete destruction. The only drawback is the price of penetrating insulation materials. For example, when using the Admix additive, the cost of concrete will increase by at least 300%.
Soil requirements
Groundwater location diagram
Unfortunately, such a base cannot be used on all types of soil. After all, when the soil moves and heaves under the floor of the house, damage to the concrete is possible. Laying such a foundation is permissible only when groundwater is located below the level of 0.5-0.6 m from the surface.
It is not recommended to install floors on the ground or on too loose, mobile soils. On heaving soils and soils with a high degree of freezing, the thickness of the footing should be increased to 15-20 cm.
Tables
| Concrete grade | Mass composition, C:P:SH, kg | Volumetric composition per 10 liters of cement P/Shch, l | Amount of concrete from 10 liters of cement, l |
| 100 | 1 : 4,6 : 7,0 | 41/61 | 78 |
| 150 | 1 : 3,5 : 5,7 | 32/50 | 64 |
| 200 | 1 : 2,8 : 4,8 | 25/42 | 54 |
| 250 | 1 : 2,1 : 3,9 | 19/34 | 43 |
| 300 | 1 : 1,9 : 3,7 | 17/32 | 41 |
| 400 | 1 : 1,2 : 2,7 | 11/24 | 31 |
| 450 | 1 : 1,1 : 2,5 | 10/22 | 29 |
| Concrete grade | Mass composition C:P:SH, kg | Volumetric composition per 10 liters of cement P/Shch, l | Amount of concrete from 10 liters of cement, l |
| 100 | 1 : 5,8 : 8,1 | 53/71 | 90 |
| 150 | 1 : 4,5 : 6,6 | 40/58 | 73 |
| 200 | 1 : 3,5 : 5,6 | 32/49 | 62 |
| 250 | 1 : 2,6 : 4,5 | 24/39 | 50 |
| 300 | 1 : 2,4 : 4,3 | 22/37 | 47 |
| 400 | 1 : 1,6 : 3,2 | 14/28 | 36 |
| 450 | 1 : 1,4 : 2,9 | 12/25 | 32 |
| Styrofoam | Polyurethane foam | Min. plate |
| Open cell structure | There is both open and closed cell structure | Fibers randomly located in vertical and horizontal directions |
| Poor moisture permeability | Almost impermeable to moisture | Almost does not absorb moisture |
| Lightweight material | Lightweight material | Medium-light material |
| Average strength | Low strength | Low/medium strength |
| Average compressive strength | Low compressive strength | Low to medium compressive strength |
| Non-toxic | Non-toxic, emits carbon monoxide and carbon dioxide at a temperature of 500 degrees | Non-toxic |
| Not suitable for use under high load | Not suitable for use under high load | Not all slabs are suitable for use under high loads |
| Subject to decay | Durable enough | Durable enough |
| Affected by ultraviolet radiation | Virtually unaffected by ultraviolet radiation | Sufficient resistance to UV influence |
Diagram of thicknesses of materials for floor insulation on the ground
Main stages of construction
Zero level marking
It is better to begin work on installing the floors of a house on the ground in the summer, after the construction of the building, walls and roof have been completed. Since when digging a pit for a strip foundation the depth of the hole is significant, it is covered with the same soil with layer-by-layer compaction.
1 To determine the lower point of the mark, mark a point at the bottom of the door threshold, called the zero mark. It is from here that the countdown for deepening into the ground begins. On average it is 30-35 cm
2 You can outline the highest (zero) point of the floors using nails and a cord driven around the perimeter of the structure
3 In ground floors, be sure to carefully prepare the base. The ideal backfill for them is sand. It is compacted in small layers with a height of no more than 15 (or even better 10) cm. According to SNiP, the total height of the layers is 60 cm
4 Each of them is first compacted dry, and then spilled with water and pressed again. A jet of water can wash away the layers, so such work should be carried out through a nozzle with a sprayer. There is no need to oversaturate the sand with water - it should be sufficiently moist, but not wet. They pour it with a hose and pass it with a vibrating plate twice, changing the direction of movement.
5 It is more convenient to control the height of sand filling using wooden pegs with a mark. They are located in the corners. After filling the next layer, the stakes are removed and new ones are placed.
6 To further compact the layers, coarse crushed stone is poured on top. When compacting it, thanks to the strong pressure of the stones, even the lowest, deepest layers of sand are well compressed
Sand-crushed stone pillow
7 The next layer is screed. As we have already indicated, its greater thickness is useless. 5 cm is enough
8 In a rough screed (concrete), the heaving load on which is small, the use of reinforcement is not necessary - it is only required for the construction of the last concrete layer - the finishing screed. Reinforcement of the concrete base is advisable only in the presence of soils with increased frost heaving or when there is a significant mass of structures in the house
9 To fill this layer of screed, it is allowed to use lean concrete mortars with a minimum percentage of cement. At high loads on the floors, its amount in the solution can be increased. In these cases, it is also recommended to use cement with improved strength characteristics
10 The third layer is waterproofing. To create it, you can use a fairly thick plastic film. Recommended thickness 150 microns. It is necessary to lay the film on the base with an overlap on the walls and the layers overlap each other by 15-20 cm. Each of the seams is carefully glued or fastened with a construction stapler. It is advisable to lay waterproofing in two layers rather than one
11 You can replace the film with bitumen roll materials. They are fused onto the concrete layer with an overlap of 2 layers.
12 As a heat insulator, it is better to use not rolled, but slab material, which has greater compressive strength
13 The ideal insulation for house floors on the ground is a layer of extruded polystyrene foam. You can also use regular foam (although working with this fragile material is a little more difficult). Both polystyrene foam and polystyrene foam completely retain their heat-shielding properties even when wet
14 When using materials that absorb moisture well (for example, mineral wool or expanded clay), they must be additionally waterproofed. Otherwise, their thermal insulation properties will decrease
15 Insulation boards are laid only staggered (in a checkerboard pattern). All joints should be filled with polyurethane foam. The thickness of the layer depends on the area of residence. It can be 5-20 cm
Floor insulation with polystyrene foam
16 When laying expanded polystyrene in 2 layers, the slabs are positioned so that the seams of the second layer run through the center of the slab of the lower layer
17 It is advisable to protect the porous heat insulator with film. Otherwise, moisture from the concrete will go into its smallest holes, and the strength of the concrete will decrease
18 When pouring the top, finishing screed, M400-500 cement is used with the addition of sand without clay impurities (preferably quarry or river) and crushed stone of a fraction of 5-10 mm. The strength of concrete must be at least M150
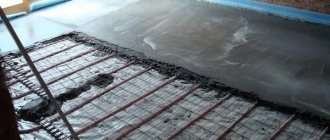
19 Reinforcement of the finishing screed is carried out using a 100x100 metal mesh or a 3-4 mm rod. The compressive strength of fiberglass wire is much worse, so it is used for reinforcement only in soils that are not prone to movement
Reinforcement of concrete screed
20 To avoid rust, the reinforcement must be in the center of the concrete screed, so it is laid out on plastic stands 20-30 mm high
21 When using a net, stretch it between driven metal pegs. It is undesirable to use wood that is susceptible to rotting for these purposes.
Additional waterproofing to protect against capillary moisture can be achieved using a layer of carefully compacted clay placed under a sand-crushed stone cushion.
Preparing for work
The preparatory stage includes studying the soil on the site, calculating the depth of the aquifer and possible fluctuations throughout the year. It is necessary to provide the building with a drainage system, thanks to which moisture from the ground will drain to a safe distance.
During the preparation process, the thickness of the backfill is calculated. The sand and gravel cushion should have good density, and the greater the thickness, the more difficult it is to compact the layer.
Experts recommend carrying out the rough screed over geotextiles , this way the concrete solution will retain moisture, which is needed to ensure normal hardening. If pouring is carried out on the preparatory layer, it will absorb moisture, which will ultimately weaken the strength of the resulting screed.
The amount of shrinkage of the preparatory layer is usually proportional to the selected thickness.
Before starting work, it is recommended to introduce all communications that will be located below floor level; at subsequent stages this will be much more difficult to implement.
When pouring concrete layers, it is necessary to withstand the entire hardening layer in order to prevent deformation or complete destruction in the future. Otherwise, there is a risk that the overall pie will lose strength or geometry defects will appear.
Recommendations for concreting
Finishing layer of concrete screed
Formwork is prepared for pouring the screed. In order for the floating screed to be located at a certain distance from the walls, it must be leveled with a building level. To make it easier to remove the formwork, the wood can be pre-treated with oil.
To avoid the appearance of cold bridges, the mortar is poured in one stage to create a monolithic screed without seams. You should work as quickly as possible so that the concrete does not have time to set.
Its mixing proportions directly depend on the brand of cement (see table). In order for cement and sand to be evenly distributed in the solution, you must first thoroughly mix the dry components, and only then add liquid.
Table of ratio of cement, sand and crushed stone
Mixing the solution in large quantities without using a concrete mixer in this case is simply unrealistic. If this is not available, it is better to purchase a ready-made solution, mixed mechanically, from a trusted manufacturer. To fill the concrete base, it is advisable to use cement of a grade not lower than M200-300, which does not crack when hardening.
Work begins from the far corner. A vibrator is used to remove voids. Level the concrete using a special construction tool in the form of a long metal strip - rules. After filling all the areas between the beacons, they are carefully removed and concrete is poured into the resulting holes. In order for the solution to dry evenly, the surface is covered with film and left to dry. During the first week, the concrete should be periodically moistened with water. It takes at least a month to finally gain strength. All work started before this time can lead to a weakening of the strength of concrete.
You can achieve a perfectly flat floor using a self-leveling mixture. It is poured over the rough concrete layer only after complete drying.
Features of the arrangement of floating floors
Floating floor
How to make floating floors on the ground in a private house? The principle of creating both structures - floating and rigidly fixed floors - is similar. To ensure the mobility of the base, a damper gap is provided between it and the foundation, with the help of which the linear expansion of concrete is compensated.
A special tape is used as a damper layer. It is laid along the entire perimeter of the foundation. The insulation (expanded polystyrene) is laid on the edge along the entire height of the screed.
What should load-bearing walls be supported on?
Strip foundation
Since this type of foundation is not load-bearing, resting heavy stoves, brick partitions and massive stairs on it is highly not recommended. In these cases, a strip foundation is used as a foundation for the internal walls.
When constructing partitions, the following method can also be used to avoid concrete fracture:
- Stiffening ribs are installed underneath them - reinforced concrete purlins that rest on the foundation; when the foundation moves, they will act as elastic inserts, dampening such deformations
- a gap is made in the thermal insulation layer and a reinforcement frame is installed into it, which is connected to the main floor frame; if the thickness of the insulation layer is insufficient, to avoid the appearance of cold bridges, you should go down 20-40 cm
In areas with severe frosts, concrete with the addition of cement of at least grade M400, which is frost-resistant, is used for pouring. Cement of similar brands should also be used for pouring screed on wet soil. This material also has higher water-repellent properties.
Advantages and disadvantages
This design has a number of advantages. The following are distinguished:
- does not require large financial costs;
- withstands significant mechanical loads;
- does not increase the load on wall structures;
- can be easily repaired and lasts a long time;
- suitable as a base for any finished floor option;
- allows you to install a “warm floor”.
A fairly simple solution to construct can answer a number of basic tasks during the construction of a building. However, you need to take into account some nuances:
- requires high-quality insulation;
- not suitable for large backfill layer thicknesses (it cannot exceed 60 cm);
- the floor is dependent on the groundwater level - not recommended for use in areas where it is high.
In addition, the floor on the ground requires a serious approach and attention to detail. However, existing technologies are well established and, if strictly followed, problems usually do not arise.
The depth of the aquifer can affect the condition of the finished floor, so the area must be surveyed first.
Dry screed technology
“Pie” screeds
The Knauf company proposes to replace concrete in the floors of a house on the ground with a dry expanded clay screed. The first three layers in them are similar to the previous version - cushion + concrete screed + waterproofing.
- Next, beacons are placed in the form of a metal profile, which are fixed motionless with a solution
- A layer of expanded clay is scattered between the beacons and carefully leveled
- Two-layer GVL slabs are laid on top. Fastening is carried out using adhesive and self-tapping screws
A company engaged in the production of soundproofing panel systems called ZIPS offers its own version of arranging a dry screed. In this case, it is proposed to replace expanded clay with mineral wool, which is glued to gypsum fiber sheets.
Basic mistakes
Base insulation with polystyrene foam
The most common mistakes when creating a floor screed include:
- Laying floors with high groundwater levels or soils with high levels of freezing. In this case, you should choose a different type of base
- Using wooden blocks that are susceptible to rotting as leveling beacons and leaving them in the screed. When wood is damaged or deformed, concrete may sag
- Small layer of footing and lack of reinforcement with increased load on floors over 200 kg/sq.m. m
- Lack of damper tape around the perimeter of the foundation, which can lead to cracking of concrete due to temperature changes
- Laying insulation below the zero level, which is fraught with freezing of the floors
- Lack of thermal insulation of the base and blind area
Common Mistakes
When pouring a concrete slab onto the ground on their own, many people make common mistakes. We list the most important of them:
- Poor preparation of the soil and sand and crushed stone bed. If they are not compacted well, the floor will turn out weak.
- Low quality of mixture ingredients. When crushed stone and sand are not washed properly, the concrete layer will turn out to be fragile, despite the use of high-quality cement.
- Reinforcement. A mesh laid directly on the base will not perform its functions. It must strengthen the strength of the structure and prevent subsidence of the floor along with the finishing coating laid on top. It is necessary that the reinforcement be completely filled with mortar.
- Failure to comply with technology. If you try to save money by purchasing materials, such a decision will cause a decrease in the performance characteristics of the mixture used and reduce the service life of the structure.
It is not difficult to pour concrete on top of the soil yourself in your home. All you need to do is control the important moments of the event, follow technology, and use high-quality components. Then you will be able to create a reliable floor that can please the owner.
Laying heated floors
If desired, heated floors can be provided in the floors of the house along the ground. To do this, it is enough to lay pipes made of polyethylene, metal-plastic in the upper (finishing) screed or install electric heating elements into such a base. Since any pipe connections in the screed are unacceptable , the contours of the heated floors are designed to be continuous.
Types of laying heated floors
The pipes are laid on top of the wire mesh reinforcement just before the fill layer. Naturally, the thickness of the screed will automatically increase. Before starting work, you should draw up a detailed diagram indicating the location of the control and monitoring of the underfloor heating system, as well as the method of laying out the pipes and the distance between them.
The thickness of the top layer should be 50 mm. Testing the performance of heated floors on the ground in a private house and connecting them is carried out only when the concrete strength has reached at least 70%, that is, 3 weeks after pouring.
As you have seen, installing ground floors in a private home is not that difficult. The most important thing is to strictly adhere to the recommended technology.
The author of the following video talks in great detail about each of the stages of their creation:
Step-by-step instructions for building concrete floors on the ground
The installation of a concrete floor in a private house on the ground is carried out according to a certain scheme. In short, all work can be divided into several groups.
The main stages of pouring the floor:
- Removing the top layer of soil, compacting it, compacting, preparing
- Leveling the floor with a layer of sand and gravel (thickness depends on the expected loads), tamping
- Pouring sub-concrete screed
- Laying a layer of waterproofing, thermal insulation
- Creation of a reinforcing frame over the entire area
- Pouring the floor with concrete
- Proper drying and care
- Finishing
Definition of zero level
Before pouring concrete floors on the ground in a private house, the zero level is determined - this is the boundary of the final floor covering. All layers below the level are indicated by a minus sign, and above - by a plus sign. Usually the floor is at the level of the foundation, but there are exceptions.
The zero level must be indicated in the project; if not, you need to mark it yourself. To do this, measure one meter from the proposed floor surface and mark it along the perimeter, connecting the marks with one line. Then they retreat from the mark a certain distance downwards, focusing on the highest point of the base, drawing another line in this place.
This is the zero level at which concrete floors are poured on the ground, retreating to the desired value. You can also determine evenness using a building level (laser, water level).
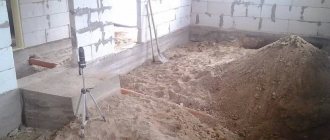
Preparing the base
The base is thoroughly cleaned of debris and anything that might interfere. Then the arable layer is removed, which usually contains various organic components that in the future can decompose and deform the concrete floor. Usually a layer of 35 centimeters is removed from the zero level.
The soil must be compacted - it’s best to use a vibrating plate; if you don’t have one, you can use a log with a handle and physical strength. There should be no traces of shoe soles on compacted soil.
Communications
You need to think through the places where communications will pass and prepare everything before installing a concrete floor on the ground. Repairs to network entry points cannot be carried out in a concrete screed, so pipes are usually placed in pipes of a larger cross-section so that they can be pulled out and replaced.
Due to the fact that the ground under a heated house will not freeze, water pipes can be laid at a depth of 50 centimeters, for sewer networks 100 centimeters is enough, electrical cables are also laid at a depth of half a meter.
Further backfill
Next, the subsequent layers of the floor are backfilled. For concreting, the surface is compacted with a sand and gravel cushion. First, gravel is poured into a 10-centimeter layer, watered, and compacted. A layer of sand 10 centimeters thick is spilled on top and compacted. Gravel is again poured onto the sand in a layer the thickness of which is equal to the layer of sand, compacted again, then sprinkled with a thin layer of sand and compacted, leveling the base.
Waterproofing and insulation
The technology of pouring a concrete floor over the ground allows the use of ordinary polyethylene film with a thickness of about 200 microns as a waterproofing material. But it is better to choose an insulating membrane for these purposes. The waterproofing layer is laid over the entire base area with an overlap of 5-10 centimeters and an extension to the edges of the wall of at least 15 centimeters (secured with masking tape).
After waterproofing, a rough layer of concrete up to 5 centimeters thick is poured. Next, it is advisable to take care of vapor barrier - usually polymer-bitumen membranes or other materials are used for these purposes. Thermal insulation for a concrete screed can be made using a variety of materials: moisture-resistant plywood, polystyrene foam, expanded clay, isolon, basalt or mineral wool, expanded polystyrene, perlite, etc.
Reinforcement and heated floor
The design of a concrete floor on the ground involves strengthening it using reinforcement with steel or polymer mesh, metal rods, and wire. Most often, a steel mesh is chosen, which is installed on special clamps that raise the frame above the floor in order to protect it on all sides with a layer of concrete mortar.
If the load on the floor is expected to be large, it is worth reinforcing with steel rods with a diameter of up to 15 millimeters, which are folded several pieces lengthwise, crosswise (in the form of a mesh) and knitted with a special knitting wire.
The warm floor is laid with a mandatory two-centimeter thermal gap between the screed and the walls. Elements of the underfloor heating system are laid on top of the reinforcement frame.
Formwork and guides
When making a concrete floor on the ground in a private house with your own hands, you need to take care of high-quality installation of formwork and guides. In order for the floor to be horizontal, first the entire area is divided into small sections of equal size, and the bars are laid on the markings (they should be level with the zero level). To fix the guides, use clay or cement mortar.
The formwork is most often made from moisture-resistant plywood, installing honeycombs that can ensure accurate and even filling in accordance with the zero level. To make it easier and faster to remove elements after filling, they are treated with machine oil before installation.
Making concrete using a concrete mixer
Technology dictates that a high-quality concrete floor on the ground in a private house should be poured continuously, so the easiest way would be to use a concrete mixer. A mixer with a bowl volume of up to 0.75 m3 is sufficient to complete the work. Gravel, sand and cement are placed close to the concrete mixer so that the materials can be easily and quickly thrown into the unit.
First, pour water - if the volume of the bowl is 0.75 m3, three buckets are enough. Then up to 10 shovels of gravel are thrown into the water, cement is poured in, and it is allowed to dissolve in the water. Next, sand and gravel are poured in the volumes necessary to obtain concrete of the selected quality. Water is also added in the amount required for optimal consistency. At first, the tilt of the bowl should be 30 degrees, then it can be raised during the filling process. But it is not recommended to increase the angle too much.
Making concrete by hand and pouring it
Pouring a concrete slab onto the ground can be done without a concrete mixer. In this case, you need to follow technology. To prepare the solution, prepare a solid, level area measuring 2 by 2 meters, lay a sheet of steel as a base, or use a wooden box with small sides (up to 20 centimeters).
Gravel, sand, and cement are poured onto the surface in the form of a pyramid, carefully alternating materials and using them in the required proportions. To prepare the mixture for concreting the floor, take: part cement, 4 parts crushed stone, 2 parts sand, 0.5 parts water (approximately).
Then the pyramid is thrown with a shovel to another place, back so that the ingredients are evenly mixed. In the center of the slide, make a funnel that reaches to the bottom, pour water into it, and mix the components with the liquid with a shovel. Moving in a circle, make sure that the protective border made of dry material is not disturbed. The concrete solution is prepared in portions in accordance with the laying speed.
Next, compacted sand and a reinforced concrete structure laid on it, the guides are filled with mortar. First, the layer is leveled with a shovel, then they work as a rule. There is no need to make beacons yet, since precise horizontality is given only to the last layer of the floor. The mass is leveled using a long rule, the surface is controlled by a level.
Experts advise making the first layer from a semi-dry mass, which has a lower thermal conductivity and is easier to install. True, it is less durable, but for residential premises this is not critical. The mixture is prepared in the usual way, just adding a little less water.