They combine a number of qualities characteristic of the best floor coverings: decorativeness, strength, wear resistance, moisture resistance and others.
From this article you will learn what polymer flooring is and get acquainted with its advantages and disadvantages. You will see how it differs from other floor coverings.
We will help you understand the classification of polymer floors and find out the rules for installing such coatings.
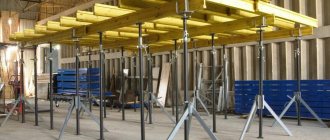
Preparing a concrete base for a polymer floor
Depending on the type of self-leveling polymer floor used, the concrete base must either be cured to full strength (28 days) or just laid (freshly laid).
Note: air-permeable cement-polymer compositions are laid on freshly laid concrete. These are relatively new polymer compounds that are gaining popularity among builders.
In the classic version, a polymer self-leveling floor is laid on seasoned concrete. Let me remind you that polymer flooring is divided into:
- Self-leveling coatings, thickness up to 3 mm;
- Filled coating 3-5 mm;
- Highly filled coating over 5 mm.
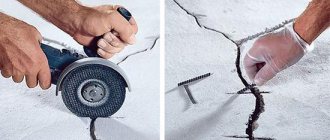
- A layer of cement laitance is removed from the concrete base. For this purpose, shot blasting machines are used on an industrial scale. Skimming increases the roughness of concrete.
- If cracks are found in the concrete, they are opened with a spatula, sealed with polymer sealing paste, the crack is glued with fiberglass, and covered with sealant a second time.
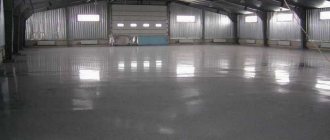
Properties of concrete floor
Concrete flooring today is the most durable and strong, and therefore the most popular base for different rooms. You can do all the flooring work yourself; the materials are available on the market, and everything is relatively inexpensive.
A concrete floor is a coating filled with a mixture of binder (cement) and fillers (gravel, sand, stone chips and others), water and various additives. All requirements for concrete floors are specified in SP 29.13330.2011 “Floors”. The foundation is especially important under conditions of high loads, which is why concrete floors can often be seen in industrial, warehouse, and commercial premises.
In residential apartments and houses, a concrete base requires mandatory finishing, with the exception of cases of design in the loft or high-tech style (then the concrete is dust-free and treated in a special way to leave it in its original form, without coatings).
The main advantages of concrete floors:
- Durability – service life is calculated in decades.
- Fire resistance – which is especially important in certain conditions where there is a risk of fire.
- Resistance to high/low temperatures, humidity, mechanical stress, aggressive environments.
- Wear resistance and strength, reliability.
- Environmental friendliness and safety.
- Relatively low cost.
The only drawback of the concrete coating is the low strength and tendency of the surface layer of the material to become dusty due to hardened cement laitance. Gradually, the layer begins to become covered with small cracks and chips, generates a lot of dust, getting into equipment and interior items, negatively affecting people’s health, and spoiling the appearance of the floor.
Due to this feature, the concrete floor is either treated with special impregnations and compounds, ground and polished, or covered with a topcoat.
One of the options for making a decorative base is to pour a polymer floor, which reliably protects the concrete and makes it more comfortable to use and maintain.
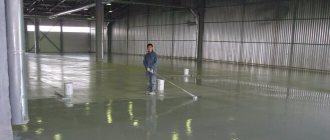
Primer application
A primer or floor primer is a special liquid that significantly increases the adhesion (adhesion) of concrete. The primer layer improves the adhesion of the polymer self-leveling floor to the concrete base.
Apply the primer with a roller in one layer.
Important! For each type of self-leveling polymer floor, primers of a similar type are used. For example, a polyurethane primer is used for a polyurethane floor, and an epoxy primer is used for an epoxy floor.
Materials from Sika
The range of Sika construction chemicals for flooring includes polymer-cement dry mixtures for leveling and preparing the base for finishing coating, one-, two- and three-component polymer floors, primers and protective varnish coatings. Materials can be used as:
- finishing self-leveling floors;
- thin- and thick-layer polymer screeds for leveling cement-sand and concrete bases.
Among the advantages of Sika self-leveling floors are:
- quick set of required strength;
- self-leveling ability;
- economical consumption;
- simplicity and ease of use.
For questions regarding the purchase of Sika polymer floors, please contact our official dealers and regional representatives, whose telephone numbers are listed on the website in the “Contacts” section.
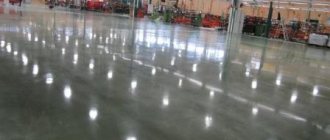
Applying a layer of polymer coating
Polymer self-leveling flooring up to 5 mm is applied in one layer.
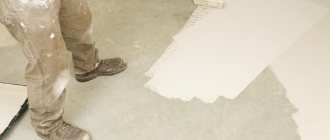
The highly filled polymer floor is applied in two layers. The first layer of self-leveling floor is applied with a spatula after mixing the two components, first along the perimeter of the room, near columns, niches and other obstacles. The self-leveling floor is applied to the remaining surface as a spill and leveled with a wide squeegee. Application is carried out on a layer of uncured primer.
- After curing, the first layer of highly filled polymer flooring is processed into a mosaic pattern using sanding machines. Dust from grinding is removed.
- The top layer of a highly filled polymer floor is a protective decorative layer. Usually it is colored.
- In large rooms, at the final stage, expansion joints are cut and sealed with polymer polyurethane sealant.
Seam cutting
The fact that polymer coatings themselves are quite elastic and do not experience technological shrinkage does not mean that it is not necessary to cut temperature-shrinkage seams in them. Due to the continuous adhesion of the polymer coating to the entire surface of the concrete base, it experiences all linear deformations to which the base is subjected during the hardening process and further long-term operation.
Typically, the seams in the polymer coating are cut so that they repeat the existing seams in the concrete base. And only in the case of a mature concrete base more than 1 year old, it is allowed to cut seams in a polymer coating half as often as in concrete.
Operation of self-leveling polymer floor
- You can walk on the floor after 24 hours.
- Full load operation of the polymer floor in three days.
- Labor productivity is 200 meters per day.
- Cost 40±10 $ per meter.
conclusions
This article describes the general technology of polymer floors. Depending on the type of polymer floor and the expected load, technologies change in the details of application, but not in the details of preparation. The preparation of mixtures for work also differs.
©Opolax.ru
More articles
- Polymer floor technology: construction of self-leveling floors
- 11 Advantages of self-leveling methyl methacrylate floors
- Installation of self-leveling polymer floor
- Properties of polymer self-leveling floors
- Polymer self-leveling floor: types of polymer floor
- Layers of self-leveling 3D floor
- Liquid linoleum is: what is liquid linoleum and features of its use
- Polymer floor in garage, coating
Applying the base layer
It is usually started the next day after priming. You should go onto a primed surface in clean shoes, since any contamination leads to local defects and damage to the appearance of the floor, and manually removing pieces of dirt from a fresh layer of material during the process of laying the coating is very labor-intensive. The initial liquid components of the base coating layer are supplied complete and mixed immediately before application on site. The given weight ratio of the components is usually maintained due to their appropriate packaging in factory containers. After preparing the working mixture of components, pour it over the prepared surface of the base in the form of puddles or strips and level it to a given thickness using a squeegee with an adjustable gap, a notched trowel or a trowel (in hard-to-reach places). Then the applied layer of material is rolled with a needle roller to distribute it more evenly and remove air bubbles. At the same time, they move along a fresh viscous-liquid layer of material using needle soles fastened to shoes.
To increase the thickness of the coating, you can use dry quartz sand of a certain fraction, which is either mixed directly into a liquid polymer binder or scattered over a freshly laid layer. Part of the sand sinks into the resin and is bound by it; the remaining non-adhesive residue is removed the next day by grinding and sweeping away from the surface. In addition to increasing the working thickness of the layer, this operation contributes to additional leveling of the surface and strengthening of the coating, which is especially important in areas of increased mechanical loads. At the same time, it leads to an increase in production costs, since it requires re-filling - applying the so-called finishing layer.
| Necessary equipment and materials | Purpose | Quantity, pcs. | Note |
| Drill with mixing attachment | Fast and homogeneous mixing of components without driving in air | 1 | Rotation speed is about 300 rpm, power is at least 0.8 kW. The mixer type is screw, the length of the shaft must exceed the height of the mixing tank. |
| Adjustable Gap Squeegee | Distribution of material over a large surface in a uniform layer of a given thickness | 1-2 | It must ensure the accuracy and consistency of the release of the whiskers (the established gap between the base and the working edge). It should be rigid and not vibrate during operation. |
| Notched spatula | Distribution of material in small areas and in hard-to-reach places | 1 | The material consumption is regulated by the angle of inclination of the spatula to the floor plane. |
| Needle roller | Removing air bubbles from freshly applied coating | at least 1 per 50m2 | Roller rolling requires more time than pouring and spreading material |
| Soles with spikes (paint shoes) | Moving on freshly applied coating over large areas | 1-2 pairs | Necessary for access to remote areas of freshly applied coating if additional leveling is necessary |
| Solvent | Cleaning the instrument |
Types and choice of composition
It is the mixture itself, which is called self-leveling flooring, that is the main material that will be used to create a smooth and beautiful coating. It is made on the basis of ordinary cement, but of high quality, as well as gypsum, sand or limestone chips and a number of polymer additives that give the base certain properties. Fractions of fillers such as sand and crumbs can vary from 0.5 to 1.2 mm . Also, modifying additives are added to the mixture to achieve certain qualities - they can increase spreadability, plasticity, adhesion, etc. Special microfibers can also be added to the mixture, which will ensure maximum quality of bonds between the individual components of the base. They are also designed to reduce the risk of cracks.
Installation of a self-leveling floor in a garage
On a note! There are a huge variety of color variations for self-leveling floors. The desired shade can be achieved by introducing a certain dye. It is this substance that will determine the main color of the floor.
Colors of self-leveling polymer floors
When choosing a mixture, it is important to pay attention to the substance that is included in its base. For example, cement-based mixtures can be used in rooms where the humidity is quite high. But it is better to pour gypsum-based compositions where the air humidity is normal. If you plan to make the floors warm, then it is recommended to choose a mixture with increased elasticity, since the floors will still have to either shrink or expand under the influence of temperatures. But with high elasticity rates, you don’t have to worry about the appearance of cracks.
Epoxy mixtures for finishing floor filling
Types of self-leveling floors from
On a note! If it is difficult to make a choice due to lack of knowledge, then you can settle on a universal mixture suitable for pouring floors in various rooms.
Polyurethane two-component self-leveling floor
In general, the choice of mixture will depend on:
- operating conditions;
- type of subfloor base;
- the presence and type of damage to the base, if any;
- working conditions, including air temperature, humidity, and so on.
Table. Types of mixtures for creating self-leveling floors.
| Type | Short description |
| Epoxy | This is a universal composition with many advantages. A floor created from such a mixture has a number of advantages. It is not afraid of any mechanical influences, and therefore it can be installed in garages, gyms, parking lots, etc. Often such floors are poured in workshops where there are high requirements for cleanliness - for example, in production facilities belonging to the food or pharmaceutical categories . Contains hardener and epoxy resin. These floors are not highly elastic, but they are very durable. Chips and damage to them will appear only under extremely strong mechanical impact. Properties of epoxy bases - excellent evenness, strength, inertness to chemicals; They are also non-slippery. |
| Polyurethane | These mixtures are used when it is necessary to obtain a base that is less brittle than that described above. Polyurethane bases have high elasticity, are not afraid of temperature changes and are suitable for installing heated floors in an apartment or residential building. They are also not afraid of the cold, which means they can be created outdoors. These are also very durable floors that are destroyed by moisture and are not afraid of frequent cleaning, and they look very nice. |
| Polymer-cement or cement-acrylic | Mixtures created on the basis of cement, acrylic with the addition of sand and crushed stone. They are not afraid of exposure to aggressive chemical compounds. Suitable for finishing laboratories and chemical industry workshops. Also used in food industry premises. Durable, high-quality, beautiful, such floors are often used in residential or office spaces. The floors are easy to clean and are not susceptible to moisture. |
| Methyl methacrylate | This mixture makes it possible to create wear-resistant bases that are also not afraid of temperature changes. They are often made outdoors. But the mixtures used to create such floors are highly toxic; you need to work with them only in respirators and with good ventilation. Also, floors are difficult to pour due to the very high speed of hardening - a person without experience will simply ruin the material, since he will not have time to use it up and it will harden. |
Self-leveling floor in the parking lot
Main types of self-leveling floors
Other materials for arranging self-leveling foundations
The technology for pouring such floors is quite simple, but still requires some skill. However, you can even try to cope with this task yourself and not ruin the materials, the list of which, by the way, is supplemented with materials to ensure an even base for pouring, primer and damper tape at a minimum.
Primer screed
On a note! If the self-leveling floor is poured onto a finished screed that is not damaged and looks presentable, then it is enough to simply clean it, apply primer to it and immediately pour the floors. In this case, you won’t have to level it, much less do it again.
Before pouring floors, you need to make sure that the base underneath is level, without deep cracks or gaps. Such damage can cause high mixture consumption. Therefore they need to be sealed. And the uneven base option should be leveled to the horizon level. The final result after pouring the self-leveling floor should be a coating that is carefully leveled. Therefore, large differences in the rough foundation need to be corrected. To do this you will need to use a cement mortar. With its help you can correct all the shortcomings. In some cases, sealants can also be used to seal small cracks and seams along the walls. If the screed is in poor condition or is missing altogether, then it will need to be completely redone.
The base must be properly prepared
It is also necessary to glue damper tape around the perimeter of the walls. This is a thin porous material that is attached to the wall using an adhesive base, sealant or self-tapping screws and acts as a kind of softening material, which is needed so that the dense materials of the screed or self-leveling floor are not damaged as a result of thermal expansion. The damper tape also acts as an additional soundproofing layer.
Gluing damper tape
In order for the self-leveling floor to hold up well, it is important to cover the rough base with a primer mixture. It increases adhesion and makes the connection of the poured layer with the rough base stronger. Also, the primer additionally performs a sealing function. It is applied in 1-2 layers using a roller or brush and dried within 24 hours.
Needle roller for self-leveling floor
How to choose a polymer self-leveling floor.
The building materials market offers a wide selection of flooring mixtures, but the most modern and in demand are polymer self-leveling floors. The scope of application of this type of flooring is wide and includes apartments, industrial enterprises, garages and warehouse complexes, sports facilities, offices, medical and educational institutions, clubs, etc.
Initially, these floors were conceived for areas with high loads, such as industrial, commercial, warehouse and other facilities, but now they are positioned as “liquid linoleum” - a comfortable and durable floor for homes and apartments. The most interesting option for an apartment or house is the effect of a three-dimensional image, or otherwise called a self-leveling 3-D floor.
Self-leveling polymer floors have a number of advantages:
1. Solidity of the coating. The floors do not have seams, which means that dirt will not clog in them and, as a result, harmful microorganisms and bacteria will appear. This criterion is very important for medical institutions and food-related industries. The tightness of the self-leveling floor does not allow water to penetrate into the base, which adversely affects the durability of the floor. That is why wet cleaning of the floor will take place without any worries.
2. Durability of the floor. The service life of the floor will depend on how correctly you choose self-leveling floors and how you use them in the future. It is very important to pay attention, first of all, to the technologically competent execution of the work, which includes the correct preparation of the base and the technology for applying the self-leveling floor.
3. Dust-free floor and easy to maintain. Polymer seamless monolithic coating is one of the few currently eliminating dust on the concrete base. And this criterion is necessary in any field of activity.
4. High wear resistance of self-leveling floor. Such floors are highly resistant to abrasion in areas most susceptible to abrasion.
5. High strength polyurethane flooring. Thanks to its high elasticity, the floors will remain intact even if heavy objects fall on it, which is inevitable in auto repair shops. When heavy objects fall, they are evenly distributed around the impact area, due to which the floors maintain their integrity.
6. Resistance of the floor to chemical reagents. What is most in demand in laboratories and chemical enterprises.
7. Installation and restoration of the floor. Polymer floors are easy to use; even a person without special skills can organize them independently. To do this, you need to carry out the work step by step, strictly following the instructions. In addition, polymer floors can be restored and it will not take you too much time and will not require special skills.
8. Aesthetics. Self-leveling polymer floors have a wide range of colors, and you can also use various kinds of decorative elements, such as glitter, chips, flocks and much more. The shades are easy to combine, and designs and logos are also applied.
9. Environmental safety of the floor. The polymer that is part of bulk mixtures is absolutely safe for humans; it is on its basis that bags and pipes that supply our homes with water are now made.
10. Thermal insulation of the floor. Self-leveling floors of this type are able to withstand a wide range of temperature fluctuations, which is very important for freezer compartments and coat rooms.
Compared to the wide list of advantages, the disadvantages of this coating are insignificant, these include:
- High price. The costs will of course be justified, but investments will be required at the start.
— In order to install floors, you first need to strengthen them and make them a level base; here it will be difficult to do without the help of a specialist.
— In order to dismantle self-leveling floors, special equipment, time and skills will be required.
— When installing the floor, it is imperative to observe temperature and humidity conditions.
Types of self-leveling polymer floors.
The composition of the polymer self-leveling floor is:
- Epoxy polymer floor
. This type is considered the most chemically resistant base and is used in premises, laboratories and pharmaceutical plants - Polyurethane self-leveling floor
. Polyurethane has good elasticity and abrasion resistance, so floors are not subject to impact deformation and are used in industrial workshops, sales areas, parking lots, parking lots, warehouses, and industrial freezers.
How to choose the right compositions for polymer-based self-leveling floors.
In order to choose a polymer floor wisely, you need to consider some points:
- Type and quality of the base.
- Purpose of the premises.
- The degree of strength of mechanical loads.
- The need for decorative elements.
- The presence of additional properties, such as: antistatic, anti-slip, etc.
- Your financial capabilities.
Scope of application of polymer floors.
Epoxy self-leveling floors:
- for auto repair shops
- for children's institutions
- for residential premises
- for factories
- for medical institutions
- for offices
- for parking
- for warehouse
- for the workshop
- for repair shops
- for retail spaces
Polyurethane self-leveling floors:
- for auto repair shops
- for children's institutions
- for residential premises
- for factories
- for medical institutions
- for offices, for parking
- for warehouse, for workshop
- for repair shops
- for retail spaces
- for antistatic floors
- for factories
- for medical institutions
- for warehouse
- for conductive floors
- for the workshop
How to calculate how much material is needed.
Once you have decided which type of bulk composition is right for you, you need to calculate the amount of material.
When pouring an epoxy floor, it is necessary to take into account the density of the composition, the preliminary consumption per 1 m? from 1.4 kg to 3.2 kg, with a layer thickness of 1-3 mm. In rooms with high humidity, consumption will be higher.
As for polyurethane flooring, is its consumption similar to epoxy flooring per 1 m? you will need up to 3.4 kg, with a layer thickness of up to 3 mm. It is also very important to take into account the total mass of the resin and hardener. The primer and putty must be purchased from the same manufacturer from whom you purchased the self-leveling floor.
Preparation before installing the floor covering:
Before you begin work on installing the floor covering, you need to know about some rules for the safety and operation of the floor.
1. During all work, it is necessary to use protective equipment, such as gloves, a respirator, closed shoes and clothing.
2. The material should not be stored in the sun; direct sunlight should be avoided, as well as heating the mixture.
3. If the material gets on your skin, you must immediately rinse with water.
4. It is recommended to open the polymer only with wooden objects, due to the fact that sparks can form from metal ones, which will lead to ignition of the composition.
If you decide to make a self-leveling coating device yourself, you will need the following tools:
- Respirator
- Drill and special attachment for it
- Needle aeration roller
- Synthetic roller
- Raklya
- Putty knife
- Industrial vacuum cleaner
- Paintshoes
- Milling machine
- Sander
After you have prepared the materials, tools, and put on protective equipment, you can begin preparing the base of your future floor.
Preparing the base.
The durability of your floor will depend on how well the base is prepared. Regardless of the type of base, it must first be cleaned of contamination and also roughened.
In order to increase adhesion to the concrete base, mechanical treatment with shot blasting machines is used. This degree of processing using these machines makes it possible to most efficiently remove hardened cement laitance and increase the degree of roughness. Moreover, the adhesion area of the polymer composition to the concrete itself increases, this happens due to the fact that loose particles are removed.
In addition to shot blasting equipment, milling and grinding are also used. It is important to pay special attention to the initial surface treatment to prevent possible peeling of the coating from the base.
Dust and large particles formed after cleaning must be removed using industrial vacuum cleaners. If there are chips, potholes, or expansion joints on the surface, they must be repaired with a special putty. In order to give strength and increase adhesion (adhesion), you need to prime the base (seal the pores). This is a very important point, since when the pores of concrete are open, air can contribute to the destruction of the integrity of the surface, i.e. will lead to the formation of bubbles and craters on the surface. The primer penetrates into the base to a depth of 3mm, which increases strength by 50%. In order to give the base additional roughness, dry quartz sand must be sprinkled onto the applied primer; this is done if:
- pause between application of primer and self-leveling floor for more than 24 hours;
- polymer floor will be applied outdoors
- During operation, large temperature changes are possible, as well as significant mechanical loads.
The average consumption for most polymer primers is about 350 g/m2.
Laying the floor.
After the surface has been thoroughly prepared, you need to prepare the polymer composition itself. The proportions depend on the components and type of floor, so you should carefully read the instructions on the package.
After pouring the mixture onto the surface, it must be leveled using a squeegee or spatula. The mixture hardens quite quickly, which is why it is worth preparing it in portions, pouring and leveling for 20-30 minutes. In order not to leave air bubbles that often appear, the mixture must be rolled with a needle roller. While the solution is hardening, it is necessary to exclude direct sunlight.
Self-leveling 3-D floor.
Classic floors are being replaced by floors with a huge number of design solutions that will make your floors unique without any restrictions on options. In the West, three-dimensional floors began to be used half a century ago, but in Russia not so long ago, despite their high cost, they won attention and recognition.
Technologies for pouring self-leveling decorative floors are as follows:
1. Artistic - the case when the drawing is applied with paints.
2. Decorative - the base is painted in the color of the background and objects are randomly scattered on it (glitter, shavings, foil, colored sand, finely chopped paint, etc.) or compositions are laid out.
3. 3D - a design that is printed in a printing house on banner fabric or vinyl film and glued to the surface, which is covered with a protective layer. Polymer 3-D coatings do not limit the variation of solutions, since the range of colors, patterns and shades is innumerable.
The self-leveling 3-D floor device includes:
- Preparing the base. The base must be carefully prepared by removing debris and dust, then degrease if there are greasy stains, since if they are not removed, the floors may subsequently peel off. All cracks and chips must be sealed with sealant, and minor irregularities must be sanded. Give the surface time to dry completely (the permissible level of substrate humidity is no more than 4%)
- Prime the surface with a specialized epoxy primer GLIMS®PRO FS 101 to ensure strong adhesion of the base to the applied layer. The composition can be applied with a roller or spatula.
- After the primer has dried (about 4 hours), it is necessary to apply the base epoxy polymer self-leveling floor GLIMS®PRO FS 302, which is leveled using a wide trowel. After this, you need to go over it with a needle roller to remove excess air.
- We apply the design itself or decorative objects (your choice depending on your preferences).
- Pour in the final filling transparent composition, carefully level it, and pass it with a needle roller. After drying, we apply a protective varnish, which will serve as additional protection from mechanical damage.
- If you need to create a matte surface, you can use polyurethane matte varnish GLIMS®PRO FS 551 M. To give additional chemical resistance, epoxy varnish GLIMS®PRO FS 202K is applied to the self-leveling floor
You can buy a polymer floor and get full advice on the product in the GLIMS online store.
Performance properties and application of polymer floors
- highest adhesion to the prepared concrete base;
- monolithic seamless floor covering with connections to walls and components of the room;
- resistance to a range of aggressive media and oils;
- resistance to abrasion, impact, stretching, bending and other mechanical influences;
- resistance to vibration loads;
- waterproof and moisture resistant;
- explosion and fire safety, antistatic;
- dust-free and hygienic, compliance with environmental standards;
- ease of cleaning the surface;
- ease of repair, consisting in adding a finishing layer;
- high installation speed, allowing you to start using the floors as quickly as possible;
- lack of permits for work and special requirements for tools and equipment for laying floors;
- application in combination with the “warm floor” system;
- can be laid in a wide temperature range and even at sub-zero temperatures;
- possibility of using an anti-slip finishing layer;
- aesthetics, perfectly smooth surface;
- scope of design solutions when choosing colors, the ability to combine colors and textures;
- service life over 15 years.
Content
- What are polymer floors
- Classification of polymer floors
- Performance properties and application of polymer floors
- Disadvantages of polymer floors
- Areas of application of polymer floors
- Technology for producing polymer floors
High performance requirements are imposed on flooring, both for domestic and industrial premises.
For example, acid resistance for chemical production, dust-free for the manufacture of microprocessors, hygiene for the pharmaceutical industry. The most common type of coating is floors made of concrete and cement-sand screed, but without protection they do not meet the level of modern requirements. The appearance of cracks, chips and damage during operation, the tendency to form dust, low resistance to aggressive environments and temperature changes are the disadvantages of floors made of concrete and cement-sand screed.
Polymer floors are designed specifically to solve this set of problems.
Area of use
The technology for proper installation of modern polymer floors can only be implemented by professionals.
Such floors can be used on construction sites of any level, regardless of their purpose. Thus, they are most often installed in industrial premises, warehouses and terminals, and in various technical complexes. Such coatings will be in demand at food and pharmaceutical industry facilities, as well as in medical complexes and other medical institutions.
In addition, the use of polymers is also popular in public facilities - shopping centers, entertainment complexes, car showrooms, shops, and administrative buildings.
Scope of use of epoxy and polymer coatings
Special-purpose polymer coatings can be in demand in freezers, industrial refrigerators, especially hazardous chemical plants, laboratories, electrical and energy enterprises.
Polymer technologies make it possible to create an aesthetically attractive floor covering with excellent strength characteristics. Self-leveling floors are created using self-leveling mixtures based on polymer materials. The manufacturing technology of such coatings requires compliance with certain environmental conditions, which strengthens the structure.
Step-by-step instruction
An important stage is cleaning, leveling different types of coatings and surface treatment. These measures help to enhance the adhesion of materials. Also, polymer technologies require pouring two layers of which the coating will consist.
Necessary tool for work
How to prepare a subfloor?
Self-leveling coatings are best installed on a well-cleaned surface. The subfloor can be made of wood, concrete (old or newly laid coating). In any case, it is necessary to ensure a flat surface with a complete absence of leaks and cracks.
Composition of self-leveling floor
If the concrete floor is old enough to be damaged, it is recommended to remove the top layer and sand it. It is important to treat wooden surfaces with sandpaper, ensuring the desired degree of roughness. On freshly laid concrete pavements, moisture levels must be controlled.
Filling cracks
This step is performed before the primer is applied. Expansion joints and various types of cracks are a common phenomenon observed on concrete surfaces. First, areas with leaks are cleaned of contaminants, including dust.
It is important that a constant temperature is maintained in the room when priming.
Then they are treated with a primer and filled with fiberglass and quartz sand. An alternative method is to use putty or elastic sealant. You can continue work in a day.
Surface priming
Polymer technologies require the subfloor to be treated before casting the first layer. This measure helps to strengthen the surface and also improves adhesion. It is allowed to start further work no earlier than 1 day.
First and second layers of polymer material
The composition is mixed immediately before pouring begins. It is recommended to start from the highest point of the room, if available. For work, you should use paint shoes, which will allow you to move across the floor without the risk of leaving noticeable marks.
Work must begin from the furthest wall from the entrance. Filling should be done without interruption so that there are no differences in height.
Self-leveling floors are leveled using a notched trowel. After this, a needle roller is used. When the base has polymerized, you can proceed to pouring the second layer. In both cases, polymer technologies are implemented according to the same principle.
Seam cutting
Since the polymer floor experiences exactly the same loads as the concrete base, it is recommended to cut the seams. Their number is determined by the age of the sex. For older floors, it is recommended to cut the joints in the same places as the joints in the concrete. The resulting leaks are primed and filled with sealant.
Determining the readiness of the coating
The duration of polymerization depends on environmental conditions. On average, it is enough to wait 1-2 days before starting light use. Full readiness of the filling strips is noted after 5-10 days.
After pouring and leveling, it is best to cover the floor with plastic film - this way we will avoid dust.
Video description
About calculating the amount of mixture for a self-leveling floor in the video:
Final calculations
As a rule, provided that the base is well prepared, calculations are made based on the data specified by the manufacturer of the self-leveling floor. As an example, we will give the procedure for calculating the required amount of mixture to fill a layer of 2.5 millimeters. At the same time, the manufacturer indicated that for 1 millimeter, when pouring 1 square meter, 1.5 kilograms of the composition are needed. The calculation requires three steps:
- The area of the filled plane is calculated. With the correct geometry, it is enough to multiply the width of the room by its length. Complex contours are divided into rectangular sectors and their area is summed up.
- The required thickness is determined using a level. In the case of a relatively flat surface, you can use a standard or laser building level. In case of significant deviations in height, it is necessary to use a water level.
- All received data is recorded and double-checked.
Let's assume that the width of the room is 4.7 meters and the length is 5.9 meters. Therefore, the area of the room will be:
As mentioned above, it is planned to pour a layer of 2.5 millimeters at a mixture consumption of 1.5 kilograms per millimeter. So per square meter you will need:
For the entire room:
When calculating, it is necessary to take into account the density of the composition. We provided approximate indicators for this parameter above, but for more accurate calculations you should check the data provided by the manufacturer.
Self-leveling floor with colonial-style ornaments Source polsdelat.ru