The article will provide a complete analysis of such a process as laying paving slabs on sand: the technology of paving slabs has its own characteristics depending on the type of base, these features will be considered. You will be able to study the main types of tiles (shapes), find out the prices for turnkey services, learn how to prepare a dry mixture intended for paving paths, and calculate materials.
Paving slabs are a fairly popular and practical solution for paving walkways.
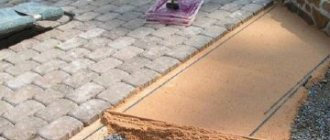
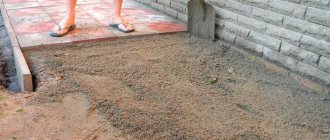
Gravel drainage pad
Crushed stone is used for laying paving slabs and sections of the road that are not subject to significant load. The average size of material fractions is 5-20 mm. The recommended layer thickness is 15 cm. This is sufficient when installing a sidewalk covering.
If you are setting up a site for a car, it is important not only to thoroughly compact and level the soil, you also need to use a sufficient amount of bulk materials. In this case, the crushed stone layer will be 30 cm. Its average size is up to 40 mm.
A thinner layer of fine-grained crushed stone no more than 5 cm thick is formed on top. The average size of the fractions in this case is 5-20 mm. You cannot use only fine-grained or coarse-grained crushed stone. This may cause shrinkage or impair drainage.
Crushed stone cushion and installation of curbs
On a compacted base covered with geotextile, crushed stone of a fraction of 20-40 mm is poured and leveled, taking into account the planned slope, in a layer of 12-15 cm. Along the perimeter of the sites and along the paths, the crushed stone is slightly raked and road stones are installed along a stretched control cord with a recess into the crushed stone with a gap of 5 -10 mm. To form ovals, do-it-yourself borders are cut lengthwise into 4 pieces using a grinder with a dry cutter, and smooth joints are laid out from the quarters.
Layout of the base for paving slabs
The top mark of the curb should not be more than 5 cm higher than the curb. After the installation of the curbs is completed, the joints between them are filled with cement-sand mortar and rubbed down. A day later, a rake is used to finish leveling the crushed stone bed, indicating the slope and taking into account the selected transverse profile of the path (flat or convex), and then compacting it with a mobile vibrating plate with an electric drive.
After compaction, sand is poured over the crushed stone, distributed over the surface in a layer 3-5 cm thick, and compaction of the base with a vibrating plate is repeated, filling the voids in the crushed stone with sand.
Road pavements covered with paving slabs are classified depending on the loads:
- class N1
- designed only for pedestrian loads; - class N2
- designed for loads from pedestrians and the arrival of harvesting equipment weighing up to 3.5 tons; - class N3
- designed for loads from pedestrians and from the arrival of large sidewalk cleaning equipment with an axle load of less than or equal to 5 tons/axle. - Category IV (4) highways
are designed for loads from vehicles with an axle load of 100 kN and a wheel load of 50 kN.
When paving a suburban area, you should be guided by the rules for constructing a base for road pavements of load classes N1 and N2
. Paving installation begins with breaking out the area to set heights and determine paving levels.
To avoid stagnation of rainwater, it is necessary to set slopes for paving - at least 1 cm per linear meter
At the first stage of foundation preparation, soil is excavated
if necessary, backfill the area with sand using an excavator. Universal geotextiles with a density of 150 grams per m2 are laid on top of the laid sandy soil.
. This measure is necessary to maintain the integrity of the subsequently laid pie when the groundwater level fluctuates. Geotextiles are laid with an overlap of adjacent fabrics of at least 30 cm.
Curbs are installed along the perimeter of the paving
to separate the boundaries between the path and the lawn. Another function of the curb is to prevent the paving slabs from spreading. The border is installed along the edges of the base pie using concrete mortar (class B15 concrete is recommended) and secured with it at the ends.
Next, they fill it with granite crushed stone using the “hands-on” method without driving onto the open surface.
. The most suitable fraction of granite crushed stone in this case is 20-40 mm. The poured crushed stone is distributed evenly around the perimeter of the site and leveled with a rake.
After this, the material is pre-compacted using a vibrating plate weighing 90-120 kg
, wedging it with a smaller fraction of crushed stone with an average grain size of 5-10 mm and re-compaction. The optimal thickness of the crushed stone cushion for a pedestrian area is 15 cm, in the case of automobile paving - 25 cm. In general, the choice of the thickness of the crushed stone layer depends directly on the stability of the soil and the designed loads. Layer-by-layer compaction of crushed stone creates a special layer, thereby preventing the upper layers of the pie from “leaking” into the underlying layers of the road pavement.
After careful compaction of the base layers, an underlying layer of sand is formed (medium and fine sands of class II according to GOST 8736)
. In some cases, when there are weak, heaving soils and there is a possibility of subsidence, you can use an underlying layer of plywood
(cement-sand mixture without adding water). The advantage of the prance in this case will be that it will provide a more stable base and, at the same time, will allow water to pass into the crushed stone and soil.
How to do it
Let's look at how to make a cushion under paving slabs in the highest quality possible way. Sand is taken, it must be clean, sifted, without impurities. The surface is leveled, its evenness is checked using a level. Sand is poured in an even layer. A string level is pulled, along which the coating is leveled.
Can be leveled using a regular rake.
The smoother it is, the better. Then the first layer is moistened with a hose or watering can. Don't apply too much force or apply too much pressure, otherwise everything may wash out.
When the material is laid, crushed stone is laid out, laid according to almost the same principle. It is also leveled as evenly as possible, the layout is even. It needs to be compacted a little, otherwise the desired horizontalness cannot be achieved. When the crushed stone is brought to the desired level, wait a little until the surface dries. Next, lay out the paving stones. Its installation is carried out in the usual way, just as it would have been installed without the protective gap.
Types of bases for paving stones and tiles
The base for the tile covering can be different - sand, cement-sand and concrete. A concrete base is the most expensive and allows paving slabs to withstand considerable loads. Sand is used for light loads and the complete absence of heaving soils and movements. The most common choice is pouring concrete or using a cement-sand mixture.
Pouring the concrete base
Such preparation for installation will be expensive. Work begins with reinforcement - usually an ordinary steel mesh of 10x10 centimeters is taken. Also suitable are pieces of metal pipes, different types of wire, rods with a diameter greater than 5 millimeters and other metal elements.
The metal is laid out on special clamps or pieces of brick (the height should be 3-5 centimeters from the surface) in a lattice format in the place of pouring, and knitted with wire. Concrete is poured in a layer up to 12 centimeters thick, but the finished surface should be below the level by an amount equal to the thickness of the tile minus 3 centimeters.
Before laying paving slabs with your own hands and pouring concrete, evaluate the depth of the trench. If it is larger, the excess must be covered with carefully compacted sand. Concrete is prepared from M400 cement in the following proportions: 1 part cement, 3 parts sand, 5 parts crushed stone. They pour everything at once, if necessary, ordering a large volume of concrete at the factory. 3-5 days after setting, you can lay the tiles.
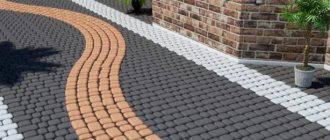
Choosing tiles for paths in the country: prices for materials and services
The most popular base for creating sidewalks and paved areas remains a sand cushion. The technology is quite simple and requires minimal effort, so many people prefer the method of laying paving slabs on sand.
Options for decorating the sidewalk area with tiles
This technology will be especially useful in two cases:
Well-groomed garden paths and beautiful areas near the house will give the site an aesthetic appearance
There are several criteria for selecting a material for laying paving slabs on sand and cement. First, you need to look at the performance characteristics of paving blanks. Secondly, you should carefully select the shape of the products, as well as the colors, so that later the coating fits well into the overall exterior of the yard.
Laying paving slabs in the country: rules for selecting blanks
The modern assortment of tiled paving coverings offers a variety of products that differ from each other in shape, color, thickness, manufacturing material, as well as creation technology.
For work you will need rubber knee pads and waterproof gloves.
In order to choose the optimal coating option, you should consider the tiles within the following criteria:
Scheme for laying paving slabs on sand and dry mix
Each type of tile has its own requirements regarding the base. This factor should also be taken into account when choosing a material.
Selection of tiles depending on the purpose of the coating:
| Purpose of coverage | Type of tile blanks | Workpiece thickness, cm | Required type of base (pillow) | Possibility to do the paving yourself | Price level for the purchase of material |
| Pedestrian | Vibrocast | 2,5-4 | Sandy | Yes | short |
| Industrial | Vibro-pressed | 6-8 | Sandy, concrete | No | high |
| Road | Vibrocast | 4-6 | Sand-cement | Yes | average |
Selection of blanks and price for laying paving slabs on a turnkey basis
Almost everyone can lay this covering option, such as paving slabs, correctly on sand. Especially if you use simple forms of blanks and the most common patterns for paving them.
There are many forms of tile products for paving sidewalks, the most common of which are:
Color range of rubber paving slabs
Laying paving slabs (cost per square meter):
| Type of work | Price, rub./m? |
| Paving + formation of sand and crushed stone cushion | from 1600 |
| Paving on a finished base | from 400 |
| Paving + forming a concrete pad | from 3350 |
| Preparing the concrete base | from 1750 |
| Preparing the crushed stone bed | from 100 |
| Paving on a sand-crushed stone cushion using a mixture | from 1700 |
| Installation of curbs (linear meters) | from 120 |
Laying paving slabs: what sand is needed for the job
When starting work, not many people think about what sand to use for laying paving slabs in their yard. The fact is that there are many options for this material, which has different origins, fraction sizes and performance characteristics.
There are even artificial analogues of sand on the market, which have a wide range of applications in construction. Therefore, it is worth seriously thinking about the question of which sand is best to use for laying paving slabs in your work.
Laying paving slabs should be done on a level area
The most commonly used types of sand are river and quarry sand. The latter option is obtained as a result of natural weathering of rocks. Under the influence of strong gusts of wind, the rock is slowly destroyed, and the sand that is formed in the process accumulates nearby.
Fractions (grains of sand) of this bulk material can be either large or small in size. Since quarry sand is a natural material, by definition it cannot be 100% pure. As a rule, quarry sand contains various impurities. Most often, clay is mixed into the material. Due to its uneven surface, quarry sand provides good adhesion to other coating components.
Scheme for preparing the base for laying tiles on sand
River sand is characterized by a smooth surface, which is obtained through prolonged treatment of the stone with water. This material has a beautiful appearance and contains no impurities. River sand can be classified as an environmentally friendly building material.
The smooth surface of river sand allows water to pass through well. Therefore, it should be used to prepare a sand-cement mixture for laying paving slabs and other types of work. Lower cost than quarry material is another advantage to the existing advantages.
Dry mixture for laying paving slabs: consumption and operating features
The preparation of sand-cement mixture for laying paving slabs is carried out in several ways. In the first case, it can be prepared at home for domestic use. The recipe is usually not difficult.
With high-quality installation, tiles can last more than 15 years
In the second case, if it is intended to be used for production purposes, strict compliance with all requirements of the recipe and proportions will be required.
To prepare a mixture at home, on the basis of which you will lay paving slabs with your own hands at the dacha, make sure you have:
- concrete mixer or container for mixing components (volume of at least 25 l);
- a drill equipped with a mixer attachment for mixing the ingredients;
- all components: water, cement, sand.
The proportions of the mixture for laying paving slabs can be very different. It depends on the recipe and the characteristics that you ultimately want to achieve.
Laying strips of paving slabs
Common recipes:
- the proportion of sand and cement is 1.5:1, respectively. The ingredients need to be mixed well and gradually add water to them. While adding liquid, be sure to continue stirring the mixture until it reaches the consistency of thick homemade sour cream;
- You can also use the proportions of the dry mixture for laying paving slabs, using buckets as measuring containers. Take a 10 liter bucket and fill it 7 times with sand. After this, fill the same bucket with cement twice. It is better to take cement grade M400 or M500 for these purposes. You will need 15 liters of water. First you need to mix 7 liters of liquid and 2 buckets of sand. Spend at least 30 seconds thoroughly mixing. After this, add another 6 liters of water and the entire volume of cement that you previously measured. After 2 minutes of mixing, the remaining components are added to the composition. The result should be a thick mixture that is not sticky. Before adding, mix all ingredients for 3 minutes;
After laying the paving slabs must be thoroughly compacted
- a formulation with mineral additives is used in cases where it is necessary to increase the level of frost resistance of the coating and give the mixture additional elasticity. To prepare 1 m? mixture, take 550 kg of dry cement brand M500, 5.5 kg of plasticizer S-3 (mineral additive) and 1650 kg of sand. After mixing the bulk ingredients, add water until you get a plastic mass that can be rolled up.
Laying paving slabs: what geotextiles are needed for the job
The use of geotextile for laying paving slabs is due to the large list of advantages that this material provides.
Garden path made of paving slabs at the dacha
Advantages of geotextiles:
- high level of resistance to decay processes;
- resistance to the destructive effects of chemicals, as well as physical factors;
- invulnerability to insects and small rodents;
- increased resistance to ultraviolet radiation.
Thanks to this, the material is in high demand on the market, so the range is striking in its diversity.
The process of laying a garden path
The most popular brands:
- SpunBel, Aquaspan (Belarus);
- Geotex (Czech Republic);
- Secutex (Germany);
- Terram (UK);
- Taipara (USA).
Prices depend on operational characteristics and technical parameters. The price is also affected by the width of the material.
Garden path made of paving slabs of simple masonry
Features of pouring liquid solution
If you want to prepare a reliable parking space and have chosen a concrete monolith as the basis, then you need to take into account several nuances:
- The height of the concrete base should be 5-10 cm higher than the cement-sand mixture.
- For a monolith you will also need a “pillow”, but in this case you will need less sand (layer height of about 2-3 cm).
- Since the concrete monolith will not allow moisture to pass through, a drainage system will have to be provided. For holes that drain water, pipes about 20 cm long are suitable (the length depends on the height of the base). For each m2 you will need one piece of pipe.
- The liquid solution consists of sand, cement (M 150-200), plasticizers or slaked lime and water. The finished solution must be liquid enough so that it can be leveled with a rule.
- If heavy vehicles will drive on paving slabs, then the base must be reinforced. In this case, the height of the monolith will increase by 3-5 cm.
Waterproofing the base
In areas with high groundwater, waterproofing is laid between gravel and sand.
Geotextiles can be laid on top of the sand layer. This is an environmentally friendly material that not only protects the base from weeds and the coating from subsidence, but also allows you to properly organize the waterproofing of the top covering. Geotextiles are laid in one overlapping layer.
The advantages of this material:
- resistance to rotting and decomposition;
- long service period;
- high strength.
In addition, thanks to geotextiles, the likelihood of water accumulation under the paving stones is reduced. If it is not possible to use such material, use polyethylene film.
It is folded in half, but even this will not provide reliable protection of the coating from water. The film quickly deforms.
Types of foundations and requirements for them
For paving with cement, stone or polymer blocks, the following bases can be made:
- Sand or fine screenings. The tiles are laid directly on the cushion, the thickness of which can be 20 cm.
- A mixture of cement and sand. For additional strengthening, a layer of crushed stone can be added from below.
- Concrete. The blocks are glued onto a pre-made slab.
The following requirements apply to the grounds:
- Smooth surface;
- strength and stability;
- durability;
- waterproofing from groundwater;
- presence of drainage;
- penetration into the ground.
Let's consider the stages of preparation and implementation of paving.
Installation of a sand cushion for laying paving slabs
A layer of sand 4-5 cm thick is poured on top of the second layer of geotextile, leveled and compacted. Geotextiles will prevent sand from falling into the lower layer of crushed stone and thereby causing subsidence of the paving stones. Paving slabs begin to be laid on this sand preparation.
The cushion under the paving slabs is laid in three layers
However, there is a technology that differs little in cost from a sand preparation device, but guarantees a higher paving result in terms of strength and durability. On the second layer of geotextile you need to put a thoroughly mixed dry mixture of sand and cement in a ratio of 7:1 in a layer of 4-5 cm and level it.
Cement in this proportion will slightly increase the cost of laying tiles, but, gradually absorbing moisture due to its hygroscopicity, it will make the cushion monolithic. The procedure for preparing such a dry mixture is incomparable in terms of labor intensity with preparing concrete with your own hands, on which paving slabs are also laid, but it gives a result close to it.
Device stages
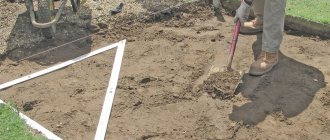
The installation of the base for paving slabs is carried out in several stages. In this case, a “pie” of layers is sequentially formed, each of which performs its own function. It is important to know how to properly lay each layer.
Excavation
Initially, a trench is prepared. To do this, soil is removed, the top layer of which in most cases is loose, and therefore is not able to withstand significant operational load and the weight of the laid finishing material.
The amount of soil removed depends on the planned result. As a result, the paving slabs should be 2-4 cm lower than the adjacent territory. To do this, it is worth removing a sufficient amount of earth so that the depth of the formed trench is at least 20 cm. If the site is being prepared for transport, it is recommended to increase the depth by another 8 - 10 cm.
Having selected the ground, the bottom of the trench is compacted. The work is carried out using special equipment that ensures a sufficient degree of compaction.
Drainage pad
A layer of sand at least 5 cm thick is poured onto the compacted bottom. The sand layer is leveled, spilled with plenty of water, and then compacted. If you don't have the necessary equipment, you can wait. In this case, the wetted sand will compact itself.
The next layer will be crushed stone. Preference should be given to the middle faction. The use of large material will not ensure a tight fit of the particles. Over time, the layer will begin to sag. This will cause the base to lose its original shape. You should also avoid using fine fractions. If located too close to each other, the particles will reduce the drainage properties of the layer. You can level the formed crushed stone layer using sand. Having poured the required amount, the base is spilled with water and compacted.
Attention! The final thickness of the layer providing drainage is 15 cm. This is two-thirds of the total thickness.
Waterproofing the base
Preparation for laying paving slabs involves the formation of a waterproofing layer, which is located above the drainage. In this case, it will be possible to prevent moisture from reaching the upper load-bearing layer.
Attention! It is preferable to use geotextiles; this material has excellent performance properties.
This waterproofing material:
- does not rot when kept in water for a long time;
- does not decompose even after a long period of use;
- has high strength characteristics;
- is able to provide reliable protection against water.
Geotextiles are in demand
If geotextiles are not available, you can use polyethylene film. To do this, the waterproofing material should be folded in half.
Advice! To ensure effective moisture removal, waterproofing is arranged with a slight slope. Its formation must be taken care of at the stage of drainage installation.
Pie composition on soft soils
On soils that are oversaturated with moisture, on loam (a lot of clay and sand), sandy loam (a lot of sand), the composition of the cake for laying paving slabs should not only retain moisture, but also prevent the entire path from sagging. After all, at its core, the base itself for the tiles is a long beam, which under load can bend, sinking into soft soil. This can be avoided by laying geotextiles on the ground before the cake layer.
It must be remembered that geotextiles not only have filtering ability, but have sufficient tensile strength that will keep the entire layer of the cake from sagging.
The composition of the cake for weak soils looks like this:
- Geotextiles are laid at the bottom of the ditch.
- Then gravel.
- Layer of sand.
- Concrete base.
Preparing materials for the pillow
Paths or platforms on the adjacent or personal territory are then created to provide the ability to move comfortably on a stable surface free of grass and dirt. Properly organized preparation of the base for laying paving slabs is the secret that ensures the creation of an even and durable coating. Before you start making a base for paving stones, you should clearly decide on the type of building material. It is this that will serve as the so-called cushion for the future laying of the pedestrian pavement. Why are components such as:
- cement and sand;
- dropout;
- pebbles, gravel;
- crushed stone, slag.
Excavation
Preparing and marking the site using simple twine.
Preparation of the base for paving slabs begins with removing the soil, so that the final location of the upper level of the surface of the site or path is flush with the upper edge of the adjacent ground. In addition, often the top layer of soil turns out to be quite loose and unable to withstand the weight loads that will fall on it due to the weight of the laid materials.
The depth of the removed soil layer should be such that the surface of the finished base is 2-4 cm below the adjacent area. Usually the soil is selected to a depth of 20 cm, but if the site is intended for parking or driving a car, then the depth must be increased by 8-10 cm.
After excavating the soil, the bottom of the trench must be compacted well. In the case when there is a fertile layer on top, it is recommended to take all the soil to flower beds and beds, and not spread it next to the future path.
Preparation
Before laying paving, it is necessary to carefully prepare the working surface. The quality of the service life of the tile depends on this.
First, remove the top layer of soil. The fertile composition can be used in the garden.
The depth of the trench under the foundation should be at least 20 centimeters for dense soil; on complex terrain with loose soils it must be increased by 5 - 7 cm.
If you plan to lay tiles for driving and parking cars, the depth of the ditch should be at least 7 - 12 cm.
To prevent the coating from sagging during operation, careful moistening of the lower layers of the trench is required. This can be done using a hose or watering can, going through each layer with a tamper. After this, it is necessary to cover the base with geotextiles or agro-fabric (a type of covering non-woven material made of polymers). The texture allows water to pass through freely, but will not allow plant roots to sprout, which can undermine the soil and at the same time disturb the topography of the laid tiles.
A well-prepared foundation will extend the life of paving slabs and avoid replacing decking elements.
Note! The tiles are laid in the direction away from you. This technique does not make it possible to trample compacted sand.
As the work progresses, the specialist must move forward, stepping on the laid fragments, pressing down the already laid elements under his weight.
The uniformity of laying is controlled using a building level. If masonry elements protrude above the surface, they are tapped with a rubber mallet. When laying tiles in a single sheet, it must be removed and the base supplemented with sand and crushed stone.
Why paving stones are gaining popularity
Paving stones are gaining popularity every year. This is a beautiful and durable way to pave a path or create an elegant staircase. Pavers also transform patios. Pavers bring richness to an ordinary space and add immeasurable value to a property.
In the modern world, homeowners are increasingly choosing to use paving stones. Its types can be much more economical and can withstand the high pressures placed on them by modern machines. This makes them popular for driveways, driveways and sidewalks.
You can make a path from paving stones or decorate the area with unusual patterns.
Pros and cons of paving stones
The main advantages of paving stones:
- Most cost effective. Asphalt tiles are manufactured either domestically or from anywhere in the world, hence there is no extra charge for export.
- Increased pressure tolerance. Unlike conventional bricks, asphalt slabs have exceptional pressure resistance, making them suitable for specialized applications.
- Variety of options. When homeowners decide to install a sidewalk, they have a wide variety of options to choose from. Some types look like regular red brick, while others resemble granite.
- Uniform production. Because paving slabs are mass-produced, replacement components are easier to find when needed.
- Better drainage. Most paving slabs are manufactured in such a way that they can promote more efficient drainage.
The advantages of paving stones are that they are economical and beautiful, withstand a lot of pressure unlike bricks, and there is a huge selection of design options and materials.
The main disadvantages of paving stones:
- The process of laying paving slabs on sand will take longer than with conventional tiles.
- This may be more expensive than other options. The initial cost of installing paving stones may be higher than other options, but you will save money in the long run thanks to easier and less expensive maintenance methods.
- Over time, weeds grow next to such tiles.
Disadvantages of paving stones: the installation process takes a long time, the cost may be higher than in other options, and over time, weeds grow between the tiles.
Installation of paving stones
We begin the installation of paving stones by adding a 50mm layer of sand concrete. We level the layer of sand concrete and begin laying paving stones. There are many different types of pavers. With a pattern, chipped, with a shift, from several elements, etc. In this article we are talking about ordinary standard rectangular paving stones. Having laid the first row, the next one begins with half, etc. That is, laying is done in a running start. The stones are placed tightly together and tapped forcefully with a rubber mallet. The level is constantly applied. To maintain the slope correctly. It happens that when tapping, the paving stones sink lower than necessary. To correct the situation, you need to remove the sagging paving stones. Add a handful of sand concrete and lay it down again. After installation of paving stones. Sand concrete is poured onto the surface. And with the help of a broom he sweeps into the cracks between the stones. After which the entire surface is spilled with water. This completes the installation.
Specialists with extensive experience. They will do the job carefully and quickly. Warranty 36 months.
Sand-cement base
The principle of forming the finishing layer in this case is the same as in the case of a sand base. Only instead of pure sand, a mixture of components is prepared. This will make the coating monolithic. Mix sand and cement in a ratio of 3:1. After the finishing layer is formed, it is leveled. It is not necessary to compact the sand-cement mixture.
If the preparatory work for laying the crushed stone-sand cushion is carried out correctly, the surface layer of bulk materials can simply be formed on the surface of the geotextile.
Tamping is performed during the installation of paving stones. When using a cement-sand mixture, it is important to carry out the work in dry weather, provided that the air humidity does not exceed normal levels. Upon contact with moisture, cement begins to harden. This leads to a decrease in the quality of the coating.
Laying base
Before you begin installation, you need to choose the right type of base. This will allow you to achieve the desired level of strength and stability of the surface. A cushion for paving slabs can be created from:
If you want the paving slabs to be laid by craftsmen, the price of the work is indicated on the website.
- Sand. This option is optimal when arranging a simple pedestrian alley located in the garden and not intended for regular use.
- Sand and crushed stone. This “underlay” is suitable for covering the main part of the yard or the path leading from the street to the doors of the house.
- Dropouts. This option allows you to get a fairly solid base.
- Sand-cement mixture. It is used to create traffic or parking areas near private houses, as well as in places with low traffic.
- Concrete. This material allows you to achieve maximum strength of the ground surface. At the same time, it involves the highest degree of material costs. Selected when constructing roads or city parking lots.
If you are planning to create an ordinary garden path, but the site has problematic soil, it is better to use a sand-crushed stone base. This will improve the quality of water absorption.
The area of use is indicated approximately - it often happens that only sand is placed under the parking lot or tiled elements of the garden path are mounted on concrete. Everyone chooses an option according to their “taste”.
What fraction of sand is needed for laying paving slabs
Most people are familiar with the idea that paving stones should be laid on top of a layer of sand. Ideally, this sand should be coarse and grainy. Compaction will sand the edges together, locking the layer of sand in place, which helps prevent erosion or movement.
Concrete sand works very well, but rock sand is sometimes used instead. However, none of these types of sand are suitable for filling the joints of paving slabs. Loose sand is washed away over time or during heavy rains. Because of this, polymer sand was developed for pavement seams to maintain its shape and eliminate movement.
Paving slabs should be laid on sand. It should be rough and grainy.
In recent years, a new type of sidewalk sand has been developed that softens when wet. Although this is thought to provide greater flexibility, it can also cause erosion problems and may require re-sanding.
Polymer sand is simply a granular sand material that is placed into the cracks and joints between stone pavers to hold the blocks in place and maintain the beauty and integrity of the pavers. A water-activated polymer is injected into the sand.
After applying the material to the paved surface, the sand is sprayed with water, which causes the polymers to harden. This secures the sand in place. Polymer sand does not need to be replaced, even when exposed to extreme weather conditions.
Polymer sand is a sandy material that is placed into the cracks and joints between stone pavers.
Advantages and disadvantages
When installing small areas of paving slabs, the base is sand, which does not swell under the influence of precipitation (melt and storm water pass through the sand cushion and are absorbed into the ground soil). After rain, water stains do not remain on the surface if the material is laid professionally, and the path does not “crack” when the soil moves.
The disadvantages of sand cushions for paving slabs include:
- Exceeding the permissible loads on the coating. Vehicles on a tiled walkway can damage the pavement.
- Ants carry away sand from under paving stones in large quantities. The better the sand cushion is compacted, the more difficult it is for insects to knock out grains of sand from the soil, thereby the higher the wear resistance of the paving surface.
- Washing the area with water if high-quality laying of the sand cushion is not ensured.
- Weathering of sand grains from the seams between tiles. This leads to loosening of the stone.
Washed sand (obtained by sifting and washing), river and seeded sand is the most successful option for laying paving slabs.
An alternative to the sand layer is artificial screening from crushed stone, gravel and slate. The low cost of building material processed from rocks does not provide high performance characteristics of the paving slab (the screening layer does not tolerate moisture well). Compacting the screening layer, preferably in several approaches, helps improve the wear resistance of paving slabs.
Materials and tools
To lay paving slabs yourself, you need to purchase a cord (string), and pegs for marking the territory, a building level, a mallet, trowels, a grinder with a diamond wheel, an automatic or manual tamper, plastic crosses, cement M 500 and buy sand of different fractions.
On the World Wide Web you can find video master classes or advice from experts on forums on paving sidewalks.
Important! If the soil is swampy and clayey, it is necessary to carry out drainage work (forming a slope and installing drainage pipes for water drainage). On dry soils, it is enough to lay the tiles at a slope of 2 or 3% towards the curb.
Coverage area calculation
When measuring complex laying of paving slabs, it is recommended to first calculate small fragments of the coating, taking into account an error of + - 5% (laying, undercuts). And then they add it up. When laying a complex pattern configuration, the error will be from 10 to 20%.
The sand layer under the tiles is usually from 3 to 5 centimeters. When using crushed stone, multiply the area of paths and platforms by the thickness of the substrate layer (5–10 cm).
The amount of border framing is calculated based on the length of the perimeter of the site minus the places where the tiles join.
Curb stones are calculated according to the length of the path. The value is multiplied by two, and after the resulting amount the total is divided by the length of one border. Sold individually. The result is the value required to purchase the required number of enclosing elements.
How to lay concrete paving stones for a driveway
Paving paths takes quite a lot of time. In addition, it is necessary to arm yourself with tools and materials, as well as perform preparatory work.
Important! All engineering communications must already be laid.
Work equipment and materials
You should stock up on everything you need in advance so that you don’t need to take breaks from work. To prepare the base you will need: stakes, a cord, a hammer, a tape measure, a level, shovels, a container for mixing the masonry mixture, a device for compacting soil and cushions, a rule for distributing the cushion material, a trowel. It’s good when you can use a mini-excavator for excavation work, it makes the process much easier.
What you need for work
Laying a paving stone path requires the construction of a reliable foundation. It is prepared from compacted soil, sand, gravel and geotextiles. To fix the curbs you will need a mixture of sand and cement. It is also necessary for paving the surface.
Paving stones for the road used for vehicle access should have a thickness of 60...80 mm. To pave the area with it, you will need, in addition to what was listed, a mallet and a grinder for cutting to size.
Prices for angle grinders (grinders)
Angle grinders (grinders)
Preparing the base
Setting up a site for laying tiles is one of the most labor-intensive stages. But the performance characteristics of the entire structure depend on the quality of this work.
Step 1. Excavation. To lay the covering it is necessary to make a pit. Its depth should allow it to accommodate a sand and gravel cushion, DSP and tiles. It can be different for paths for different purposes. In order for the coating to support the weight of the car, the substrate must be solid. To lay it, you will need a trench with a depth of at least 150 mm. The bottom of the pit must be compacted.
Digging a pit
Step 2. Installation of curbs. Retaining edges need to be installed. It will fix the laid coating in place. This will allow the structure to withstand the weight of passing cars. Curbs are usually used as edges. To do the job correctly, you should drive stakes along the edges of the path (in increments of about 2 m in a straight line and 0.2 m in curved sections) and pull a rope indicating the installation level. In this case, you cannot do without a level. When installing the cord, you need to take into account that the curbs should be 25 mm higher than the track surface.
Laying the border
To create an edge, you need to prepare a dry mixture of three parts sand and one part cement, and then make a solution. Curbs are installed on it. A mallet is used to level them. The products also need to be clamped with concrete on both sides. After this stage, you need to pause so that the solution has time to set (at least until the next day).
Step 3 . Pillow device. The base for the paving stones should have a slope (preferably from the house towards the street) to ensure water drainage. Otherwise, precipitation will lead to the formation of puddles on the coating. The slope is usually 1 cm for every 60...100 cm of the track. If it is possible to tilt only towards a residential building, it is necessary to install linear drainage channels (drainage trays) in front of it to intercept water flows.
Rubble is crumbling. The thickness of its layer is 7...10 cm. Each layer of the base must be carefully compacted. To do this, you can use hand tools or special vibrating rammers. The quality of the compaction affects the durability and appearance of the future path.
Each layer of the base must be thoroughly compacted
It is recommended to lay geotextiles on the crushed stone. It will help protect the covering from weeds and prevent sand from falling down.
Sand is laid in a layer of about 40 mm on a dense crushed stone base. It should be a little damp. The material is also leveled by the rule and compacted.
Leveling the sand layer
Paving the path
To lay tiles, you can use either a dry sand-cement mixture or a mortar. When choosing a composition, soil characteristics matter. If it is mobile and free-flowing, it is better to prepare a solution. If it is dense there will be enough mixture. An option is offered for installing a track on a dry substrate.
Step 1. A mixture of slightly damp sand and cement (M400 or M500), the proportions of which are 4:1, is leveled and compacted on the base. The thickness of the layer is 4 - 5 cm. When laying it, you need to take into account that during paving the paving stones will drop by about 5...7 mm.
Cement-sand layer
Step 2. After installing the screed, you can begin paving with paving stones according to a pre-drawn sketch. A cord is pulled to fix the height of the covering. To move this marker, you can attach it to two bricks placed on both sides of the path and move them as needed. When laying products, you need a mallet that can be used to change the position of the element. Installation is carried out by yourself. If necessary, cut parts of the tiles, you can use a grinder with a diamond blade.
Paving stones
You need to pour enough mixture onto the pillow to lay the tiles on it during the day. The central heating system should not be left uncovered with paving stones overnight.
Step 3 . The coating will be of better quality if, after laying it, you walk over the surface with a vibrating plate. This will compact it more firmly into the base.
Tamping paving stones with a vibrating plate
Prices for tamping machines
Tamping machine
Step 4 . Construction debris, if any, is removed. From above, the seams between the paving stones are filled with a sand-cement mixture (some are limited to simple sand). For this you will need a brush. Excess composition is removed from the track. Now you can drive up to the house along the sidewalk paving stones.
Excess mixture must be removed
Important! If, when paving, there are obstacles in the way, such as hatches, they must be bypassed with whole tiles. It is better to trim the material at the end.
To strengthen the structure, you can lay a road mesh on the sand (before filling it with a mixture of sand and cement). If all stages of work were completed correctly, the laid paving stones will serve reliably and please the eye for a long time.
Laying paving stones
After installing the sand cushion, they begin laying the paving stones. Paving slabs are laid in the “toward” direction with a gap between the products of 2-3 mm. A trowel and a rubber mallet are used to lay the paving stones and adjust them in place. Trimming tiles is also done with your own hands using a grinder with a dry cutting disc, which allows you not only to cut concrete, but also to undermine it with its side surface.
Scheme for laying paving stones
When laying paving slabs, every linear meter of masonry is checked for compliance with the slope and cross-sectional profile of the coating. The correct convexity of the track profile can be formed by periodically applying a self-made plywood template to the coating.
Let's sum it up
To make paving not only practical and durable, but also aesthetically pleasing, careful planning and design are required. Manufacturers recommend installing a permeable base not only for paths in pedestrian areas, but also for entrance areas and parking areas. This will save not only money, but also time and effort, without compromising the technical and operational characteristics of the coatings.
The outstanding characteristics of vibropressed tiles are due to the peculiarities of the production cycle. About the popular shapes and installation patterns - in the previous thematic material. In the video - planning a garden plot, advice from a landscaping engineer, in simple language.
Common mistakes
The size and shape of the tiles influence the quality of installation. Large elements in small areas leave a large amount of “trimming”, that is, waste.
It is recommended to use water when compacting the foundation under the sidewalk deck during a dry period of time (depending on climatic conditions). The technology ensures quick drying and fastening of the building material.
During the rainy season, laying paving is not recommended. Sandy flooring will be damaged by moisture.
Safety precautions
When decorating areas with tiles, if you are not a professional builder, you should adhere to a number of safety measures:
- When working with a grinder, it is not safe to cut tiles on your knees. It is better to place it on a hard surface.
- To protect against chips, protect the respiratory system with a mask.
- Actions not related to water are carried out with cloth gloves, this will protect your hands from injuries.
When laying paving slabs, do not neglect basic construction techniques. Compliance with the rules will ensure the durability and aesthetic appeal of the proposed paving areas.
Where does the installation of paving stones begin?
The first step is to make markings. That is, mark the area where we will install paving stones. It is important to calculate the width correctly. So that later you don’t have to cut the paving stones a lot. Drive pegs along the streets and along the planned paths. Pull the threads between them. It is better to take nylon threads. They do not tear, do not stretch and have different colors.
Next, you need to determine the elevation differences and slopes. This can be done using a hydraulic level or a level. If our site is more or less flat. That's no problem. You can immediately begin excavating the soil. If there are differences. Then it is necessary to provide steps, or make a slope towards the downward direction, which is not always possible. After all, for proper installation, the slope must come from the building.
Now you can start excavating and leveling the soil. Soil leveling is an integral phase of paving stone installation. All the soil that will have to be dug up needs to be put somewhere. You need to think about this in advance.