Today we will tell you about two more non-standard methods of making a vase from cement (from concrete) in addition to those that have already been presented on the pages of kamsaddeco.com.
Previously discussed work on the production of decorative concrete vases included casting (here) and sculpting (here and here) large and small sized concrete vases. In this case, plastic forms were always used. Only when casting a concrete vase (when making the base of a fountain) was it necessary to have two forms, but when sculpting a vase, one was enough. In the latter case, additives were used in the cement mixture, which simplified the work and produced an interesting color pattern.
Content
- Making a cement vase using one mold.
- Making a cement vase without using a mold.
As for the new ways:
the first - also using one form, but without the use of polymer additives;
the second - instead of a mold, there is a pile of wet, formed sand.
What you need to make a flowerpot from cement and rags
To make garden planters from cement with your own hands, you need to prepare the following materials and tools:
- Cement. Portland cement M400 is used to create street decor.
- Rags. This could be unnecessary tulle, lace napkins, old waffle or terry towels, burlap. More interesting and original ones are made from cement planters using rags with a relief structure. The dimensions of the product can be both large and small, it all depends on desire and imagination, any rag can be used.
- Paint. For concrete surfaces, it will be possible to use acrylic, polymer, and water-based epoxy. Vinyl compositions, as well as acrylic-silicone and lime compositions, have worked well for decorating cement pots.
- Paint brushes.
- Low-density polyethylene film, packaging - stretch film.
- Form for pots. This can be a conical bucket or another suitable container of any geometric shape. The main thing is that there are no difficulties with the removal of the finished product.
- Container for mixing cement mortar.
- Protective gloves.
- Lubricant such as paraffin, vegetable oil, machine oil.
- Electric drill with mixer attachment.
Flowerpots made of cement and rags do not require special experience; anyone can do it.
Some recommendations for making flowerpots from cement and rags with your own hands:
- The working solution is prepared from cement (1 part), sand (2 parts), aggregate (4 parts) and water (½ part). Alternatively, you can do without additives, but if you want to make a real work of art, then you should add polymer components, natural minerals with dyes with fine fractions to the solution. Thanks to decorative concrete, the pots are interspersed with natural stones.
- Reinforcing frame if the structure is planned to be large in size.
- Sander. It is necessary to give the front side of the pots perfect smoothness. The first time they use an emery wheel, and then a felt wheel with a special paste.
Preparation of the solution
Sand is prepared in advance, all debris and stones are removed, it must be sifted through a fine construction sieve. The fabric is placed in a container for the solution to remember the amount of space occupied. Take out the rag, add cement and sand in a ratio of 1 to 1, mix and add water so that the consistency is not too thick. Stir all components with a drill, the mass should be homogeneous. The amount of solution should be enough for one product; if several items are being made, it is better to mix the composition one by one.
How to make a flowerpot from rags and cement
There are many variations of making unusual flowerpots from rags. You need to decide on the form and adhere to a certain algorithm of actions.
Simple planter made of cement and fabric
Master class on making cement pots:
- Cover the workpiece for future garden decor with plastic film. This material will facilitate easy release of the finished flowerpot.
- Prepare the working solution in a suitable container. First, clean water is poured into the container, and then cement is poured. For ease of mixing, it is recommended to use an electric drill with a mixer attachment. The consistency of the composition should resemble sour cream.
- Immerse a rag or burlap in the working solution. The material should be completely in liquid cement, it is advisable to leave it in it for 2-3 minutes.
- Stretch the rag over a bucket or any other container, straightening the edges. Imitation of folds on a flowerpot will look good. The time for the rag to dry completely is 3 days.
- Decorate the concrete decor from a rag with paint.
Planters made of gloves and cement
The step-by-step process of making original garden decor involves the following steps:
- Mix the working solution according to the instructions described in the previous case.
- Filling gloves with cement composition.
- Placement of workpieces for drying. They need to be laid so that they bend slightly, as if holding something.
- Removing gloves after the cement has hardened.
- Coloring pots as desired.
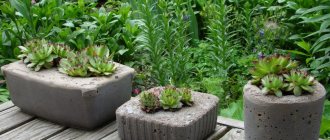
Cement and foam plant pots
To create the next masterpiece, they use cement and granulated foam, but any other will do, as long as it crumbles well. Instructions for making pots with your own hands:
- Choose a plastic basin of suitable size and pour a 4 cm thick layer of sand on the bottom.
- Cover the bottom of the container with liquid cement mortar.
- Coat the walls of the basin with a thick cement composition with the addition of polystyrene foam. They should first be coated with liquid Vaseline, layer thickness 2 cm. This mixture should also be placed on the bottom of the flowerpot. Coat the top with liquid cement mixture. Time for complete drying is 48 hours.
- Turning the container upside down, you need to remove the workpiece. Apply a layer of polystyrene foam dissolved in acetone to the surface using a brush. First, to open the pores, you should walk along the outside with a metal brush.
- Cover the product with white cement or putty mixture.
- After the pots have dried, sand the outside with sandpaper with a grit of first 80 and then 120. After cleaning the cement dust, the decor is painted using a latex compound.
Making cement pots Swans
Step-by-step instructions for creating a Swans flowerpot:
- Cut off the top of a 5-6 liter plastic container. Inside, through the hole in the cork, you need to install a wire bent in the form of a two. Fill the mold with wet sand.
- Mix a steep cement mortar and, using a spatula, cover the edges from bottom to top. First you need to lay the solution on the film and place the mold on it - this will form the bottom of the flowerpot.
- Form a neck from the solution, coating the base of the wire along with the cork. You can level the surface by using a brush soaked in water. Coat the workpiece completely. The layer thickness should be approximately 2 cm.
- Make wings from the reinforcing mesh, bending them slightly and pressing them into the solution. The mesh dimensions are 15x30 cm. After which they need to be coated with a cement composition, holding them from the inside.
- Finish the neck with a solution and a bandage; wrap it around the frame soaked in water. At the end you should press down lightly to form something like a beak. Level the surface with a wet brush.
- Make a tail from the mesh, bending it 40-45 degrees. It is fixed with a solution. After 30 minutes, making movements up and down, left and right, you need to finish the tail, rounding it from the bottom.
- After complete drying, the cement swan is painted.
Flowerpot made of jeans and cement
Algorithm for performing work on creating an unusual flowerpot from old jeans:
- Make a relatively liquid cement mortar using an electric drill with a mixer attachment.
- Prepare jeans and rags for stuffing inside. Unnecessary rags, bags, and plastic containers are also suitable for these purposes.
- Immerse old jeans in the prepared working solution until they are completely saturated. Fill the inside and place in the desired position to dry. A few days are enough for this.
- Paint it the desired color.
Creating a print
For manufacturing you will need the same material that was used in the glossy product. To create a print, you need to take printed fabric with various patterns, wallpaper or newspaper.
The cardboard is laid on a flat surface, a film is spread on top, then the location of the print is marked, taking into account that the form will be in the center. The location of the pattern is generously lubricated with silicate adhesive, fabric, newspaper or wallpaper is placed on this area, the outer side is placed on the film, and the inner side is connected to the fabric.
The inner side is also generously lubricated with adhesive; this work can be done while the main fabric is soaked in cement. Leave space for up to 10 minutes for complete impregnation, while ensuring that small folds do not form.
A rag soaked in the mixture is spread on the foam, a bucket or other prepared form is placed in the central part, then it is turned over so that the fabric remains on top of the container. Beautiful edges are formed and left until completely dry, then the product is removed. To create a product with a bright and colorful color, white sand and the same cement are used, and the necessary pigment is added. It is worth considering that such materials may be more expensive than conventional standard types.
You can trim the edges with a simple hacksaw, but the cuts will stand out from the main color, so they are sanded with an emery mesh for plaster.
Useful tips
To achieve results when making flowerpots from cement and rags, you should adhere to the following tips:
- If there is a need to trim any of the edges of the flowerpot, you should use a large sanding mesh for drywall. A regular hacksaw is not an effective solution here; the edges will stand out too much from the general background.
- To decorate flowerpots made from old jeans, it is better to choose metallic acrylic paints. Bronze and greenery will look more advantageous.
- For ease of painting the finished product, white sand should be added to the working solution. Alternatively, you can cover it with plaster.
Video on creating flowerpots from cement and rags:
Plaster and concrete vases
Also, a similar operation was carried out together with the children when making a vase from plaster for a gift to their mother.
Only there, instead of fabric, they used a small knitted tablecloth left over from their grandmother, and plaster instead of cement.
Gypsum, like concrete, products vary greatly in their strength, depending on what brand of binder was chosen and whether additional ingredients were used in the gypsum and cement mixture.
Painting gypsum, in contrast to painting concrete, is much simpler, since the requirements for coating are lower due to the conditions of use (indoors).
The basic and simplest methods of painting plaster were used at the final stage of work and in the manufacture of this vase, netsuke figurine (short video) and crucifixion.
A vase made of fabric and cement can also be used at home. Moreover, concrete is not afraid of water, unlike gypsum, and indoor plants can be grown in such vases. Plaster products most often have only a decorative function and serve to decorate the interior.
But let's return to our concrete fabric vase.
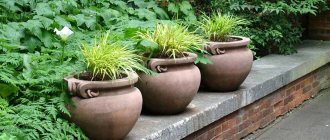
Vases made from fabric-decorated flower pots
All you need is:
- flower pots or buckets;
- cement mortar;
- old rags;
- acrylic paint.
Stages of work:
- we prepare the solution and soak rags in it; when they are sufficiently saturated, we decorate flower pots with them, creating folds;
- After drying, you can cover the top of the fabric with the hardened solution with acrylic paint.
Did you like our site? Join or subscribe (you will receive notifications about new topics by email) to our channel in MirTesen!
Interesting ideas for beginners
Having no experience in using cement for decorative purposes, it is better to start with something simple that does not require modeling skills and obtaining the desired consistency. The first exhibits in your garden can be cute mushrooms, colorful balls or original flower pots.
To make a mushroom you will need an old rubber ball (the size of the cap will depend on its size), a plastic bottle (it will become the basis for the stem, its size should be proportional to the cap), a metal rod to attach the cap to the stem. The ball is cut into two halves, one of which is placed in a bucket of sand and pressed evenly. Next, cement mortar is poured into the resulting form and leveled.
The bottom and neck of a plastic bottle are cut off and inserted into the filled form in the center, immersing it by 1 - 2 cm. Then, using a long iron rod, the future stem and cap of the mushroom are connected and the cavity inside the bottle is filled with the solution. The product should harden for several days, after which you need to remove the piece of the ball and the plastic cylinder.
After a few more days, the product can be coated with paint and decorated with various elements. Mushrooms of different sizes look impressive on the plot in the form of a small clearing. It is also worth noting that your imagination may tell you to use other containers (bowls, jars) and methods for making garden mushrooms.
It’s enough to just make an openwork ball that seems so light and airy. For the base, use a balloon (the size of the future shapes depends on how much you inflate the balloon). Next, any rope is placed in the prepared solution and then the ball is wrapped around it.
Do not wrap the base too tightly; you need to leave enough holes for further removal of pieces of the burst ball. When the product is dry, you can begin decorative coating.
If you cover the balloons with cement mortar with a small amount of gypsum added for faster hardening, you can get original garden lanterns or flower pots.
Complex figures with a frame
It’s more fun to decorate your country house with sculptures of animals and mythical characters. Such creations involve the preliminary production of a durable frame and layer-by-layer application of cement mortar.
Interesting flowerpots can be made using buckets from construction mixtures. At the first stage, a container of suitable size is wrapped with a plaster mesh and covered with a thick layer of cement. At the second stage, until complete hardening, decorative adjustments are made, making an imitation of an old stump with natural wrinkles on the bark.
A monolithic figure of a hippopotamus would look appropriate near artificial reservoirs. The place for it must be determined immediately and carefully aligned, since in the future the figure will be stationary.
Two elongated plastic basins, which must be fastened with wire, are suitable as a frame. Another option is also possible: a thick cement solution is covered on top of a pile of broken bricks or crushed stone.
The figure itself does not contain complex elements and is easy to perform. After hardening, the product is treated with fixing impregnation and dry pigment for concrete, rubbing the powder with a hard sponge.
More complex sculptures are made in several stages: 1) making a frame from wire and foam plastic or containers; 2) covering the workpiece with a plaster mesh; 3) applying the mixture in several layers; 4) formation of small details (facial features, special texture, folds of clothing, etc.); 5) priming and painting the finished work.
Flowerpots in the shape of swans will become an elegant decoration of the garden. The body frame is an old plastic basin, the neck is woven wire. The head, wings and imitation plumage will have to be made from a cement mixture, showing the skills of a sculptor.
Monolithic figures have a significant weight, so as an alternative there is a way to create lightweight large objects. You can decorate your garden with boulders of different sizes.
To make them, any unnecessary and lightweight material (cuts of polyurethane foam, plastic bottles, polystyrene foam) is tied into a tight lump with wire.
The resulting base is wrapped in a plaster mesh and covered with thick cement mortar. The more irregularities and protrusions there are, the more natural the “stone” will look.
Small garden figurines are made from a mixture of cement with the addition of gypsum or Portland cement.
Here you can use the manufacturing methods described above, as well as any basics: old toys, items of clothing, household utensils.