Cement. Photo Megastroy
Decorating interiors and landscapes is a fascinating activity, ideas for the implementation of which can be realized independently. Various tools and materials can be used for this One of the popular solutions is cement. The use of accessible and inexpensive building material, which is quite convenient to use, allows you to create interesting in design, reliable and durable products . Cement flowerpots organically complement the garden and transform the interior space of a country house, cottage, apartment, office, commercial premises, hence the increased interest in these products. Items created in industrial conditions cannot always boast an attractive price, so it is recommended to consider the option of self-production . In addition, homemade flowerpots made of cement have a whole range of advantages and advantages over solutions made from other materials.
What do we need for the flowerpot?
Flowerpots made of cement and fabric can be used to decorate the local area, as well as for landscaping or interior design. To make it you will need the following materials and tools:
- Portland cement brand M400 is the most popular brand of cement available for retail sale;
- Blank - old tulle, terry towel, burlap. The following rule applies here: “the more prominent the texture, the more beautiful and original the finished product looks”;
- Any concrete paint available to you: acrylic, water-based epoxy, polymer, vinyl, acrylic-silicone or lime;
- Paint brushes;
- Thin packaging polyethylene film – stretch film;
- Shape – conical bucket or any other container having a conical or pyramidal shape. This is necessary to be able to remove the finished pot from the mold;
- Container for mixing cement;
- Electric drill with mixer attachment.
Flowerpot manufacturing technology
- For convenience and the ability to remove the product, the mold under the flowerpot is carefully covered with stretch film.
- Preparation of cement mortar. Before preparing the cement mortar, a fabric blank is placed in the container. A mark is made on the inner wall to indicate how much space it takes up. The workpiece is removed. Pure water is poured into the container “to the mark” or slightly above the mark. Cement is added to the water while simultaneously stirring the mixture with a mixer attachment. Cement is added until a consistency between milk and sour cream is achieved;
- When the cement lait is ready, dip a cloth into the container and allow it to be thoroughly soaked in the mixture. Before removing, you should make sure that there are no dry areas left on the fabric;
- The workpiece is removed from the container and thrown like a rag onto an inverted bucket. Having learned “the wings-walls of the pots are carefully laid out in beautiful folds, and the fabric on the bottom is carefully straightened so that there are no folds;
- After three days, the pots are removed from the mold and painted with concrete paint from the above list.
What you need to make a flowerpot from cement and rags
To make garden planters from cement with your own hands, you need to prepare the following materials and tools:
- Cement. Portland cement M400 is used to create street decor.
- Rags. This could be unnecessary tulle, lace napkins, old waffle or terry towels, burlap. More interesting and original ones are made from cement planters using rags with a relief structure. The dimensions of the product can be both large and small, it all depends on desire and imagination, any rag can be used.
- Paint. For concrete surfaces, it will be possible to use acrylic, polymer, and water-based epoxy. Vinyl compositions, as well as acrylic-silicone and lime compositions, have worked well for decorating cement pots.
- Paint brushes.
- Low-density polyethylene film, packaging - stretch film.
- Form for pots. This can be a conical bucket or another suitable container of any geometric shape. The main thing is that there are no difficulties with the removal of the finished product.
- Container for mixing cement mortar.
- Protective gloves.
- Lubricant such as paraffin, vegetable oil, machine oil.
- Electric drill with mixer attachment.
Flowerpots made of cement and rags do not require special experience, anyone can do it
Some recommendations for making pots from cement and rags with your own hands:
- The working solution is prepared from cement (1 part), sand (2 parts), aggregate (4 parts) and water (½ part). Alternatively, you can do without additives, but if you want to make a real work of art, then you should add polymer components, natural minerals with dyes with fine fractions to the solution. Thanks to decorative concrete, the pots are interspersed with natural stones.
- Reinforcing frame if the structure is planned to be large in size.
- Sander. It is necessary to give the front side of the pots perfect smoothness. The first time they use an emery wheel, and then a felt wheel with a special paste.
How to make a flowerpot from rags and cement
There are many variations of making unusual flowerpots from rags. You need to decide on the form and adhere to a certain algorithm of actions.
Simple planter made of cement and fabric
Master class on making cement pots:
- Cover the workpiece for future garden decor with plastic film. This material will facilitate easy release of the finished flowerpot.
- Prepare the working solution in a suitable container. First, clean water is poured into the container, and then cement is poured. For ease of mixing, it is recommended to use an electric drill with a mixer attachment. The consistency of the composition should resemble sour cream.
- Immerse a rag or burlap in the working solution. The material should be completely in liquid cement, it is advisable to leave it in it for 2-3 minutes.
- Stretch the rag over a bucket or any other container, straightening the edges. Imitation of folds on a flowerpot will look good. The time for the rag to dry completely is 3 days.
- Decorate the concrete decor from a rag with paint.
Planters made of gloves and cement
The step-by-step process of making original garden decor involves the following steps:
- Mix the working solution according to the instructions described in the previous case.
- Filling gloves with cement composition.
- Placement of workpieces for drying. They need to be laid so that they bend slightly, as if holding something.
- Removing gloves after the cement has hardened.
- Coloring pots as desired.
Cement and foam plant pots
To create the next masterpiece, they use cement and granulated foam, but any other will do, as long as it crumbles well. Instructions for making pots with your own hands:
- Choose a plastic basin of suitable size and pour a 4 cm thick layer of sand on the bottom.
- Cover the bottom of the container with liquid cement mortar.
- Coat the walls of the basin with a thick cement composition with the addition of polystyrene foam. They should first be coated with liquid Vaseline, layer thickness 2 cm. This mixture should also be placed on the bottom of the flowerpot. Coat the top with liquid cement mixture. Time for complete drying is 48 hours.
- Turning the container upside down, you need to remove the workpiece. Apply a layer of polystyrene foam dissolved in acetone to the surface using a brush. First, to open the pores, you should walk along the outside with a metal brush.
- Cover the product with white cement or putty mixture.
- After the pots have dried, sand the outside with sandpaper with a grit of first 80 and then 120. After cleaning the cement dust, the decor is painted using a latex compound.
Making cement pots Swans
Step-by-step instructions for creating a Swans flowerpot:
- Cut off the top of a 5-6 liter plastic container. Inside, through the hole in the cork, you need to install a wire bent in the form of a two. Fill the mold with wet sand.
- Mix a steep cement mortar and, using a spatula, cover the edges from bottom to top. First you need to lay the solution on the film and place the mold on it - this will form the bottom of the flowerpot.
- Form a neck from the solution, coating the base of the wire along with the cork. You can level the surface by using a brush soaked in water. Coat the workpiece completely. The layer thickness should be approximately 2 cm.
- Make wings from the reinforcing mesh, bending them slightly and pressing them into the solution. The mesh dimensions are 15x30 cm. After which they need to be coated with a cement composition, holding them from the inside.
- Finish the neck with a solution and a bandage; wrap it around the frame soaked in water. At the end you should press down lightly to form something like a beak. Level the surface with a wet brush.
- Make a tail from the mesh, bending it 40-45 degrees. It is fixed with a solution. After 30 minutes, making movements up and down, left and right, you need to finish the tail, rounding it from the bottom.
- After complete drying, the cement swan is painted.
Flowerpot made of jeans and cement
Algorithm for performing work on creating an unusual flowerpot from old jeans:
- Make a relatively liquid cement mortar using an electric drill with a mixer attachment.
- Prepare jeans and rags for stuffing inside. Unnecessary rags, bags, and plastic containers are also suitable for these purposes.
- Immerse old jeans in the prepared working solution until they are completely saturated. Fill the inside and place in the desired position to dry. A few days are enough for this.
- Paint it the desired color.
Useful tips
To achieve results when making flowerpots from cement and rags, you should adhere to the following tips:
- If there is a need to trim any of the edges of the flowerpot, you should use a large sanding mesh for drywall. A regular hacksaw is not an effective solution here; the edges will stand out too much from the general background.
- To decorate flowerpots made from old jeans, it is better to choose metallic acrylic paints. Bronze and greenery will look more advantageous.
- For ease of painting the finished product, white sand should be added to the working solution. Alternatively, you can cover it with plaster.
Video on creating flowerpots from cement and rags:
Aligning the top and bottom edge of the cement pot
To align the edges of the workpiece, trim off the excess fabric.
Next, cut strips of fabric about 2 cm wide. For this purpose, you can use thick non-woven material such as geotextile.
It absorbs cement very well and creates volume. but you can take thinner fabric. Then you will have to apply several layers of it. This will help smooth out any remaining unevenness.
Glue cement-impregnated strips to the edges of the pot.
Planters for the garden made of cement
A flower pot made of fabric and cement is made according to the following instructions:
- Prepare a solution by combining 2 parts of cement mixture, 1 part of perlite and 2 parts of peat. To calculate the amount of raw materials, it is recommended to use a 1.5 liter bucket.
- Pour the dry additives with liquid and start stirring. The process continues until the consistency of the mixture becomes creamy. If the pot is large, you need to prepare the mixture in several stages.
- Cellophane is immersed in the container so that it completely envelops it.
- You should also provide holes for drainage. To do this, place a cork wrapped in film at the bottom.
- When the workpiece is completely immersed in cement, it must be covered with film and left for 10 days to harden and gain strength.
- As the solution dries, it must be moistened with water.
- When a week has passed, you should assess the readiness of the material by knocking on it.
- Finally, the surface is treated with a brush.
Canister pot
The easiest way is to pour the concrete mixture into a plastic mold. You need to take a standard 5 liter canister and cut off the top to the point where the walls stop expanding. A plastic cup is inserted inside. You can take a 9 liter canister as a basis and insert a 5 liter container into it. You will get a ribbed pot. It is perfect for planting succulents. It can be safely kept outside.
How to make a flowerpot from ordinary cement and fabric - step by step guide
When performing work, follow the following instructions:
- The blank for the future flowerpot is covered with plastic film to make it easier to get the finished structure.
- The cement mixture is prepared in a suitable container. First, the liquid is poured, and then the cement is added. The components are mixed using a construction mixer. The thickness of the solution should be similar to sour cream.
- Fabric or burlap is immersed in a container with the solution. It is important that it is completely immersed in the composition and lies there for several minutes.
- After this, the form is stretched onto the bucket, and the edges are straightened. To make the product more interesting, you can simulate folds.
- After 3 days, the workpiece is taken out.
- After the product is ready, it is treated with a coloring composition suitable for application to concrete.
Planter under a wooden bucket
It’s not hard to figure out how to make such a pot: just use an old wooden bucket as a mold. You can put together something similar yourself. After the concrete has set, it needs to be decorated. Wood grains will not appear immediately; they need to be created using a cutter. The overlay imitating a metal ring will also have to be applied separately. Finally, holes are made in the concrete for the rope.
It's a bit heavy to carry 10 and 20 kg pots. To make the structure lightweight, foam should be used as a second filler. This tip can be applied to any design.
Flower pots in the shape of a shoe
In order to independently make a shoe-shaped flowerpot from available materials, you will need the following materials and tools:
- Plastic canister.
- Thick threads.
- Fastening elements (it is recommended to use self-tapping screws).
- Adhesive tape.
- PVA glue.
- Newspapers.
- Water.
- Egg trays.
- Cement mixture and sand.
Step by step guide:
- For future work, use 2 canisters with a capacity of 10 liters and one with a capacity of 1 liter.
- Two large canisters need to be cut along the lines, and the small one should be left unchanged.
- Place another on the side of one container and secure it with self-tapping screws.
- The next step is to make a series of drainage holes.
- Using pieces of newspaper and adhesive, a blank for the future shoe is created using papier-mâché technology.
- A solution of 1 part cement, 3 parts water and sand is mixed.
- Screw the screws into the finished form and tighten them with threads for better fixation.
- After the shoe has dried, it is treated with sandpaper and coated with paint intended for concrete surfaces.
To simplify the process of making a homemade flowerpot, you should watch video instructions or master classes.
DIY flower pots made of cement and fabric (rags), photo
Concrete reigns in interiors decorated in a modern style for several seasons. It is found on walls, in architectural details, and small functional objects. This is an excellent material for molding small objects. Many people like it when their lives are filled with beautiful and unusual handmade items, but experience and skill are not always enough to produce them. You don’t need to be a craftsman to create your own cement flowerpots. In this article we will tell and show how to make flower pots from cement with your own hands.
An easy way to create original jewelry
Spring has come, it's time to plant flowers in balcony boxes and flowerpots. Good large flowerpots are expensive, they are heavy, and do not always meet our expectations in size, shape, and color. Lighter pots are fragile and not resistant to frost. An interesting alternative to purchased flowerpots are homemade pots made from concrete using various shapes and decorative methods.
It is important to choose the right size of pots. The dimensions depend on the dimensions of the form used.
- The wall thickness of a large container should be about 5 cm to ensure strength;
- for a small pot, a thickness of 1 cm is sufficient;
- for a large container with a width and height exceeding 50 cm, the minimum thickness is 7-8 cm.
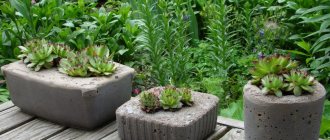
Round base
To create such a container, you will need round sponges. It is necessary to make a small recess in them, which will later serve for planting plants. Then the sponge is dipped in cement mortar. The result is a very light pot, and even a child can make it. Since the planting hole will be small, you can only place a succulent there.
Option using forms
Making your own garden pots from cement is a simpler task than it seems at first glance.
What will you need?
- bag of cement;
- any lubricant - paraffin, sunflower oil;
- protective gloves;
- molds - 2 pieces (one smaller, the other larger - corresponding in shape to the first);
- bucket for mixing concrete;
- spatula or small blade;
- a small heavy object in the form of a load (for example, a stone).
Step by step guide
Step 1: Selecting a Shape
Before you make a cement pot, you need to find 2 containers of different sizes. They should have the same shape, but differ in size. Ideally, the gap between the smaller and larger container is at least 5 cm.
- carton boxes,
- plastic containers,
- old pots,
- glass containers,
- stainless steel containers.
The containers should have a shape from which the pot can be easily removed after drying. For example, cans have grooves that make removing the finished product difficult.
By placing concrete in a wooden box or thick cardboard box and loading a smaller box into it, you can create square pots. To prevent the concrete from soaking the cardboard, thin boards can be placed at the bottom of the box. Cover the box with film and grease the film with oil.
Step 2. Preparation of the solution
You need to prepare a bucket (bowl) for preparing the cement mass. Pour the cement mixture into a bucket and gradually add water, stirring constantly. The packaging of the purchased mixture contains information about the proportions for preparing concrete. You must follow the manufacturer's recommendations.
The mixture should have an acceptable consistency, then it is convenient to spread. Liquid cement takes longer to harden, but the surface of the pot will be smoother. A thick solution is difficult to spread; the finished product will receive more cracks, holes, and air bubbles.
Usually the mixture is prepared in the following proportion: 1 part cement – 2 parts water.
You can enrich concrete flowerpots with additional effects by adding various additives to the freshly prepared mass, giving the products a unique character:
- glass beads,
- small shells,
- small pieces of broken dishes,
- small items.
Square pots with gilding
Typically, concrete pots are left uncovered: this makes them look more authentic. But why not play with their appearance? With the help of simple paint, faceless gray concrete can be turned into a decoration not only for minimalist interiors, but also for rooms in the Empire style, ethnic style, and so on.
The manufacturing process is similar to that which has already been described many times above. Square pots are best suited for painting. They are easy to use stencils on. After the cube pot is ready, you need to:
- Wait at least 4 hours for the concrete to set. Remove from the mold.
- Cover with white paint. If you choose a paint with the addition of fine sand, it will help hide minor surface irregularities. In this case, you will be able to do without thorough sanding, but before applying the substance, it is still recommended to go through the corners with a file.
- When the first coat of paint has dried, apply a second coat if necessary. This may be necessary if the paint is translucent and the gray base shows through.
- Wait for the paint to dry. The drying speed and time required to apply the second coat are indicated on the packaging. Usually it is 12 hours.
- Cut out a stencil from cardboard. You can repeat the pattern in the photo or use your own sketch. Using metallic paint in a gold or bronze shade, apply the design through a stencil.
Such a pot will delight the eye for a long time and is suitable not only for strict men’s interiors, but also for elegant women’s bedrooms.
Advice!
Since concrete is porous, it is best to use a thin layer of primer before applying paint. This way the paint will adhere better, and you won’t have to renew it in a couple of years.
You may be interested in:
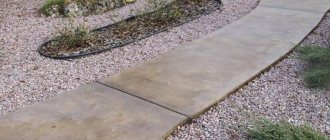
How to decorate and illuminate garden paths in an original way? With the onset of the spring-summer season, summer residents clean up their garden plots. They plant flowers and trees,...Read more...
Flowerpots made of cement and rags (fabrics)
Making pots from cement and rags with your own hands is very simple and looks very impressive and original.
What you need
- cement mixture;
- water;
- bucket;
- rubber protective gloves, work clothes;
- an object (pot, pan, dish, bucket, log), the shape of which the product will take;
- old rags, a piece of cloth, pieces of fabric;
- a stick for mixing cement and water, preferably a mixer - a low-speed drill with high power;
- cling film;
- acrylic paint;
- clear varnish (preferred).
Any container made of moisture-resistant material - galvanized sheet, aluminum, plastic, impregnated wood - is suitable as a form. For example, old pots and containers in which ready-made plants are sold in garden stores are perfect.
You can use regular cement tile adhesive. Mixtures should be chosen that are quick-drying, intended for external use, resistant to water and frost (for example, Adefilex P9 Express, Mapeklej Extra and others). Before starting work, the glue is diluted to the consistency of thick cottage cheese (cement glue diluted too much with water takes a long time to dry).
As a drapery, an unnecessary piece of material (unnecessary fabric, floor rag) in the shape of a rectangle with dimensions:
- length – at least 1.5 times the circumference of the pot;
- width – at least 1/3 of the height of the form.
It is better to take a fabric made of absorbent material (cotton) - such fabric will be evenly and quickly saturated with cement (glue).
Performance
- Preparing the mold for the pot. Place the mold on a platform, preferably smaller than the mold, and cover with cling film.
- Mix cement and water in a container. Add enough water to obtain a dough consistency. The consistency should not be too liquid, otherwise the solution will drain from the rag. The consistency of thick sour cream is suitable.
- The prepared rags are thoroughly moistened in the solution, wrung out, dipped again in cement and laid out (wrapped) around a pre-prepared mold. You can simply hang the fabric, draping it on the body of the form, trying to give the material the most interesting shape and texture. Draping must be done immediately, before the solution (glue) begins to harden.
- We wait about a week for the solution to dry.
The fabric can simply be hung on the forms, as shown in the photo.
Laying fabric drapery in different ways
You can make a concrete flowerpot from several pieces of fabric, overlapping them. It doesn’t matter where the first flap is placed - on top or bottom of the form. The option looks interesting when the flaps are laid diagonally, lengthwise, crosswise.
The way we apply the fabric depends on our vision. When the first experience is successful, you can improvise. The strips of fabric should stick well to the surface of the mold. The fabric can be draped, folded, waved, wrinkled, or tied with bows. There are many options for showing creative ingenuity and imagination.
You can make a stand or plinth for the pot using various available materials, leftover building materials, for example, a piece of plastic pipe. Prepared pots made from rags and cement will decorate gardens, balconies, houses, and terraces.
Advantages
The plasticity of cement mixtures and the high strength of the hardened material make it possible to create products of various shapes and dimensions : from simple pots to large flowerpots in the form of an open flower on a stem. Using cement, it is also possible to make flowerpots, vases for indoor plants, solid fences without a bottom for installation on the ground, and other types of flower stands. Flowerpots differ in the composition of the mixture (solution) , methods of production and decoration, and the presence or absence of reinforcement. But regardless of the type, flowerpots have the following advantages:
- any person who is not afraid to work with his hands and has enough imagination has the opportunity to independently create or improve a product he likes;
- Cement containers, compared to plastic and metal, retain moisture better and heat up less in the sun;
- durable;
- resistant to mechanical damage: shocks and scratches;
- do not corrode;
- do not collapse under the influence of ultraviolet rays, humidity, or negative temperatures;
- the ability to produce both mobile and not too bulky, as well as stationary options;
- the ability to create a flowerpot of exactly the shape that best suits the landscape design;
- especially convenient to use outdoors.
Decorating flowerpots
For minimalist arrangements in a modern loft style, raw concrete pots without decoration or paint are suitable. To create romantic, rural, retro gardens, you can decorate ready-made flower pots in various ways.
- When the material is completely dry and hardened, you can paint the product. The finished pot can be painted with special durable paints for plaster or decorated with aerosol paints and varnished.
- You can add interesting texture to fabric and cement pots using tile adhesive. If you choose a high-quality frost-resistant composition, you can leave the pot outside in winter.
- An interesting option is to glue decor to the pots:
- shells;
- pebbles;
- pieces of glass;
- broken tiles.
We use cement
This is perhaps the easiest way to make vases or flower pots using cement. For this method we will need:
- plastic bottles of different sizes;
- cement mortar;
- plastic containers of smaller diameter than the molds themselves;
- acrylic waterproof paints;
- varnish
We prepare the molds for filling: we cut the bottles to the required size, cut off the neck. Pour cement inside and place an additional container of smaller diameter, this is necessary to create a hole in the vase.
When the cement has hardened, the outer and inner forms must be removed, and the vase itself must be covered with paints and varnish.
Let's sum it up
Instead of buying expensive flower pots, you can easily make your own. This work does not require special precision, skills, or equipment. An old bucket or pot found in the attic can start a new life as an unusual flowerpot. Concrete pots look good in the garden and are durable. Homemade flower pots can be imperfect, and that's the beauty of them. Plants grow well in them and look harmonious in modern gardens. Their small size fits into some modern styles.
Caring for concrete pots is as easy as caring for plastic pots - just wash with water. Homemade pots are not only an easy way to create a functional, original decoration, but also a lot of fun from the work done!
Sources:
https://salecement.ru/kak-sdelat-kashpo-iz-cementa-i-tkani-i-chto-dlya-etogo-nuzhno/ https://vdome.club/podelki/raznoe/kashpo-iz-tsementa- svoimi-rukami-master-klass-s-foto.html https://1beton.info/izdeliya/kak-sdelat-kashpo-iz-tsementa-i-tryapok-tkani-svoimi-rukami-poshagovoe-rukovodstvo https:// wiki-dacha.ru/gorshki-dlya-tsvetov-iz-cementa