Recently, people have been choosing concrete vases. This material is the most accessible and cheap, so owners will save a lot of money. Concrete also has good aesthetic properties and, with high quality raw materials, will last for many years. But against the background of concrete there are also more presentable vases, say, made of ceramics or stone. Concrete flowerpots: trend or poverty?
Pros of concrete vases
Let's start with the advantages of concrete flowerpots:
- Durability. If all requirements in the production of the vase are met, it will serve its owners for decades and will not lose its aesthetic qualities.
- Cheap . Concrete flowerpots cost significantly less than similar vases made of ceramic or stone. This will allow the owners to save a lot and spend the saved money more efficiently.
- High resistance to external factors. Concrete does not deteriorate under negative environmental conditions or temperature changes.
Advice! We recommend installing concrete flowerpots in places with “problematic” weather. Your vase will not be damaged.
- Possibility to create a vase of any shape. Concrete is a malleable material, which allows you to create a vase of almost any shape and design. Thanks to this, you can succinctly fit the design into the exterior of the house.
- Safety . There is a high probability that a ceramic flowerpot will be stolen by intruders if you do not have a large fence on the site. Lifting a concrete flowerpot will be difficult due to its heavy weight. In addition, the neighbor's children play football "sloppy", so the ball will often end up in your yard and hit a vase.
Important! Plastic and wooden flowerpots can break, but concrete ones can withstand any mechanical impact.
How to make a vase from cement and foam plastic
Many things are thrown away as trash even though they can be recycled or reused.
Expanded polystyrene, better known as Styrofoam, can be shredded and used in garden decorations!
Welcome to my Handicraft Master channel!
In this tutorial I will teach you how to make a vase from cement and foam. It's very simple!
We will need a large plastic bowl.
Mix liquid detergent and petroleum jelly and use a brush to coat the outside of the mold with this solution so that the cement does not stick to the bowl.
Prepare cement mortar:
- 1 measure of cement;
- 1 measure exterior tile adhesive (a cement mixture used to adhere ceramic tiles outdoors);
- 2 measures of crushed polystyrene foam;
- Water (The exact amount depends on the volume of cement. You need to knead the cement dough so thick that you can pick it up and make balls).
Let's prepare a workplace for ourselves. It's easier to work if you turn the shape like a potter's wheel and stand in one place. I made myself a spinning stand by placing a spinning gymnastics disc under a large ceramic tile.
You can simply place a few pieces of cardboard under a large ceramic tile. And turn it as needed. We lay a sheet of paper on it and place an inverted bowl, which we will cover with cement.
Mix dry ingredients.
Gradually add water and continue stirring. Add water until the mixture is thick enough to form into balls that will hold their shape.
So, our mixture has reached the desired consistency. Scoop it up in small portions and make balls. Place the balls around the base of the mold.
You can model balls of any size you like. More or less.
I lay out the first row with large balls, the second row with smaller balls and the third with the smallest ones. Make sure that the walls are the same thickness.
I ended up with three rows of balls and one large cake on the bottom. Add cement, flattening it along the bottom and making sure that the walls remain the same thickness throughout the entire pot.
We make three drainage holes to drain water.
Now let's make the legs. We make three small balls and place them between the holes without covering them.
Cover the top with a large bag.
And we put a large ceramic tile on top.
Now you need to check by level whether the vase will stand level on the ground. We put a level on the tile and if it warps somewhere, we level it by lightly pressing on the desired edge.
We remove the tiles and the package. I don't achieve perfect smoothness. I like the rough texture of cement.
We leave it to dry for 24 hours. Then cover with a damp towel and leave to harden for 3 days, periodically moistening the towel.
After 3 days, turn the pot over and remove the mold. There are holes left between the balls that we need to cover up, smooth out the inner walls and process the edge of the vase.
To finish our pot, we prepare cement mortar. Mix cement and fine sand in a 1x1 ratio, add enough water to get the consistency of sour cream. Using a brush, coat the inside of the vase with the resulting paste, closing all the holes and leveling the walls inside the vase.
Then outside around the edges.
Let it dry. Now we need to make the cement waterproof. Prepare the following solution:
- 1 large glass of water (300 ml);
- 3 tbsp. PVA glue;
- cement.
Mix PVA glue with water and add enough cement so that you can apply the mixture to the walls with a brush (the consistency of liquid sour cream). Lubricate the vase inside and out. And leave half a glass of solution.
Add a little black and green paint (acrylic will do) to paint the outlines of the stones. I painted the indentations between the stones and also went over the bottom and inside of the vase.
Using a semi-dry brush, I first paint with green paint, then add brown and then ocher and paint the protruding parts of the stones.
Let the paint dry and cover the entire surface with acrylic resin. It's quite thick, so I mix it with acrylic thinner.
The paint and thinner have a specific smell, so I wear a respirator.
Turn over and paint the bottom and legs.
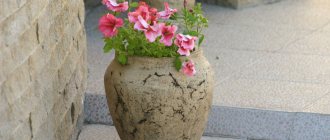
The vase is ready! Let the paint dry completely.
It is not as heavy as pure cement. As you can see, I calmly hold it in my hands. It is lightweight and durable. It can be used outdoors. The vase is not afraid of moisture.
Thank you for watching to the end.
I will be glad to see your comments and see you next time!
Minuses
But the heavy weight of the material can also be considered a disadvantage. If you are going to install a concrete vase, then transporting it will be extremely difficult. It’s much easier with a ceramic, wooden or plastic vase.
Related article: How to make paper snowflakes for your home
In terms of aesthetic qualities, a concrete vase is inferior to stone and ceramic, but this difference is not so significant.
Composition and structure
Depending on the manufacturing technology, component compositions will be required that are slightly (or significantly) different from each other. Let's take a closer look at three ways to make a vase using mortar.
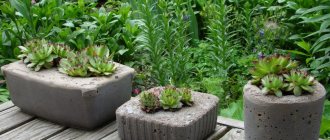
Method one - concrete flowerpot
To get a product that imitates stone well, you need to take:
- two parts of peat (which can be replaced with expanded clay or vermiculite);
- one part coarse sand (for texture);
- one part dry fresh cement;
- water (add it to the dry mixture until the mass reaches a viscous consistency).
Cardboard boxes (two pieces, one inside the other with a gap equal to the wall thickness of the future vase) can be used as forms for a concrete vase in this embodiment. Or any other containers. You can also buy a ready-made plastic mold at a hardware store.
Method two - when a form is not required
This technology was published in one of the Hungarian magazines. There is no need to make or buy a mold - just simple plywood (board) templates are enough for the internal and external walls. Each of the templates has a semicircular recess, and wire loops are attached to the side.
Composition of the solution used in this technology:
- dry fresh cement - one part;
- sand (with coarse or medium grain) - from three to five parts;
- water until the mixture has a fairly thick consistency.
Method three - plaster vase
In this case, we most often need a permanent form. If the product is small, then, for example, plastic bottles can be used.
A larger flowerpot can be made from a bucket of building materials, a large tin can or box.
To make a vase you need:
- gypsum powder;
- plaster bandage (can be replaced with strips of fabric or a bandage);
- water - to create a mixture of sour cream thickness.
Read below about how to make an outdoor flower vase out of concrete for your dacha with your own hands, from a solution with rags, cloth and burlap.
This video will tell you why a concrete vase for the street is better than a plastic one:
Comparison with other materials
If in the price segment, a concrete vase is the best choice along with a plastic one, but it is inferior to stone and ceramic in terms of aesthetic properties. But again, as soon as a neighbor’s boy throws a ball into your garden, not a trace will remain of the ceramics; the same outcome awaits plastic . Even wood can be broken, but concrete is strong and durable, and it is very difficult to split it.
If the concrete vase becomes dirty, you can easily wash it. With other materials you will have to suffer.
Technological process
In order to make a beautiful, high-quality and durable product, it is necessary to carry out the following steps step by step:
- At the initial stage, a solution of sand and cement is prepared in a 1:1 ratio. However, it should not be too thick.
- A prepared rag is immersed in the resulting solution, and this is done in such a way that the product is completely saturated and not even a small piece remains dry. The rag should remain in the solution for approximately 10-15 minutes.
- Next, you need to take a container on which the rag will be placed and wrap it with film. This is done so that the finished vase easily falls behind the mold.
- The soaked rag must be removed from the solution and allowed to drain excess liquid, after which it is carefully placed on a container wrapped in film. To ensure that the bottom of the future vase is as even as possible, the fabric must be placed on the selected container as evenly as possible. If you wish, you can experiment - make the edges wavy or come up with some other original solution.
- The vase is left until completely dry (usually this takes from 24 to 72 hours), after which it is removed from the container.
If the resulting flowerpot looks too gray, then it can be made brighter and more unusual. To do this, it is enough to use ordinary concrete paint, and not just one, but several colors. The finished product will decorate any cottage, garden or personal plot.
Trend or poverty?
A concrete vase means poverty, but you can’t call it a trend either . When buying such material, people choose reliability and durability. No doubt, ceramic looks amazing, but will it withstand harsh weather or mechanical damage? And plastic is a cheap, but not environmentally friendly material. And in terms of aesthetic qualities, concrete wins here.
If price plays a secondary role for you, and the garden is reliably protected from bad weather and hits from neighbor’s balls, we recommend choosing a ceramic vase. In terms of beauty, concrete is inferior to it.
Advice! If the garden is poorly fenced and there is no canopy over it, choose a concrete planter. Neither the rain nor the neighbor's ball are afraid of him. Rest assured, the design will last a long time and reliably.
Additional decor
You can use fabric to decorate finished flower pots. In this case, the same rag soaked in cement mortar, acrylic paint, artificial flowers and the pots themselves are used.
When decorating pots, the fabric is folded in such a way as to create folds.
Another interesting option for a homemade craft is a flowerpot with a print. We are talking about using printed fabric or patterned paper on the flat (but not glossy) surface of the flowerpot. To achieve the desired result you must:
- Select the place where the print will be located, cover it with film, and then lubricate it with silicate glue. A piece of paper or fabric is placed on top, which is also treated with glue. The resulting composition is left for 10 minutes.
- The impregnated material is installed in the center of the mold so that creases do not form at the bottom of the vase, after which the product is left to dry completely. To create smooth lines, you can carefully cut off the edges.
Garden vases made of fabric and cement make it possible to bring to life even the most unusual and extraordinary ideas with your own hands, and thereby create unique products that you cannot buy in any store.