Foam concrete is one of the relatively inexpensive and accessible varieties of cellular concrete. That is why a fence made of foam blocks is in considerable demand, both among residents of private houses and owners of summer cottages. In terms of strength, foam concrete is significantly inferior to materials such as brick, but do not forget about the degree of environmental friendliness, which can only be compared with wooden fences.
The site begins with a fence
A fence made of foam blocks has unique characteristics, such as excellent mechanical strength and high insulation rates. Foam block is a porous stone. It is made by mechanically mixing cement, water, sand and synthetic foaming agents, which contribute to the creation of closed pores, which significantly improves its waterproofing properties.
There is no need to create certain atmospheric conditions for foam blocks to harden. This process occurs naturally. As for financial costs, a cinder block fence will be somewhat more expensive.
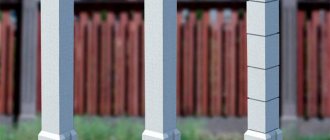
The options for finishing a foam block fence are very diverse.
Features and applications of this material
For the production of foam blocks, special synthetic foaming agents are used. The mass obtained by mixing stable foam with lime and Portland cement is poured into cassettes, where the process of forming and setting occurs. A cut block of a specific size is distinguished by regular and clear shapes and the absence of chips. It is easy to work with and apply plaster. The structure of the material resembles a porous chocolate bar.
All blocks are made on an organic basis using minerals, so the material is considered an environmentally friendly and chemically neutral product. It does not harm human health.
Main properties of the material:
- light weight;
- low density and thermal conductivity;
- noise insulation properties;
- low cost, low glue consumption;
- relatively low strength, high fragility;
- fire resistance;
- resistance to extreme air temperatures;
- convenience and ease of installation;
- possibility of use with other finishing materials;
- weak geometric characteristics, primitive shape.
The low weight is due to the use of a small amount of minerals. This characteristic allows you to speed up construction and save money. Low density will ensure a low weight of the foam block fence, which will reduce the load on the foundation and the ground underneath it.
Unlike gas blocks, this product has poor geometry. Obtaining accurate dimensions when forming in cassettes is only possible with good equipment.
What is such a fence?
Foam block elements are a modern building material that is becoming increasingly in demand. In its production, special synthetic substances are used, which, when reacting with each other, form foam.
The resulting foam is combined with Portland cement and then with lime. This mixture is poured into special forms - cassettes. It is there that future foam blocks harden and take their final shape.
All components of foam block products are organic substances with the addition of minerals, so the finished material does not pose a threat to the environment and human health - it is environmentally friendly.
A fence made of foam blocks is applicable in almost any area and climate zone . But it absorbs moisture very well, so if the area where the fence will be installed has an overly humid and rainy climate, then it is better to immediately finish the fence or buy another material, for example, brick, cinder block or gas block.
Although a damp, shrinking and cracked fence should not harm anyone’s life, the product will have an unsightly appearance and will have to be replaced with a new one.
Foam blocks are made in a rectangular shape with a smooth, even surface. This ensures high-quality joining of seams when laying the fence.
Foam block elements may not always fit into the stylish appearance of the building facade. Ordinary gray or white blocks do not really emphasize the beauty of the walls of a house finished with clinker tiles or decorative plaster. Therefore, if the walls of the house are decorated with a special decor, then perhaps it is worth taking care to finish the foam block fence in the same way.
Stages of fence construction
Before building a fence, you need to decide on the functions it should perform. Nowadays, foam concrete blocks are in great demand and are often used for the construction of various objects. Although foam block is inferior in strength to brick and in environmental friendliness to wood, it is an alternative solution for those who want to purchase a quality product at an affordable price.
Foam block fences perfectly protect the territory from the penetration of ill-wishers, dust and debris.
The simplicity of the construction process makes it possible to produce foam blocks at the construction site itself. This makes it possible to complete all work with minimal loss of time and money.
Building a high-quality and reliable fence from foam blocks with your own hands involves performing the following basic steps:
- foundation construction;
- construction of a plinth, pillars;
- Finishing work.
httpv://youtu.be/CNp1S29 >
Step-by-step construction instructions:
- Construction of the foundation. It is enough to dig a hole 20-25 cm, a block wide. Then compact the bottom, fill it with sand and fill it with water. You can also make a pile foundation with a grillage. For reinforcement in a vertical position, you need a profile pipe, which is embedded into the grillage at 2.5 m. For horizontal reinforcement, wire rod with a diameter of 8 to 10 mm is used. The main thing is to remember that the finished structure should not be higher than 10 cm. To ensure the strength of the foundation, the surface should be treated with a waterproofing material, for example, bitumen. For a fence made of foam blocks, it is advisable to lay the first row of masonry based on cement and sand, and for the next rows use special glue, thanks to this the masonry will be strong and reliable.
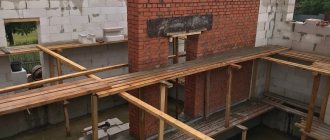
- Plinth and pillars. After completing the masonry work, it is necessary to lay a reinforced seismic belt, which is best tilted towards the street. To erect pillars, it is recommended to use the permanent formwork method. On the outside, each element is made of foam blocks. For strength, you can insert reinforcement and then fill it with concrete. Posts for gates should be filled completely at once, and for gates - gradually, in layers.
- Finishing. After the work is completed, the finished fence masonry is primed. After it dries, the surface is covered with fiberglass mesh and plastering work is carried out. Next, tiles and finishing plaster are laid, and then everything is covered with a hydrophobic bridging additive.
Foam block is a fairly good and reliable material for installing a fence. It has minimal impact on the foundation and has good sound insulation properties. This is an environmentally friendly material, so it is considered one of the best options for building a fence.
Difficulties or errors during operation
Since foam concrete is a porous material, sometimes difficulties may arise with attaching some additional items to the fence , for example, a mailbox, signs, etc.
Regular nails and dowels will not be able to securely fix into the block and any secured objects will fall. For fastening you need to buy special dowels and anchors for foam concrete. They are designed for installation of structures in porous materials.
Foam concrete is one of the few materials that only becomes stronger over time. Therefore, immediately after production, the foam block product is not very strong. If you start installing freshly made blocks, then due to the fact that they are not completely dry, they will shrink from the load in the very first days.
Foam blocks gain their strength approximately a month after creation, so when purchasing, it is important to check the date of their manufacture.
When buying material, it is important to pay attention to its size, uniformity of color, structure and evenness of the surface. If, after examining and breaking the block, cracks and oily stains are discovered, then it is better to refuse such products.
foam blocks from one batch so that there are no differences in color, size and structure in the finished fence.
Starting from the second row of masonry, you need to use a special glue for foam concrete so that the thickness of the seams does not exceed 2-3 mm. The seams must be filled with high quality glue so that there are no voids left in them.
Construction of a fence from foam blocks
Often, private sector owners decide to build a cinder block fence. This fact is not surprising, because a fence made of foam blocks has many advantages and important qualities. If we consider that earlier people erected fences solely to protect the territory from unwanted guests and prying eyes, today everything has changed dramatically; in addition to the above properties, such a fence serves as an addition to the process of arranging the design of the space.
Foundation
The weight of cinder block fences is small, so making a foundation for the fence is quite simple. The process is carried out in the following order:
- First you need to make a dig so that a hole is formed in the ground where the foundation for the pillars will be installed. The depth of the excavation should be approximately 20-25 cm. The width should be equal to the width of the cinder block.
- The resulting depression is generously filled with sand. Sand should cover the entire bottom.
- Water is then poured on top to give the sand a hard texture.
- If the decision is made to make a pile foundation, then grillages are installed.
- The next step is laying the profile pipe; it is screwed into the grillage by 2-2.5 cm.
- Horizontal reinforcement of the foundation is carried out using wire rod. The diameter should be 8-10 mm.
Laying the plinth and installing the pillars
After the foundation construction process is completed, you need to proceed to the next step.
This step is laying the plinth, as well as installing support pillars for the fence structure.
This process can also be done with your own hands, the main thing is to act one by one. The sequence of work is as follows:
- First you need to lay a seismic belt made of reinforced material.
- The pillars are installed using formwork technology, which is a permanent structure.
- The outer part must accommodate elements of foam blocks.
- In order to add durability and strength to the fence, reinforcement is also inserted in a vertical position. The beams are then filled with a concrete mixture.
Laying fence posts made of foam blocks
Laying cinder blocks
The process of laying foam blocks is elementary. It is enough to simply glue the blocks step by step, maintaining the composition planned in the fence design. It is better to lay the first layer of cinder blocks on a layer 2-3 cm thick of the mixture, while the subsequent ones are easily fixed on a thin layer of adhesive solution. The video shows the process of laying cinder blocks into a fence.
Finishing
When the masonry process has come to an end, you should proceed to the final stage - finishing. In this mission you should also act in turn:
- First, the surface of the foam blocks must be primed.
- When the primer has dried, you need to cover the fence with fiberglass mesh.
- The next step is plastering.
- Then the prepared coating is finished with the finishing material selected at the planning stage.
Do-it-yourself foam block fence: photo and construction
Foam concrete is one of the relatively inexpensive and accessible varieties of cellular concrete. That is why a fence made of foam blocks is in considerable demand, both among residents of private houses and owners of summer cottages. In terms of strength, foam concrete is significantly inferior to materials such as brick, but do not forget about the degree of environmental friendliness, which can only be compared with wooden fences.
The site begins with a fence
A fence made of foam blocks has unique characteristics, such as excellent mechanical strength and high insulation rates. Foam block is a porous stone. It is made by mechanically mixing cement, water, sand and synthetic foaming agents, which contribute to the creation of closed pores, which significantly improves its waterproofing properties.
There is no need to create certain atmospheric conditions for foam blocks to harden. This process occurs naturally. As for financial costs, a cinder block fence will be somewhat more expensive.
The options for finishing a foam block fence are very diverse.
Production and features of foam block
In the manufacture of foam blocks, various synthetic foaming agents are used. The mass obtained as a result of mixing is poured into special molds, where the hardening (setting) process occurs. Thanks to this, each of the blocks has a clear shape and a complete absence of chips (at first). It is very convenient to apply subsequent layers of plaster.
Contains only five components
The process of making blocks is quite simple
For the production of foam concrete, exclusively organic components and minerals are used, which are considered environmentally friendly. It is also classified as a chemically neutral substance that is not capable of causing harm to the human body.
Storage and transportation is carried out on pallets
What properties does the material used have:
- fire resistance;
- relatively light weight;
- low cost;
- simplicity and ease of installation;
- excellent sound insulation properties (like cinder block);
- the ability to combine with other finishing and building materials;
- low consumption of auxiliary materials (glue);
- primitive form;
- low thermal conductivity and density;
- resistance to possible temperature changes;
- high threshold of fragility.
Due to the negligible use of minerals, these fence blocks weigh almost nothing. This will allow you to save on building a fence by erecting it yourself, without resorting to outside help or renting expensive equipment. The low density of the material affects the overall load and weight of the structure, which eliminates the need to create a solid foundation.
Table of foam block weight depending on its size and brand of foam concrete
Tools and consumables for work
To install a pediment made of cellular concrete, the following consumables and tools will be needed:
- Structural autoclaved gas blocks of rectangular and U-shape of the selected size, with a density rating of D500 and above.
- Plumb line, level (regular or laser), construction cords, wooden beams (for marking).
- Screwdriver, drill, anchors, screws and other fasteners, nails, construction hammer, rubber mallet, aerated concrete float or grinder, hacksaw.
- Sand-cement mortar (dry components ready-made or separately - cement grades M400-M500, river sand, crushed stone or gravel, plasticizers) for the 1st layer.
- Glue or foam for the 2nd and subsequent layers.
- Trowel, spatulas, construction mixer, containers for solutions.
If a person does not build a building with his own hands, then the construction company with which he draws up an agreement will provide the consumables itself, according to the estimate. Any company also has construction working tools.
Main stages of fence construction
The technology for the production of cinder block bricks and foam blocks has long been brought to perfection, thanks to which the production of the latter can be carried out directly on the site allocated for the construction of a fence. Thus, time and financial costs can be significantly reduced.
Conventionally, all upcoming manipulations can be divided into three main stages:
Before installing a fence made of foam concrete blocks, you must familiarize yourself with the rules for installing fences between neighbors. It is necessary to determine the permissible height based on SNiP standards.
Making the foundation
It is recommended to start building a fence from foam blocks by determining which foundation to use. Many experienced builders recommend giving preference to a pile type of foundation, which would be connected to each other using a grillage. A profile pipe will be needed when carrying out vertical reinforcement.
It is built directly into the grillage in increments of two and a half meters from each other. It will create additional rigidity of the structure and serve as a frame. Hot-rolled reinforcement with a diameter of 10 mm is used for horizontal reinforcement.
Preparing the fence foundation for concreting
Thick-walled pipes are perfect for arranging gates or wickets.
The use of cinder block is encouraged, however, only to create stronger pillars. The top layer of the fence foundation also needs additional waterproofing treatment. So, its surface is covered with a primer and a layer of bitumen-based paint.
It is recommended to lay the first row of foam blocks on a layer of sand and cement. For subsequent installation, you can use special glue. In general, the technology is similar to constructing a foundation for a fence made of aerated blocks.
Ready foundation before performing coating waterproofing and subsequent laying of blocks
Arrangement of fence posts and plinths
After completing the masonry process, it is recommended to think about arranging a reinforced fence belt that would be resistant to various seismological activities. In order to build an armored belt, you need to have wire, metal reinforcement with a ribbed surface, steel rods and a special hook for tying the rods together.
The metal frame is woven in the form of a mesh, then it must be laid on a dense support, usually brick. Reinforced rods should not reach the trench walls at a distance of about 70 mm. Gate posts should be installed using permanent formwork.
The contour of the pillars should be made not of cinder blocks, but of foam blocks, since this option is considered less expensive. To improve the strength indicator, reinforcement is used (it is placed in pipes), after which they are filled with cement-based mortar.
Pouring must be done at one time, otherwise ineffective layers will form. But for the gate, pouring is done gradually, in small layers.
Fence block laying technology
The first row of laying foam blocks starts from the corners. It is the corner blocks (beacons) that will serve as a guide for subsequent laying, so this is the most critical stage of the work.
To ensure that the foam blocks lie strictly horizontally, use a laser level and a rubber mallet. A cord is pulled over the corner blocks - a mooring - and secured with nails.
When laying the first row of foam blocks, it is necessary to use only sand-cement mortar and mandatory reinforcement. Moreover, the solution should be applied using a notched spatula.
When laying the second and subsequent rows of foam block fences, an adhesive mixture can be used.
Do-it-yourself foam block laying
Finishing work
After the seismological belt has been completely manufactured, you can begin priming the working surface using special mixtures that promote moisture absorption.
After the applied layer has dried, it is recommended to cover the surface with fiberglass mesh, which is used in facade work.
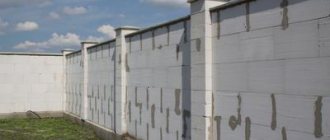
After all layers have completely dried, you can begin laying tiles and finishing plaster. The photo below shows a fence prepared for plastering.
Fence before plastering
To improve waterproofing, as well as to protect the foam concrete structure from aggressive environments and moisture, it is recommended to use “calmatron” as an auxiliary composition, as one of the best and most affordable hydrophobic mixtures. When using a cinder block it is not necessary. You can use a photo grid to decorate the fence. But landscape design along the fence should be started only after finishing work has been completed.
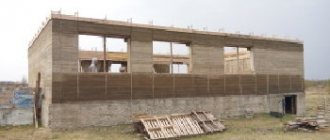
The photo below shows a fence made by yourself.
The original finishing is almost complete. All that remains is to cover the fence
This is what the completed structure looks like
Auxiliary fortification
Some types of fencing require additional reinforcement due to their lightweight structure, which makes the material incredibly vulnerable to various mechanical damage. To increase the strength indicator, after laying the first row of foam blocks, reinforcement is performed.
To do this, using an auxiliary tool (wall chaser), grooves are made along the masonry, into which metal rods (reinforcement) are then placed.
Additional masonry reinforcement to strengthen the foam block fence
If you plan to perform all the operations yourself, then you need to be careful and take your time, since the work will be with extremely fragile material.
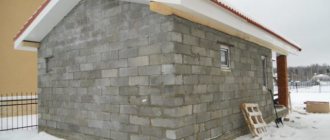
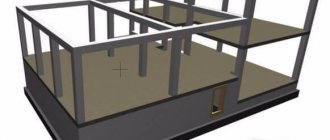
What buildings can be added to?
Making extensions from foam blocks is suitable for all types of houses, including wooden ones. What is especially important here is the age of the house, the condition of the walls and the structure of the main foundation (type), with the help of which the added meters of additional rooms will be connected to the main building.
Experienced builders do not recommend starting an extension if the building is a new building. It is best to wait six months for the new building to shrink, and only then build an extension. According to the technical characteristics, the house to which the structure will be attached must be in satisfactory condition and subject to operation.
Foam blocks are a good building material. With their help, you can lay an extension, as it has a number of positive qualities (density, strength, durability), has a cellular structure and is represented by several types of blocks (structural and thermal insulation), which can be used in two installation circuits.
Foam concrete blocks are lightweight, so work with them is carried out in a very short time (and this is very ergonomic). In addition, they are inexpensive building materials, and the façade built with them can be decorated with any finishing.
Preparation for construction should include:
- mandatory project development,
- obtaining a technical passport for the constructed meters,
- carrying out architectural calculations,
- meeting the requirements for the supporting base.
What you need to know about this material
Today, the requirements for any building materials are incredibly high and foam blocks are no exception. The material should not be subject to any destructive processes, including rotting. It must also have excellent soundproofing and thermal insulation qualities. There is no need to talk about safety and durability, since these parameters are considered key. Even in construction, many people prefer to use foam blocks rather than build brick walls.
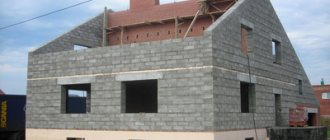
A material such as foam block has begun to enjoy well-deserved popularity in recent years. It allows you to build not only various fences, but also full-fledged residential buildings. However, not all material can be called high quality.
Before you purchase the required amount of material, it is a good idea to check its quality.
After all, such economical production often pushes people to try to save even more. Only high-quality products are stored on special pallets, covered with a protective layer of polyethylene and neatly stacked. This is the only way to avoid damage to the material due to its incredible fragility.
An example of how foam blocks should not be stored
The fragility index plays an important role. If you try to crumble it only with your fingers, then with a high quality indicator of the product it will not crumble. If the material begins to crumble, then its quality leaves much to be desired, because the manufacturer has decided to save on cement.
Even the slightest crack will not speak in favor of the manufacturer, as this indicates violations of the drying technology. Internal tension will be created, which will lead to the complete destruction of the foam blocks.
A comparison with a gas block can be seen in the video below.
The bubbles should be small and there should be a lot of them. The oval shape indicates the low strength of the fence material. The dimensions of the foam blocks should also not differ.
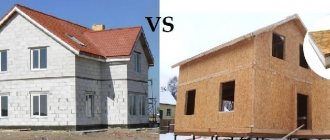
Tree
Wood as a fence is an expensive option, has low strength and durability, and, moreover, although it is treated with special chemical fire-retarding solutions, it is prone to fire. Maintenance and constant repair of such a structure is very tedious and expensive. The foam block is a fairly reliable structure, moreover, it puts minimal load on the base, and a high-quality foam concrete block allows you to build in a short time a good noise-imitating, durable, fireproof and, most importantly, a solid fence.
Today, this is the best option for fencing buildings of a private, especially country house.
Fence made of aerated concrete blocks: advantages and disadvantages
Aerated concrete is a practical building material; specialists use it not only for the construction of buildings, but also for beautifying the surrounding space. One of the options for using aerated concrete is a fence made of aerated concrete blocks, which you can build yourself without the involvement of specialists.
A fence or fence is a mandatory element when landscaping a private area, which preserves privacy and protects property from unwanted intrusion.
A high-quality fence will help protect the yard from prying attention, protect against debris and dirt from the street, serve as a wind barrier, and also transform and decorate the surrounding space.
Let's take a detailed look at the features of constructing a fence from aerated concrete blocks with our own hands, and also find out its main pros and cons of a fence made from aerated concrete blocks.
Conclusion
When planning the construction of a fence for your site from foam blocks, remember that high-quality material is the key to a reliable and aesthetic structure. When choosing blocks, do not give preference to price at the expense of the quality of foam concrete, otherwise such a building will not last you long. Do-it-yourself house made of wicker? Be sure to waterproof both the foundation and the foam block walls themselves.
How to treat the surface → Room decoration → How to choose the right paint → Surface treatment technologies → Leveling and finishing the walls → Selecting and applying a primer → Removal from the surface → Stretch ceilings and technologies → Reviews and testimonials
Selection of aerated concrete blocks for fencing
Aerated concrete is produced on a cement base, it is a type of cellular concrete and has a porous structure, which helps reduce the weight of the blocks and improve qualities such as thermal insulation and sound insulation.
The blocks are available in several types - solid and hollow. To build a fence made of aerated concrete, experts advise using hollow products, as this will not only reduce costs, but will also allow additional reinforcement of the fence or hidden wiring.
You can erect an aerated concrete fence yourself and in a short time. This is facilitated by such qualities as:
- Large block sizes;
- Smooth product geometry;
- Ease of processing;
- Light weight.
Some manufacturers produce decorative aerated concrete blocks for fences. The blocks have different colors and textures, and are additionally protected from external influences, but their cost is quite high compared to conventional gas blocks.
Choosing foam concrete
Usually, for maximum savings when building a fence, developers purchase low-density blocks, because this is not a load-bearing structure. The train of thought is correct, but the main point was missed that such material is very soft, and even a lazy person can make a hole in your fence with a simple movement of his hand, or foot, but it’s not so easy to spoil a more durable material. Therefore, it is better to take foam concrete products starting from a density grade of D700 and higher; the block sizes are preferably large, more than 10 cm thick. Another thing worth knowing when buying a foam block is that under the direct influence of water it will begin to collapse; buy it as a set for the foam block immediate moisture-protecting material. The best option is special liquid waterproofing agents; they are a bit expensive, but this will be more than offset by the low cost of the blocks and future durability.
In any case, this option is much cheaper than brick and metal.
Fence installation steps
The fence must be strong and reliable, so it is important not only to choose the right material, but also to carefully consider each stage of construction.
Installation of a fence made of aerated concrete blocks consists of three stages:
- Foundation installation;
- Construction of a fence;
- Exterior finishing.
Let's take a closer look at each of them and identify the key points at each stage of work.
Foundation
The construction of the foundation for an aerated concrete fence proceeds according to the following algorithm:
- Mark the area of the future fence and places for posts (2-3 meters from each other);
- Along the marking, dig a ditch half a meter wide and 50 to 80 cm deep (50 cm in dense soil, 80 cm in a wetland or unstable loose foundation);
- At the places where the pillars are installed, widen and deepen the ditch by 50 cm;
- Place a cushion of gravel and sand in the resulting holes - the layer thickness is about 20 cm;
- Install vertical pipes and check their levelness. Insert plugs into the pipes to prevent water from entering there.
- The space remaining after installing the pillars should be filled with stone or coarse gravel and filled with concrete mortar;
- Prepare and install permanent formwork around the perimeter of the future foundation; you can use sheets of plywood, pour crushed stone into the resulting space and fill it with concrete mortar;
- Leave the structure to dry for 7 – 10 days; to protect it from moisture, you can cover it with polyethylene;
- After the foundation has dried, it is necessary to carry out waterproofing; for this, the surface is covered with a special mastic and roofing felt is laid.
Laying aerated concrete blocks
Depending on weather conditions, concrete structures gain full strength after 3 weeks, so it is important to begin further work no earlier than this period. Failure to comply with this rule may lead to the fact that the foundation will not support the weight of the fence and will bend or crack.
For installation work you will need a special adhesive solution for cellular concrete, cement-sand mortar, reinforcement and a spatula.
Block laying process:
- Clean the surface of the foundation from dust and dirt;
- Apply 20 mm thick cement mortar to the base;
- Lay out the first row of blocks. It is necessary to constantly check the horizontality of the blocks;
- Columns are laid out around the previously installed pipes, aerated concrete blocks for the fence posts are installed with a dressing of one and a half blocks, the first and subsequent rows of aerated concrete blocks are placed there;
- Lay reinforcement - a rod with a diameter of 6 mm is used as reinforcement; it is stretched between the fence columns and firmly fixed there;
- Lay the second and subsequent rows until the desired height is reached, glue is applied for fastening, the layer thickness should not exceed 3 mm;
- Strengthen fence posts made of aerated concrete blocks by pouring concrete mortar into the space between the pipe and aerated concrete blocks;
- Cover the upper part of the fence with tiles or profiles to protect it from moisture.
The first and third rows of blocks are reinforced.
To build a fence without installing posts, it is worth using solid blocks and reinforcing every few rows.
Finishing work
Finishing is one of the most important stages of installing a fence; it not only gives a finished look, but also protects the fence from premature destruction.
For the external finishing of the aerated concrete surface of the finished fence, the following materials will be needed: deep penetration primer for cellular concrete, reinforcing mesh or fiberglass mesh, plaster for aerated concrete.
- Clean the base from dust and oil stains (if any);
- Cover the entire surface with a primer solution;
- Install reinforcing mesh;
- Apply the plaster in two layers, after the first has dried, the surface is primed again, the thickness of the second layer should not exceed 10 mm;
- After the plaster has dried, the base must be carefully primed; it is better to use solutions with a waterproof effect for additional protection from moisture;
- A special impregnation is applied to the resulting surface, which protects it from external influences. If desired, the fence can be painted.
When using decorative aerated concrete blocks, a primer and varnish or hydrophobic impregnation are used for finishing.
Advantages and disadvantages of a fence made of gas blocks
A fence built from aerated concrete blocks has a large list of advantages, among them the following can be distinguished:
- Durability and reliability;
- Noise insulation;
- Durability;
- Relatively light weight;
- Frost resistance and resistance to temperature changes;
- Ease of use;
- Fire resistance;
- Construction speed;
- Variety of colors and textures;
- Affordable price.
Aerated concrete fencing is an excellent choice for construction near roads; it will protect against dust and outside noise.
Among the disadvantages of aerated concrete fencing, I would like to note its poor resistance to moisture, fragility and the need to build a foundation. But these disadvantages can be attributed to almost every type of wall blocks. They can be eliminated by following a few simple steps:
- Carry out waterproofing;
- Carry out external finishing of the aerated concrete surface;
- Use material with strength grade D
Decorative aerated concrete is produced with an external finish that protects the material from the action of water. But over time, water resistance decreases, so decorative blocks must be additionally treated with a special primer or varnish every three years. This simple step will help keep the fence in its original condition and extend its durability.
Block requirements
Although the fence is not considered a critical structure, the material from which it will be built is also subject to serious requirements. Among them:
- Structure and size of pores (cells) .
The structure of the foam block resembles porous chocolate. The air cavities themselves should not be connected to each other (this property is inherent in the aerated block), otherwise the blocks will absorb too much moisture. The larger the pores, the lighter the material, the better the thermal insulation and sound insulation, but its strength will be low. Therefore, for high-quality elements, 90% of the pores should be up to 1 mm. When a block is broken in half, the structure of the outer and inner parts should not differ. If you can easily break off a piece of the block with your hand or press a nail into it with your palm, then the element is made poorly. Products from this batch are not worth buying. - Shape of elements. They should have smooth, neat shapes, without chips or potholes. You can check this by placing several blocks next to each other and on top of other blocks. The seams should be smooth and have no gaps.
- Coloring . A high-quality foam block made in accordance with GOST can be gray in color (with shades from light to darker). If the color of the elements is too white, then a lot of lime was added to them, and not enough of the fastening component - Portland cement.
- Weight – one block weighs approximately 22 kg. If it is less, it means that the elements will not be very strong.
- Density. This indicator is designated by the letter “D”, and the marking next to it can be from 100 to 1200 (kg/cm2).
This figure indicates how many kg 1 cm2 block can withstand. D100-D300 are used for the construction of interior walls of a house, but such blocks are also suitable for fences. D400-D900 - for external walls - they are more durable and can also be used to build a fence. Material with a density above D900 is durable and expensive. It is mainly used for the construction of multi-storey buildings. Therefore, its use for fences is irrational. - Hardness - shows compressive resistance and is designated by the letter “B”. There are 3 classes - from 0.5 to 1; from 2.5 to 7.5; from 10 to 12.5. For the fence, you can use materials with hardness classes l and ll. The hardness of the foam block increases over time. For example, a material that has been in use for 50 years is 3 times stronger than a freshly installed one.
- Frost resistance - depends on the climate zone. For the southern climate, 15-30 freeze-thaw cycles are sufficient. For central regions, 30-50 cycles are suitable. And for the northern part of the country – 50-75 cycles.
- Availability of product certificates.
- Price . An unreasonably low cost indicates that the material is second-rate and its production technology is incorrect.
Reviews from builders and owners
A fence built from aerated concrete blocks will serve its owners for decades. It is not demanding, but at the same time meets all the requirements, such as strength and durability.
Specialists and developers who used aerated concrete to build fences speak about it only from both positive and negative sides:
- “building a fence does not require much time, the blocks are large and light, which can significantly reduce the time”;
- “if necessary, the blocks can be easily cut with a simple hacksaw”;
- “Aerated concrete absorbs water strongly, so it is necessary to protect the surface and carry out external finishing in a timely manner.”
Owners who have used aerated concrete blocks to decorate their local area additionally note the property of the material as sound insulation - the area fenced with aerated concrete is much quieter than on the open street. This is especially important if the house is located near roads or highways.
Advantages of erecting a fence from foam blocks
Recently, many people have been installing a fence made of foam blocks. The building material is easy to process and has a low price. Blocks can be made at home. Foam concrete is a mixture of cement, sand and a chemical reagent (foaming agent). The prepared mixture is laid out in molds and allowed to harden. No special firing or pressing is required; it simply hardens on site. But it is better to order blocks of the required size.
In addition, the unconditional advantage of this material is its noise-insulating properties, which will help create a quiet and peaceful atmosphere even in a big and noisy city. If such material is used in the construction of a fence for a country house where there are children among the family members, then parents can be calm about the safety of the fence.
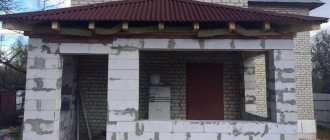
Foam block fence option
After all, foam blocks are not only an environmentally friendly material, but also breathable due to their porous structure. This material is popular not only because of its properties, but also because of the cost-effectiveness of its use. After all, as a rule, the main amount of expenses for the owners goes to building a house, and only the remainder of the funds remains for the fence.
If you cannot produce blocks of the required sizes yourself, then industrial enterprises can offer foam blocks of standard sizes: width 100 - 200 mm, height 300 mm and length 600 mm. A narrower option is suitable for a fence. They are easy to process, have a low specific gravity and do not sink in water. This material is suitable for the construction of not only fences, but also garages, sheds, and temporary country houses.
A huge advantage is the fact that a fence made of this material will be easy to install, even if you do this work yourself.
Before you start building such a fence, you should decide on the density of the material.
Judging by the advice of experts, you should not overpay for a density higher than the D-500 grade.
Indeed, thanks to the brand of material for these foam blocks, you can create a high-quality fence, despite the recommendations of managers to purchase material with a density of D-700 or higher.
Preparing the foundation for the fence
After choosing the base of the fence, it is worth moving on to marking it, to put it technically correctly - drawing out the contours. Using the placed beacons, soil is removed to lay a shallow strip foundation.
An example of a strip foundation for a fence made of foam blocks
It is enough to go deeper by 20 - 25 cm, and the width should correspond to the width of the block. The bottom of the trench is compacted, sprinkled with river sand and spilled with water.
You can build such a fence on a pile foundation, which is connected with a grillage, and this adds a lot of hassle. If speed plays an important role in installing a fence, then it is easier to use the tape option.
Speaking about the foundation, it is worth noting several points that deserve special attention:
- The finished base should rise no more than 10 cm;
- In order to ensure the strength of the foundation, it is necessary to treat its surface with waterproofing materials, for example, roofing felt or bitumen.
Place for wicket and gates
After the foundation is installed and ready for further work with the fence, you can begin planning the location of the wicket and gate. This can be done with the help of pillars, which will serve as landmarks in the future. To do this, a recess is made in the places where the support pillars will stand, a thick-walled pipe is inserted and fixed with concrete.
A strictly vertical position will ensure trouble-free installation of the wicket and gate. This stage is very important for further work with the fence. Therefore, it is worth paying special attention to it.
Columns
Let's move on to the columns, they also need to be lined with blocks, this can be done using permanent formwork. After finishing the masonry work, we proceed to finishing the fence. Initially, it is necessary to waterproof it with a special solution; while it is drying, you need to install a Chainlink mesh; special glue is used for its installation; tiles can also be installed on it.
Laying foam blocks
The next step is the laying of the foam blocks itself. It is produced according to the classical scheme of laying similar material. The only recommendation can be the use of cement-sand mortar for the first two rows. Thanks to this, the masonry base will be stronger and more reliable. Other rows can be fastened with adhesive mastic.
After all the necessary rows have been laid out and the work is essentially finished, it is necessary to treat the entire fence made of foam blocks with a water-repellent primer.
After this, the finished and processed fence can be decorated to your liking - with tiles, metal or corrugated sheets. This way the fence made of foam blocks will acquire its own individual look.
Plaster
After completing these works, we begin to calmly plaster its surface; how many times to apply the finish is up to you, but after the finishing plaster you should definitely treat it with a water-repellent solution. It will not only reliably protect the finish from the harmful effects of moisture, but will also increase the frost resistance index, so a beautiful and reliable fence made of foam concrete blocks is ready.