When installing floors in apartment buildings, as well as on the upper floors of private houses, a concrete screed is poured over the floor slabs. But what if there are no such plates? Imagine that you have poured a strip foundation: the load-bearing walls of the building will stand on it, but where will the floor rest? This is where the technology of pouring concrete onto the ground comes in handy.
In this article we will tell you what it is: we will talk about the brand, composition and proportions of concrete for floors on the ground, and also describe the technology of screeding. You will learn in which cases it makes sense to pour floors on the ground and what the advantages and disadvantages of this method are.
What brand of concrete should I choose for pouring a floor screed?
Concrete is made from a mixture of crushed stone, sand, cement and water. The materials are mixed in certain proportions to form a thick solution. When it hardens, a monolithic product is formed. The liquid state during mixing allows you to give it any shape using formwork.
Which brand is best to use for concrete screed?
During manufacturing, precise calculation of proportions is carried out. Depending on this, the grades of the solution are determined. Indicators are classified according to the strength of the finished structure. From here the areas of application are determined. There is a brand of concrete and cement, sometimes these concepts are confused. It happens that several options for the proportions of materials and different types of cement are acceptable.
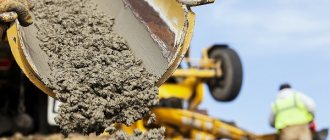
Ready-mix concrete is manufactured in a factory. It is also called BSG, which means ready-mixed concrete. The production technology is determined by the brand, and the class indicated in brackets indicates the quality characteristics. Strength indicators:
For indoor flooring, experts recommend M100, M150 or M200. The foundation is made from M100; it is chosen for installing reinforcement cages and creating curbs and sidewalks. Suitable for making “warm floors”.
M150 is selected for the construction of individual houses and apartments. It is not recommended for use in the presence of chemicals. You can make a floor in the garage, but it is worth remembering that the surface is not intended for heavy loads. M200 (B15) refers to medium strength options. The service life of concrete for floor screed is decades.
In the process of pouring the floor, you may need M250 and M300; they are resistant to groundwater and precipitation. The M300 brand is quite in demand when creating floors. It sets quickly and is resistant to wear, moisture and frost. The material has high strength, so it is used not only for filling floors, but also roads. Professionals do not recommend purchasing M350 and M400 for private housing construction due to low profitability.
Filling methods: which one to choose?
The technical features of the material and the service life are regulated by such technological parameters as:
- correct technology for preparing the solution;
- competent calculation and the required ratio of the components included in the composition;
- high-quality concreting of the floor.
This work can be done using the wet method.
To install durable flooring in your home, you should consider which pouring method is best to choose. The modern construction industry practices three main types of floor screeds:
- wet;
- dry;
- semi-dry.
Wet pouring: pros and cons
The classic flooring method is used in the treatment of large-scale areas. The disadvantages of the method include the expenditure of a large amount of time on the coating process and the time it takes for the material to harden. To fill you will need:
- Construction materials. The list of mandatory items includes hydrophobic and antiseptic primers, rough putty, waterproofing agents, damper tape and concrete composition.
- Inventory. For large volumes of work - a concrete mixer, for minimal ones - a construction mixer, guide elements in the form of beacons, a laser level, spatulas, trowels and rollers.
- Compliance with the installation process. Filling the designated area should be carried out in one working approach; such manipulation will protect against the formation of external seams and joints.
Dry pouring: features
The fastest method. Installation of a large area takes no more than one day.
This coating dries so quickly that you can lay tiles on it the next day.
The advantages of the method include the following indicators:
- quick installation;
- no need for hardening time;
- the ability to cover the surface with tiles, laminate or parquet the very next day.
The disadvantages include the rather high cost of coating. The floor screed is unstable to a humid environment; the ingress of liquid into the structure of the structure contributes to the rapid development of fungal spores and mold. In this case, it is impossible to correct the situation and a complete replacement of the floor is required. If dry pouring is not done correctly, the surface will sag and creak.
Semi-dry floor screed
To implement the mechanized method you will need:
To install such a coating, you need to purchase a damper tape.
- Building materials: damper tape;
- waterproofing products;
- cement-concrete mortar.
- pneumatic supercharger;
Recommendations for preparing the mixture
Mixing occurs the same for all cement-based compositions. For this purpose, it is best to use a concrete mixer with an electric or manual drive. A metal basin will also work. Stages of filling the container:
Bring the resulting mass to a homogeneous state, add water in small portions, then add a plasticizer. Stir for about five minutes until the dry material is completely saturated with water. It is important that the sand does not contain clay and small debris, and that the cement does not contain compactions or lumps.
Nuances of filling the floor
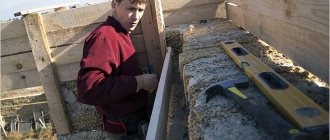
When pouring the floor in an apartment, at least a little skill in repairs is desirable. It is important to evaluate your strengths and capabilities so as not to waste time and money. There are some nuances when working with self-leveling mixtures:
1. The ready-made concrete mortar for floor screed must be handled very carefully, since it dries quickly. You need to study the information on the original packaging, which indicates the time during which you can work with it.
2. Follow the layer thickness according to the recommendations on the packaging.
3. The room temperature should not be lower than +°5C.
4. Close the windows before work.
5. Optimal air humidity is no more than 60%.
6. The coating must be completely dry, only then can you proceed to the next steps.
7. It is desirable that the components of the solution are from the same manufacturer.
8. The base for pouring the floor must be carefully prepared.
9. To ensure a uniform floor surface, install beacons.
Source
How to fill a screed with your own hands, the main stages of construction
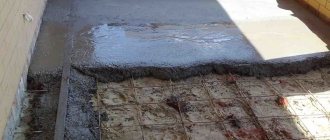
Before starting work on pouring concrete onto the ground, all vegetation is removed from its surface and the top layer of soil is removed. A concrete cushion is installed in the recess. It consists of sand, crushed stone, gravel. Typically the thickness of the pillow is 300-600 millimeters. All this must be carefully compacted. For better compaction, water the pillow.
Note! Before you start arranging the pillow, you must not forget to lay all communications, such as water supply, sewerage, ventilation.
Expanded clay bedding and crushed stone are a good protector against natural gas formations in the soil and retain heat indoors. Sand is poured on top of it for leveling. Then everything is covered with moisture-proof material, extending onto the walls of the building.
Along the perimeter of the walls, covering all layers of the structure, strips of insulation are laid, which will act as a cutting edge. A thin concrete layer is poured under the waterproofing; its thickness usually should not exceed 0.8 centimeters.
To strengthen a thin concrete layer, steel or fiberglass mesh is used; for reinforcement, you can also use steel fiber from pieces of wire. A moisture-resistant material is glued onto the finished concrete layer to prevent water penetration, protecting the house from moisture. For waterproofing, you can use a material based on modified bitumen.
Additional Information ! The waterproofing materials of the floor must be firmly bonded to the waterproofing of the walls of the house.
Insulation is laid on the waterproofing layer to create a comfortable microclimate in the house and prevent heat loss. If you make a choice between extruded polystyrene foam and polystyrene foam, preference is given to the first material, since the latter is destroyed by alkalis. The insulated floor is again covered with a film that does not allow moisture to pass through.
Note! At this stage, underfloor heating is installed, not forgetting to leave expansion joints.
The next stage is a reinforced intermediate layer using steel mesh, which is laid on the waterproofing protection, pouring concrete mortar on top. Level the cement-sand screed under the covering with self-leveling mixtures.
How to make a concrete floor on the ground with your own hands - step-by-step plan
A concrete floor in a private house on the ground is the most optimal option, which has many advantages: ease and simplicity of installation, excellent strength, wear resistance, reliability, frost resistance, relatively low cost, the possibility of subsequent installation of any type of coating (warm floors included).
Modern materials and technologies make it possible to carry out work with the highest quality and efficiency; floorboards, linoleum or self-leveling flooring, laminate or tiles, and other types of flooring can be laid on top of concrete.
Before pouring a concrete floor onto the ground, it is necessary to carefully study all the requirements and standards, the sequence of work: first the soil is studied, then preparatory work is carried out, concrete is prepared, pouring is carried out, and proper maintenance is carried out. The performance characteristics of the coating will directly depend on the accuracy of adherence to the technology.
Advantages of a concrete base
Concrete is the best material for pouring a garage foundation. It is superior in many respects to wood flooring, compacted earth, compacted gravel and has the following positive characteristics:
- significant strength;
- resistance to aggressive compounds, gasoline, oil, chemicals;
- extended operating period;
- ease of maintaining cleanliness;
- resistance to abrasive factors;
- resistant to moisture.
Knowing what brand of concrete to fill the floor in the vehicle storage room, you can create a high-quality foundation in the building for parking your car.
Step-by-step instructions for building concrete floors on the ground
The installation of a concrete floor in a private house on the ground is carried out according to a certain scheme. In short, all work can be divided into several groups.
The main stages of pouring the floor:
Definition of zero level
Before pouring concrete floors on the ground in a private house, the zero level is determined - this is the boundary of the final floor covering. All layers below the level are indicated by a minus sign, and above - by a plus sign. Usually the floor is at the level of the foundation, but there are exceptions.
The zero level must be indicated in the project; if not, you need to mark it yourself. To do this, measure one meter from the proposed floor surface and mark it along the perimeter, connecting the marks with one line. Then they retreat from the mark a certain distance downwards, focusing on the highest point of the base, drawing another line in this place.
Preparing the base
The base is thoroughly cleaned of debris and anything that might interfere. Then the arable layer is removed, which usually contains various organic components that in the future can decompose and deform the concrete floor. Usually a layer of 35 centimeters is removed from the zero level.
The soil must be compacted - it’s best to use a vibrating plate; if you don’t have one, you can use a log with a handle and physical strength. There should be no traces of shoe soles on compacted soil.
Communications
You need to think through the places where communications will pass and prepare everything before installing a concrete floor on the ground. Repairs to network entry points cannot be carried out in a concrete screed, so pipes are usually placed in pipes of a larger cross-section so that they can be pulled out and replaced.
Due to the fact that the ground under a heated house will not freeze, water pipes can be laid at a depth of 50 centimeters, for sewer networks 100 centimeters is enough, electrical cables are also laid at a depth of half a meter.
Further backfill
Next, the subsequent layers of the floor are backfilled. For concreting, the surface is compacted with a sand and gravel cushion. First, gravel is poured into a 10-centimeter layer, watered, and compacted. A layer of sand 10 centimeters thick is spilled on top and compacted. Gravel is again poured onto the sand in a layer the thickness of which is equal to the layer of sand, compacted again, then sprinkled with a thin layer of sand and compacted, leveling the base.
Waterproofing and insulation
The technology of pouring a concrete floor over the ground allows the use of ordinary polyethylene film with a thickness of about 200 microns as a waterproofing material. But it is better to choose an insulating membrane for these purposes. The waterproofing layer is laid over the entire base area with an overlap of 5-10 centimeters and an extension to the edges of the wall of at least 15 centimeters (secured with masking tape).
After waterproofing, a rough layer of concrete up to 5 centimeters thick is poured. Next, it is advisable to take care of vapor barrier - usually polymer-bitumen membranes or other materials are used for these purposes. Thermal insulation for a concrete screed can be made using a variety of materials: moisture-resistant plywood, polystyrene foam, expanded clay, isolon, basalt or mineral wool, expanded polystyrene, perlite, etc.
Reinforcement and heated floor
The design of a concrete floor on the ground involves strengthening it using reinforcement with steel or polymer mesh, metal rods, and wire. Most often, a steel mesh is chosen, which is installed on special clamps that raise the frame above the floor in order to protect it on all sides with a layer of concrete mortar.
If the load on the floor is expected to be large, it is worth reinforcing with steel rods with a diameter of up to 15 millimeters, which are folded several pieces lengthwise, crosswise (in the form of a mesh) and knitted with a special knitting wire.
The warm floor is laid with a mandatory two-centimeter thermal gap between the screed and the walls. Elements of the underfloor heating system are laid on top of the reinforcement frame.
Formwork and guides
When making a concrete floor on the ground in a private house with your own hands, you need to take care of high-quality installation of formwork and guides. In order for the floor to be horizontal, first the entire area is divided into small sections of equal size, and the bars are laid on the markings (they should be level with the zero level). To fix the guides, use clay or cement mortar.
The formwork is most often made from moisture-resistant plywood, installing honeycombs that can ensure accurate and even filling in accordance with the zero level. To make it easier and faster to remove elements after filling, they are treated with machine oil before installation.
Making concrete using a concrete mixer
Technology dictates that a high-quality concrete floor on the ground in a private house should be poured continuously, so the easiest way would be to use a concrete mixer. A mixer with a bowl volume of up to 0.75 m3 is sufficient to complete the work. Gravel, sand and cement are placed close to the concrete mixer so that the materials can be easily and quickly thrown into the unit.
First, pour water - if the volume of the bowl is 0.75 m3, three buckets are enough. Then up to 10 shovels of gravel are thrown into the water, cement is poured in, and it is allowed to dissolve in the water. Next, sand and gravel are poured in the volumes necessary to obtain concrete of the selected quality. Water is also added in the amount required for optimal consistency. At first, the tilt of the bowl should be 30 degrees, then it can be raised during the filling process. But it is not recommended to increase the angle too much.
Making concrete by hand and pouring it
Pouring a concrete slab onto the ground can be done without a concrete mixer. In this case, you need to follow technology. To prepare the solution, prepare a solid, level area measuring 2 by 2 meters, lay a sheet of steel as a base, or use a wooden box with small sides (up to 20 centimeters).
Then the pyramid is thrown with a shovel to another place, back so that the ingredients are evenly mixed. In the center of the slide, make a funnel that reaches to the bottom, pour water into it, and mix the components with the liquid with a shovel. Moving in a circle, make sure that the protective border made of dry material is not disturbed. The concrete solution is prepared in portions in accordance with the laying speed.
Next, compacted sand and a reinforced concrete structure laid on it, the guides are filled with mortar. First, the layer is leveled with a shovel, then they work as a rule. There is no need to make beacons yet, since precise horizontality is given only to the last layer of the floor. The mass is leveled using a long rule, the surface is controlled by a level.
Experts advise making the first layer from a semi-dry mass, which has a lower thermal conductivity and is easier to install. True, it is less durable, but for residential premises this is not critical. The mixture is prepared in the usual way, just adding a little less water.
Requirements for the soil, what it should be
The quality of a monolithic concrete pavement largely depends on the constituent soil surfaces and on the proximity of groundwater, the height of which should not exceed 500-600 centimeters.
On porous, loose soil it will not be possible to pour a high-quality screed made of sand and cement. The lower the soil indicators, the higher the cement strength required for the solution should be. In extreme cases, concrete is laid on a reinforcing mesh.
With a groundwater depth of up to 2 meters, the floor layout consists of:
- soil compaction;
- layers of sand and crushed stone;
- water-repellent pad;
- a simple intermediate layer or reinforced screed.
If there is deep water in the soil, the intermediate layer is laid on a backfill of crushed stone and sand.
Important! When laying a floor heating system, it is necessary to leave an expansion joint in the first layer of cement screed. This will help avoid cracks on the surface and prevent it from swelling as a result of thermal expansion.
What is the grade of concrete
Not only inexperienced, but also professional builders often do not distinguish between the concepts of brand and class of concrete. What are the differences between them, what characteristics are indicated in the project, and what are given by industrial manufacturers of mixtures? In short, the grade is the average strength of concrete, and the class is the guaranteed strength of concrete . Such a short answer is unlikely to bring clarity to amateurs; we need to dwell on this issue in more detail. Otherwise, when choosing a specific concrete for floor screed, annoying mistakes may be made with very unpleasant consequences. Eliminating them will require a lot of effort, time and financial resources.
Table of fillers for different grades of concrete
The grade of concrete is determined in laboratories after special tests of several samples of the mixture from the same manufacturer and from the same batch. Samples of certain sizes (cubes) are made, and after the mixture has hardened at standardized humidity levels and time, the parameters of resistance to physical effort are measured in laboratories. During the manufacture of a concrete structure, the concept of strength class is used; if the word grade of concrete is used, this indicates the low professionalism of the builders. What is the difference between the concepts?
Determining the grade of concrete
Looking for energy efficient solutions?
Pay attention to FORUMHOUSE geothermal heat pumps
Ground source heat pump EU (start/stop)
Geothermal heat pump IQ (pseudo-inverter)
IQ ground source heat pump (inverter)
A strip foundation is one of the most common types of foundation for a house, but it is not without a number of disadvantages. If you forget to make vents in the strip foundation (or incorrectly calculate their cross-section), then over time this can lead to problems. Due to insufficient underground ventilation, wooden joists become covered with fungus, mold and rot. Excess moisture in the basement also leads to the destruction of the concrete floor slabs of the first floor.
To avoid this, you can replace traditional vents with a closed, ventilated underground. This is discussed in detail in the article “Are vents needed in the base? ” But there is another option - to abandon the underground and build a floor on the ground based on a strip foundation, as FORUMHOUSE experts advise.
Floors on the ground: what is it ?
This structure is a monolithic concrete base (screed). Here is the construction of the floor on the ground: the screed is poured inside the perimeter of the strip foundation onto well-compacted soil, which is used to fill the foundation sinuses and a layer of insulation. A heated floor system can be installed together with a concrete base. This design accumulates heat, so it is well suited as an element of an energy-efficient home.
The following ground flooring options are available:
Let's take a closer look at the pros and cons of these options.
Mikhail1974:
– If you pour a “floating” screed, this “unties” the structure of the tape and the floor. If shrinkage occurs, the structure of the floor screed on the ground will “play” regardless of the foundation; cracks will not appear in the structure, because no tension. That's a plus. But there is also a minus - the structure “lives its own life”, separate from all other structures.
When pouring a rigid structure, the foundation/screed assembly works as a single unit. The screed will not shrink, because lies on the foundation. But if the soil is not compacted well enough, after a while it may sag and the screed will “hang” in the air. Under heavy loads, if there are walls, partitions, or supporting elements on the screed, this can lead to deformation of the base, cracks and loss of the load-bearing capacity of the entire floor structure on the ground.
How to make a floor on the ground
Both screed options have both pros and cons. The quality of concrete floors on bulk soil largely depends on the quality of compaction of the bulk soil and on how correct the design is.
Mikhail1974:
– When pouring a “floating” screed, the “foundation wall/screed” knot must really be untied, otherwise the structure may become pinched in the tape frame. Those. the floor inside the tape frame must move relatively freely, otherwise the whole point of a floating screed is lost.
A common mistake is to tie all the knots as tightly as possible. As a result, increased loads occur in structures. In the case of a floating screed, the “floor” and “foundation” elements work independently of each other.
Floor on the ground: device. Basic principles
An important rule: a well-prepared foundation is the key to a long service life of the entire structure. The backfill base (the best backfill for the floor on the ground is sand) must be spilled with water and thoroughly compacted in layers of 10-15 cm. In order to properly compact the base, filling with crushed stone is used (crushed stone should be laid under the floors in a coarse fraction).
how to dilute cement m 500 for plastering walls
kam711:
– All instructions for vibrating plates say that the plate compacts sand to a depth of 20-30 cm, but I doubt that this layer is compacted well enough. Therefore, I believe that, to be on the safe side, it is better to compact the sand in layers of about 10 cm. It looks like this:
What kind of waterproofing to put on the floor on the ground
After thoroughly preparing the base, we begin laying a hydro-vapor barrier, which will protect the floor structure from moisture. People often ask whether it is necessary to make a footing before laying this layer. After all, in order to avoid damage, welded or glued waterproofing must be placed on a flat, rigid base.
Comment from a member of our portal with the nickname al185:
– It is necessary to make a footing for laying a waterproofing layer when there is groundwater pressure. This is true for basements. A simple version of flooring on the ground does not require anything other than a simple plastic film.
The film, 150 microns thick, is laid on the prepared base with an overlap of 15-20 cm, with the seams necessarily taped. For insurance, the film can be laid in 2 layers.
As insulation, you can use polystyrene foam PSB-25 (foam plastic) or extruded polystyrene foam. It is recommended to lay a layer of insulation with a thickness of at least 100 mm.
The next stage: a screed 50 mm thick is poured on top of the insulation. The screed is reinforced with a metal mesh with a mesh size of 100x100 and a rod diameter of 3-4 mm.
It is also necessary to properly insulate the foundation, blind area and drain water from the base.
Advantages and disadvantages
The advantages of this design include:
Among the main disadvantages are:
chicken-A:
– I have been using floors on the ground for 7 years now, and would not exchange them for any other structure. Thanks to them, the house maintains above-zero temperatures almost all winter. It is only important to insulate the base and blind area.
At FORUMHOUSE you will learn how to properly make a floor on the ground, and you will be able to read reviews from the owners of such a design. If you can’t calculate how much sand is needed for a floor on the ground and whether high groundwater allows floors on the ground, our full FAQ can help you. Check out the photo report on frame construction using Finnish technology. And our video reveals all the nuances of constructing a shallow strip foundation.
Source
What is concrete class
Let’s say the brand of the existing concrete floor is M 100, but certain sections of the screed always have slightly lower strength parameters (50 kg) and approximately the same amount with higher ones (150 kg). Strength from the minimum value to the maximum is distributed according to mathematical statistics corresponding to the normal distribution. If you plan the average strength of a floor screed, then in practice, in fact, half of the products will have strength parameters that are too high, and the other half will have insufficient strength parameters.
Classes and grades of concrete
When ordering a floor brand with minimum strength, the customer signals a deliberate reduction in the required indicators, which has a negative impact on the durability and operational safety of the building.
To eliminate the described problems, the ensured strength of concrete is used - the most objective and universal definition, called the class of concrete for pouring floors.
What determines the strength of precast concrete?
If we keep in mind that the distribution area is calculated by the formula, then the strength class is a cutoff point indicating the minimum values from which the area of the figure is equal to the security. If the endowment t = 0.95, then the area should be the same. 95% is the generally accepted standard for the strength of all concrete structures, regardless of their purpose. The fact is that in the calculations, various physical concepts of strength and additional safety factors are used, which completely eliminates the possibility of emergency unforeseen situations due to the low strength class of the concrete screed. We'll talk a little more about these parameters below.
Scheme of the main types of concrete macrostructure
If you set a strength class of 80 kg, then 95% of the floor area will have a strength higher than this indicator. Concrete class is a statistical concept.
Prices for cement M500
How to calculate concrete for screed
The algorithm for calculating the amount of concrete that needs to be purchased or prepared independently is simple and consists of several mathematical examples. The initial data for the calculation are:
- Length of the room in meters.
- Width of the room in meters.
- Screed thickness in meters.
- Shrinkage coefficient.
Let's assume that our room has the following dimensions: 4x3 meters, the thickness of the screed is 0.04 meters, and the shrinkage coefficient is 1.022. We multiply the numbers and get the “frequent” amount of concrete in cubic meters: 4x3x0.04x1.022 = 0.49 cubic meters of concrete will need to be produced or purchased to pour a floor screed in a room measuring 4x3 meters.
Many readers of this article may have a question about the numerical value of the shrinkage coefficient of 1.03. It is well known that standard cement mortar and concrete decrease in volume (shrink) when setting and gaining strength. The exception is special expanding concrete.
The amount of shrinkage is characterized by the shrinkage coefficient and depends on a number of factors: aggregate size, amount of foreign impurities, etc. To obtain the true amount of shrinkage, it is necessary to carry out a series of tests and calculations. In order not to overwhelm a simple developer, it is recommended to use the average value between the minimum coefficient of 1.015 and the maximum of 1.03 - 1.015+1.03/2= 1.022
How do the parameters of concrete depend on the method of its production?
The percentage of concrete components plays an important role in determining the cost and has a significant impact on strength parameters. Of course, a lot depends on the technology of work, weather conditions, skills of workers, etc. But the recipe among these factors occupies a leading position - no one will be able to achieve high strength of a concrete floor screed if the material is of low quality. How do the parameters of concrete depend on the methods of its production?
Manual method
Lowest quality concrete. The manual method means not only mixing the material manually using shovels, but also the use of concrete mixers. The main difference between this method is that the amount of components of cement, sand and gravel is determined manually using buckets or shovels. Buckets are rarely used and only when producing a small volume of material. It is long, difficult, and the loss of time and physical strength increases significantly. If the volume of finished concrete is several cubic meters, then it should be prepared in a concrete mixer . But manual measuring of concrete components has a great influence on the grade and class of concrete; the spread of properties is very large.
At concrete plants with outdated equipment
The quality situation is much better; sand, gravel and cement are measured using special equipment before being fed into the mixer. The spread in comparison with the first method is much smaller.
On the most modern lines
Very precise production equipment is used here. Not only the weight, but also the humidity of the components is controlled. The variation in the quality of the prepared mixture is the minimum possible today.
The grade of concrete is the same in all cases; it is determined as the average value of several samples. For hand-made concrete, the cutoff, which determines the class of concrete, is located far from the middle of the graph, and for concrete made using high-tech equipment, the cutoff is located very close to the mark of the concrete grade. Thus, three different methods of producing the same brand of concrete result in different classes of concrete.
Several types of equipment for concrete production
Technology of pouring concrete floors, features and advantages
Today, pouring concrete floors is very popular all over the world. Such floors have higher strength, durability, and are also easy to clean. Taking into account all these features, they were most often used in industrial premises, where enormous loads are expected on the floor surface. Also, since they are unpretentious to a variety of conditions, they are very often used in places with high humidity.
Recently, when various technologies for heated floors have appeared, the use of concrete has also become relevant in apartments in living rooms. Given the enormous popularity of this material, the question increasingly arises of how to correctly carry out the entire process of pouring a concrete floor. This article will discuss all the nuances regarding this issue.
The principle of laying a concrete floor
Oddly enough, concrete can be laid on almost any surface. It will adhere perfectly to floor slabs, on top of old wooden or concrete floors. It is most often used in the construction of houses and cottages, where laying is done on the ground itself. Since this is an undemanding material at a low price, the installation of such floors will not require large investments.
To obtain the most durable and long-lasting coating, you need to thoroughly know all the stages and various technologies, as well as all the possible nuances when using this material on different coatings. In general terms, the technology for making a concrete floor comes down to the following points:
- laying thermal and waterproofing throughout the entire area;
- reinforcement of the entire surface to give maximum strength;
- installation of orientation beacons to obtain the most even surface possible;
- preliminary laying of the solution on the surface followed by polishing it;
- leveling screed that creates an ideal surface.
Moreover, if you decide to carry out all the work yourself, you should remember that depending on the initial surface, some steps may not be applied, while others, on the contrary, will be added.
To prevent cracking of the screed, special expansion joints are used, which come in three types. These are shrinkage, insulating, and structural. If you decide to do all the work yourself, you need to apply these seams on time. They should not be applied in any way immediately after pouring the screed.
Pouring the base with concrete
On the other hand, when arbitrary cracks have already appeared, they are of no use. Such joints should be to a depth of no more than 1/3 of the entire concrete covering. There is no need to worry that after the entire surface has dried, these seams will remain open throughout the entire floor, since they are sealed with a special sealant.
How to make a concrete floor in a private house
Before pouring concrete onto a surface in a house, you must clearly remember that a special backfill must first be made on open ground. However, a legitimate question immediately arises: what is the best way to make it? For this, materials such as crushed stone, gravel, and sand are usually used, and they are laid in layers, 10 centimeters each. Gravel is placed directly on the soil, which must be thoroughly watered so that it compacts. Sand is placed on top of it, which must be thoroughly compacted. The final layer is laid with crushed stone, which also needs to be leveled and thoroughly compacted.
However, not in all cases it is necessary to add bedding. You can do without it in cases where groundwater is no closer than 4 meters from the floor level:
- If there is motionless soil under the house, which is a solid foundation.
- If the room is heated in winter, since in our latitudes the soil freezes very deeply, resulting in a destructive effect on the foundation.
- Moreover, if you are pouring a concrete floor in the basement, then you only need to take into account the close location of groundwater.
Drawing the floor level or the so-called zero mark
As you probably already know, indoor floors are done last. In order to get an ideal result without a slope in one direction or another, it is necessary to first apply the so-called “zero level”, which will show us to what level we need to pour concrete.
Regardless of the type of room, all markings should start from the doors and gradually move along the room. These instructions will help you get an excellent surface without much effort:
- All dimensions must be made from the level of the doors, since they cannot escape anywhere.
- It is necessary to measure 1 meter from the lowest point in the door opening and place a mark on the wall.
- Using a level, draw a horizontal line evenly around the entire perimeter of the room.
- From the resulting line you need to measure down exactly one meter and draw another line along the resulting level, which will be our zero level.
- Also, for convenience, it is recommended to drive nails into the corners at this level and pull a cord on them, which will clearly show our level.
At the end of all these stages, it will immediately become clear how thick the solution needs to be laid out and where you have uneven floors.
The process of pouring a concrete floor
Having made all the measurements that were described in detail earlier, we can assume that the main work has already been completed, since pouring the floor with concrete is considered the final stage, before which we still need to do a lot of preparatory work.
If concrete is laid in a room where the floors are made of natural soil, then it is necessary to consider heat and waterproofing. In this case, either a special membrane or an ordinary high-density oilcloth is stretched over a previously prepared bedding, the edges of which must be brought to our zero level.
Most often it happens that it is not possible to lay waterproofing in a continuous sheet; in this case, the material can be laid overlapping with a margin of 20 centimeters. On top of this film you can lay thermal insulation, which can be made of polystyrene foam, expanded clay, expanded polystyrene foam, or polyurethane foam.
A metal mesh is installed on top of these materials on special supports. It is necessary to ensure maximum surface strength. After this, you can safely begin mixing concrete and applying it to the prepared surface. Pouring a wooden floor with concrete follows a similar principle. In this case, materials such as OSB, plywood, fiberboard and chipboard act as a substrate where floor slabs are used, but it is necessary to perfectly level the floor.
Mortar for pouring concrete floors
When pouring a concrete floor, oddly enough, the quality of the resulting concrete is of great importance. This directly determines how this material will be stored in the future and how long it will last. Thus, if you decide to do all the work yourself, you need to make sure you have a concrete mixer, since it is very difficult to mix such an amount of concrete manually, and it is almost impossible to obtain the required quality.
To obtain a high-quality material, many experts recommend the additional use of perlite, which is formed from volcanic rock and provides increased strength to concrete, and also significantly increases fire safety.
It should be remembered that perlite, when in contact with water, loses significantly in volume, so compliance with all proportions is one of the main conditions for obtaining high-quality material. The grade of concrete for pouring the floor directly depends on the amount of cement in the solution. To correctly calculate this value, you need to clearly know what brand of cement you are using. For example, cement M400 or M500 is most often used for flooring.
When mixing the solution, there is one little trick, namely, during the kneading process, you need to pause for 10 minutes so that all the components are perfectly soaked, and with further mixing they mix perfectly with each other. If this is not done, the solution may delaminate and all the work will be done in vain.
The pouring of heated floors with concrete also deserves special attention. This kind of work needs to be done very carefully, and it also takes much longer and lasts for almost a whole month. Since concrete is very heavy, in this case pipe heated floors are used. To prevent concrete expansion and further cracking, special expansion joints are used. In this case, the concrete is placed on the turned-on system so that no unpleasant surprises occur when it hardens. In this case, the temperature in the system must be gradually increased.
The following tips will help you avoid several troubles:
- To obtain high-quality concrete, you should not use dirty water, as well as rainwater, which has various chemical impurities.
- If you don’t have any other crushed stone on hand other than limestone, then you can use this one. At the same time, its cost will be much cheaper than usual.
- It is recommended to start using concrete floors under heavy loads no earlier than after 28 days. This is due to the fact that it is during this period of time that the solution dries 100%. Although it will initially be strong to the touch, the weight of a car, for example, can easily push it through, leaving unevenness.
- After the floor is poured, it needs to be looked after in a special way for a week. To do this, it is necessary to periodically water the entire surface with ordinary water, and then cover it with ordinary film. This method avoids cracking of concrete when drying.
remvizor.ru
How is concrete class determined?
Our country has outdated standards; no one uses such methods in developed countries anymore. The class of concrete is determined by the formula B = M (1-v×t) . Where:
According to the currently valid technical conditions, the coefficient of variation is 13.5%, and the availability is 95%. These are stable values. The indicated values should be subtracted from unity to obtain a transition coefficient from the grade of concrete to its class. The transition coefficient is ≈0.87.
Concrete strength gain schedule
Accordingly, to determine the strength class, we do not need to carry out any research, but simply multiply the grade of concrete by the transition coefficient. In order to make life easier for illiterate foremen, the building codes have ready-made tables; you can find the brand of concrete and immediately find out the class of products made from it.
For responsible enterprises producing precision products, this state of affairs is not considered acceptable. As a rule, their coefficient of variation does not exceed 5%, and not 13.5%, which means that the concrete grade M 300 corresponds to class B 30, and not much lower. Due to this, it is possible to increase the cost of production, and the profitability of the enterprise increases significantly. Of course, during the existence of the USSR, no one was particularly worried about quality and profitability; everything was state-owned and no one’s. This explains the established large coefficient of variation; marriage is legalized at the level of regulations.
How to choose a concrete supplier?
Due to the high demand for concrete, the domestic market is oversaturated with various offers. Naturally, each seller offers the best prices, quality and delivery conditions. Therefore, choosing a responsible supplier from the total number of manufacturers and resellers is quite a difficult task.
Main selection criteria:
- It is advisable to focus on companies that have their own production facilities for producing concrete. As a rule, such organizations offer the best prices and strictly monitor product quality;
- It is worth asking the potential supplier about the presence of laboratories at the plant that monitor each batch;
- It is better to choose from manufacturers located directly in your area or region. This will help save on shipping costs;
- Be sure to check the availability of all necessary documents and quality certificates.
meets all the above requirements and is ready to provide you with its services in the field of concrete production. For additional advice, please call +7 (812) 336-43-77.
What measures are used to ensure the reliability of concrete elements?
Some developers have concerns that they will have exactly this 5% that does not meet the quality of the concrete floor screed. The result is premature destruction, the need for unscheduled repairs, etc. There is no need to be afraid, such problems cannot arise in principle, everything is foreseen at the design stage. For example, for concrete M 350, class according to table B 30, the following precautions are used.
Testing concrete for strength
In total, the safety factor increases the parameters of concrete structures at least three times. Accordingly, financial costs increase within the same limits.
Concrete sample during testing
Conclusion. The reliability of the structure is ensured by a significant increase in concrete consumption, an increase in the estimated cost, etc. If you want to build high-quality and relatively cheap buildings, it is recommended to purchase concrete only from those manufacturers who have the most modern high-precision equipment for preparing concrete mixtures of various brands.
Nuances of filling the floor
Regardless of the brand, several nuances must be taken into account when pouring a concrete floor:
- The finished concrete solution dries very quickly. Therefore, floor screeding must be carried out as carefully and quickly as possible.
- The thickness of the concrete layer should correspond to the manufacturer's recommendations on the packaging.
- Floor screeding is carried out at temperatures above 5 °C. Air humidity should be no more than 60%.
It should also be remembered that before proceeding with the next steps on arranging the floor, the concrete base must be completely dry.
Practical use of various grades of concrete
When developing the architectural elements of a building project, architects fulfill two important conditions: they guarantee sufficient strength for long-term and safe operation of the structure and achieve the minimum estimated cost. The higher the grade of concrete, the higher the cost of its production.
Table. What grades of concrete are used during construction work?
| Concrete grade | Operating parameters and areas of use |
| The weakest solution, the cheapest in price. It is used in industrial construction to create non-essential architectural elements in large quantities. It is often used during the manufacture of concrete pads for reinforced concrete structures, pedestrian paths, sidewalks and for leveling the base of more critical structures. Such concrete is not used for floor screed. | |
| Purpose – unloading layer on a sand cushion to level out swelling processes during freezing/unfreezing of the soil. In most cases, it is reinforced, thereby increasing the bending strength of the material. Can be used for screeding floors in outbuildings that do not require heavy physical activity. Another area of use is screeding on reinforced concrete floor structures to level external surfaces. In this case, the load forces are borne by the reinforced concrete slab. | |
| It is used for concrete floor screed on the ground, and the finishing coating on the joists. It can withstand significant loads; to increase strength, depending on the thickness, it is reinforced with steel rods of periodic profile. It is also used for pouring pile foundations for low-rise buildings, during the manufacture of car platforms, retaining walls, and light-load load-bearing structures. | |
| Industrial concrete of this brand is rarely used in private construction due to the insufficient accuracy of dosing ingredients manually. But in terms of physical parameters, it satisfies private developers; such concrete is universally applicable and is used not only for the manufacture of floor screeds. The material is suitable for pouring shallow reinforced strip foundations; it perfectly withstands compressive and tensile forces. | |
| It is considered the leader in the number of sales of industrially produced concrete and is excellent for most concrete work. The quality and cost parameters suit developers of both industrial and individual construction. Suitable for the manufacture of monolithic ceilings, used for pouring flat roofs in use. This type of concrete is used to make a screed for any finishing flooring. Can be used independently when pouring floors of industrial buildings. | |
| Physical strength indicators make it possible to use concrete for the manufacture of stairs, balconies, crossbars, beams and hollow core slabs. In private construction, it is recommended to use it when pouring bowls of large concrete pools, monolithic walls and ceilings. Concrete of this brand has excellent frost resistance and is not afraid of dynamic and static loads. | |
| Only special grades of concrete used in military construction have greater strength. This type of concrete is used for the construction of bridges, including railways, reinforced concrete elements for special purposes, etc. It is expensive and is recommended to be used only in exceptional cases during the installation of heavily loaded architectural elements. |
As can be seen from the table, it is advisable to use concrete grade M 200 and higher to fill the floor, but in each specific case an individual decision should be made. At the same time, attention is drawn not only to indicators of physical strength and performance characteristics, but also to the cost of the material and the complexity of its manufacture.
Installation of concrete floor in a country house
Installation of concrete floors on the ground is carried out in garages, workshops, industrial premises with intense loads and on the ground floors of a private house. The advantage of such an overlap is reliable isolation from groundwater, safety, durability, strength and simplicity of technology: all stages of the work can be completed by yourself, without the involvement of construction companies. The disadvantage of pouring is the need for insulation and the higher cost of consumables compared to wood floors. Work begins after the walls have been erected and doorways have been marked; at this stage it is easy to mark on the same level in all rooms of a private house.
Table of contents:
Choosing concrete for the floor
The required brand of mortar for pouring is taken into account the future load and compressive strength. For floors in a garage, apartment or small utility rooms, concrete grades M100, 150 and 200 are sufficient. M100 grade is often used as a preparatory material before carrying out reinforcement work or when installing heated floors. The optimal concrete for pouring in a private house is M250 and 300 (provided there are no aggressive influences). The last brand is the most popular, it has high abrasion resistance, good frost resistance and water resistance.
It is not advisable to use more durable and expensive types of concrete in individual construction, with rare exceptions: building a house on a site with moving soil or a significant level of groundwater. To fill the floor, you need a high-quality solution: you can buy it ready-made or mix it in a concrete mixer. The type of coarse filler is of great importance; when heavy loads are expected, crushed stone from hard granite rocks or gravel is used. For finishing screed, concrete M200 (medium strength) is recommended.
Step-by-step technology
The main stages of floor concreting:
- Level marking.
- Preparing the base: leveling and compacting the soil.
- Backfilling the cushion with crushed stone and sand.
- Laying a waterproofing layer.
- Insulation of floors.
- Installation of reinforcement frame.
- Installation of formwork and beacons.
- Preparing and pouring the solution.
- Finishing screed made of liquid concrete or cement-sand mixture.
1. Preparatory work.
First of all, the level of the finished floor is marked on the walls, future doorways serve as a guide, then the zero line is determined. To achieve maximum accuracy at this stage, it is advisable to use a laser pointer. After marking, the room is cleared of construction debris, the soil is leveled along the marked zero line (removed or topped up) and thoroughly compacted. Ideally, you get a hard and level platform that can support the weight of an adult when walking. Next, 5 cm of crushed stone and at least 3-4 sand are backfilled, all layers are leveled and also compacted.
2. Hydro- and thermal insulation.
The technology for concreting a floor requires mandatory protection from moisture; for this purpose, polyethylene film, membranes or roofing felt are spread over the prepared cushion. The material is laid with a slight overlap, the joints are taped with sealing tape. Good reviews have ready-made liquid waterproofing bases that are almost completely impermeable to moisture. Standard materials are used as insulation for concrete floors: polystyrene foam, mineral wool, expanded clay, polyurethane foam, perlite, cork. Some types must be protected from the alkaline effects of cement; this is usually indicated in the attached instructions.
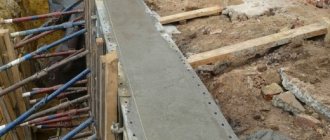
3. Reinforcement and formwork.
High-quality pouring of a concrete floor involves the installation of a rigid frame, the design looks like a regular flat mesh, in increments of 10 cm. It is fixed 2-3 cm above the bottom layer (it turns out to be in the middle of the concrete). Next, guides and formwork are placed; these structures are used to facilitate the concreting process and to achieve maximum evenness of the floor. Without them, it is almost impossible to do the work yourself. After installation, the formwork divides the room into compartments with a precisely calibrated level of the future floor; upon completion, it is disassembled and removed from the concrete.
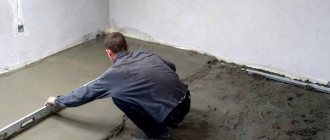
4. Screed technology.
To ensure the integrity of the ceiling, this step is carried out in one or two passes; the easiest way is to use a ready-made solution. Uncured concrete is carefully compacted (preferably with a vibrator), smoothed out and left alone. To do everything correctly, you should wait for the solution to completely harden (according to the instructions - from 3 to 4 weeks). To prevent the formation of cracks, the surface is covered with plastic film and periodically moistened, and natural ventilation is organized in the room. Next, the floor screed is poured, at this stage the ideal evenness of the floor is achieved. Filling the cells with concrete begins from the far corner of the room, the finishing coating dries for at least 3 days.
How to avoid mistakes when filling
The degree of complexity of the work is average, almost all of it is done by hand. But the organization of such a floor requires large volumes of building materials; in the absence of experience and ignorance of how to properly pour the floor with concrete, it is recommended to turn to specialists. When planning and forming, the height (horizontal) of each layer without exception is monitored using a building level (or better yet, a laser pointer); ignoring this stage leads to cracking even during the initial setting of the solution.
In some cases, installation of thermal insulation is not carried out, but this does not result in cost savings, but in significant heat losses through the concrete floor. The latter implies an increase in heating costs, especially when individually heating a private home. Therefore, it is better to install at least the cheapest insulation (fill in a layer of expanded clay).
A typical mistake when reinforcing is the use of thin rods. At first glance, this will help save money, but during operation the concrete floor often becomes deformed; without a reliable frame, its service life is significantly reduced. The joints are properly fixed, but not by welding, but by wire. A correctly placed frame is completely hidden in concrete. Otherwise, the likelihood of damage to the insulation layer above the insulation increases, and corrosion processes may occur.
Tips and tricks:
- To avoid mistakes, when forming concrete floor layers, at the marking stage, level lines are drawn or cords are pulled along them.
- To prevent the destructive effects of groundwater, before filling the crushed stone, a layer of liquid clay or bitumen is applied to the compacted surface.
- When using waterproofing membranes, carefully study the instructions to select the correct installation side.
- To improve the performance properties of the screed, it is recommended to grind and treat it with cement laitance.
- When choosing tile insulation, its placement scheme is thought out in advance, taking into account the additional laying of strips, at least 10 cm wide, along the entire perimeter, this reduces heat loss through the base of the building.
- Wooden or plywood formwork elements are lubricated with technical oil or other composition to simplify their removal from the concrete.
Average filling cost
The services of specialists are needed in the case of multi-level floors, large volumes of work, carrying them out in a wooden private house or an unheated room, for limited periods or when installing in the cold season. The minimum price for pouring 1 m2 is 500 rubles, when reinforcing concrete it increases by 150–200, waterproofing by another 350, organizing flooring by 400. The cost of work is influenced by the condition of the room and soil, the complexity of execution, and the need for additional waterproofing.
The costs of materials are taken into account separately, approximately for 1 m2 at least 2800 rubles are required (this includes a crushed stone base, concrete and reinforcement), and when using gravel this value increases. Ready-made primer mixtures are expensive (up to 1800 rubles per 1 m2). In general, pouring concrete floors with your own hands allows you to save about 1,200 rubles per 1 m2.
stroitel-list.ru
Tips for making your own concrete
We will look at an example of making concrete with an electric concrete mixer. The equipment must be clean and in good working order, connected to power in compliance with all requirements of the PUE and mandatory effective grounding. The concrete mixer works with wet components and is constantly touched by workers. This mode of operation requires unconditional compliance with safety regulations. Concrete grade M 200 is being prepared; it is a mixture of universal use and is suitable both as a load-bearing base for finishing floor coverings and as the main floor of some buildings and structures.
Calculator for calculating the amount of ingredients of a mortar for floor screed
When making concrete, you need to give three and a half parts of sand and five and a half parts of crushed stone for one part of M 200 cement. The proportions are written with the formula 1:3.5:5.5. Water is added taking into account the moisture content of the ingredients and the required density of the solution. Before starting work, it is necessary to calculate the amount of cement, sand and concrete. You need to buy them with a reserve of about 10%. The fact is that it will never be possible to accurately determine the volume of building materials; unforeseen situations always arise that increase the actual consumption.
Example of proportions for preparing concrete
Step 1: Turn on the concrete mixer and pour water into it. Depending on the planned volume of the mixture, you can pour one or two buckets.
Important. Never pour cement onto dry sand or crushed stone; during rotation, it forms dense insoluble balls, which significantly reduces the quality of the finished concrete.
Water is poured into a concrete mixer
If there is a need to increase the strength of concrete, then various plasticizers and fiber fibers can be added to it. Proportions and technology are indicated by manufacturers on the packaging. You must follow their recommendations exactly.
Step 2. Practitioners advise throwing several shovels of crushed stone into the water; it speeds up the process of cement dissolution. Then you need to add cement in the required quantity.
Gravel is added (crushed stone can be used)
Step 3. After the cement has completely dissolved, begin to gradually add the remaining portion of crushed stone.
Step 4. At the last stage, sand is added. It absorbs water perfectly, and with its help you can precisely regulate the viscosity of the solution. Water is added as needed.
Sand is added at the end
Step 5. The finished solution is poured into a special container or onto a prepared area on the floor. The choice depends on the volume of the solution and the practical skills of the builders.
The solution is almost ready
Procedure for pouring a concrete floor
To produce a flat concrete floor, the first step is to prepare the surface. After that, the insulating material is laid and the pouring process begins. At the preparation stage, the required layer of soil is removed and the surface is compacted with gravel or crushed stone. Sometimes crushed brick is added. The thickness of the screed is made within 5-10 cm. When planning to accommodate additional loads with the screed (in a garage, for example), the screed is reinforced with reinforcing mesh.
Concrete floor diagram.
The cable is placed in special gutters and a level is placed: a line 1 meter high is drawn along the entire perimeter of the room from the base of the doorway downwards. Wooden wedges are driven into the ground in the center of the room and along its walls (1 cm deeper than the completed level) and gravel is poured. Then the wedges are removed, a layer of sand is poured in and leveled. Lay polyethylene film and divide the room into strips using slats.
Begin pouring from the far corner so that the layer of the poured surface rises slightly above the level of the slats. Using the rule, the surface is leveled. The slats are removed one by one, filling the voids with solution, gradually moving towards the entrance. At the end of the pouring, all strips are covered with film and left to harden, constantly moistening.
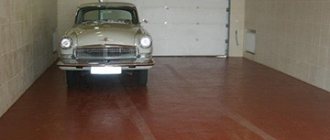
If the floor is poured in a garage, then the fresh flooring is painted or polished. Polished concrete floors are made using special professional grinding equipment. This creates a concrete surface that is smooth and even, with the possibility of decorating it. For example, in shopping centers they install colored surfaces made of polished concrete. They are easy to care for and durable. If a concrete floor is poured into a home, then a laminated or natural wooden floor is usually used. Wait a while to let the screed dry before laying the boards.
It turns out to be very difficult to assess the moisture content of the slabs, lay a vapor barrier layer and provide for all technological requirements.
Therefore, most owners choose the help of professional builders. Because of this, the demand for concrete floor installation services generates a high response among many contracting organizations.
Answers on questions
How to determine the quality of a concrete solution by eye?
This question interests almost all novice builders. The test recipe is very simple. There is no need to make any cubes, especially since to test their strength you need to have special laboratory equipment. Checking the concrete is simple - if after an hour clear water appears on the surface, then there is not enough cement, you need to increase its volume or reduce the percentage of other ingredients. It is better to remember the number of shovels of cement, sand and gravel per mixer, and then use the practical proportions available.
How to get high-quality concrete solution
How long can ready-mixed concrete be left in place?
Another problem of interest to beginners. But they need to know that concrete hardens not because the water completely evaporates. This opinion is fundamentally wrong. Concrete hardens through chemical reactions between cement and water, which begin from the moment the mixture is prepared. If water is added to hardened concrete and mixed, its strength will decrease significantly; a significant part of the cement has already bonded with the liquid and no longer affects the parameters of physical strength.
Video – Tips for mixing concrete
How to make mortar to fill the yard?
The proportions of concrete for pouring the yard, floor or foundation will be approximately as follows:
- 1 part cement,
- 2.8 parts sand,
- 4.8 parts of crushed stone,
- water - 20% of the total volume of the mixture.
Interesting materials:
How to find out that Viber has been deleted? How to find out the IP address of a remote computer on the network? How to find out when a contact page was deleted? How to find out who has been removed from Tinder couples? How to find out the port for a remote connection? How to find out visited sites if the history is deleted? How to find out your remote IP address? How to find out the deleted history of visiting sites? How to delete browsing history on iPad? How to delete all music in iTunes?
Several frequently asked questions about rough screed
Inexperienced builders often try, in order to save money or improve performance characteristics, to replace the recommended materials for backfilling the rough screed with others.
Filling with expanded clay instead of crushed stone
Don't use broken bricks
Example of floor waterproofing
In the photo, crushed stone is spilled with cement laitance
Expanded clay spilled with cement
Now that we have dealt with most of the questions regarding the features of the technology for constructing a rough screed, we can give step-by-step instructions for pouring it.
Schemes of the rough screed device
Diagram of a concrete floor
An example of a floor installation on the ground
Option for ground screed with expanded clay
Building codes and regulations recommend using several options for rough screed depending on its location in relation to the foundation, ground level and proximity to groundwater.
Connection of the floor along the ground to the strip foundation
Floor on the ground on belt extension
The ground floor is adjacent to the wall of the strip foundation
The ground floor is located above the foundation strip
short curtains for the kitchen with a balcony door in a modern style
There are no universal recommendations for the location of the rough screed; it all depends on the operating conditions and architectural features of the house. The only requirement is that the position of the door frame must be planned even before the rough screed begins; the level of the finished floor must be located at the level of the threshold.
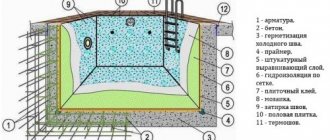
Concrete floor pie on the ground
What factors influence the construction technology of rough screed
Ground water level.
Ground water level
If they come closer than two meters to the surface, then be sure to add sand and gravel. The bedding serves to prevent the absorption of moisture by soil capillaries. If there is a bedding, then the use of a film to retain cement laitance is mandatory. If the rough screed is done directly on the ground, then the film does not need to be placed.
The photo shows crushed stone bedding
Important. The location of groundwater must be determined in the spring; it is during this period that it rises the most.
If the floor structure is intended to accommodate heat transfer fluids, then the rough screed must have a compensating gap between the foundation. Such designs eliminate the negative impact of thermal expansion and eliminate the possibility of cracking or swelling of the rough screed.
If the planned load on the floor can exceed 200 kg/m2, then reinforcement is required. The fittings parameters are selected individually for each case. The same approach is needed in cases where it is planned to install interior partitions on the floor. You should not rely only on the reinforcement of the finishing screed; its physical characteristics do not allow it to withstand heavy loads.