Building a house is a long-term process and includes a huge number of works in various directions. This includes the construction of walls, the construction of roofs, and a host of other types of work. One of the required stages is the rough screed. It is necessary to create a primary base, on which the finishing screed or finishing coating will then be laid. A rough floor screed does not require special qualifications of the builder, but, nevertheless, involves a large number of works associated with its creation. What types of screeds are there? What materials are needed for the job? We will answer all these questions later in the article.
Rough screed reinforced on the ground
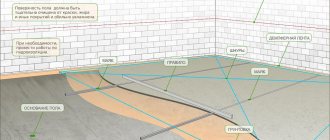
Floor pie on the ground
Creating smooth floors in a new home is not the easiest thing. And it is the construction of a rough screed that is the main step on the way to a level base suitable for laying various types of coatings. It ensures the reliability of the base and its strength. This is a rather labor-intensive and time-consuming process, but at the same time it is financially quite economical.
Making a subfloor in a private house
As a rule, laying the rough screed on the first floors is done directly on the ground. And most often, ordinary concrete mixture made from sand and cement is used as the base material.
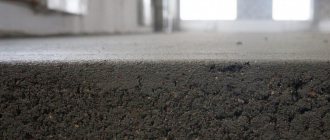
Rough screed
Floor screed mortar
However, the process of creating a rough screed cannot be called completely simple. The fact is that it involves laying several layers of different materials and several preparatory stages:
- soil preparation - it must be thoroughly compacted;
- laying sand and gravel mixture;
- flooring waterproofing material, insulation;
- installation of the rough screed itself;
- installation of finishing material.
Thus, the floor consists of several layers. And this design has its own name - floor pie. It may also contain a reinforcing layer. Reinforcement is necessary to increase the strength of the screed.
Footing for floors on the ground
Expert opinion
Afanasyev E.V.
Chief editor of the pol-exp.com project Engineer.
A rough screed can only be installed on dry soil. It will not be possible to create a full-fledged one in damp conditions, as problems with waterproofing may arise. Also, a rough screed can only be installed if groundwater is at least 4 m below the surface.
Installation of rough screed in a private house
Also, during the installation of the rough screed, a floor heating system and other communications can be installed inside, if necessary according to the house construction project.
In general, a concrete floor on the ground in private construction is probably the most acceptable option for creating a foundation. It is often installed inside garages, on terraces, verandas, in warehouse premises and others.
Concrete floor in garage
On a note! Most often, concrete floors on a soil base are installed where there is no severe cold in winter, that is, in the middle or southern zone of the Russian Federation. In cold regions, it is recommended to use wood to create the subfloor.
This type of foundation appeared in the country relatively recently, during a period when there was a shortage of wood building material. Previously, low-rise construction was carried out without the use of concrete mixtures - houses were built on a wooden foundation, which attracted rodents and other pests/parasites. However, now it is quite difficult to find a wooden base - creating a concrete floor is both cheaper and easier.
In the photo - crushed stone bedding
What is their service life?
The service life of a monolithic slab is estimated by experts as very long - some sources estimate it at 100 years. At the same time, contractor companies give a guarantee for the stove for about 15-30 years, which makes one doubt the long service life.
The reasons for this discrepancy may be differences in technology, operating conditions and other factors affecting the material and design. Accurate and confirmed data is not yet available, since the technology appeared relatively recently and statistics have not been collected.
For strip bases, the service time is determined much more specifically. For prefabricated brick belts, 30-50 years are allotted, and for FBS - 50-75 years. Monolithic concrete strips have a design life of up to 150 years.
Main advantages
If we consider the main advantages of creating a floor on the ground, we can identify the following.
- Simplicity of all work. Overall, creating a floor cake with the right approach only takes a few hours.
- High strength and resistance to deformation will ensure a long service life of the floor finish.
- This base has good thermal, hydro and sound insulation properties. Such a floor will not freeze critically even in cold weather, which will keep the house warm and cozy.
- One of the factors is economy. Arranging a rough screed is not as expensive as it might seem at first glance.
Subfloor on concrete floor
Thanks to all these advantages, many future home owners choose a concrete subfloor as a base, rather than one created from any other materials.
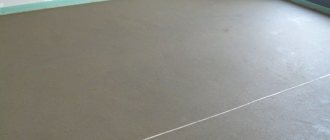
Final leveling of the concrete floor
Which type is built faster?
When pouring a concrete strip or slab, you have to let the concrete sit for a certain amount of time. This greatly slows down construction, but in this case it is impossible to speed it up. When creating a prefabricated strip or laying ready-made reinforced concrete slabs, construction time is significantly reduced.
In addition, pouring concrete is possible only in the warm season, which significantly limits the possibilities of creating monolithic slabs or strips, while prefabricated structures, with some restrictions, can be built at any time of the year.
Therefore, the speed does not depend on the type of base, but on its design.
Types of rough screed
Rough screed, like regular screed, can be of different types. It all depends on the installation technology and materials used. It can be performed using both dry and wet methods.
A dry floor screed is a kind of multi-layer cake, where the layers are vapor barrier (or waterproofing) material, expanded clay or sand, which acts as a dry “cushion”, as well as any leveling material such as chipboard, OSB, plywood or gypsum fiber, depending on the wishes of the future owner Houses. Often the material can be laid not in one, but in two layers, with individual sheets fastened with self-tapping screws.
Backfilling dry screed along beacons
A wet screed is made on the basis of a cement-sand mixture, which will be poured on top of previously laid other layers and carefully leveled. A waterproofing layer and insulation can be laid under it, and a sand cushion is mandatory.
Wet floor screed
On a note! There is also a semi-dry screed. If in the previous version the mixture during preparation and use will resemble the consistency of sour cream, then in the version with a semi-dry screed it will look like wet sand.
Semi-dry screed over heated floor
Schemes of the rough screed device
Depending on the level at which the groundwater lies, as well as depending on the ground level and the position of the screed relative to the foundation, several types are distinguished.
Table. Types of arrangement of rough screed.
| Type of screed | Description |
| Screed below ground level | This method is used if it is planned to arrange food storage rooms or warehouses under the floor. In this case, the screed is located below the ground level, adjacent to the foundation. |
| Screed at ground level | Can be used both in industrial construction and in the construction of residential low-rise buildings. The screed is located at ground level and adjacent to the strip foundation. |
| Screed above ground level | In this case, the screed is mounted above the foundation level; it is most effective and advisable to use it in places where groundwater lies quite close to the surface, in areas where the risk of floods and streams is high. |
In general, there is no universal scheme for arranging a screed - depending on the design of the house, it can be carried out in any of the above options. However, it is important to accurately design the location and level of doorways before construction begins, so that you do not have to correct mistakes later.
Three-layer screed
Foundation preparation process
All work on arranging a rough screed begins with careful preparation of the soil base. To begin with, it is important to identify the highest and lowest points, taking into account the level of the soil and the evenness of its surface. A laser level will help determine their values. This procedure is necessary in order to evaluate for yourself the entire scope of work, as well as determine how much building materials may be required.
It is also important to pay attention to thoroughly compacting the soil. To do this, you can use special construction equipment - for example, a roller or vibrator. The procedure is necessary so that in the future the soil does not sag significantly and this does not lead to cracking of the rough screed, which will undoubtedly negatively affect the finishing floor covering.
Pneumatic rammer for soil compaction
After the soil has been thoroughly compacted, a sand and gravel cushion is laid. It can also be made of clean, washed and river sand. The thickness of this layer should not be more than 60 cm. In the latter case, a layer of gravel or expanded clay is also poured on top, which will make it possible to create a more durable base.
Attention! Before the soil is compacted, it is important to cut off the entire fertile layer, if any. It can be found in a more worthy use than burial under the house. The soil layer is removed approximately 35 cm.
It is also recommended to fill the pillow not all at once, but in layers - for example, 20 cm each. In this case, each layer is well compacted separately. The procedure will make the base as dense as possible. Before compacting, the pillow is moistened with water. The thickness of the expanded clay layer can be at least 10 cm. This layer is also compacted separately.
Expanded clay backfill
Prices for popular models of electric vibratory rammers
electric vibrating rammer
Creating a parking lot
Before you begin completing the tasks, you need to clarify how to fill the area under the car with concrete in the yard, and this is done in several steps:
- preparatory work on the site;
- arrangement of the bottom of the future site, formwork;
- subsequent reinforcement;
- preparing the solution and pouring it.
To build a parking lot, you need to know the weight of the car. This will allow you to select the correct grade of concrete strength for the corresponding loads. It is best to use grade 500 cement (with frost-resistant additives) and river sand.
Preparatory work
This stage includes determining the location of the parking lot, measurements and all necessary calculations. The site must be accessible for free movement of the vehicle. The dimensions of the parking lot depend on the number of cars being parked, their size and weight. In this case, the slab should not be located close to the foundation of any buildings. The boundaries of the site are marked with pegs and rope.
Preparing the soil before concreting
Arrangement
Having figured out how to make a parking lot at your dacha with your own hands, you need to prepare the site itself. Grass and debris are removed, at least 20 centimeters of soil are removed, and a sand cushion is installed:
- the bottom is covered with a layer of sand (up to 15 cm), leveled, moistened and compacted;
- crushed stone is poured (at least 10 cm), leveled and compacted;
- the third layer is optional (but recommended by experts) - agrofibre/geotextile (the material will restrain other layers and will not allow them to creep when pouring concrete and due to its heaviness).
The site itself should have a slight slope; it is necessary to provide a drainage area.
Formwork and reinforcement
After the mixture has dried, the formwork will be dismantled. Fences can be wooden or metal, fastened together by any convenient means. Fixed formwork is used less frequently. To create it, a curb stone is used, which is installed around the perimeter. It will be necessary to prepare the appropriate foundation.
Beacons are placed after the formwork has been installed. They are necessary to control the evenness of pouring the mixture. Beacons can be pins made of metal profiles or similar materials. The distance between beacons is allowed no more than 0.5 meters.
Beacons for formwork
Reinforcement is used to enhance the strength of the future foundation. To do this, before pouring, reinforcement is laid on the previous layers in one or two layers. A lattice is made from rods, the diameter of which should be 8-10 millimeters; it is advisable to tie the rods themselves at the joints. It is strictly forbidden to use welding, since the mesh will be very rigid.
Mortar and pouring
Sometimes crushed stone is not added to the mixture. Then the mass must be of such density that it can penetrate between the stones in the prepared cushion.
Pouring is carried out at a time, the amount of concrete should be enough for a base layer of 20-25 centimeters. For parking, the standard mixture is made from the following components: 2/1/3 crushed stone/cement/sand. There should be enough water to create a thick solution.
Hardening occurs within two days; in order to release air from the mass, the base is pierced in several places. Grooves can be left to prevent concrete deformation due to temperature changes.
Experts recommend covering the structure itself with film and moisturizing it 3-5 times a day. This allows the concrete to dry faster and set better. The procedure is repeated for a week. The concrete hardens completely and gains brand strength within a month. Only then can it be used for its intended purpose.
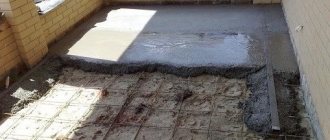
Concreted yard area
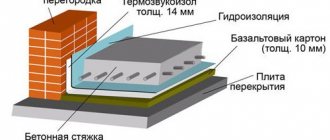
Layer of rough screed and waterproofing
Another important step when creating a rough screed is its waterproofing. If it is neglected, then the moisture seeping from the soil will “undermine” the concrete screed and as a result the foundation will become unusable and collapse, or at least will last for a very short period of time.
For waterproofing rough screeds, roll materials are usually used - others will be ineffective in this case. The ideal option is to use rolled bitumen material or a waterproofing membrane. Less commonly, but still used, dense polyethylene. The material must be laid in one large piece. If it is necessary to form joints (in the case of large areas), then they are carefully sealed - soldered or taped with construction tape so that water has no chance of penetrating to the base.
Waterproofing the floor before screed
Attention! The waterproofing material should not have defects - holes, otherwise it will not fulfill its role.
It is important to lay the waterproofing material in such a way that it extends 15-20 cm onto the walls. If necessary, after laying the finishing screed, the excess can be cut off. If the waterproofing material cannot be laid for some reason, then the final screed must be treated with coating materials that can resist moisture and retain it.
Coating waterproofing
Construction of a floor on the ground. The groundwater level should be no closer than 2 m to the floor pie
Tables
| Concrete grade | Mass composition, C:P:SH, kg | Volumetric composition per 10 liters of cement P/Shch, l | |
| 100 | 1: 4,6: 7,0 | 41/61 | 78 |
| 150 | 1: 3,5: 5,7 | 32/50 | 64 |
| 200 | 1: 2,8: 4,8 | 25/42 | 54 |
| 250 | 1: 2,1: 3,9 | 19/34 | 43 |
| 300 | 1: 1,9: 3,7 | 17/32 | 41 |
| 400 | 1: 1,2: 2,7 | 11/24 | 31 |
| 450 | 1: 1,1: 2,5 | 10/22 | 29 |
| Concrete grade | Mass composition C:P:SH, kg | Volumetric composition per 10 liters of cement P/Shch, l | Amount of concrete from 10 liters of cement, l |
| 100 | 1: 5,8: 8,1 | 53/71 | 90 |
| 150 | 1: 4,5: 6,6 | 40/58 | 73 |
| 200 | 1: 3,5: 5,6 | 32/49 | 62 |
| 250 | 1: 2,6: 4,5 | 24/39 | 50 |
| 300 | 1: 2,4: 4,3 | 22/37 | 47 |
| 400 | 1: 1,6: 3,2 | 14/28 | 36 |
| 450 | 1: 1,4: 2,9 | 12/25 | 32 |
| Styrofoam | Polyurethane foam | Min. plate |
| Open cell structure | There is both open and closed cell structure | Fibers randomly located in vertical and horizontal directions |
| Poor moisture permeability | Almost impermeable to moisture | Almost does not absorb moisture |
| Lightweight material | Lightweight material | Medium-light material |
| Average strength | Low strength | Low/medium strength |
| Average compressive strength | Low compressive strength | Low to medium compressive strength |
| Non-toxic | Non-toxic, emits carbon monoxide and carbon dioxide at a temperature of 500 degrees | Non-toxic |
| Not suitable for use under high load | Not all slabs are suitable for use under high loads |
Diagram of thicknesses of materials for floor insulation on the ground
Video - Floor on the ground with expanded clay backfill
Floors on the ground are an economical option for building a country house on a strip foundation. During the arrangement, costs are kept to a minimum, since publicly available materials and tools are used. Concrete as a building mixture for screed is most popular due to its availability, low cost, ease of manufacture, high strength and durability.
Effective thermal insulation material
| Photo | Name | Rating | Price | |
| #1 | Extruded polystyrene foam | ⭐ 99 / 100 | More details | |
| #2 | Penolast | ⭐ 97 / 100 | More details | |
| #3 | Expanded clay | ⭐ 96 / 100 | More details | |
| #4 | Basalt wool | ⭐ 80 / 100 | More details |
In order to make the floors as warm as possible, it is important not to skip the thermal insulation stage. Expanded clay, basalt wool, and polystyrene foam are used as materials that help retain heat. Laying the material is simple - slabs or layers of any of them are mounted end-to-end, without gaps, on a surface insulated from water. In this way, it will be possible to obtain a base that maximally retains the heat that tends to leave the house.
Attention! After laying the insulation material, it is recommended to lay another layer of waterproofing. This will allow you to fill the screed evenly and protect the insulation as much as possible from getting wet in the event of flooding. Wet insulation often loses most of its properties.
Using polystyrene foam for floor insulation
Extruded polystyrene foam
The most convenient and simplest option is polystyrene foam. In addition to its thermal insulation functions, it makes floors stronger. It is obtained by mixing granulated polystyrene and a special foaming agent at high temperatures and created pressure, followed by extrusion from the extruder.
Extruded polystyrene foam
pros
- good thermal insulation;
- low water absorption rate;
- low vapor permeability;
- durability;
- ease of installation.
Minuses
- high price;
- flammable material.
Penoplex for floors
Styrofoam
Polystyrene foam can also be used as insulation. In this case, PSB50 grade material is used for garages and warehouses, and PSB35 is used for residential premises.
Brands and characteristics of foam
It is important to protect polystyrene foam from contact with cement, which can destroy the material. To do this, the foam must be covered with plastic film.
pros
- low cost;
- good thermal insulation;
- light weight;
- long service life;
- is not a medium for the development of microorganisms and fungi;
- ease of installation.
Minuses
- subject to mechanical damage;
- when burning, releases toxic substances;
- hygroscopic;
- afraid of sunlight;
- we love rodents;
- unstable to solvents.
Styrofoam
Expanded clay
This material consists of small granules with low mass, which is achieved thanks to the ubiquitous pores. Expanded clay is a heat insulator that meets environmental standards.
Expanded clay
pros
- environmentally friendly material;
- good heat and sound insulation properties;
- light weight;
- resistant to fire;
- long service life;
- easy installation.
Minuses
- a thick layer of insulation “eats” the height of the room.
expanded clay
Basalt wool
Basalt insulation (or rock wool) is an insulation based on ordinary mineral wool, but basalt rock is used as a filler.
Basalt wool
pros
- environmentally friendly material;
- excellent thermal insulation properties;
- non-flammability;
- durability;
- resistance to rodents and insects;
- easy installation.
Minuses
- tends to absorb moisture, which is why waterproofing measures must be carried out especially carefully.
stone wool
Reinforcement
Reinforcement is an additional strengthening of the rough screed by laying a reinforcing mesh in it. This material, created from metal rods or plastic, can significantly strengthen the base and allow it to withstand maximum loads. The mesh is laid on top of the previously installed layers on small supports, so that when pouring the screed, it appears to be inside the cement-sand mixture, and not under it. If the mesh has not been raised, it will not perform its functions of strengthening the base. The approximate height of raising the mesh level is about 2-3 cm. It is recommended to use a mesh with a cell size of no more than 10x10 cm. The smaller the cell size, the stronger the base will be, this is especially true for plastic mesh, which is also often used in construction.
Reinforcement and laying of damper tape around the perimeter of the floor
How to reinforce a floor screed
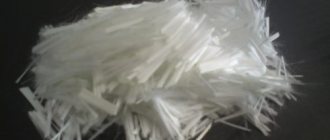
Fiber fiber for concrete screed - replaces metal mesh reinforcement
Calculator for calculating the amount of ingredients of a mortar for floor screed
Go to calculations
Selection of insulation
Expanded clay floor insulation technology
In order not to think about this when it is necessary to pour a rough concrete floor, the issue is resolved before starting work. If you plan to pour it on the ground, then inexpensive expanded clay is most often used as a heat insulator. The thickness of the backfill layer is on average from 30 to 50 cm, depending on the climatic region of construction. You can use a more effective material - extruded polystyrene foam. Its thickness will be in the range of 100-150 mm. When pouring onto the ground, the use of polystyrene foam or mineral wool is highly discouraged due to their low strength and instability to moisture.
For the attic floor under the screed, it is possible to use the following thermal insulation materials:
The best option in terms of price-quality ratio would be the following: a layer of foam plastic with an average thickness of 100 mm is laid on top of the ceiling, and then a layer of extruded polystyrene foam with a thickness of 50 mm. The use of inexpensive polystyrene foam allows you to reduce costs, and durable polystyrene foam increases the quality of the floor.
Scheme of floor insulation with mineral wool
It is important that if polystyrene foam or mineral wool are used as a heat insulator, reinforcement of the floor must be provided.
It can be done using wire meshes with a diameter of 3 mm with cells of 100 by 100 mm. The need for additional reinforcement is due to the low strength of these materials.
Technique for installing a concrete foundation on soil
Before laying the rough screed begins, it is important to ensure that you acquire all the necessary materials and tools. It can be:
- expanded clay and sand;
- cement mixture;
- slats for lighthouses;
- waterproofing and insulating materials;
- rule;
- building level;
- spatulas;
- container for mixing the mixture;
- construction mixer;
- shovel;
- reinforcement mesh.
Instructions for making a rough floor screed on the ground.
Step 1. The soil base is thoroughly leveled. The top fertile layer of soil is removed, the remaining one is brought to a horizontal state.
Ground leveling
Step 2. The base is compacted. The procedure can be carried out manually or using special equipment. The main thing is that the soil is compacted as much as possible.
Soil compaction
Step 3. A sand and gravel cushion is created on the soil surface, which is also carefully compacted. After this, a layer of waterproofing is laid. In this case, dense polyethylene is used. A reinforcing mesh is laid on top of it with an overlap of 2 cells.
Laying reinforcing mesh over polyethylene film
Step 4. Beacons are installed. They are necessary in order to bring the screed to a perfectly flat horizontal level as conveniently and accurately as possible. The beacons are installed at a distance of approximately 50 cm from each other and fixed.
Examples of installing screed beacons
Two mistakes at once: the reinforcement lies on the floor surface, and the beacons are installed on gypsum mortar
Usually securing is done using small piles of mortar, but they can be secured in other ways. Beacons must be strictly level.
Installation of beacons
Attention! The distance between beacons should not be greater than the length of the rule. It is by laying on them that the rule will move and level the building mixture.
Step 5. A damper tape must be glued along the perimeter of the walls, which will act as a kind of compensator in the event of thermal expansion of the screed and will not allow the base to crack.
Laying damper tape around the perimeter
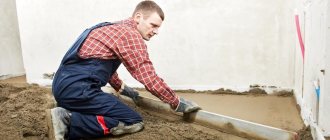
Step 6. Mix a solution of cement, sand and water using a construction mixer. Next, the solution begins to be laid out on the previously prepared layers.
The prepared solution is laid out
Step 7. Before the mortar completely covers the reinforcing mesh, it is raised slightly above the waterproofing layer by using small supports or piles of mortar.
The reinforcing mesh is raised
Step 8. The solution is evenly distributed over the waterproofing layer and mesh.
Solution distribution
Step 9. Using a rule laid on two adjacent beacons, the solution is leveled, if necessary, its excess is removed, and the shortage is replenished.
Leveling the solution using the rule
Step 10. The entire base is poured in the same way. After the cement mortar has set a little, its evenness is checked using a building level.
Checking the evenness of the base
The screed will dry for about 28 days
Important! The drying time for the screed is 28 days. Until this time has expired, no further work can be carried out.
Now the screed should dry well. During the first days, it is recommended to moisten it with water so that it does not dry out and cover it with polyethylene. It is then dried under natural environmental conditions.
Preparatory work
The soil inside the house needs to be leveled and compacted. If the height of the room decreases significantly after pouring and installing all the layers, you will need to dig a pit over the entire surface of the room for concrete floors in a private house. Its bottom is compacted and leveled.
Prepare the base for the screed:
- Pour 10-30 cm of sand onto the bottom and compact it.
- Fill in about 15 cm of crushed stone, and for thermal insulation you can make an additional pillow of expanded clay (10-15 cm).
- A rough screed that strengthens the bottom layer is prepared from lean concrete, mixing 1 part of cement with 6-7 parts of crushed stone.
Waterproofing works
Before making a concrete floor in a private house, it must be protected from moisture penetration from below (condensation from wet soil, etc.). Rolled materials (roofing felt, thick polyethylene film) are spread over the prepared base with an overlap on the walls (10-15 cm). Adjacent panels should overlap each other by 5-7 cm. At the joints, the seams are filled with bitumen or taped with adhesive tape.
A damper tape made of elastic materials is installed on top of the waterproofing layer extending onto the walls. It will serve to compensate for the expansion of the screed in a warm room or during heating if a heated floor system is installed.
Waterproofing can also be carried out using liquid compositions resembling paint (mastic, rubber masses), or using molten bitumen. The entire surface of the base is filled with the compositions, and they are applied to the walls with a brush.
Reinforcement and placement of beacons
To carry out reinforcement, a small layer of concrete (3-5 cm) is poured. A flat welded mesh with a mesh size of 10-15 cm is laid out on it. The thickness of the rod is at least 3 mm.
In order for the floor in the house to have a flat surface, beacons (slats on which the rule will slide) must be installed on the prepared base. The basic requirements for installing beacons are a small step between them and installation of all guides in a single plane. You can check the horizontality of the beacons using a building level, placing it both along and across the planks.
You can change the height of the beacon if necessary and fix it in the desired position using cement or gypsum mortar. A pile of composition is formed under the bar, raising or lowering the lighthouse to the desired level. You can continue working only after the composition has hardened.
Composition of the solution
Concrete for pouring is prepared according to the following recipe:
- 1 part cement;
- 3 parts sand or ASG;
- 4 parts of crushed stone fraction 2-3 cm;
- 0.5 parts water.
The components are most often measured out with a bucket, gradually pouring them into the rotating drum of a concrete mixer. When kneading by hand, dry ingredients are poured in layers and mixed dry. When the ingredients are mixed, add water and begin to knead the solution until the consistency of a thick, creamy dough is obtained. If there is not enough water, you can add it little by little, constantly monitoring the thickness of the solution. Don't pour too much water.
In a properly mixed solution there are no dry or otherwise colored areas, and all components are distributed evenly. The solution is poured with a shovel into a bucket or wheelbarrow and delivered to the work site.