For passionate supporters of the use of environmentally friendly materials in construction, the question of whether expanded clay can be used for floor insulation will probably seem strange - of course, yes! For its production, absolutely natural materials are used - clay and shale rocks, which are sintered and granulated in a rotating cylindrical kiln at high temperature. The result is granules of different sizes.
But expanded clay is good not only for its high environmental friendliness. It should also be noted its low cost in comparison with other insulating materials, as well as the ease and speed of its application, because this does not require any special equipment.
More about expanded clay
The word "expanded clay" has Greek roots and is translated as "burnt clay." This material is extremely light, has a cellular porous structure, and its granules are round in shape. During the firing process, low-melting clays, to which peat, sawdust and diesel fuel have been added, swell. Expanded clay is often used in construction as a filler in concrete in cases where it needs to be made lighter.
The thermal insulation properties of expanded clay are affected by:
- granule size;
- granule strength;
- density of the material.
Based on bulk density (or volumetric weight), there are 10 grades of expanded clay (from 250 to 800). The brand number hides the bulk weight of the material, expressed in kilograms per cubic meter. For example, a cubic meter of expanded clay grade 250 weighs exactly that much in kilograms.
The greater the porosity of the material, the lower its density and the higher its thermal insulation properties, which is very important when choosing which expanded clay is best for floor insulation.
Different bulk densities are obtained with different methods and modes of processing the feedstock. Bulk density is determined by filling special measuring vessels. Typically, the largest fraction has the lowest volumetric weight.
Varieties of expanded clay
Expanded clay sand
It is formed after firing clay residues or by grinding large fractions of expanded clay. The particle sizes here are no more than 5 mm. This sand, together with large fractions, is used for insulating interior partitions or when floor insulation with expanded clay concrete is required. It also serves as a filler for cement mortar.
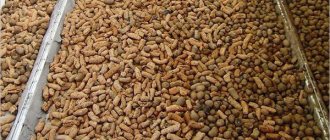
Expanded clay gravel
It consists of rounded grains 5-40 mm in size with a porous structure, which are obtained in pyrogenic furnaces when superfusible clay is expanded. It is fire-resistant, frost-resistant and water-resistant material.
Expanded clay crushed stone
It is angular, has no definite shape, and is similar in size to gravel. It is obtained by crushing large pieces of expanded clay, and is used together with other types to produce lightweight concrete if the concrete floor is to be insulated with expanded clay.
Experts recommend using a mixture of different fractions of expanded clay to insulate the floor. So, for residential premises it is recommended to mix 10 mm granules with smaller ones (5 mm) or even with expanded clay sand.
Which expanded clay is best for floor insulation?
When classifying expanded clay, the size of its granules can be chosen as a basis. The division into factions is as follows:
- The fraction from 5 to 10 mm is used for the production of expanded clay concrete blocks and when pouring screeds.
- Granules from 10 to 20 mm are the answer to the question of what fraction of expanded clay is used to insulate floors or ceilings in houses.
- Fractions from 20 to 40 mm are used to insulate basements, roofs, garage floors and heating mains.
If you put the second and third fractions into the screed, its thickness will increase.
Advantages and disadvantages of expanded clay
Advantages
The advantages of expanded clay include:
- good thermal insulation and sound insulation;
- fire resistance;
- high strength;
- durability;
- frost resistance;
- environmental friendliness.
Floor insulation with expanded clay under a screed can be chosen for a number of reasons:
- Expanded clay is exceptional in that it can be poured onto any base, even onto the ground, on which foam or mineral wool cannot be placed directly, as they will quickly lose their useful qualities.
- Expanded clay has the greatest strength among other insulation materials.
- The environmentally friendly composition ensures that expanded clay is safe to use, since it does not release anything into the air.
- Due to its non-flammability, expanded clay has no restrictions in terms of fire safety; it can even serve as a barrier to open flames.
- Expanded clay is the cheapest insulation material, so insulating floors with expanded clay in a private home, as well as walls and ceilings, has long been widely used. In addition to private buildings, it is widely used in industrial and other buildings.
Flaws
A significant disadvantage of floor insulation with expanded clay is its strong hygroscopicity. When its granules are actively saturated with water, they completely lose their heat-protective properties, and do not release moisture back for a long time. Damp, heavy expanded clay begins to sag, and unevenly, which leads to deformation of the floor, which must be taken into account if insulation with expanded clay and screeding of the floors of the 1st floor are carried out. To avoid this, when installing floors, you need to carry out reliable waterproofing.
Laying features
Beginners are often lost in the question of what layer of expanded clay gravel is required to reliably insulate walls and ceilings, and what additional elements are needed to create a heat-insulating “cushion.”
It is recommended to pour a thick layer of large expanded clay for complete insulation, but taking into account the total load on the ceiling. In cold regions, the height of the buried gravel reaches half a meter, and, despite the insignificant mass of the granules, the insulation makes the structure heavier.
Gravel sand is poured under the main layer, and in addition, two types of insulation are laid under the bulk material and on top of it: steam and hydro. To reduce the cost of the project, polyethylene or roofing felt is used, but the vapor barrier is broken, since the film creates a greenhouse effect, and condensation accumulates if the room is poorly ventilated.
When planning to pour only one fraction, spread the membrane fabric, choose which optimal layer is needed, and scatter the expanded clay to the height required for insulation, evenly distributing it over the surface of the ceiling.
To enhance the insulation and sound insulation of a wooden or concrete ceiling, the material is compacted by mixing sand with expanded clay.
The same effect is achieved by combining gravel with smaller granules. You can increase the heat saving rate by filling the granular insulation with concrete. In this case, there is no need to place a vapor barrier under the screed.
Professionals do not recommend insulating the top floor if it is the ceiling of a flat roof without an attic. This applies to both bathhouses and residential buildings. Expanded clay is highly hygroscopic, which negatively affects the thermal insulation properties of granules.
Whatever fraction of clay expanded clay you take, during work and use as insulation the material emits dust, and therefore for a plank ceiling an additional layer to contain dust is required.
The optimal thickness is 10 cm, a thinner layer of expanded clay is ineffective for insulation, and in regions with low temperatures, the height of the embankment starts from 20-40 cm, subject to the appropriate ceiling height or the possibility of its reconstruction.
The different size fraction and lightness of expanded clay allows you to create an effective heat-saving “cushion”. All insulation work is simple and it is possible to install the ceiling yourself, without special construction experience. Consumers are also attracted by the low cost of the material, the lack of special equipment for installation, and the effectiveness.
Methods of insulation with expanded clay
Builders use three methods of adding expanded clay:
- wet;
- dry;
- combined.
To make the technology of floor insulation with expanded clay more understandable, you should understand each option in more detail.
Dry insulation with expanded clay
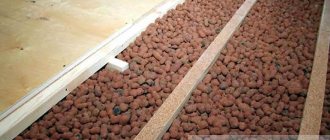
This is how floor insulation is usually done with expanded clay in a wooden house.
- The material is poured between the beacons or joists, and a subfloor made of plywood, chipboard or ordinary boards is mounted above it.
- To protect the insulation from moisture, it is necessary to lay a waterproofing material underneath it.
To increase the density of filling granules, it is recommended to take different fractions of them and mix them before filling.
This is a very quick method of insulation that does not require much labor.
Video about the dry method of insulating a floor with expanded clay:
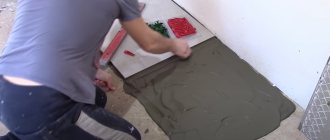
Wet laying of expanded clay
Here a screed is made from expanded clay concrete. Liquid concrete is mixed with expanded clay, after which it fills the space between the beacons.
This is a very convenient method when working with floors that have large differences in height and which require a thick leveling screed. Expanded clay greatly facilitates it, which can significantly reduce the load on the base.
In addition, the screed dries faster and cracks less. But the use of the wet method leads to the fact that the thermal conductivity of expanded clay that has collected moisture increases greatly.
Combined method
Insulation of a concrete floor with expanded clay under a screed is done as follows:
- Dry expanded clay is poured between the beacons.
- Then it is leveled.
- Its uppermost layer is watered with liquid cement mortar.
- When it dries, a regular screed is made on top.
The cement mortar forms a crust on the top layer of expanded clay and does not allow the lower layers to be deformed when pouring the screed.
If a large load is expected during the operation of the floor, then you can also supplement the structure with reinforcing mesh.
Useful tips
If there is a residential attic above the insulated floor, then there should be a ventilation air gap between the expanded clay layer and the floor covering. It will protect you from squeaking when walking on the floor, because grains of expanded clay will rub against the floor covering.
Self-leveling mixtures are not used to pour screed over expanded clay insulation. This is due to the fact that the liquid mass will easily flow between the granules and saturate the entire insulation. With a significant thickness of the insulator, the consumption of the mixture will be very high, which will entail high costs. If it is necessary to install poured floors, first make a concrete screed, and then apply a thin layer of self-leveling compounds.
Insulation with expanded clay under a wooden floor on a concrete base
Materials and tools
To insulate a wooden floor with expanded clay, you will need:
- jigsaw or hacksaw;
- nail puller;
- pencil;
- roulette;
- hammer;
- building level;
- electric drill;
- shovel;
- self-tapping screws;
- damper tape;
- coating material or film waterproofing;
- sand.
This example examines the insulation of the first floor floor with expanded clay on a concrete base.
Dismantling the coating
- It is necessary to remove the floor boards and take them out of the room.
- Carefully inspect the logs and check their position with a level.
- Rotten logs need to be replaced, and new ones should be leveled.
- If the beams are in good condition, not deformed and have no deflections, then they can be left.
- If the damage is minor, it is enough to replace individual beams, but if they are rotten or loose, then you need to remove everything right down to the concrete.
Surface preparation
- Clear the base of the floor from debris, repair small cracks and inspect the corners - if there are deep cracks, they need to be filled with foam or covered with mortar.
- The joints around the perimeter of the walls and floor should also be filled with foam.
- Then you need to pour a layer of sand onto the base and compact it thoroughly, but if coating waterproofing is used, then there is no need for sand.
Waterproofing
- A special membrane or plastic film must be spread on the floor so that it covers the walls by 7-10 cm with its excess.
- The logs should also be under the film.
When the width of the canvas is not enough, you can lay several pieces overlapping and secure the joints between them with construction tape.
- Fix the waterproofing on the beams with a stapler, having first tucked it well in the recesses between the joists
- If coating waterproofing is used, the mixture must be applied to concrete that has been cleaned of dust, including sections of walls near the floor. With this option, the logs should be on top of the protective layer. It can be coated with liquid polymers, bitumen mastic, polymer-cement based mastics and bitumen-polymer mixtures. The composition should be applied in 2-3 layers at intervals of 3 hours, so such waterproofing will take a lot of time.
- Finally, you need to fix a damper tape at the height of the subfloor along the perimeter of the walls, which will resist cracking and deformation of the screed during temperature changes.
Installation of logs
- If the old logs had to be completely dismantled, then new ones must be installed. For this purpose, durable wooden beams or boards are suitable, which need to be cut to the length of the floor, then soaked in an antiseptic and completely dried.
- The wooden frame on the floor must be at least 10 cm high.
- The outermost joists should be located 2-3 centimeters from the walls, and the step between adjacent joists should be within 50-100 cm.
- All logs must be placed parallel to each other and at the same level, so that their upper surfaces all lie together on the same, strictly horizontal plane.
- The joists need to be secured to the floor using metal corners: screw one side of the corner with screws or self-tapping screws to the joist, and the other to the floor.
- The extreme corners should be 2-3 cm from the edges of the joists, and the step between adjacent corners should be within 50 cm.
Expanded clay backfill
Before forming a layer of expanded clay to insulate the floor, you need to mix its large and small fractions, and then pour it between the joists.
The question of what layer of expanded clay is needed for floor insulation is simply resolved - after it is leveled until all voids are eliminated and compacted (carefully so as not to crush the granules), the level of expanded clay should not be higher than the top edge of the joists.
All that remains is to lay waterproofing on top and secure it with a stapler.
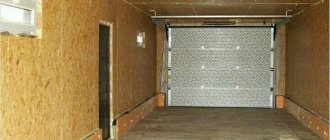
Flooring installation
A subfloor made of boards, chipboard or plywood must be attached to the beams protruding from the insulation layer, after which the finishing coating can be laid. The film sticking out near the walls can be cut with a knife and the gaps can be closed with decorative skirting boards.
Advice from the experts
It is worth paying attention to the fact that if we are talking about the construction of a frame house, then the expanded clay will have to be compacted especially carefully. But insulating a wooden structure with expanded clay will be very difficult, since it is necessary to leave cavities about 30 cm thick, and this is an additional load on the structure and foundation
In this case, it will be much more effective, simpler and cheaper to use mineral wool as insulation. And if climatic conditions and the thickness of the log house allow it, then you can do without it altogether.
Despite the positive assessment of such a thermal insulation material as expanded clay, during installation it is worth paying attention to such a disadvantage as a high level of fragility, which should be taken into account when backfilling and compacting. Thrifty owners advise using economical expanded clay to insulate not only the walls, but also the floor, ceiling, and attic space
With proper care, such thermal insulation material will last for many years.
Any building material, including expanded clay, can lose its original properties if stored improperly. For example, if bags with this insulation remain in the country for a long time, then there is a risk that the expanded clay balls will eventually turn into ordinary dust. If expanded clay is needed as insulation for walls or filler for lightweight concrete, then you should choose fractions 5–10 or 10–20.
Insulation with expanded clay under a wooden floor on the ground
Sometimes, instead of a concrete base, there is soil under the floor; in this case, it is necessary to insulate the floor with expanded clay over the soil in the following sequence:
- Level and compact the soil.
- Add about 10 cm of gravel.
- Fill the gravel with sand and compact it tightly.
- Next, add insulation, and the thickness of the expanded clay layer should be 15-25 cm.
- Having leveled the insulation layer, it is necessary to fill it with concrete on top.
- You can lay a wooden floor.
Final work
Any option for installing an expanded clay insulating layer means completing the rough stage of flooring. The insulating layer must be covered with a hydro- or vapor barrier material. And on top of this insulation made of plywood or other sheet material, a substrate corresponding to the selected floor covering is fixed.
With the flooring option on joists, the finished wooden floor can be installed directly on them, without creating a separate substrate.
Section of a wooden floor with expanded clay insulation
Insulation with expanded clay under a concrete base
Floor preparation
In this case, standard preparation of the subfloor is performed:
- It is necessary to dismantle the old coating, seal all the cracks, and clean the surface from dust.
- After this, lay a film on the base or cover it with liquid waterproofing. To cover all the joints along the perimeter of the floor, the film must be placed on the walls.
- Finally, at the level of the future screed, you need to secure the damper tape, after which you can proceed to insulation.
Installation of beacons
Metal beacons are required here; U-shaped aluminum slats are best suited for this.
- To fix the beacons you need to mix a little gypsum or cement mortar.
- The first lath must be laid on the mortar under the wall located opposite the doorway. Its position must be carefully checked with a level, and, if necessary, raised or pressed into the solution.
- The distance between the beacons should be 50-100 cm, and the height of each should be no more than 10 cm.
Expanded clay backfill
First you need to calculate how much expanded clay you need to insulate the floor. According to the standard for 1 sq. m area you need 0.01 cubic meters. m of expanded clay with a layer thickness of 1 cm. That is, the required amount depends on the thickness of the intended insulation layer and the area of the room.
Expanded clay thickness for floor insulation:
- On the 1st floor and above unheated rooms - 10 cm.
- On the 2nd and above floors in residential premises - 3-4 cm.
For example:
- In a room of 20 sq. m you need 10 cm of insulation thickness (expanded clay).
- With a thickness of expanded clay of 10 cm, you need 0.1 cubic meters. m per 1 sq. m area.
- For 20 sq. m of area will need 0.1 * 20 = 2 cubic meters. m of expanded clay (1 cubic meter of expanded clay = 400 kg).
- The resulting quantity must be prepared by mixing its different fractions.
- Then you need to fill the entire space between the beacons with this mixture, leveling the material with a piece of plywood or a rule.
- Particular care must be taken to fill joints and corners so that there are no voids left there.
- Then the expanded clay must be compacted carefully so as not to damage the granules.
Reinforcement
Place a large-mesh metal mesh on top of the insulation, which should be 4-5 cm away from the walls everywhere. The mesh should have no sharp protruding edges, bulges or dents.
Performing a screed
- The mixture for the screed should consist of 1 part cement and 3 parts sifted sand, which must be mixed well with water until an even thick consistency is obtained, then pour it in portions between the guides on the floor.
- The mixture must be leveled with a long rule, running it along the beacons and removing its excess.
- After this, you need to wait until the concrete gains sufficient strength to lay the floor.
This floor insulation with expanded clay assumes that the screed is laid directly on the insulation without additional insulation.
Video about floor insulation with expanded clay under a screed:
Technologies
Wall insulation with expanded clay is most common in brick houses, although it is sometimes used in frame versions.
The technology is the same - it is laying in bulk. Although in most cases, in frame buildings, builders resort to insulation with lightweight materials. They use mineral wool, polystyrene foam, liquid polyurethane foam and penoizol. But owners choose expanded clay primarily because of its low cost. One of the common ways to insulate a house with expanded clay is to organize a three-layer frame.
The inner part is usually about 40 cm thick and is made of expanded clay concrete - this layer acts as thermal insulation.
- The second layer is expanded clay mixed with cement in a ratio of 10: 1. This mixture is called capsic cement. Such a solid mixture gives the frame additional strength and rigidity, and its small mass carries almost no additional load on the foundation of the building.
- The third outer layer plays the role of protecting the insulation and simply decorating the building. Various finishing materials are used for it, depending on the preferences and financial capabilities of the owner, as well as the overall architectural solution. It can be wood, clinker bricks, lining, granite, stone, fiber cement boards or aluminum panels.
With three-layer wall insulation, experts use three finishing options, depending on the type of structure.
- Masonry with diaphragms. In this option, walls are erected: one as thick as a brick, and the other half as thin, and the distance between them should be 20 cm. After every fifth row, insulation is poured into the gap between the walls, tamped down and filled with cement laitance. Then 3 rows of brick are laid out, and the corners are made without cavities.
- Masonry with embedded parts is done using a similar technology with expanded clay filling between the walls, as with masonry with diaphragms. In this case, the walls are fixed together with brackets made of reinforcement.
- Well masonry involves building walls at a distance of 20–30 cm from each other. The walls are tied across a row using jumpers of 80–100 cm. The cavities are filled first with expanded clay and then with cement laitance.
Expanded clay concrete screed
If the subfloor is very uneven or you need to significantly raise the floor level, then this requires an expanded clay concrete screed:
- At first, the surface also needs to be cleaned of dirt and dust.
- Then apply foam along the joints and cracks and apply waterproofing.
- Then you can begin the main process.
- Secure metal beacons to the floor using cement mortar.
- Having mixed cement and sifted sand in a ratio of 1:2, add 3-5 parts of expanded clay (this depends on the expected load on the floor) and 1 part of water.
- Fill the space between the beacons with the mixture 2-3 cm below their level.
- Compact and level the surface, to do this, drown the floating granules in the solution again.
- As soon as the screed has set slightly, prepare regular concrete without additives and pour it over the screed, then level it according to the beacons.
The screed should dry for 3-4 weeks. In the first days, its surface must be watered so that cracks do not form on it. The result is a warm and durable base that can last a long time. When the surface of the screed can be walked on, it should be covered with a water barrier or film.
How did you insulate the floor with expanded clay, and why did you choose it? Write your answer in the comments - your experience is important to us.
Layer thickness calculation
The thickness of insulation such as expanded clay depends on its properties and technical characteristics of the wall materials. Of course, it is easier to turn to the services of professional builders, who will definitely take into account the peculiarities of the local climate when calculating the thickness of the insulation layer.
You can calculate the required thickness of the insulation layer yourself using the following indicators:
- thermal conductivity coefficient of expanded clay – 0.17 W/m x K;
- minimum thickness – 200 mm;
- thermal resistance, which is equal to the temperature difference along all edges of the material and the volume of heat passing through its thickness. That is, R (resistance) = wall thickness / CTC (wall thermal conductivity coefficient).