However, upon closer examination, this work has many nuances, only by strictly observing which can you obtain a high-quality rough screed that can last for decades. The technology of pouring cement floor screed in a private house also has its own characteristics.
Purpose of concrete screed
Cement screed performs a number of different functions in floor construction.
Depending on the type of floor covering, the dominant role is given to one or another property of the concrete pour.
Let's consider what role a rough concrete layer can play in arranging floors in a private house.
Leveling the surface
The screed will eliminate problems with bumps and depressions.
The main purpose of the cement screed is to create a smooth and durable base surface.
Laying any modern floor covering is not possible on an uneven surface covered with bumps and depressions.
In one case, an even bottom layer makes it possible to save on expensive adhesive compositions for the finishing coating, making it possible to make their layer thinner.
In other cases, without a smooth base it is generally impossible to obtain a perfectly flat surface of a decorative floor.
Creating a Solid Foundation
Subfloors, thanks to the special strength characteristics of concrete mortars, play the role of a base that takes on the weight of furniture and household appliances.
The strength of the floors in the house depends entirely on how strong the rough concrete pour is. Finishing elements laid on a solid monolithic base will not move relative to each other, deform or crack.
When installing such progressive heating systems as water or cable heated floors in your home, it is also impossible to do without pouring concrete.
In this case, it performs two functions at once - protective and heat transfer.
Protective functions
Concrete will protect heated floors from deformation and mechanical impact.
Heating elements of underfloor heating systems are quite vulnerable to physical impact. Under external load, plastic pipes through which coolant flows can become deformed and wrinkled.
As a result, the flow of heated water or antifreeze through them will be hampered or even stopped. This can happen if the floor covering is laid directly on top of the heating elements.
Heating electric cables with the same open installation method may be accidentally broken or their insulating braid will be damaged.
To avoid such troubles, heating elements of heated floors are not only laid on a concrete screed, but also filled with screed on top. Under such a shell, they are no longer afraid of any external influences.
Heat transfer
Such a base conducts heat well.
Pouring heating elements with concrete solution can significantly improve the efficiency of heated floors.
The fact is that the heat transfer coefficient of concrete is much higher than that of other materials.
Thanks to this, thermal energy passes through the screed with minimal losses, and less energy is required to heat the room to a comfortable temperature.
Basic mistakes
Base insulation with polystyrene foam
The most common mistakes when creating a floor screed include:
- Laying floors with high groundwater levels or soils with high levels of freezing. In this case, you should choose a different type of base
- Using wooden blocks that are susceptible to rotting as leveling beacons and leaving them in the screed. When wood is damaged or deformed, concrete may sag
- Small layer of footing and lack of reinforcement with increased load on floors over 200 kg/sq.m. m
- Lack of damper tape around the perimeter of the foundation, which can lead to cracking of concrete due to temperature changes
- Laying insulation below the zero level, which is fraught with freezing of the floors
- Lack of thermal insulation of the base and blind area
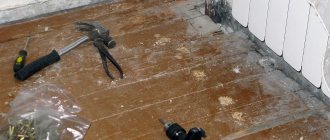
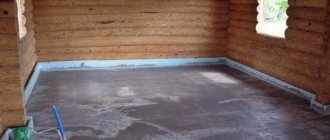
Preparatory work
On concrete floors, you need to repair cracks and remove debris.
Before you screed the floor with your own hands in a private house, you should carry out a number of preparatory work.
Their character will depend entirely on the design of the house and on what supporting foundations it is planned to fill.
In a residential building of individual construction this could be:
- Ground surfaces. This option is possible if the design of the house does not provide for a basement or ground floor. In this case, the soil surface itself acts as the basis for concrete pouring.
- Concrete floors. The most common type of screed base. In a private house, concrete floors are mounted from slabs or poured in a monolithic manner supported on the walls of a concrete foundation. Moreover, the walls of the house itself can be made of a variety of materials - brick, wood, aerated concrete, etc.
- Wooden floors. Despite controversial opinions, installing a concrete screed over wooden floors is quite possible. To do this, it is only necessary to prepare wooden structures in full compliance with construction regulations.
Only by following all the recommendations of SNiPs regarding pouring cement screeds will you be able to obtain a high-quality surface suitable for further use.
Let us consider the procedure for carrying out preparatory work in each specific of the listed cases.
Preparing the soil base
The soil base is freed from debris and turf down to the sand cushion.
First of all, you will need to clear the entire area of the future floor from any organic matter. Moreover, the word “organic” means not only shrubs and grass, but also a layer of surface black soil.
It must be carefully removed until the underlying mineral rocks appear - sand, clay, loam, etc.
The fact is that organic substances tend to rot over time, decreasing in size, therefore, by pouring the solution onto a layer of organic soil, we risk getting a void under the floors in ten years. What this can lead to is clear to anyone: cracking of the monolithic foundation, and in the worst case, its sagging and subsidence into the resulting void.
After removing the humus layer, we level the site. For these purposes, you can use the soil base, moving the earth from higher areas to lower ones.
Filled areas must be thoroughly compacted after completion of work. To achieve a better effect, you can shed the bulk part of the base with a large amount of water until the soil subsidence completely stops.
The layer of sand and gravel cushion should be 5 - 15 cm.
If compaction of the bulk soil is not conscientious enough, it may sag under the pressure of the concrete solution.
As a result, instead of a perfectly flat surface of the subfloor, you risk getting a significant slope on one side.
After the soil surface has been leveled to an acceptable condition, we fill the entire area of the future floors with a sand and gravel cushion 5–15 cm thick. It is needed to improve the adhesion of the solution to the soil, and also as a kind of shock absorber during seasonal ground movement. This is especially true for heaving and water-saturated soils.
Preparation of concrete floors
The least troublesome option for pouring screed for a private house, if you take into account that all construction standards were met when installing the floor slabs.
In this case, you will only have to inspect all the joints of the slabs and, if necessary, seal the cracks with putty or silicone sealant.
If the concrete floors are installed on a horizontal slope, such defects will have to be leveled using a screed.
Preparing wooden floors for screeding
Check the wooden structure for strength; it must withstand the weight of the concrete screed.
The most labor-intensive work will be preparing wooden floors for pouring the cement screed. Wooden foundations are the most common type found in individual residential buildings.
By design, wood floors are not designed to have a layer of concrete poured over them. This is due to the very limited load-bearing capacity of wood, and to the much shorter service life of wood compared to concrete, but sometimes there are cases when it is necessary to make exceptions and install a cement screed on top of the wooden flooring.
First of all, you will have to conduct a complete inspection of wooden structures to detect rot or fungi. All structures affected by fungus must be removed, and the surface of the remaining wooden elements must be treated with antiseptic compounds. For more information about screeding on a wooden floor, watch this video:
It would be a good idea to treat the wood with a solution against wood-boring insects.
After the inspection, the wooden structure should be strengthened as much as possible. If there are doubts about its load-bearing capacity, it is necessary to strengthen the base with additional load-bearing pillars.
The fact is that a concrete screed 5 cm thick has a mass of up to 200 kg per square meter, which will create impressive pressure on the entire floor structure.
The logs under the boardwalk should be laid in increments of no more than 0.5 m. The boards themselves should be at least 5 cm thick, and it is advisable to make them from the most durable tree species, for example, larch.
Soil requirements
Groundwater location diagram
Unfortunately, such a base cannot be used on all types of soil. After all, when the soil moves and heaves under the floor of the house, damage to the concrete is possible. Laying such a foundation is permissible only when groundwater is located below the level of 0.5-0.6 m from the surface.
It is not recommended to install floors on the ground or on too loose, mobile soils. On heaving soils and soils with a high degree of freezing, the thickness of the footing should be increased to 15-20 cm.
Waterproofing device
Rolled waterproofing is overlapped.
Next, waterproofing should be installed on top of the base. It is needed to prevent the smallest particles of moisture from seeping from the basement through the pores in the concrete.
Accumulating under the floor covering, dampness provokes the development of mold and rot.
To create a water-repellent layer, you can use two main types of materials - coating and pasting (roll) waterproofing.
Bitumen insulation will protect wood well from moisture
The first type is a liquid composition that is applied using brushes or rollers. They are created on the basis of bitumen or polymers, and the principle of their operation is to fill all the smallest cracks, thereby blocking the access of dampness to the room.
Pasted insulation is produced in the form of rolls, which are rolled out over the surface of the base and attached to it using adhesive mastics.
Each sheet of rolled waterproofing is placed on top of each other with an overlap of at least 5 - 10 cm, and the joint is thoroughly coated with an adhesive solution. If necessary, you can lay 2-3 layers of waterproofing.
Base
The first step is to prepare the base. The first step is to determine the level of the finished floor. Doorways serve as reference points. You should take into account the total thickness of the “pie” and add another 50 mm to this.
To prepare the base, you need:
- cut off the top layer from the soil;
- moisten the surface with a mixture of water and liquid glass;
- lay out a layer of clay;
- thoroughly compact the site;
- wait a day for the clay to react with liquid glass.
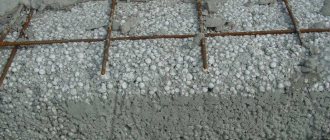
Reinforcement
The screed with reinforcement will be much stronger.
The next stage of work is the creation of a reinforcing frame. Reinforcement can significantly increase the strength of concrete pouring and prevent its cracking during operation.
At home, you can make a reinforced frame with your own hands. To do this, you will need steel or fiberglass reinforcement with a diameter of 6 - 10 mm, knitting wire or fastening clamps and a grinder. We cut the reinforcement into pieces of the required length, which we fasten together with wire crosswise. As a result, we get a lattice with a cell size of about 5 cm.
Some kind of pads should be placed under the frame so that the mesh does not lie on the surface of the base, but is raised above it by at least 10 - 20 mm.
Final stage
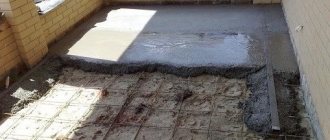
Once pouring is complete, the floor is left for about a week. At the same time, it is regularly moistened and covered with a thick layer of polyethylene on top so that cracks do not appear in the coating. After a week, the beacons are removed from the screed.
You can use a regular hammer: you need to lightly hit the insert and it will fall out of the concrete. The voids are filled with an identical solution, and the floor is put into operation after complete drying.
Bottom line
The article describes in detail the procedure for installing a concrete screed for the further installation of any floor covering. There is also an option to process the screed using a grinding machine, which allows you to use it as a finishing coating that looks no worse in photos and visual inspection than conventional facing materials.
If difficulties arise, you can always turn to specialists who will take responsibility for all stages - from purchasing the necessary materials to pouring the screed and putting the floor into operation.
Preparing the mixture for the subfloor
Next, we proceed directly to pouring the subfloors. You can prepare the composition for them yourself, or purchase a ready-made dry mixture at a hardware store.
DIY solution
Adding plasticizers will make the mixture softer.
This option, despite its archaic nature, is still quite popular due to its cost-effectiveness.
To prepare a solution for pouring screed, you will need the following components:
- Portland cement grade not lower than M-400.
- Coarse sand or fine gravel.
- Water.
If desired, plasticizer additives can be added to the solution to make the concrete softer and more fluid.
This will greatly simplify its alignment and allow you to complete the job with less effort and time.
When installing a screed in a private house over wooden floors, it is recommended to use perlite or expanded clay as a filler, which will reduce the density and weight of the mortar.
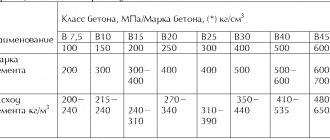
To obtain the highest quality concrete, you should adhere to the proportions recommended by building regulations.
The table shows the proportions of components for the preparation of certain types of cement mortars.
Ready mixes
In dry mixes, the components are selected in precise dosages.
Today, construction supermarkets have a huge assortment of dry mixes designed for pouring subfloors.
Dry mixtures, thanks to precisely selected dosages of components, are distinguished by the high quality of the resulting solution.
Another plus is their ease of use. To prepare a ready-to-use solution, you just need to dilute the mixture with water in the proportions indicated on the package. The only drawback of ready-made mixtures is their high cost.
So subfloors poured using dry mixtures will cost you 2-3 times more than those poured with home-made concrete.
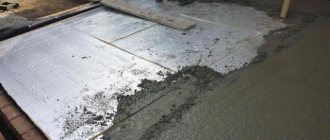
Recommendations for concreting
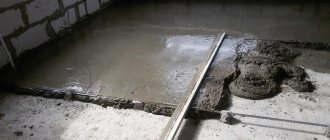
Before installing the screed, the area of the room must be divided into strips 80-100 cm wide using a steel U-shaped profile or wooden beacon boards placed on edge. The damper tape is attached to the walls before pouring begins so that it protrudes 1.5-2 cm above the design mark of the finishing surface.
Pouring concrete begins at the far end of the room and moves towards the front door.
Laying is done in strips, filling the cells slightly above their level. For leveling, use a vibrating screed or a metal rule, moving it along the beacons.
After allowing the mixture to dry, the beacons are removed from it, filling the resulting seams with fresh concrete. After this, the concrete is covered with film and given 4 weeks to gain strength, periodically moistening it with water.