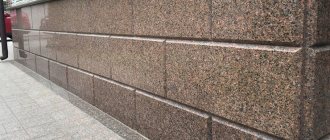
The basement is a very important part of the house from both a functional and decorative point of view. Therefore, finishing the basement is a separate task, to which a good owner of a country cottage will definitely pay a lot of attention. Most often, decorative stone is used for these purposes - an expensive material that not everyone can afford in large quantities. But today the material has a cheaper alternative that is not inferior in its performance characteristics. This is an artificial stone for a plinth.
Artificial stone for plinth
What are the requirements for finishing a plinth made of artificial stone?
Let's start with a list of requirements that any high-quality finishing of the base must meet, regardless of what material it is made of. This fully applies to artificial stone.
- Waterproofing – the base is constantly exposed to moisture that falls on it along with rain and snow. Therefore, the finishing should not allow water to pass through itself and perform a protective function - to protect the lower part of the walls of the house and the foundation from dampness and gradual destruction.
Artificial stone for plinth
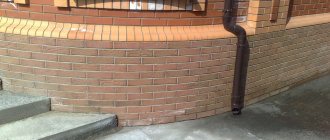
Lining the base with artificial stone
- Resistance to mechanical loads - during the shrinkage of a newly built house and various movements caused by certain factors, the finishing of the base may experience various loads and forces. They can also occur for other reasons. Therefore, artificial stone and other materials must be strong enough to remain in their original form under the influence of moderate mechanical loads.
- Resistance to temperature changes - external finishing, especially in autumn and spring, experiences impacts caused by sudden changes in weather. If this requirement is not met, the material will very quickly lose strength, chip and collapse.
- Durability – when buying artificial stone, the home owner expects a long service life. And good material should fully meet these expectations.
- Attractive appearance and harmonious combination with the rest of the home's decoration.
Lining the base with artificial stone
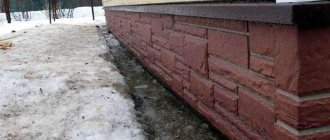
Why do you need a base belt / flashing?
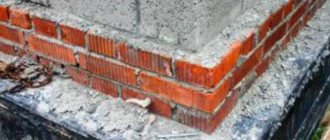
The foundation of a house is vulnerable to ground and atmospheric moisture; due to its action, it may begin to collapse over time. Also, in rainy or snowy weather, precipitation can accumulate on the lower part of the foundation or flow down the base, which over time will damage the monolithic structure of the base. To avoid this, the structure is insulated - the base is cast.
Advantages of artificial stone for plinths
Now it’s worth telling why artificial stone has become such a popular material for finishing plinths. It should be noted that this is due not only to its low cost relative to natural material, since there are many other advantages.
- Convenience and ease of use – modern varieties of artificial stone are created in such a way that they can be laid on the base without any special preparation. Therefore, you can do all the work yourself, without involving third-party specialists and without spending your own money on their services.
Another example of cladding
Basement of a wooden house
- Easy processing - if you have the appropriate machine or grinder, it is very easy to correct and trim artificial stone tiles. This advantage of the material greatly simplifies the installation process on the plinth.
- A wide variety of colors, textures and shades - using artificial stone, you have the opportunity to get exactly the finishing of the base that you need, and at a relatively low cost.
- Standardized sizes of individual tiles significantly simplify the installation process and eliminate the need to waste time selecting matching stones and adjusting them.
- Less load on the base and foundation of the building due to the relatively small mass of the individual material compared to natural stone.
- Durability and moisture resistance - modern artificial stone, manufactured with strict adherence to all technological processes, is no worse than natural material and can also last for decades without losing its appearance and strength.
Installation of finishing stone
The only drawback that discourages some homeowners from using artificial stone is its “unnaturalness”. But here it should be understood that the material is made from the same mineral components and it so accurately replicates the color and texture of the original that they can only be distinguished up close.
Base for artificial stone
Wall covering
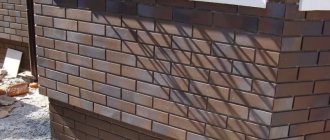
In the external cladding of a building, artificial stone for walls also has serious requirements, but here the choice of material will be slightly wider than for the base. Artificial stone for facade walls can be laid on any surface, such as brick, concrete, metal, wood. Based on this, the preliminary work immediately preceding the cladding with artificial stone may differ.
When choosing a material for cladding facade walls, you should additionally pay attention to the thermal insulation qualities and energy-saving properties of artificial stone for walls. Porcelain stoneware or vinyl panels are very often used for cladding facade walls.
The choice of material for cladding will also be affected by the weight load on the foundation of the building.
Porcelain stoneware or vinyl panels are very often used for cladding facade walls. The choice of material for cladding will also be affected by the weight load on the foundation of the building.
The aesthetic component encourages, when using artificial stone for the facade, to combine its different color shades, both to create a picture of “naturalness” and to create something completely unusual and not existing in nature.
Types of artificial stone
Today, the construction market offers a huge number of different types of artificial stone. So that you can navigate this diversity, we have made a table that presents the main types of this material and their features.
Currently, there are artificial stone facing materials that are completely different in appearance, shape and color.
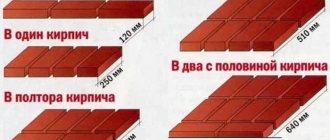
Table. Artificial stone for plinth - main types.
| Name | Description |
Cement-based artificial stone | The most popular type of artificial stone is widely used for finishing plinths, facades and interior walls in private cottages, apartment buildings and public buildings. This material is manufactured as follows: a solution prepared from high-quality cement, sand, dye, plasticizers and other additives that improve certain properties of the final product is poured into a plastic, rubber or silicone mold. Depending on the type of dye and shape used, the appearance and texture of a particular type of stone is reproduced. The result is a beautiful, strong and durable material, but quite heavy. |
Polymer sand artificial stone | Composite finishing material. It is created, as the name implies, from a mixture of sand, acting as a filler, and various polymers used as binders, plasticizers, etc. It is produced in the form of individual tiles, which are connected to each other using locks of various designs. Polymer sand artificial stone is fixed to the base and other surfaces of buildings using a frame and self-tapping screws. A lightweight and fairly durable material, the installation of which goes well with the insulation of the base, facade and other surfaces. |
Flexible artificial stone | This material is a multilayer composite, produced in the form of individual tiles or solid sheets. A very thin section of rock is attached to the fabric base using glue. On the inside there is another layer of glue - it is necessary to secure the canvas or tiles to the surface. To protect against premature drying, the material is covered with paper. It is distinguished by the lightest weight among all types of artificial stone, flexibility, versatility and good resistance to temperature changes. |
Clinker tiles | In its manufacturing method and appearance it resembles a cement-based artificial stone, but in this case the material is made of clay. In its class, clinker tiles have the most outstanding performance characteristics and high cost. |
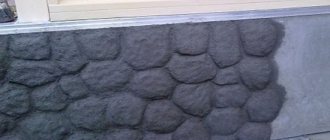
Homemade artificial stone | The cheapest option for artificial stone for a plinth is to apply a layer of concrete mortar to the surface, on which, using tools, a finish reminiscent of natural stone is formed - with roughness, unevenness and seams between the individual elements. The color is imitated using several layers of paint. |
Important! It is worth highlighting siding façade and plinth panels separately. They have a polymer base with holes for fastening to the frame and locks for connecting to each other. And their outer side can be made of concrete mixture or polymers. But at the same time, it accurately imitates the color, appearance and texture of real stone.
Basement siding under stone
The basement and the house are lined with stone panels
Simple installation technology
Before the instructions are presented, it is worth noting that if the house is new, we do not recommend covering it with any tile materials. Since the foundation will shrink in about 3 years and the house will play.
This, with a high degree of probability, can lead to peeling of the cladding. This rule does not apply to old houses.
But if you still really want to cover the zero cycle of a new house, then you can stuff a metal corner with dowels along the bottom edge with a small gap at the bottom. It will serve as a rigid support for the stone cladding.
Wet styling.
Preparing the base
- If the zero level is already plastered, then we recommend completely removing the old plaster; this is worth doing, even if it seems to you that the layer is strong and reliable. The only exception to this rule may be the case when it is decided to install an intermediate layer of thermal insulation.
- Next, you need to level the base, that is, knock down all convex defects whose dimensions exceed 10 mm. For thermal insulation, the surface is plastered or, in another option, the surface can be waterproofed with bitumen mastic.
- After this, sheets of extruded polystyrene foam are attached with dowels. Expanded polystyrene is pre-treated with quartz primer for exterior use. A metal mesh is mounted on the insulation.
- If you live in a relatively warm climate and you do not need to additionally insulate your house, you also do not want to plaster, you can do without it. Just don’t forget to prime the base with coarse concrete contact before laying the stone.
Attaching the mesh to the insulation.
Laying slabs
The technology for cladding the plinth with natural stone is different for each type. For laying rocks such as marble or granite, it is better to invite a professional.
The fact is that they have more weight, plus polished slabs are more difficult to work with.
We will consider the simplest and most common option for laying sandstone or shale.
- Since natural, irregularly shaped slate is most often used, laying it in even rows is impossible. The slabs are laid approximately, adjusted to the shape, making large gaps, using slabs of different sizes and configurations.
- The slabs can be attached using a wet method using cement-sand mortar or special mixtures. And mechanically, when special fastenings of the plates to the base and to each other are used. Sometimes these methods are combined. The simplest is the wet method.
- If you decide to save money and use a cement-sand mortar, then you should add a plasticizer to it. The price of special adhesive mixtures is higher, but it is more convenient to work with them. Plus, thick and heavy slabs can only be laid with their help.
Arrangement of seams.
- Laying begins from the corner, along the bottom row. It’s up to you to move from right to left or vice versa, it doesn’t really matter. Initially, the solution is applied to the base and leveled with a notched trowel.
- Next, a stone slab of a suitable size is selected; if necessary, the side and bottom edges can be trimmed evenly with a grinder. The disc is used for cutting concrete.
- After this, an adhesive mass is applied to the pre-moistened stone with a spatula and pressed against the wall. For a more dense installation, the slab is adjusted with a rubber hammer. Excess solution is removed immediately.
- The next stone is laid in a row, along the bottom row. And so you move along the foundation along the entire perimeter of the house. As a result, when you, having walked around the house, join the first slab, the adhesive solution under it has already set well enough and, without fear, you can begin laying the next row. So, gradually, you will complete the entire zero cycle. The top edge can also be trimmed with a grinder.
- At the end of the work, after the entire zero cycle of the house has been completely laid and the solution has dried, the entire base should be coated with waterproof yacht varnish. This will seal the surface and will also look much better.
Pebble facing.
How to choose the right artificial stone for a plinth
Before considering methods for laying artificial stone on a plinth, let’s take a look at the recommendations that will allow you to choose a high-quality finishing material that will be beautiful, strong and durable.
Choosing artificial stone
Firstly , pay attention to the price of artificial stone. Please note that although it is cheaper than natural, it cannot be too cheap. If the cost of a material is significantly lower than the market average, then most likely it was made of poor quality, in violation of technological processes. Such a stone will be fragile and short-lived, and it will also have significant differences in color and texture, which will stand out on the base and spoil its appearance.
Secondly , if we are talking about cement-based artificial stone, then ask the seller what form the material was cast with. It is advisable that it is not plastic or rubber, but silicone - with its help, a conscientious manufacturer is able to very accurately convey the texture of natural stone.
Silicone mold for casting cement-based artificial stone and components added to it during manufacturing
Thirdly , inspect the surface of the artificial stone. If there are several elements of different colors on one tile, then their colors should not “crawl” onto each other. Individual stones should look beautiful and not have significant external defects.
Above is an example of high-quality artificial stone tiles. Below there is a defect, you can see that the painting is uneven and “creeps” onto an element of a different color, which is marked with a red arrow
Fourthly , none of the artificial stone tiles should have through holes. This is an obvious defect, a product with a short service life. It shouldn't be on your base.
Water gets into such holes in artificial stone. Subsequently, with temperature changes, it freezes and expands, destroying the finish, spoiling its appearance and significantly reducing its service life.
Fifthly , check whether there are grooves on the back of the artificial stone tiles. Their presence is necessary for better “adhesion” of the finish to the tile adhesive and the base surface of the base.
The grooves are required for better “adhesion” of the finish to the tile adhesive and the base surface of the plinth
Sixthly , if we are talking about rectangular tiles that imitate natural stone only on the outside, the material must have smooth boundaries that fit well together.
And finally, always pay attention to the quality of the external coating of artificial stone. The texture should repeat the natural analogue. Also make sure from the cut that the material is painted to its full depth - in this case, in the future, with chips and under the influence of wind, the artificial stone will not lose its original color and will remain the way you chose it.
In addition, on a cut or chip it should be noted that the artificial stone does not have too large (more than 0.5 cm) foreign inclusions
Important! It is desirable that, in addition to regular tiles, the set includes an artificial corner stone. This will significantly simplify and speed up installation on the plinth.
Corner element made of artificial stone
Price for decorative stone
Decorative rock
Painting, plastering and fur coat
In principle, if the plaster is well leveled, after the solution has dried, the surface can be painted and stop there. This is an inexpensive but viable option. If you used façade paint that is intended for outdoor use, the base will look good for a couple of years. Then you will have to remove the old paint and paint it again to maintain the appearance.
The next method is to apply a layer of decorative plaster on top of ordinary plaster. And again, choose those formulations that are intended for external use. They can be tinted in the desired color or taken colored ones. The only negative is that plasters are often porous and splashes of dirt that fall on the walls during bad weather have to be cleaned off with a brush and sometimes with detergent.
Types of decorative plaster for finishing the base: beautiful and relatively inexpensive
The method of finishing the base “like a fur coat” is still popular in some areas. This is when the solution is not applied in an even layer, but in small fragments. Previously, they did this with a broom made of twigs. They dipped it into a liquid solution and hit the stick with the handle so that the splashes flew onto the wall. This is how they made “fur coat” - a finish with a torn surface. Today there are special devices for applying plaster, powered by a compressor. With their help, it is easier to make such a finish.
Finishing the basement of a house using materials in the form of slabs or tiles is technologically more difficult. To prevent it from falling off, you need to know some subtleties.
Finishing the base with artificial stone using tile adhesive
Let's consider the most common method of finishing a plinth with artificial stone - laying it on tile adhesive. Here are standard step-by-step instructions showing how to work with this material correctly. Everything that is stated in it can be successfully used for finishing the base with artificial stone.
Artificial stone laying works
But first, let’s take a look at the list of tools needed for laying artificial stone:
- building level;
- roulette;
- drill with mixer attachment;
- stone cutting machine;
- spatula and trowel;
- brush;
- a set of several brushes;
- syringe for applying grout;
- wedges for maintaining the position of stones;
- containers for water, tile adhesive, and also for preparing grout.
Step 1. Prepare the surface of the base; if there are significant (more than 5 mm) unevenness, plaster it. Then successively apply two layers of primer, which will ensure better “adhesion” of the tile adhesive to the surface of the base.
Preparing the primer mixture
Applying primer
Important! When working with a plinth made of brick, it will be useful to pre-treat it with a product to prevent salt release. Without this, the adhesion of the tile adhesive to the surface of the house will be significantly worse, therefore, the durability of the finish will suffer.
Step 2. Perform preliminary markings - determine which stones will fit in which places. Pay special attention to the corners and top. It will be useful to first lay out the stones in the same order in which they will be attached to the surface of the base. At the same time, check how well they fit together and whether there are any samples between them that seriously stand out from the general color scheme.
The stones are laid out in the same order in which they will be attached to the surface of the base
The stones are laid out
The presence of corner elements made of artificial stone greatly facilitates the process of laying on a plinth or any other surface
Step 3. Using a brush, clean the inner surface of artificial stones from cement laitance - a foamy light layer.
Cleaning the inner surface of the stone
Step 4. Prepare tile adhesive. To do this, follow the instructions written on the packaging. When stirring, be sure to use a mixer - this is the only way to achieve a homogeneous composition that will hold the finish of your base firmly and for a long time.
Follow the proportions specified in the manufacturer's instructions
Preparation of tile adhesive
Step 5. Apply a layer of tile adhesive 5-8 mm thick to the back side of the artificial stone with a spatula. Do not leave areas on the surface that are not covered with adhesive - this will significantly reduce the service life of the finish.
Glue is applied to the back side of the artificial stone
Step 6. Carefully attach the stone to the desired location on the plinth. At the same time, move it slightly to the sides so that the tile adhesive “adheses” better to the base surface.
Fastening artificial stone
Step 7: Carefully remove excess tile adhesive from the joints between individual trim pieces.
At this point, the instructions for laying artificial stone without “seams” on the base are completed. In the future, you should only repeat the previous steps and attach one tile after another. But if you choose a finish with “seams” created by grout, then be sure to study the second instructions in this section, presented below.
Step 1. Lay individual elements of artificial stone according to the same principle as in the previous instructions, but respecting the gaps to which grout will subsequently be applied. To maintain exact dimensions, insert wedges made of plastic or wood between the slabs.
Laying elements
Wedges for maintaining precise gaps between elements
Step 2. Prepare the grout mixture and put it into a construction syringe.
Step 3. Using a construction syringe, apply grout into the gaps between the artificial stone tiles. Choose the layer thickness yourself, based on personal preferences.
The gaps are filled with the prepared mixture
Step 4. Using a narrow spatula or any other similar tool, smooth the grout applied between the artificial stone tiles.
Smoothing the grout
Finished artificial stone masonry with seam
Artificial stone laid on the plinth in any way requires mandatory treatment with a water repellent - a composition that protects the finish from moisture, sunlight and other factors.
Prices for Ceresit glue
Ceresit glue
Video - Decorative stone. Plinth cladding
How much does it cost to face stone-like plinth tiles: price of material and cost of work
The average price for tiles is 800 – 1500 rubles, and installation in each specific case is calculated individually. It depends on the region, the complexity of the cladding and the surface area.
- In Moscow, concrete facade tiles will cost you approximately 1,000 rubles, and installation costs from 2,000 rubles per 1 sq.m.
- In Nizhny Novgorod, prices will be lower: material from 800 rubles, installation from 1000 rubles per 1 sq.m.
Let us give an example of the calculation of concrete facade tiles “Rostov Stone” from the LOBAS company. For a house 9x8 meters, taking into account the deduction of windows and doors, you will need about 120 sq.m. tiles:
| per 1 sq.m., rub. | for 120 sq.m., rub. | |
| Materials | 970 | 116 400 |
| Installation | from 1 000 | from 120,000 |
| Total | from 1 970 | from 236 400 |
*installation cost depends on the complexity of installation work.
Finishing the base with artificial stone on the frame
In addition to individual cement-based tiles, artificial stone is available in the form of panels similar to siding. Their installation has serious differences, which you will learn about from the step-by-step instructions given below.
Step 1. Start finishing the base with siding with artificial stone by making a frame. To do this, use either a wooden beam or a metal profile similar to that used for drywall. The frame includes lower and upper frames, vertical posts and intermediate horizontal beams.
The frame for basement siding must be strong - it needs to withstand the weight of panels with artificial stone
Important! Before installing the finishing of the base, it makes sense to use the free internal space created during the manufacture of the frame and insulate the structure with mineral wool or foam panels.
Step 2. Unpack the basement siding and “fit” the panels to the frame. In this case, most likely, solid panels will not fit in height - you will have to cut them off either from the top or from the bottom.
Unpacked panels need to be tried on
Step 3. Install the corner panels of the basement siding and the profiles used to fix the remaining cladding elements.
Installation of corner panels and profiles
Step 4: Trim the left edge of the panel so that it is completely vertical. Install it on the frame. Then install the second panel, securing it to the side of the first with a tongue-and-groove lock. The siding is fixed on top with self-tapping screws; screw them strictly in the middle of the holes in the finishing material.
Attaching basement siding
Important! Screw the screws holding the base siding panel into the frame not all the way, but maintaining a gap of about 1 mm between the trim and the fastener head. This is necessary to compensate for the thermal expansion of the finish created on a polymer base.
Step 5. Using the same principle, install the remaining panels of the basement siding. In this case, the top or bottom rows will have to be trimmed if they do not fit in height.
Installation of remaining panels
Step 6. Separately install artificial stone panels on “difficult” places in the basement - where the ventilation pipe exits, where the gas pipeline enters the house, or where there is a basement window. Then install a metal shimmer on top, which will protect the finish from excessive moisture.
Metal shimmer
At this point, the installation of artificial stone plinth finishing in the form of siding panels can be considered successfully completed.
Sandstone for facade
In modern construction, sandstone is used quite widely, primarily for cladding facades. Such buildings look very attractive, and in addition, they have a number of advantages in terms of operation. True, before choosing sandstone as a facing material, it is necessary to study the characteristics of the stone and the rules for working with it.
Tiles based on natural resins
A very interesting version of facing tiles can be found in modern construction supply stores. The use of various resins in production allows you to create a unique material that bends at any angle.
If necessary, modular blocks can be cut with construction scissors. After laying, the tiles will provide reliable protection against natural moisture, but only if the finishing work is carried out optimally.
For the glue to completely and successfully harden, it will take about three days and absolutely dry weather.
Note!
Mosaic from broken tiles: step-by-step instructions on how to lay it out with your own hands (140 photo ideas)
Mosaic for the bathroom: TOP-150 photos of new designs, as well as modern ideas for combining mosaic tiles
Do-it-yourself water heated floor under tiles step by step: installation instructions with photos and descriptions, installation and connection
Do-it-yourself artificial stone for a plinth
The essence of the method is that a layer of cement-based mortar is applied to the base. Then, using available tools, a surface is formed that imitates the appearance and texture of stone. This method of finishing the base is well suited for those homeowners who, for one reason or another, do not want to spend money on buying ready-made material, and for those who want to do all the work themselves.
To form artificial stone on the plinth you will need the following materials.
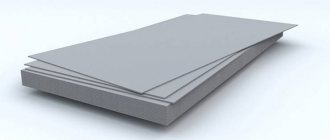
- Magnesium glass sheets as a base for a layer of cement mortar.
- Deep penetration primer - for better adhesion of the concrete mortar to the main surface of the plinth.
- Tile adhesive is the basis of the solution for forming a layer of artificial stone. As an alternative, facade plaster or a regular mixture of sand and cement can be used.
- Light and dark paints are necessary to give the cement mortar layer a color that imitates the appearance of natural stone.
Glass magnesium sheet
In addition, to form a layer of artificial stone on the base you will need:
- containers for mixing solution, water and paint;
- drill with mixer attachment;
- building level;
- trowel for decorative plaster or spatula;
- a tool for forming joints between stones - a screwdriver or something similar;
- sponge to create stone texture;
- brushes for cleaning joints and rounding individual elements of concrete mortar;
- brushes and roller for applying paint.
Step 1. Preparation - finish the base with glass-magnesium plates. Due to their better “setting” with concrete, they will ensure greater durability of the layer of artificial stone formed from mortar.
Step 2. Coat the glass-magnesium boards with two layers of deep penetration primer. Apply the second layer only after the first has completely dried.
Step 3. In a separate container, mix a concrete solution from the components that were mentioned earlier. To work with the mixture, use a drill with a mixer attachment. The resulting solution should be thick, plastic and homogeneous.
Mixing the solution
Preparatory stage
There are several ways to lay a natural stone foundation.
In any case, pre-clean the surface. Excess dry mortar is removed and the seams are cleaned if the base is brick. The swells on the concrete foundation are cut down. The surface is washed, if necessary, degreased and dried. Primed with concrete contact, applied with a brush, roller or spray gun. It is better to choose a ready-made primer with a coarse-grained fraction, which will increase the adhesion of the finishing material to the surface. Approximate consumption: 250 g. per square meter. Allow 7 hours to dry completely. Operate at temperatures from +5 to +35°C.
Tip: The primer significantly reduces its quality when dust settles on it. Therefore, they treat the area with which they will directly work. For greater reliability, the base can be covered with a fine metal mesh.
Comparison
When comparing artificial stone with natural stone, it is not always possible to give preference to the latter. New materials have beauty and richness of texture, but the strength and surface pattern, as well as the structure itself as a whole, are inferior.
Artificial material cannot be compared with the service life of natural material. If the latter can stand for centuries, for the first this is an unrealistic result, although it can stand for half a century. But such a period is not always needed, for example, if you just need to decorate an ordinary private house, and not a family estate. Therefore, is it worth paying more?
In laying, artificial stone will give natural stone a head start, since it is specially designed for this - lighter weight and a smooth back surface, nature cannot compete here. However, it is not at all necessary to refuse a real stone because of its large mass. For example, you can replace heavy granite with lighter slate or sandstone.
Our advantages
More than 10 years on the market Production was launched in 2007
Exhibition houses You can see examples of houses in Moscow
More than 100 objects implemented Every year 120-150 objects are covered
Reliability The reliability of stone panels has already been time-tested
Additional benefits Heat retention and durability
Low prices We have our own production, so you buy without intermediaries
For five whole years we could not solve the problem with the plinths of the house and bathhouse (they were built on pile-screw foundations in 2014). There were many proposals, very diverse, but either the materials were artificial, or the budget was beyond reasonable limits. And then we found a website on the Internet. The proposal satisfied all parameters:
- I liked the stone panels
- communication with company managers,
- budget amount,
- accuracy and speed of work execution.
As a result, we received a good-quality and beautiful base, aesthetic, warm, in the color scheme we needed. Thanks to the company management for the comfortable relationship and ease of communication, and to master Sergei, my deepest regards for the quality work and boundless sense of responsibility. Galina and Vladimir, KP Sofiino, Ramensky district, Moscow region