When constructing buildings and structures, reinforced concrete or metal columns are used as load-bearing elements.
They represent a kind of frame on which the vault trusses, floors, longitudinal and transverse beams rest.
The strength characteristics of the entire building depend on the correct construction of the frame base.
Even minimal deviations from design calculations are not acceptable. The foundation for the column helps to avoid them, ensuring a strictly vertical location and maintaining the weight of the entire structure. Types of fastening may vary depending on the material of the column, its size, and the way the load is carried.
Base installation technology
Before starting installation work, even at the design stage, the issue of choosing a base for the columns is decided. Properly selected foundation blocks ensure the reliability of the structure and uniform distribution of the load over the soil surface.
Depending on the type of supporting columns, monolithic or prefabricated foundation blocks are used . Despite the difference in installation technology, they allow you to reliably fix the lower ends of the load-bearing columns in the desired position:
- Monolithic blocks are a solid structure with a recess in the center for a column.
- The prefabricated version of the blocks consists of a base plate and a column.
The installation of foundation blocks takes place in several stages :
Site preparation . After clearing the area of debris, a pit is dug (separately for each block or a common one, limited by the border of the future building).- Creation of a compacting sand and gravel cushion .
The need for it exists only if the soil has a low density and its shrinkage is possible. The bottom layer is filled with crushed stone and compacted thoroughly. Sand is placed on top. It is moistened and compacted thoroughly. - Marking the axes of foundation blocks . The axles are fixed by crossing stretched strings or thin wire. The axis points are transferred to the ground using a plumb line. Using pegs, mark the side contours, simultaneously checking the horizontality of the pillow. If necessary, make corrections.
- Installation of blocks . The foundation blocks are moved to the installation site and installed in accordance with the markings, after which the sling is dismantled.
Starting to mount the columns, fix the geodetic markings, after which the axes of the building are placed on the upper edges of the foundation and columns. The technology for attaching reinforced concrete and metal columns to the foundation is somewhat different.
How to fasten reinforced concrete supports?
Reinforced concrete columns are installed in special recesses in the foundation blocks, after which the resulting gaps are filled with concrete or a grouting mixture.
The stages of work are as follows:
- The reinforced concrete structure is attached to the hook of the assembly crane in such a way that when the boom is raised, it stands vertically. Use special pin or friction grips.
- After the column is delivered to the installation site and lowered into the foundation glass, the risks on the column and foundation are compared. Using a level, the correct position of the structure is verified, then temporary fastening is performed.
- The remaining columns are installed in the same way.
- Once again, carefully check the position of the columns. Vertical adjustment is made using special wedge liners.
- They monolith the structure, making sure that the concrete fills the entire space between the foundation glass and the column. To do this, using a deep vibrator, concrete is pushed from each side.
- Wait for the concrete to harden by 70%, after which the wedges are cut off.
After the cement mixture has completely hardened, a load is applied to the structure. It is important to carefully follow the installation technology. The slightest mistakes are unacceptable. They can lead to serious consequences, including reducing the strength characteristics of the structure and shortening its service life.
How to attach metal supports?
The installation of metal columns is carried out on monolithic or prefabricated foundations on the surface of which marks of the column axes are applied. Anchor bolts are pre-installed on the foundations so that their location coincides with the holes in the bases of the metal columns for their subsequent fastening.
The bolt threads are lubricated and checked by screwing on the nuts. After installation is completed, the structure is filled with concrete mortar, giving it additional strength. Another connection method is also possible: by welding the column reinforcement.
The vertical position of the column axes guarantees the reliability of the connection.
Attaching metal columns to the foundation can be done in three ways :
- on steel linings;
- foundation on the surface;
- onto the base plates.
On steel linings
The columns are mounted on steel pads with a thickness of 4 to 5 cm, placed between the column and the foundation. In this case, the foundation is not brought to the level specified in the project. The method has disadvantages: it is not accurate enough, and during the fitting process there may be an overconsumption of material (for additional pads).
Steel pads are installed with high precision in advance, even before concreting the foundation (permissible error ± 5 mm). After the column is aligned and installed, it is secured with bolts, and the gap is filled with concrete.
To the surface of the base
With this method, the foundation must be brought to the design levels. Fastening occurs using anchor bolts, but no cement mixture is used. It is important to maintain the accuracy of the foundation dimensions (the deviation of the surface on which the column is installed should not exceed half a centimeter).
The foundation surface is brought to the design value with a permissible deviation of ±5 mm. Columns must have milled bases.
On base plates
This method is considered advantageous and can be used when installing heavy columns. Rigid fastening of columns to the foundation occurs with a high percentage of accuracy. After installing the columns, pour concrete.
With this method, the thread length of the anchor bolts must be such that the top surface of the nut is flush with the bottom of the base plate.
The accuracy of the placement of the nuts ensures the vertical position of the post . If necessary, adjustments are made by twisting. After the columns are installed, their position is fixed by installing washers and cement mortar.
When preparing columns for installation, they are laid out on wooden flooring next to the installation site, parallel or inclined to the axis of the row. Using an assembly crane, the structures are transferred to a vertical position and moved to the installation site. Pointing at the anchor bolts, carefully lower them, after which alignment is carried out using two theodolites.
The columns are secured with temporary fastenings using fastening devices. After final alignment, the supports are secured with bolts or welding .
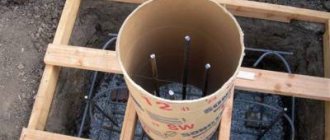
Installation of prefabricated foundations
Installation of prefabricated foundations is usually carried out in a separate advance flow during the construction of the underground part of the building. The layout of foundation installation sites is carried out using longitudinal and transverse axes, fixed with wire.
When installing foundations under columns, the position of the axes is transferred with a plumb line to the bottom of the pit, fixing them with pins or pegs driven into the ground. On glass-type foundations, determine the middle of the side faces of the glass and apply axial marks on the top edge. When lowering the block onto the base, the position of the block is controlled by the risks.
The installation of a glass-type foundation must be carried out immediately in the design position to avoid disturbing the surface layer of the base. The height position of the foundation block is verified using a level, monitoring the mark of the bottom of the glass. The position of the block in plan is checked with the slings not removed by aligning the marks (installation and alignment axes) along two mutually perpendicular axes; a slight deviation is eliminated by moving the block with a mounting crowbar.
Upon completion of the installation of the foundation blocks, a geodetic survey of their position is carried out - high-altitude and in plan. Based on the survey results, an as-built diagram is drawn up, which indicates possible block displacements.
Installation of foundations:
1 — crawler crane; 2 - position of the foundation block before lifting; 3 - foundation block during installation
Permissible deviations of the installed glass-type foundation blocks from the design position: the displacement of the block axes relative to the alignment axes is no more than ± 10 mm, the deviation of the bottom marks of the glasses is 20 mm.
Installation methods
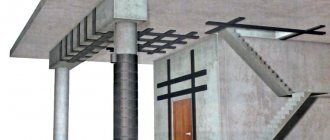
The types of fastening of a column to the foundation can have different design solutions. In particular, in different situations, 2 types of connections are used:
- Hard. Provides a tight connection between the element and the base. The element at the fulcrum point does not have the ability to move or rotate (as, for example, when embedding a reinforced concrete column into a deep foundation glass).
- Articulated. With a hinged fastening, the elements have a sufficient degree of freedom to rotate or move relative to the base under the influence of an external force (fastening with two bolts). Let's consider in what cases hinged and in what cases rigid connections are chosen.
Articulated
Mounting options:
- The fastening unit consists of a base plate on which the milled end of the column is installed.
The embedded plate is pre-installed into the concrete foundation. This type of fastening is used for fastening half-timbered posts in the construction of small one-story buildings, where centrally compressed columns are used (longitudinal force is applied along the axis of the column, evenly distributed over the section). - The base plate on which the column is mounted is secured to the foundation using anchor bolts.
Additionally, the column is strengthened to the building frame. The last stage of fastening is poured concrete. This type of fastening is used for centrally compressed columns. - The base plate is secured to the base of the foundation with two anchor bolts.
The column is mounted on a metal plate and additionally reinforced to the frame. This increases the degree of stability. The last stage is pouring concrete to the design mark.
Hard
Mounting options:
- The base plate is secured to the foundation with four anchor bolts.
This design can be used to install the main columns of buildings, since the bolts reliably hold the column in a fixed position. Concrete pouring is used as the final stage of installation to increase strength. This type of fastening is suitable for compression-bending columns (working in compression with bending). - The base plate is attached to the foundation with anchor bolts.
Additionally, stiffening ribs are installed to regulate the thickness of the base plate. This type of connection is highly reliable and can therefore be used for load-bearing structures of a building. Column type – compressed-bending. - Connection with cross beam (vertical steel sheets for uniform load transfer), rigidly fastened with four bolts.
Used for main columns, overpasses, supports. A fastening unit of this type perceives both a bending moment and a transverse force. Suitable for compression-bending columns. - The base plate is reinforced with stiffening ribs and secured to the foundation with anchor bolts.
The fastening unit is used for mounting the main columns, racks, and trestles. Very reliable type of fastening: easily withstands bending moment and shear force of any power. Suitable for compression-bending columns.
Preparatory work: what to pay attention to?
Before performing installation work, special marks are applied to the columns along all four faces (both top and bottom), which indicate the axes.
Reinforced concrete elements must be laid out near the installation area in such a way that special equipment, or rather a crane, makes a minimum of movements, and workers can safely inspect and secure the structures.
Please note: it is permissible to install only those building reinforced concrete products that do not have:
- rust or grease stains on the front sides;
- cracks on the outer sides, with the exception of local surface shrinkage damage, and their width should be up to 0.1 millimeters;
- influxes of concrete on the outlets of reinforcement, as well as open surfaces of embedded steel products and mounting loops.
Connection node
The attachment point for the column to the foundation consists of a column base with a base plate, cross beam, anchor bolts, and a centering device.
The column base is installed on the foundation and centered. The screw stop is located in the hole of the centering gasket, the lower part of which rests on the annular part of the screw stop.
When lowering the column onto the foundation, it is combined with a centering device. The column base is lowered onto the centering device until the upper end of the screw stop is aligned with the gasket hole. The column is secured in the design position using the base plate and the column base.
Installation of covering slabs
As a rule, covering slabs have a length of 6 m with a width of 1.5 and 3 m and a length of 12 m with a width of 3 m. Slinging of the slabs is carried out with a four-legged spider-type sling or, more often, with traverses. The installation of the slabs is carried out in the same flow with the trusses (coating beams), therefore, immediately after the installation of the next truss, the next row of slabs is laid.
For a roof without lanterns, it is recommended to lay the covering slabs from one end of the truss to the other, starting from the side of the previously installed span; if there are lanterns, from the ends of the trusses to the middle of the span. The covering slabs are laid according to the markings on the upper chords of the trusses (beams) in order to ensure their design position in plan on the truss structure.
The first covering slab installed on the rafter structures is welded at four support nodes. The embedded parts of each subsequent slab in at least three support units must be welded to the embedded parts of the upper chord of the truss (the fourth corner of the slab is inaccessible for welding).
When laying the first slab in each cell, one installer is on the slab laid in an adjacent cell, the second is on a ladder-platform hung on a column. Subsequently, both installers move to the newly laid slab to accept and lay the next one.
The outer covering slabs must be equipped with an inventory fencing structure. The seams between the slabs are sealed with cement-sand mortar using quick-hardening cement or fine-grained concrete mixture.
In one-story industrial buildings, large-sized shell slabs, 2T slabs, and other industrial products, which most often arrive at the site with insulation and roofing already completed, can be provided as covering elements.
Storage of coating slabs is carried out in the working area of the installation crane along with other elements included in the installation flow. The slabs are stacked in stacks of up to 8...9 pieces, sometimes stacks are arranged on both sides of the installation crane. It is necessary that on these stacks all slabs are laid completely in the span being assembled. Only for covering slabs, as the lightest frame elements, is it permissible to change the crane's reach when laying elements on two adjacent trusses. The optimal solution is to use it as an assembly crane with an extended jib, which will allow you to lift and install trusses and beams on the main hook, and covering slabs on the other hook on the jib.
The spacer between the trusses is removed after laying and welding the embedded parts of the slab placed at the spacer to the truss. Installation of reinforced concrete covering slabs on rafter beams is carried out in the same sequence and using the same techniques as on trusses.
Installation of wall fences
Wall panels are installed in an independent installation flow after installing the frame and covering the entire building or part of it. External wall panels are accepted in lengths of 6 and 12 m with a height of 1.2 and 1.8 m.
Installation of wall fences is usually carried out by self-propelled jib cranes on caterpillar or pneumatic wheels with straight booms, jib booms or specialized tower-jib equipment. Crawler cranes are most widely used, since it is easier for them to prepare the base for driveways.
For unloading from vehicles and installing wall panels into cassettes, an independent crane, usually a truck-mounted one, is used. It is irrational to place cassettes in several rows along the building and thereby expand the installation area. Therefore, if the height of the wall includes more than 12 panels, installation of the wall filling is carried out in 2…3 passes of the crane along the length of the grip.
Wall panels are mounted in sections between columns over the entire height of the building. A truck crane is usually used to unload and install panels into cassettes. In this case, slinging of panels 6 m long is carried out with a two-leg sling, and panels 12 m long - with a traverse. The width of the installation area, the passage for vehicles delivering wall panels, the crane operating area depend on the technology of installation work, the location of the cassettes with panels and other factors. The smallest width of the zone for installation work will be in the case when the cassette with wall panels is located between the crane and the wall being mounted; at the same time, the cassette must contain enough panels to build the wall to its full height.
Hanging external wall panels for different storage of structures:
a - when the cassettes are located between the tap and the wall; b - the same, behind the tap; c - when the tap is located between two cassettes;
1 - tap; 2 — cassettes with wall panels; 3 — guy wires; 4 — slings;
5 - wall panels; 6 — covering panels; 7 - roof trusses
Using existing technology, installers align and fasten the panels being installed from the inside of the building. If it is possible to travel inside the building, it is advisable to use two car-based lifts as work stations for installers. This allows installers to accept each panel at its connection to the columns. In the absence of lifts, scaffolds and cradles can be used as a workplace. If it is impossible to travel inside the building, self-elevating cradles can be used as workplaces.
The technology for installing external wall panels using a crane with specialized tower-boom equipment is being used. The main technological features of the use of this equipment are:
— combination of a load-lifting crane with an installation site;
— the ability to move the installation platform vertically (up and down the crane tower) and horizontally (from the tower to the wall and back);
— placement of panels in cassettes installed between the crane and the wall being mounted;
- the width of the installation area around the perimeter of the building is at least 8.5 m.
When installing external panels, the accuracy of installation is of particular importance in order for the panels to perform not only enclosing, but also aesthetic functions. Therefore, it is necessary to observe the dimensions of the seams, the proper quality of their finishing, and preserve the edges of the front surfaces.
When geodetic checking the accuracy of the work, the following is controlled: for panels of the first row - alignment of the lower edge of the panel with the marks of the alignment axes; combining the edges of panels installed side by side or one above the other; verticality of the edges of the installed row of wall panels.
To joint horizontal seams or apply sealing mastics from the outside, to seal vertical seams between panels, use scaffolding or lifting cradles, which are located on the outside of the span after the installation crane has moved to the next parking lot.
Materials for work
Concrete solutions of class B15 (M200) or B22.5 (M300) are suitable for attaching columns to the foundation . Today, mortar construction and repair mixtures with excellent fluidity properties are very popular. Due to their high strength and adhesion, after hardening the compositions become one with the structural elements and securely fasten them.
The absence of metals and chlorine salts in the composition ensures chemical passivity, which allows them to be used together with metal parts. Properties such as fire resistance and water resistance are also important.
Here are several types of gravy mixtures :
Starmex FM7 is a non-shrinking mixture. It hardens in a short time, forming one whole with the structure, is non-toxic, non-aggressive, does not react to temperature changes, and is not afraid of exposure to water, oils, and grease.- Manogard Fer 133 – forms a special protective layer on surfaces after application. Thanks to this, it can be used for metal columns, protecting them from rust.
- REX Grout M – is characterized by high strength and fluidity, has a high degree of alkalinity, due to which it protects elements from corrosion processes. Reliably fills all voids and fixes structural elements, since it expands at the stage of the plastic state.
- Mapefill – provides high-precision fixation of columns in the foundation, high-quality monolithic joints of reinforced concrete structures. The material is completely ready for use and is a mixture of high-strength cement, sand and special expanding additives. Flows well, does not separate, non-toxic.