In the field of private housing construction, technologies are constantly evolving, and new materials are appearing on the market. Let's look at how to make a floor in a private house by installing a screed directly on the ground. Let's get acquainted with various schemes, design features, recommended and regulatory requirements from the current SNiP. After reading the article, you will be able to think through the installation of a floor on the ground at the design stage, independently select the necessary groups of materials, and calculate the thickness of the insulation for a specific room and type of screed.
Concrete base for the floor - slab foundation Source yandex.net
Briefly about the soil foundation
Before you decide to make your own home floors from scratch cheaply, you need to consider options for protecting the floor from the natural effects of the earth. These include changes in humidity with temperature, seasonal movement of the formation at the freezing depth, and gas release.
Almost every person is familiar with the first two facts. Here, a mineral substrate, a water barrier and a thermal insulation sheet are installed as the main protection. Gases are often forgotten.
Chemical processes in the bowels of the earth occur continuously. Among them is the breakdown of radioactive substances, which are also contained in sand, clay, and crushed stone. As a result, radon gas is formed - an inert substance that tends to have an irradiating effect. Since it has a density higher than that of air, there is a cumulative effect inside a closed space. Concrete is breathable, so it is important to create protective barriers for harmful substances.
Radioactive gas Source townsquare.media
Insulation works
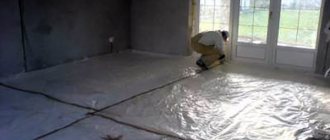
To ensure that your home is always warm and cozy, you must put waterproofing on the dry layer. For this purpose, you can use roofing material folded several times, modern membrane materials or ordinary polyethylene film (minimum 200 microns).
Waterproofing
The insulation is spread over the entire surface, overlapping the walls to the zero floor level and fixed with adhesive tape. In cases where one sheet of waterproofing is not enough to cover the entire area, you need to put two pieces of material with an overlap of 15-20 cm and glue it with tape.
roll waterproofing
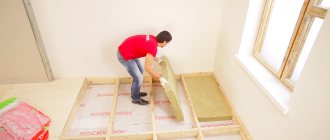
You will not need floor insulation only if you are building a house in a tropical climate. In other geographical latitudes, during construction it is necessary to put insulation on the waterproofing layer. To do this, you can use almost any material presented on our market: mineral wool, polystyrene foam, expanded clay, chipboard, polystyrene foam, cork, polyurethane foam, basalt stone wool, etc. The choice depends on the characteristics of the building and climatic conditions.
Basalt wool
Review of possible schemes for constructing a subfloor on the ground
Technically, there are only two solutions for how to make a floor in a house on the ground floor with an earthen covering: supported on a natural foundation or on load-bearing supports. In the first case, it means forming a floor covering on a pre-erected substrate and screed (possibly without it). In the second, a ceiling with a ventilated space is created, which is mounted on load-bearing structures: walls, strip foundation, concrete grillage on the same piles using TISE technology, a joist system with jumpers (if required).
Pros and cons of such solutions
The main drawback that casts doubt on the construction of a floor on the ground is the lack of a basement. However, the pros have a significant advantage. For example:
- admissibility to all premises on the ground floor (from the extension to the garage);
- ease of project implementation (you can do it yourself);
- low cost compared to the installation of an underground room or basement.
Construction of a basement in a private house Source mycdn.me
There is also a positive point in relation to the foundation. According to the technology, a multi-layer cushion needs to be installed under the subfloor. This backfill does not freeze and always has a temperature above zero degrees Celsius. That is, the soil on the site, including under the foundation, freezes to a lesser extent than around the house. This reduces the degree of seasonal soil movement, which means the mechanical pressure on the supporting part of the building is also reduced.
There are two more disadvantages. The estimate is close to or exceeds the cost of constructing a basement and floor if it is necessary to fill a space with a height of more than 0.6 m with soil. It is impossible to carry out work in a house with a pile, columnar foundation, or a grillage that is installed above the ground.
Briefly about floor plans on the ground
Solutions for installing floors on the ground floor come down to wooden flooring on joists and how to pour a concrete floor in a private house on the ground. The first option involves creating a support base in the form of a screed or pillars, and attaching the timber to the walls.
House on logs in a private house Source yandex.net
The second is the formation of a monolithic slab, which can be a supporting part of the building (“suspended” type), located on top of the foundation or between vertical structures without being tied to them.
The main tasks of any of the solutions:
- thermal insulation of the room;
- protection of living space from moisture and radon;
- dampening mechanical vibrations.
Also, the house should be comfortable. Inside the structure, the risk of condensation formation is reduced to zero. This means a healthy environment is ensured regarding biological activity (fungal formations, bacteria, insects).
The main advantages of a monolithic floor
Concrete flooring has many advantages :
- Durable and reliable, designed for at least 20 years of trouble-free service. Can be used for any premises.
- Withstands enormous loads, durable. The highest load level among all types of flooring.
- Resistant to fire, moisture. Concrete floor is a monolithic structure. There are no cracks into which moisture can get in and lead to the destruction of the coating. Not exposed to fungus or mold.
- Any floor covering is suitable for finishing: linoleum, laminate, carpet, tiles, even wooden floor boards or parquet if desired.
- Safe for health. Concrete does not emit any harmful substances into the air during operation, which makes this material one of the best.
How to make a concrete floor on the ground in a wooden house with your own hands
Step-by-step compliance with technical requirements is a simple solution to how to properly pour the floor in a house onto the ground. It is necessary to perform the following actions: installation of a cushion, insulation measures, formation of a rough and finishing base. At the design stage, it is necessary to take into account the standards that are prescribed in SNiP 2.03.13 of 1988. The table shows the main requirements.
| Criterion | Standard | Restrictions |
| Soil type | A high groundwater level is acceptable if you raise the floor and install a reinforced water barrier under the rough screed. In conditions of heaving soil, lower the groundwater by 0.8 m relative to the soil freezing depth, insulate the floor or replace the soil with mineral backfill. A cushion of gravel is created with a layer of 40 mm or more (except in the case of rocky soil). | Exceptions: peat, black soil and other plant soils. |
| Soil backfill | Minimal natural shrinkage, seasonal expansion when moistened. | It is not permissible to use it as a base unless compacted according to SNiP 3.02.01 of 1987. |
| Concrete layer | The thickness is determined by the design load on the underlying layer with maximum values. Permissible horizontal deviations | The use of concrete with a class below B22.5 is excluded. |
| Waterproofing | Bitumen sheets are laid in 2 layers, polymer sheets - one is enough. In conditions of close proximity to groundwater and wastewater, the amount doubles. The overlap on the walls is 30 cm from the bottom point of the floor base. | The formation of a cement screed on top of adhesive bitumen waterproofing cannot be done without an additional layer of a mixture of similar mastic with sand of a 1.5-5 mm fraction. |
| Thermal insulation | In the residential sector, it must be laid along vertical structures adjacent to the floor and foundation. The goal is to compensate for the thermal expansion of the horizontal web. | Organic materials that are not resistant to moisture and have a density of over 1200 kg/cubic meter are excluded from use. |
| Finishing screed | The leveling or covering layer (to protect utilities) is formed with class B12.5 concrete or CPS with a strength of 150 kgf/sq.cm. | The use of asphalt concrete is limited to piece tongue-and-groove parquet. |
See also: Catalog of companies that specialize in the reconstruction and rebuilding of houses
In SNiP 3.02.01 from 1987, excerpts about compaction of natural soil and soil cushion are useful. For example, if work is carried out in winter, then the soil should not be frozen, and for backfilling it is permissible to use a mass with a 15% content of frozen lumps up to 15 cm in size. The average air temperature can not be lower than -10 degrees Celsius.
Ground cushion
Work begins with the removal of the top fertile layer of soil. This is necessary to prevent plant growth and rotting. This also reduces the likelihood of settlement of the constructed floor structure. The resulting plane should be smooth and dense.
For backfilling, materials are used that are easily compacted and do not lend themselves to seasonal heaving. Traditionally it is sand, crushed stone, gravel or a sand-gravel mixture. If the house is built on soil with a low groundwater level, then loam or sandy loam is used. It will be cheaper to fill up the mass that remains after constructing a foundation, septic tank or well. The exception is black soil and peat.
Backfilling of the foundation Source sverit.ru
At this stage, you need to comply with several requirements and recommendations from experts on how to make floors in a private house from scratch:
- Layer-by-layer device . Since the pillow should be as dense as possible, it is worth creating it in several passes. It is easier to compact the backfill up to 15 cm thick and periodically moisten it with clean water.
- Fraction of stones . Between large grains of crushed stone or gravel, voids form, which may subsequently turn out to be unfilled. These areas will fill with water and allow gases to pass through. To minimize these processes and sedimentation, it is worth using fine-fraction minerals.
- Thickness of the pillow . The recommended value is within 30-60 cm. With any compaction, shrinkage cannot be completely eliminated. But if you exceed 0.6 m, the floor will settle longer, to a greater extent and unevenly.
- Radon protection . Here you can use crushed stone or expanded clay. The working mass should not contain more than 10% grains up to 4 mm in size. The compacted captage layer is formed with a thickness of 20 cm.
Expanded clay backfill under the screed Source instrumentgid.ru
Installing a mineral barrier for radon is not enough. Gas penetrates well through sand, concrete, and wood. To protect the living space, you can create conditions for ventilation of the subfloor or create a reliable vapor-tight water barrier. It is worth noting that polyethylene film does not provide protection against radon. Good options: vapor barrier membrane, bituminous materials.
Isolation measures
Before you pour the floors in your house onto the ground, you need to take care to protect the concrete from moisture from the ground. It is also necessary to prevent excessively rapid loss of moisture from the concrete solution. As a result, you can limit yourself to laying a polyethylene film 150 microns thick on top of the soil cushion. Here you also need to overlap the canvas on the walls with a height greater than the thickness of the subsequent screed.
Technical film Source bitrix-cdn.ru
Insulation also includes strips of thermal insulation 20-30 mm thick. The width is determined by the total height of the floor pie excluding the ground pad. This is a separating element that acts as a damper tape and filler for cold bridges along the walls.
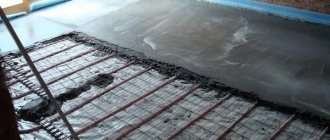
Before further insulation work, it is necessary to form an underlying layer of reinforced concrete. The solution can be used in class B7.5 with gravel fraction 5-20 mm. The thickness of the rough base is 50-80 mm. A steel or fiberglass mesh with 10*10 cm cells is suitable as reinforcement. The immersion of the canvas should be at least 30 mm. Another reinforcement option is steel shavings measuring 0.3-1*50-80 mm, which are added to the solution during mixing.
A waterproofing sheet can be fused or glued onto a hardened dry board. This can be bitumen roofing material or a polymer analogue. The overlap is maintained from 10 cm on the walls and between the edges of adjacent panels. The joints must be sealed. For example, adhesive mastic or double-sided tape based on bitumen.
Bitumen tape for waterproofing joints Source prom.st
Rigid insulation is laid on the finished hydrobarrier. Extruded polystyrene foam with protruding mounting edges is considered the best option today in terms of price and quality. Also, as an alternative, you can use foam plastic with a density of PSB 35 for a living space, and PSB 50 for a garage. The main disadvantage of styrene materials is destruction under the influence of an alkaline environment (cement) and from contact with petroleum bitumen. Negative consequences can be prevented using technical polyethylene with a thickness of 100 microns.
Layer of dry bedding
Layer of dry bedding
Dry materials are used to prevent moisture from penetrating directly to the floor, and they also prevent soil subsidence. The backfill often consists of several layers of sand, gravel or crushed stone. Each layer must be 5-10 cm thick and must be leveled. Then we carry out the work according to plan:
- we isolate the communication box passing through the room;
- fill the first layer with fine gravel with fractions up to 0.5 cm. Then it needs to be moistened with clean water and compacted;
- Next, we create a layer of construction sand, which is also moistened and compacted;
- the last layer may be gravel or small crushed stone. After compaction, the crushed stone is carefully leveled, removing or turning over sharp stones.
Sometimes the third layer is sprinkled with a little sand or crushed stone chips. The end result should be a smooth surface.
In no case should you replace crushed stone with broken bricks, since the layer of construction waste cannot withstand the loads necessary in this situation, which can lead to deformation of the entire floor.
Also, you should not use expanded clay instead of gravel or crushed stone. It does not create waterproofing and is used only as a leveling material in cases where groundwater runs very deep.
Video description
How it is possible to reduce the cost of flooring while complying with technology is explained in the video:
Rough concrete floor
Before pouring the floor in the house, you need to form a continuous waterproofing sheet on top of the insulation. This can be a technical film with sealed joints. The overlap on the walls is also maintained at a height of at least the thickness of the screed (from 60 mm). The solution here is used with a class of B22.5. Welded steel mesh is used for reinforcement.
Additionally, before pouring you need to consider:
- laying utility lines in the body of the insulation, protecting them with a metal casing;
- installation of a “warm floor” system in a screed, taking into account recommendations from the manufacturer of a specific series.
Depending on the planned finishing, a decision on the condition of the concrete surface is considered. For example, under flooring on joists or ceramic cladding, it will be enough to saturate the base with a strengthening primer. If laminate, parquet or linoleum will be laid next, you will need to fill the floor with a self-leveling compound. It is important to take into account the permissible layer of 3 cm.
Self-leveling floor Source bathroomz.ru
How to make a floor in a wooden house using the dry screed method
When deciding what is best to make a subfloor in a wooden house, many began to lean toward dry screed. This is a good option for doing it yourself, since the technology is simple, no special equipment is required, and the materials are accessible and lightweight. The advantage of this approach is also that finishing can begin immediately after laying the base.
But there is one significant drawback. Dry screed is not acceptable for use in a basement, bathroom, or boiler room. The reason is the low moisture resistance of the materials used. Therefore, the technique is applicable as an alternative to the traditional pouring of a reinforced concrete base for finishing.
The installation instructions look like this:
- installation of a pillow, laying insulation around the perimeter (width 80 cm, thickness according to calculation), pouring a concrete layer with a layer of 8 cm or more, waterproofing flooring;
- laying and insulating pipes, installing a protective casing;
Pipe laying Source hausbauen24.eu
- filling the surface with expanded clay or quartz sand without compacting with a layer of 1.5 cm, creating a flat horizontal plane;
- formation of rigid flooring from special sheets of gypsum fiber boards or gypsum fiber boards (for example, for the Knauf system), wood boards (plywood, chipboard, OSB) with a layer of about 20 mm.
Additionally, EPS boards with mounting edges or stone wool can be placed under the hard flooring. To ensure high rigidity of the base, slabs (gypsum fiber board or wood) are laid in a checkerboard pattern in two layers with the lower joints overlapping.
Marking
Correct marking is the key to the success of all work. First of all, you need to remember that the level of the finished floor must be equal to the line of the thresholds of the doorways. Therefore, you should make a mark on the wall (100 cm + floor threshold height, taking into account the minimum - 30 cm). Next, take a level and draw a line at the marked height along all the walls of the room. From the line, measure 100 cm down and draw another line, which will be the zero level. To make it easier to navigate while working, install pegs in the corners and stretch a rope along the walls at the level of the future concrete covering.
Installation of a concrete slab on the ground and foundation
If the rough foundation for the floor covering is formed before the construction of the load-bearing walls, then it is important to decide how to make a floor in a house supported by a monolithic foundation. The main advantage here is that the load of the slab is not on the ground, but on the supporting elements of the building.
This approach helps solve two problems that the owner may encounter. If the house is built on a peat bog or the height of the soil cushion exceeds 0.6 m. This minimizes the likelihood of shrinkage and deformation of the “suspended” structure due to soil movement.
Peat soil Source whygoodnature.com
Another option is to install a slab or solid foundation. Such a monolith can initially serve as a rough foundation for the floor. Here it will be enough to perform insulation, waterproofing and fill in the leveling screed.
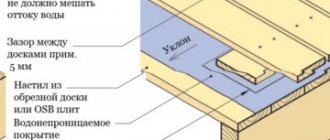
Features of the screed device for wooden floors
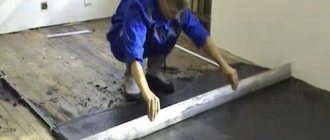
The cement-sand screed, after drying and gaining strength, turns into a monolithic slab that is not subject to linear changes. And wood has the ability to expand or shrink under the influence of humidity and temperature changes. The screed connected to the base, under the influence of unstable wooden structures, will become cracked and collapse.
Therefore, the main condition when installing a concrete screed on a wooden base is its isolation from wooden structures. So that the screed solution does not touch the wood of the walls and floor.
In addition, the screed should not put too much stress on the floor.
Effective thermal insulation material
In order to make the floors as warm as possible, it is important not to skip the thermal insulation stage. Expanded clay, basalt wool, and polystyrene foam are used as materials that help retain heat. Laying the material is simple - slabs or layers of any of them are mounted end-to-end, without gaps, on a surface insulated from water. In this way, it will be possible to obtain a base that maximally retains the heat that tends to leave the house.
Attention! After laying the insulation material, it is recommended to lay another layer of waterproofing. This will allow you to fill the screed evenly and protect the insulation as much as possible from getting wet in the event of flooding. Wet insulation often loses most of its properties.
Using polystyrene foam for floor insulation
Extruded polystyrene foam
The most convenient and simplest option is polystyrene foam. In addition to its thermal insulation functions, it makes floors stronger. It is obtained by mixing granulated polystyrene and a special foaming agent at high temperatures and created pressure, followed by extrusion from the extruder.
Source
Rough screed, hydro- and thermal insulation
It is best to wait about 10-15 days before performing subsequent work, since this time is required for the crystallization of liquid glass.
Remember that the room loses up to 35% of heat through the floors, so special attention must be paid to the thermal insulation layer. In pursuit of savings, you will ultimately end up overpaying for heating your home.
Diagnostics: when is repair needed?
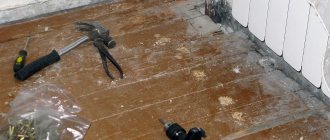
Without a thorough examination and identification of the condition of the floor, it will not be possible to understand whether it needs to be repaired. So before you decide on a major or cosmetic repair of the foundation, you need to diagnose it. The presence of certain signs will help make a decision about the need for repair work, as well as what generally needs to be done to revive the foundation under your feet.
Before repairs, the floor must be inspected
Table. Basic parameters for assessing the condition of the floor.
| Parameter | Characteristic |
| Sound during floor examination | You need to tap the floors with a hammer and listen to how the wood sounds. If the sound is dull, then the wood is already beginning to rot or is rotten and needs to be replaced. |
| Condition of nails | Nails can show where boards have rotted. In places affected by rot, the metal will be rusty; it becomes so due to the processes of ongoing decay occurring next to it. |
| Lag condition | It is assessed by probing these elements with an awl. It is recommended to walk along the entire length of each joist. The tool should not easily enter the wood, but if the situation is the opposite, it means the logs have rotted. Most often, the softest wood is found in the area of the ends of the beams. |
| Smell | If an unpleasant odor seeps between the floor boards, then the likelihood of the boards and joists rotting is very high. In any case, if there is an unpleasant odor, it is advisable to disassemble the floors to understand the reason. |
| Condition of the floorboards | If the floorboards sag and squeak, are severely curved, or crumble, then the floors definitely need to be repaired. |
On a note! Wooden floor elements can also be damaged by wood-boring beetles. In this case, the boards will also have to be changed. Most often, insects attack wood that has not been treated with a protective compound.
These logs definitely need to be repaired.
By the way, despite the fact that the floorboards themselves may be in perfect condition, it is still recommended to check the joists. The floor itself could have been re-laid at one time, but the joists were unlikely to be completely changed. It is especially important to spend enough time checking the floors if we are talking about a secondary home or an old house.
Repairs may also be required if the floor is very cold. Perhaps the insulation under it either served its purpose, or it was not there at all. Laying new insulation will help make your stay at home more comfortable. This is true for apartments on the first floors.
Gaps in the floor - what to do?
Stage 5. Preparing the solution and pouring
How to mix concrete correctly
Table. Calculation of the required amount of water for the corresponding type of filler per cubic meter, and the percentage of sand in the filler
| Maximum crushed stone grain size, mm | Volume content of sand in the mixture in% | Water consumption per cubic meter of concrete in liters |
| 10-12 | 56 | 230 |
| 15 | 52 | 220 |
| 20 | 49 | 200 |
| 25 | 46 | 195 |
| 40 | 41 | 185 |
| 50 | 39 | 177 |
| 70 | 35 | 167 |