Types of concrete grave monuments
Concrete monuments vary in shape and orientation. There are horizontal and vertical monuments, steles designed for 2 graves. The design is chosen by the customer. The appearance of the monuments is very beautiful. If you make it yourself, then choose simple square or rectangular shapes.
The upper part of the gravestone can be made round in the form of an arch or by cutting off one corner - triangular. It can be standard rectangular (Muslim monuments most often have a simple shape), cruciform or in the form of a sculpture. The monument, together with the tombstone, table and fence, forms a memorial complex.
Features of the preparatory stage
Do not start making monuments with your own hands without preparation. You must have:
You also need tools: shovels and bayonets, brooms, buckets, hammers, nails, a saw for producing formwork and a number of other materials.
Foundation of the monument: stages of work
They begin to make the foundation by digging a pit, then step by step:
Completion of all work may take several hours.
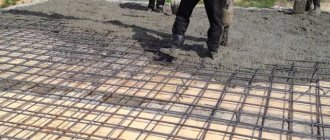
Foundation reinforcement
Installation of formwork
The formwork is made of wood and metal pipes, having previously determined its location using pegs and rope. The pipes are buried around the perimeter, securing it all with wooden beams, between which a gap is left (for filling with cement). There should be a frame. You will need bolts, a screwdriver or nails with a hammer. All parts of the formwork must be tightly connected to each other. It should rise 25-30 cm above the ground. Levelness is checked with a level.
Preparation of the solution
The pouring solution is made from a mixture of sand and cement in a ratio of 3 to 1. To create a monument, 2 mixtures are prepared, one for the inside, the second for the outside. For 20 kg of cement, take 50 kg of granite screenings and 5 kg of river sand. Everything is filled with water, adding a plasticizer, without which the monument will not be so durable. The amount of plasticizer depends on the volume of the mixture. Dilute it with water 6 hours before starting work.
Site preparation
The construction of a foundation for a monument begins with clearing and preparing the site. If an old monument is erected, dismantling is done and the location of the foundation and beams is determined. After clearing, marking is carried out. Using a crowbar, the edges of the burial are determined.
The length of the beams is calculated. A trench is dug under the ends of the beams and the frame is immersed. Reinforced concrete beams are laid to accommodate the cabinet and flower bed. Using a level will save a lot of time.
It is important at all stages to check the dimensions as often as possible.
Monument care
Concrete monuments require no maintenance. From time to time, dust is removed from them with a dry sponge and even washed, but such a stove does not need polishing or regular cleaning. If it has been standing on the grave for more than 5 years, the plates with photos and inscriptions may need to be replaced.
Concrete monuments are cheap and beautiful. They are easy to make if you have the knowledge and equipment. The material can also be used for formwork, foundations, and sculpture. Neither gravestones nor sculptures require special care.
Source
Installation of formwork
Formwork is installed on the frame. The formwork is mounted from wooden material or metal panels. Temporary spacers are made under the tree, and the inside is covered with roofing felt insulation.
Ready-made formwork panels have great strength. The panels are connected with bolts. The design is easy to use. The formwork can be quickly removed from the foundation. After metal formwork, a smooth and level area remains.
For professional builders, metal panels become an indispensable assistant. If you build the foundation yourself, wooden formwork will cost less. The material is selected to be reliable to maintain concrete pressure.
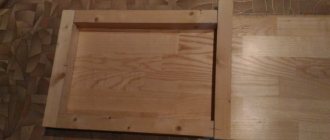
We make a frame from timber and a base
For this operation, a beam 50mm x 50mm and 2 meters long was used. I used an old parquet board (2 boards) as a backing. We fasten the finished bars to the substrate with self-tapping screws.
To create the circumference of the top of the stele, a simple option was used. Take a piece of hardboard. We cut it out in width a little more than the width of our stele, and in height, that is, 50mm.
We cover the hardboard with tape to prevent the concrete from sticking to the surface. I also recommend covering the entire surface of the substrate with tape.
We attach the hardboard to the block.
We are preparing the reinforcement for the stele. Reinforcement with a diameter of 12mm was purchased. In general, 10 or 8 mm reinforcement is also suitable for this purpose.
We drill holes in the lower bar for the fittings outlets. In the future, the outlets of the reinforcement will fit into the holes in the base of the stele and will be concreted.
We attach the reinforcement to the substrate. For this purpose, self-tapping screws were screwed into the substrate, to which the reinforcement was attached using ties.
Preparing the concrete mixture. For this purpose, Portland cement M500 and construction sand were purchased. The stele itself was filled with concrete without crushed stone. The base is already using crushed stone. Proportions cement:sand 1:1. Water was added 0.5 liters per 1 liter of cement. Approximate grade of concrete is M400.
We evenly place the concrete mixture in the formwork. It is necessary to bayonet the mixture with a spatula so that there are no voids. This is an important point. The more voids there are in the finished concrete, the lower the strength of the concrete.
After pouring, when the concrete begins to set, it is necessary to water the surface with water. After watering, cover with film. This must be done during the concrete hardening process for a week.
After 14 days we remove the formwork. If you have covered the entire surface with tape, then there should be no problems with removal.
Making the base of the stele.
For the holes in the base, a children's construction set covered with tape was used.
We fill the holes with sand concrete (you can just use mortar or ceramic tile adhesive). We also apply the solution to the surface of the base in the place where the stele will stand. We connect the stele with the base. Drying takes about 2-3 days. All the stella is ready. Now you can attach the ritual tablet to the glue.
Source
Lesson in Arinka's class
Bird drinker “Autumn leaf”
Take a large burdock or rhubarb leaf. Lay cellophane on the table, make a slide of wet sand, and form a mound in the middle to give the sheet depth. Cover the slide with cellophane. Place the leaf with the veins facing up and straighten it.
Mix non-liquid concrete: 3 parts sand, 1 part cement, water. Place the cement on a sheet: the thickness of the solution in the middle should be 2 cm, reduce to 1 cm towards the edges. Then insert a plastic tube with a diameter of 10 cm and a height of 10-15 cm. Coat it with the solution at the joint, fill the pipe cavity with concrete. Cover with cellophane, leaving gaps for ventilation, and leave the product to dry.
Do not turn the sheet over earlier than after two days!
After the concrete has dried, remove the sheet. If it comes off with difficulty, lightly moisten it with water. The sheet can be painted twice with yacht varnish with the addition of gold, red and orange colors. The result is a high-class garden sculpture!
Types of concrete grave monuments
make a grave monument from various materials .
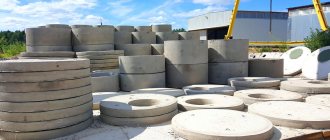
Modern technologies make it possible to achieve high quality and durability of concrete monuments
The main types of materials used in the process of making ritual products include:
Monuments and tombstones made of concrete will not differ in shape from products made from other materials.
Ritual sets installed on graves are divided into several types:
Is it worth reinforcing the structure?
It all depends on the shape and amount of mortar used to create the headstone. For example, if we are talking about a unique frame, then it can be produced without first introducing a reinforcing frame.
You need to understand in advance that concrete will require additional protection from moisture. If painting is intended, you can do without moisture-repellent mastic. It should cover at least that part of the tombstone that will be immersed in the ground.
The video shows the result of producing a tombstone from ordinary concrete:
Installation of a tombstone
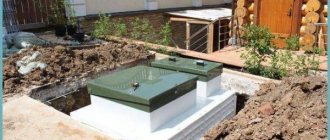
Concrete is made at the feet of the grave, which, in fact, serves as the basis for the pedestal. Its surface must be strictly horizontal and have sufficient thickness. This will not only allow you to correctly install the monument in a vertical position, but also ensure its stability for many years.
Do-it-yourself installation of monuments is done using a cement-sand mixture with the introduction of steel reinforcing rods. Their number varies, but not less than three units. After completion of the work and hardening of the solution, the formwork is disassembled. Prepared and fertilized soil is poured into the flower garden. The installation of the tombstone is completed, and the memory of the deceased will remain for a long time.
Cladding works
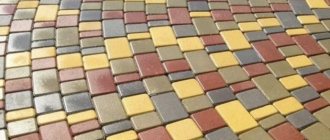
There are many ways to cladding monuments: from modern to classic options. Granite tile cladding is strong, durable, looks beautiful, but is more expensive than paving slabs.
Dirt and dust are first removed from the concrete base. Fat is removed from the surface with special glue. Markings are made on the foundation. With a special circle, notches are applied where the glue will be poured. The tiles are laid according to the markings and pressed tightly. Within 24 hours the glue sets to the surface. Excess glue from the surface is removed with a solvent.
Recommends watching the video:
Instead of concrete slabs, you can put a special slab made of heavy-duty reinforced concrete on the grave. A minimum of time is spent on installation - maximum aesthetics and reliability. Conventional cladding is an old proven installation method without glue, without cement, without a monolith. All work is carried out using a hammer and loose clinching.
Source
Features of the material
Traditionally, the mixture used for concrete products usually includes cement and filler in a ratio of one to three. In addition, during the manufacturing process of the mixture, various components based on epoxy, furan or polyester are added. This improves the quality of the concrete product. To change the color of the concrete mixture, special metal pigments of Russian and foreign production are used.
Recently, new technologies for the production of decorative products from concrete mixture . They make it possible to obtain complexly colored products. Today, when painting concrete in one product, you can get several shades and imitate the iridescence that is inherent in natural stone. The use of such technological processes is fully justified - the product acquires a more aesthetic appearance, they become more attractive and noble. In addition, the competitiveness of the product increases without a serious increase in cost and final selling price .
The process of making concrete monuments
In order to make a high-quality monument in a cemetery, strict adherence to technology is necessary . In this case, the ritual item will stand for a long time without damaging its appearance. And, importantly, such a monument will look very presentable.
When producing concrete monuments, it is important to strictly follow production technology and use the highest quality materials
Preparation stage
At this stage, it is necessary to prepare everything that will later be needed during the work process. To make and install a monument, not much is required, but everything should be “at hand.” To make a monument you will need:
Note! To obtain concrete, sand is needed and the purer this component is, the higher the quality of the finished monument will be. Therefore, it is advisable to wash the sand several times before adding it to the cement.
Preparation of the solution
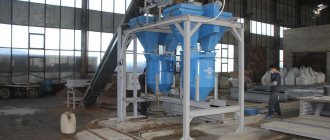
To produce a monument, a certain volume of working mixture will be required . The mixture is prepared in the sequence given below.
If during the work you do not use a mixer to prepare the mixture, then you will need a large and convenient container in which it will be diluted. But, in fairness, it must be said that a better solution is obtained in a mixer .
Having prepared the container, you need to mix cement and sand in a 1:1 ratio . Separately, you need to dilute the coloring component and plasticizer in water (so they will be evenly distributed throughout the entire mass of the solution). Then, adding water to obtain a working solution, everything is thoroughly mixed. You need to take enough water so that the mixture has the consistency of thick sour cream.
The solution for making the inner part is prepared separately . Here the proportion of sand to cement is 3:1. In addition, clean crushed stone is added to the mixture. The required amount of crushed stone is determined experimentally during mixing.
Note! The volume of the mixture will depend on the size of the monument. We should not forget that the top layer must have a thickness of at least 10mm - filler with crushed stone will be poured inside the monument.
Product molding
This stage also includes several steps.
Manufacturing technologies
Made from concrete
What the process looks like
The concrete mixture consists of one part cement and three parts filler (for example, sand). To improve quality, various plasticizers are added (for example, “Plasticizer C3” or “Superplast RT”).
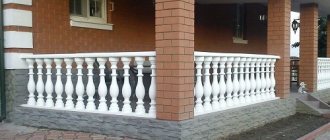
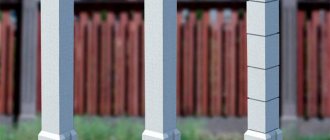
It is possible to produce tombstones and monuments in grey, white, brown, black or burgundy if iron oxide pigments are added to the mixture. There are technologies that allow you to combine several colors and produce complexly colored elements (fences, flower beds).
The process of making a grave monument
From natural and artificial stone
If monuments are made of stone, then it should be taken into account that marble is more malleable in processing than granite. It is best to purchase ready-made monument blanks (polished), especially if you do not have the funds to purchase machines. In this case, you only need to engrave the inscriptions and the portrait. If the portrait is made on a separate board, you need to make holes for attaching it.
Do-it-yourself mosaic monument production technology
When producing monuments from marble chips, the solution consists of 5 parts marble, 3 parts cement and water. All components are placed in a concrete mixer and mixed for about 5 minutes. The finished solution is placed in a mold and placed on a vibrating table for 5-7 minutes, then dried at a temperature of 16-20°C for up to 48 hours. After drying, the finished product should rest for two days. Then you can do engraving or other type of processing.
Sometimes it is not enough to make a monument; the customer wants it to be installed. To carry out this work, pipes (diameter 4-5 cm), a level, cement mortar, a shovel, a hammer, and wood beams are required. The pipes are installed first and filled with mortar. Pins are inserted into the cabinet (on the same solution), and wooden beams are placed next to them. A stele is placed on the bars, pins are inserted into it, gradually removing the bars. The position of the stele is checked with a level.
From simple to complex
Galina Ara suggests trying your hand at making simple figures and making a mushroom. Cut the neck of a 1.5-2 liter plastic bottle to the shoulders. Prepare a solution: 1 part cement, 3 parts sand, add water until it reaches the consistency of “cottage cheese in a pack.” Fill the bottle to the top and let it harden. Then cut and remove the plastic - the mushroom stem is ready.
Make a hat using a metal or plastic bowl of the required size: grease the inner surface with sunflower oil or grease, put the solution there to the very top and let it harden a little. When the solution can be cut with a knife, make a hole in the middle 6-7 cm deep. The diameter should be slightly larger than the diameter of the top of the leg. Again, wait for the concrete to harden further, then carefully turn over and remove from the mold. Grind off the edge of the cap with a knife.
Decorate the hat: make a hole in it, roll a worm from the solution and stick it halfway there. After complete drying, coat the figure with primer and paint.
Galina Ara makes products smaller than 150 cm without frames or fittings. A piece of a soft monolith, from which a figure is then cut, can be made using a metal sheet: roll it into a pipe of the required diameter and tie it with a rope. Then fill with the solution and leave to dry.
The disadvantage of this method is that it will not be possible to make figures with protruding parts, with outstretched arms, etc.
More complex figures require reinforcing elements. A forum member did this cat this way. At first they blinded everything except the head. Then, while pouring cement into the mold, I stuck two reinforcements of the required height and made a frame for the head and ears from thin wire. When the solution (up to the lower jaw) had hardened well, I placed the pipe again, but on a frame made of boards at neck level. I cut out a bottom with a hole for the neck from plywood and filled it with mortar. I cut out the head without removing the wooden support. After 2-3 hours, I removed the frame and coated the border with the solution.
Advantages and disadvantages of concrete headstones
Reviews from people who install concrete monuments on the graves of their loved ones are mostly positive. The advantages of concrete monuments include the following:
The disadvantages of such a product include the same service life of the product . If the manufacturer of the tombstone decided to “cheat” by using insufficiently high-quality consumables when preparing the working mixture, or did not keep the monument for the required time, handing over the work ahead of schedule, then such a monument will last 5-6 years. Next, irreversible processes will begin on it (cracking, covering with moss, etc.). That, in fact, the existing advantages may be insignificant.
Source