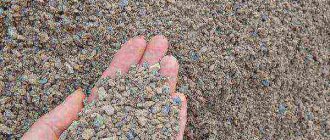
Concrete is a strong, wear-resistant and solid building material. However, over time it is subject to various deformations (cracks, chips, holes, cracks). There are many reasons that influence the formation of defects - from the rearrangement of furniture and sockets to the shrinkage of the building. The process of filling holes in a concrete wall with your own hands is not difficult, but you must adhere to the correct technology and sequence for eliminating defects, and also take into account the nature and size of the gap.
The main reasons for the formation of cracks in the floor
If cracks appear after laying the wooden covering, it means that the work technology was violated, during which the material dried out and a gap formed.
The formation of cracks is also promoted by:
- Activity of rodents and insects that dig holes through the wood. This reason is the most common, since in order to save money, many people ignore the need to seal the underground space. The cracks in the concrete are open gates, which pests will definitely take advantage of and turn the wooden floor into dust.
- Increased humidity and improper care of the floor - if the ventilation system in the room is broken and high levels of humidity remain, the wood will certainly absorb it. Swelling of the fibers inevitably leads to the development of microscopic bacteria that will destroy the floor.
- Lack of protective coating - when the floor is not exposed to paint and varnish products, the wood wears out faster, and any temperature changes or mechanical damage can cause cracks and large holes to form.
The sooner the problem is identified and action taken, the greater the chance of maintaining the integrity of the wooden floor. Where there are cracks, there will always be insects, mice, rats and other parasites, the proximity of which is unacceptable for humans.
How to choose the right aerated concrete block
Compliance with documents and acts, as well as timely work and support from highly qualified specialists - these are all the necessary conditions that must be met for aerated concrete production.
What blocks are used and where?
- First of all, you need to select a foam block according to the type of structure. After all, they eat differently and each one is suitable exclusively for its own job. The photo above shows a table on this matter.
- The main indicators in this process are strength, density, size and, of course, frost resistance. These indicators are basic, therefore they are all indicated in the passport data on checking the quality of an aerated concrete product.
- Also, the certificate or passport must have a specialized blue seal, which must be supplied by the manufacturer. In some cases, quite frequent, an additional mark from the organization that conducts the tests is required. Quality indicators must be fully suitable and consistent with the requirements of the project.
Separately, you should pay attention to the fact that a good quality block is distinguished by a light color shade, smooth corners and edges, as well as a uniform structure. Therefore, if there are stains, stains or oily films on the surface of the block, you must refuse to purchase it. If all the rules of the technological operation have been followed, then the pores of the block will always be only closed, round and even
They will be distributed evenly over the block area. Also, when purchasing, you should pay special attention to the cut of each block. If there are pores that differ greatly in size and are not round in shape, this indicates that the rules and parameters of thermal conductivity were not followed. This may also be a sign that the block has poor sound insulation properties. If a monolithic aerated concrete block is used, special attention should be paid to the surface level of the mixture. If there are watery compartments, this indicates that the required recipe was not followed when creating the block.
What building materials are suitable for repairing damage?
Today in any supermarket you can see materials for sealing cracks; they are designed to work with various types of surfaces. Both universal mixtures and special ones for external or internal use are sold.
Several of the most used types of putties from different manufacturers:
- Neomid Professional - for eliminating both street and internal damage. This putty is distinguished by its versatility, it is suitable for various materials. The content of reinforcing fibers allows you to work with deep and wide cracks.
- Semin Fibrelastic is a universal putty with increased elasticity, can be used both indoors and outdoors. Withstands significant loads when “breathing” cracks expand and contract, and does not lose its qualities due to changes in temperature and humidity.
- Profix - easy to apply and has plasticity and high adhesion to most materials from which walls are built. The mounting-putty mixture works great outdoors and is suitable for self-repair of small cracks; it can be applied textured.
- Unis Glare-thick-layer is a gypsum putty; manufacturers provide a 15-year guarantee on Unis seams. Used to correct internal defects.
You can prepare a mixture for sealing cracks yourself.
Cement-sand mortar is made at the rate of 3 parts sand to 1 part cement; for large or through gaps in the walls, crushed stone can be added, and for plasticity, add liquid soap in the amount of 30 g per 15 liters of concrete or silicate glue (1 liter per 15 liters of solution) , or PVA (100 g per 15 liters of mixture). The properties of the finished putty can be improved by adding fiber reinforcing fibers and ready-made plasticizers.
It is used for external cracks in brickwork, concrete, and aerated concrete. The advantage of this material can be considered its strength, and the disadvantage is its low elasticity, even in the presence of plasticizing additives; moreover, the finished solution cannot be stored for a long time.
There is no need to make silicone sealant yourself; it is sold ready-made in special tubes and is applied using a glue gun with a thin tip, which is convenient for filling cracks. The advantages of silicone are fast drying and high elasticity of the seam, moisture resistance. Disadvantages include the fragility and softness of the material. Silicone is used inside the home to repair small cracks.
—
Polyurethane foam is used to fill internal voids in cracked structures made of aerated concrete or aerated concrete; its advantage is lightness and excellent thermal insulation. The downside of polyurethane foam is its softness and lack of strength; an additional coating of plaster is required on top.
Repair compounds for concrete
In order for the restoration of artificial stone to be successful, before choosing a repair composition, a thorough inspection of the destroyed structure is carried out and an analysis is performed. The mixture is selected taking into account the following factors:
- the degree of loading of the structure, its load-bearing capacity;
- depth of damage;
- operating conditions of concrete (humid environment, temperature conditions, degree of exposure to aggressive environments);
- accessibility to the damaged area;
- expected scope of work.
If you are repairing the concrete surface in a visible area, it is important to take into account aesthetic requirements.
Major Damage Repair
The large damaged area is filled with new concrete mortar. First, the surface of the structure is cleaned of loose pieces and dust. A clean, solid base of good quality concrete should remain.
Filling is carried out with a cement composition with complex additives that improve its performance characteristics. Good results are achieved by fast-hardening polymer mortar or fiber-reinforced concrete.
For concrete repair with cement mortar to be successful, it is important to create conditions for its reliable adhesion to the base being restored. Two methods are usually practiced:
- Continuous filling of the entire area of the structure is carried out with a solution more than 100 mm thick. If partial restoration is carried out, the concreting site is deepened.
- Better adhesion between old and new layers occurs when a steel reinforced mesh is attached with dowels to the base being restored.
Before pouring the solution, the surface of the structure being repaired is treated with epoxy, acrylic or other adhesive compounds that provide better adhesion.
Dry mixtures for concrete repair
All dry mixes for concrete repair contain cement, which ensures optimal compatibility with the concrete structure being restored. There are many compounds from different companies on the construction market.
The most popular is Osnovit.
Apply the repair composition in a layer 5-50 mm thick on horizontal and vertical substrates. To restore the ceiling, it is optimal to maintain a mixture thickness of 30 mm. Better adhesion is ensured by pre-treatment of concrete with a primer or primer.
concrete repair mixture OSNOVIT
According to the type of application, dry mixtures are divided into the following types:
- for work at temperatures above +5°C;
- at negative temperatures;
- for waterproofing and providing protective properties;
- for repairs that do not change the geometry and load-bearing capacity of the concrete structure.
The scope of application of dry mixtures is wherever quick repairs are required to eliminate defects.
- good adhesion to the old base;
- high mechanical strength of the frozen composition;
- due to additives, the mixture does not shrink;
- possibility of eliminating defects up to 100 mm deep.
The disadvantage is the high cost and short shelf life.
Thixotropic mixtures
In essence, these are analogues of conventional dry mixtures, but with improved characteristics. Popular manufacturers are: MAPEI, BASF, Sika. The thixotropic composition for concrete repair is based on cement, sand, and complex additives. Mixtures with polymer fiber are considered the most effective.
Sika concrete repair mixture
Unlike conventional dry mixtures, thixotropic compositions are applied without installing formwork on a horizontal, vertical or ceiling surface.
The optimal layer thickness is from 10 to 30 mm. The mixture is used when repairing monolithic and prefabricated concrete structures, for sealing seams, and restoring protective layers.
- resistance to mechanical loads and abrasion;
- good adhesion to the base;
- resistance of the frozen composition to moisture and low temperatures.
The downside is the high cost and inability to use at sub-zero temperatures.
Epoxy and polymer compounds
The main purpose of the compositions is the repair of self-leveling floors, injection work, and the organization of protection of a concrete structure from the effects of destructive factors. Popular, "Technoplast", "KrasKO".
polymer composition for concrete repair Elakor
Acrylate compounds are used to repair cracks in concrete, seal chips, and treat the base to improve water resistance. Epoxy mixtures help restore the load-bearing capacity of artificial stone and repair cracks.
Sometimes the composition is applied to improve the adhesion of the base to the new repair layer. Polyurethane mixtures eliminate leaks and prevent the influx of water.
- resistance to mechanical and chemical stress;
- good wear resistance;
- high adhesion to the base;
- good waterproofing properties.
What is the correct way to cover cracks?
There are different options for covering the stove. This can be done with a putty solution purchased or prepared independently.
Fireclay putty
Fireclay is a fireproof clay produced by firing. It is often used in metallurgy to repair steel-smelting furnaces.
Chamotte is a good option for covering the hearth. It is packaged in 20 kg paper bags.
The solution for chamotte putty must be made according to the instructions - it is on the package. A special feature of the preparation of the composition is soaking for 2 days.
Sand-clay mixture
If it is important how to coat a brick oven cheaply and reliably, then you need to choose such a mixture. It is malleable, viscous, after firing it acquires strength, durability, and becomes fire-resistant
To obtain all these qualities, the proportions of clay and sand for kiln putty are important. They must be selected during mixing, since they are associated with the fat content of the clay.
Prepare the mixture as follows:
- Pour clay into a suitable container, add water, keeping the proportions 1:3. The mixture must stand for a day.
- Mix the composition and knead. If it is too thick, add water.
- Strain the mixture using a sieve (mesh size 0.3x0.3 cm).
- Let the mixture settle, then drain off the excess liquid. It should have a creamy consistency.
- Add sand - the volume is equal to clay. Mix everything with a stick. It is also necessary to control the readiness of the solution. If it remains on the stick in large quantities, then add sand. If the consistency of the mixture is correct, there will be little and clumps on the stick.
If a brick stove is repaired using a sand-clay composition, then preliminary reinforcement is recommended. To do this, prepare clay milk from clay diluted in half with water. Soak gauze in the resulting liquid, then place it on the stove. When the material is dry, you can cover up the defects.
There are other recommendations on how to dilute clay to putty a stove. Some experts believe that it is enough to soak it for half a day and add half as much sand. When choosing proportions, you should also focus on the fat content of the composition.
Gypsum based mixture
Gypsum is in demand in the construction industry due to its viscosity. When applied correctly, it forms an even and durable coating. This must be taken into account when working.
Putty for gypsum-based stoves is prepared from the following components in certain proportions:
- 5 parts plaster;
- 10 shares of lime;
- 1 part asbestos;
- 5 shares of sand.
All components must be mixed dry. Further work involves the following actions:
- Moisten the surface to be treated in advance.
- Add water to the dry mixture in portions. The mass should become thick.
- Start working immediately as the plaster hardens quickly.
- When coating the fireplace, immediately level the surface with a spatula. Once the mixture sets, it will be difficult to do.
Heat-resistant adhesive for ovens
This product is made from fireproof cement and fireclay powder. The mass is in a hard and elastic state. The first one is taken when it is necessary to plaster the entire surface, the second one is used to seal defects.
Heat-resistant glue is durable, not afraid of high temperatures
Its important advantage is fast drying.
To use the solid mass, it must be diluted with water. The putty should be prepared in small portions, as it hardens quickly.
Alternative oven grout
If you need to grout the stove in your house without extra expenses, then instead of ready-made products, you can use homemade grout. It is based on clay with sand, salt and straw. The breeds should be taken in a ratio of 4:1. If you measure them in buckets, then take 50 kg of straw and 1 kg of salt.
Before covering the stove with clay, sand and straw, you need to prepare the following composition:
- Pour the clay into the container.
- Pour water, wait 0.5-1 day.
- Add sand and mix.
- Chop the straw and add it to the sand and clay base.
- Add salt and stir.
The presence of straw in the composition prevents the appearance of new cracks.
Armature
Reinforcement is a collection of interconnected particles and elements, which, together with a material such as concrete, in reinforced concrete structures are perceived as beams that stretch the tension. Reinforcement is also used to enhance the durability of concrete in columns.
Reinforcement elements are divided into rigid (angles, channels, rolled I-beams) and flexible (rods of periodic and smooth profiles, as well as knitted or welded frames and meshes).
Let's consider the classification of types of reinforcement.
Depending on the purpose, the reinforcement can be: - working (the cross-section is assigned by calculation, the forces are perceived in the particles of the main load); — structural (distribution fittings that absorb shrinkage/expansion, exposure temperature); — installation (installed to combine the structural and working parts); — anchor (embedded parts).
Depending on the orientation in the structure: - transverse reinforcement, which actively prevents the formation of cracks from emerging stresses near the supports and connects concrete from the compressed zone to the tensile zone with reinforcement; - longitudinal reinforcement that completely absorbs tensile stresses and prevents the formation of cracks in the stretched zones of the structure.
Depending on the conditions of use, the reinforcement can be: - non-tensioned; - tense.
In prestressed pre-stressed concrete structures, the prestressed reinforcement is exclusively working.
There are five possible options for contact between reinforcement and concrete: - contact with concrete structures by friction; — connection on shear bonds; — adhesion (the process of joining when concreting a steel reinforcing element); — interaction of cement mortar and steel reinforcement at the electrochemical level; — compression of reinforcement using concrete after it shrinks.
If it happens that a crack appears in a load-bearing wall or foundation, this is not a death sentence, it’s just time to take “global” (radical) measures to strengthen the entire structure. We will talk about the simplest and most popular methods of preserving the integrity of a building in this article.
Note.
The article uses conventional terminology.
When purchasing a ready-made house, the new owner in all cases is dealing with a pig in a poke
And it doesn’t matter whether it’s a new building or a renovated old one. Builders erect and repair cottages and private houses in a fantastically short time, which always affects their sustainability and durability
Regardless of the reasons for its appearance, a crack is a frequent and faithful companion of stone buildings and structures. We will talk about the most difficult cases of these unpleasant and dangerous defects - structural cracks, which serve as signals about the appearance of mobility of load-bearing elements. To stop the development of a crack, you should stop the movement and fix the elements, and then repair and “mask”.
Note.
A crack in the trim does not always mean there are defects in the wall material. You should make sure that it is the supporting material that is damaged by removing part of the finish and exposing the defective area for observation.
Let's leave the theory and consider the three most common cases of the appearance of mobility of elements: collapse, blockage and separation of the extension.
Sealing technology
To decide how and with what to seal the seams in the well, you need to see if water is leaking from them, since the technology for repairing dry and wet seams is different.
Preliminary work
Before sealing the seams between the rings in the well, you should carry out some preparatory measures:
Clean the walls of the shaft from dirt, algae and other deposits using mechanical cleaning methods or a stream of water under high pressure;
Cleaning with a Karcher high-pressure device
- Remove destroyed concrete from the seams, beat it off where it is cracked and does not hold well;
- Widen and deepen the seams and clean them.
In short, the surface to be repaired must be clean and durable.
The photo shows the brackets securing the concrete rings
Repair of dry seams and cracks
The seams in the well are sealed using dry mixtures mixed with water. The most affordable option is cement and sand. But such a composition will not last long under the influence of moisture and frost, and will begin to deteriorate again. To prevent this from happening, liquid glass is introduced into the mixture.
When working with it, you should remember that it hardens very quickly, so the seams need to be prepared in advance for sealing, and only enough mortar should be made that you can use in 5-10 minutes. The process itself consists of covering the seams with mortar using a spatula, as is done when plastering walls.
Sealing joints with cement mortar
When deciding how best to seal the seams in the well, do not try to simplify your work and use various sealants, polyurethane foam or epoxy resin for this purpose. At best, you will not achieve the desired effect; at worst, you will harm the quality of drinking water and make it unsafe for consumption.
Repair of leaking seams
If water leaks through the cracks and potholes in the walls of the well, it is pointless to seal them with cement mortar - it will wash out before it has time to set and harden. How to cover the seams in the well in this case?
For this purpose, quickly hardening expanding materials are used - so-called hydroseals (HydroStop, Waterplug, Peneplug and others). They harden very quickly, without forming cracks and reliably sealing the leak.
Fast setting waterproofing mixture
Hydroseals are absolutely waterproof, resistant to temperature changes, thawing salts and other aggressive influences. Their only drawback is their high price. A three-kilogram bag costs on average 800-1000 rubles.
Waterproofing seams in a well using a hydraulic seal is possible in two ways:
Just a solution. It is prepared according to the manufacturer's instructions - most often it is diluted in a clean container with water heated to 20 degrees in a ratio of 5:1. the proportion may vary depending on the size of the defect. The solution is mixed in a small amount, as it hardens quickly, stir very quickly and press into the pre-embroidered hole with your own hands. Then it is held manually for 2-3 minutes.
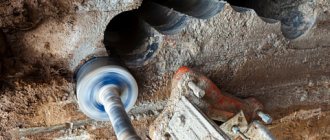
If the groundwater behind the walls of the well is under pressure, and the flow between the rings is very strong, you can try the following method. Using a hammer drill, drill one or two holes 15-20 cm below the leaking seam.
Water will rush into them, the pressure between the rings will weaken or disappear altogether, and sealing the seams in the well will be easier. When the solution has set, the holes can be filled with wooden choppers adjusted to size and also covered.
When working with a hammer drill, remember the close proximity of water and electricity, follow safety precautions
Unfortunately, even the best well repair cannot guarantee that leaks will not appear in other places over time. Therefore, it is necessary not only to waterproof the well seams, but also to treat the entire inner surface of the shaft with special elastic compounds.
After drying, they create a continuous film, sealing all small cracks and preventing them from growing. The composition adheres well to the surface and is resistant to water and frost.
If the upper seams are constantly leaking and coming apart, it makes sense to seal them not only from the inside, but also from the outside, by digging out the soil around the well. After completing the repair work, it is advisable to build a clay castle around the source or make a blind area.
Tools and materials for restoration
Before starting work, you need to decide on the scale of the restoration and prepare the necessary tools. The concrete surface is restored using the following means:
- cement;
- sand;
- ready-made concrete solution;
- fragments of bricks, stones, rags;
- gypsum;
- primer;
- antifungal agents for walls;
- putty.
Sand and cement.
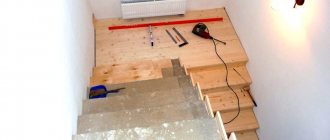
Necessary tools for repairing most defects:
- vacuum cleaner to remove dust;
- eye protection glasses;
- sandpaper for cleaning the surface;
- brushes of different diameters;
- narrow and wide spatula;
- dowels;
- knife, screwdriver.
Depending on the size of the hole, the amount of materials and the set of tools changes.
Where do you start sealing cracks?
First of all, you need to thoroughly clean the surface. Even if the gap is very small in appearance, the ceiling next to it must be cleaned very well with a spatula. Most likely, as soon as you remove the layer of putty, you will see the actual size of the gap, which may not be small at all.
Next, you need to continue cleaning the gap with a spatula, knife, in general, with any tool suitable for these purposes. Builders call this procedure “joint jointing.”
You need to completely free the gap from old, dried out mortar. When building a house, the cracks are filled with ordinary cement, but over time it loses its strength: rain, temperature changes, and again shrinkage. It is advisable not to leave a single extra pebble or piece of cement, since it will then prevent the new material from “grabbing” well.
After you have completed this work, we move on to another stage, also preparatory.
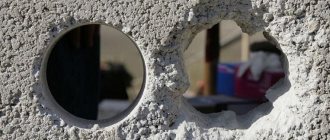
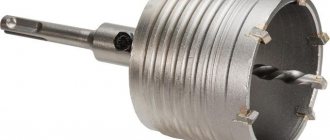
Elimination of through holes in concrete
Through holes may remain after drilling with a hammer drill or replacing systems that pass through the wall.
The main feature of repairing such damage is the need to plaster it on both sides. You need to cover the opening with a board on one side and cement it on the other, then place the board over the second hole.
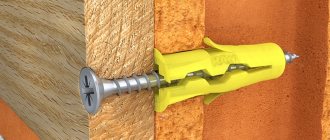
If it is impossible to get to one of the holes, installation is carried out in the following way:
- The gap is widened, cleaned of dust, moistened and primed.
- Support points are found into which self-tapping screws or dowels are screwed into the maximum possible depth using a concrete drill. In total, you need to screw in 4-5 dowels - they will serve as a support for the bookmark.
- The void is filled with stone or brick and filled with cement.
- After drying, the area is puttied and rubbed.
Cement mortars
These compounds are very popular due to their low cost and ability to repair minor shrinkage cracks in concrete.
Repairing a crack
Before you begin sealing, you need to check the crack itself for chips around it. If there are any, then in the near future they may turn into holes, so it is imperative to remove all peeling pieces of concrete. After this you need:
Perform jointing. To do this, using a chisel and a hammer, you need to walk along the entire length of the crack so that its depth is at least 5 mm. If necessary, you can use a spatula to create a depression.
- Remove dust using a vacuum cleaner and rinse the resulting depression with water.
- Remove excess water and cover the crack with cement mortar (3 parts sand to 1 part cement with the addition of PVA). In this case, you need to ensure that the composition covers the entire space of the recess.
- Moisten the poured cement with water.
Filling the hole
If a hole has formed in the concrete surface in which the reinforcement is visible, the defect can be repaired as follows:
- Clean the hole in the concrete and treat its surface with an anti-corrosion compound.
- Place pieces of steel wire about 4 mm in diameter into the recess.
- After this, the recess is covered with a primer, applying it evenly over the entire surface. In this case, the thickness of the mixture layer should be about 3 mm.
- Without waiting for the mixture to dry, fill the hole with a cement compound for sealing cracks in concrete and make sure that it fills the entire hole. If the hole is too deep, then cement is poured in several stages. In this case, each subsequent layer must be moistened with water from a spray bottle.
- Level the surface with a lath (metal or wood), moving the tool from right to left.
After the mixture has hardened, excess cement composition must be removed with a spatula and the surface must be plastered. If the crack was too deep, then leveling is done using a grinding machine.
Healthy! The cement composition must be poured with a reserve so that it is slightly higher than the floor surface. The mixture will shrink as it hardens.
After 24 hours, the concrete floor can be painted or any finishing material can be laid on it.
However, it is worth considering that such sealing of cracks in concrete will not provide a sealing effect and is not suitable for surfaces that have increased waterproofing requirements. In addition, the cement composition can be considered as a temporary solution to problems. Sooner or later the defects will appear again. If you want to “overhaul” the holes and avoid their occurrence in the future, then in this case you can repair the defects using resins, specialized repair compounds based on them, or sealant.
Regulatory requirements for the size and filling of installation joints
Typical dimensions of the slabs provide for their laying with 15 mm seams, that is, almost end-to-end. Regulatory literature prescribes the construction of monolithic sections with reinforcement with a distance between slabs of 300 mm.
To seal the seams between floor slabs, it is necessary to use
concrete with quick-hardening Portland cement or Portland cement grade M400 or higher with fine aggregate .
The grain size of the aggregate should not be more than a third of the gap between the slabs and three-quarters of the clear size between the reinforcing bars. Plasticizers and setting accelerators must be added to the concrete mixture. If you get a standard seam between slabs with a width of 10-15 mm, then usually a reinforcement bar is laid at the bottom of the seam, which is arranged in the form of a “cone”, and filled with mortar.
How to repair holes in a brick or concrete wall
The extent of repair work to the surface of a brick or concrete wall will depend on the extent of the damage. If these are holes left when old nails, screws or dowels were removed, then it is enough to cover them with putty or a special repair mixture.
Let's take a step-by-step look at how this can be done:
- To do this, take a long nail or screwdriver and widen the hole. This must be done so that the putty penetrates as deeply as possible inside.
- Then use a dry brush or vacuum cleaner to remove any accumulated dust and crumbs.
- Now moisten the resulting hole with water. For this purpose, you can again use a brush or a spray bottle, or a piece of foam rubber. This should be done so that moisture from the repair mixture or putty does not quickly absorb into the wall.
- After a few minutes, putty the damaged area, carefully rubbing the mixture into the hole.
- Once completely dry, sand the surface with fine-grained sandpaper.
- Now the area can be painted over or wallpapered.
If the hole in the wall is large and deep enough, for example, it was left after replacing pipes or dismantling an electrical outlet, then putty alone will not be enough. You will need either cement, gypsum, or a ready-made concrete repair mixture, which can be purchased at a hardware store.
What to do in this case:
- Before you fix a hole in the wall, prepare the hole by clearing away any debris and moistening it with water.
- Then fill the void with pieces of stone or brick mixed with cement mortar. This will save putty and strengthen the area being restored. Cement mortar for this purpose is prepared from one part cement and three parts sand. In such a case, you can also use building gypsum or concrete repair mixture.
- When this cement (or plaster) “patch” has dried, putty it, carefully filling and leveling the remaining voids and cracks that have formed.
- The area treated in this way should dry well. This will take at least 12 hours.
- When everything is fairly dry, smooth the surface with fine-grit sandpaper. To prevent this place from showing off as an ugly bump, it should be leveled with the rest of the wall surface.
- The wall is leveled, and now it can be painted or wallpapered.
If, during the shrinkage of the building in the room, the interpanel seams have come apart or a deep crack has formed, then there is no need to rack your brains about how to repair such a hole in the wall. In this case, use polyurethane foam, which is sold in aerosol cans at any hardware store. It perfectly fills voids, easily penetrating even hard-to-reach places. In this article you can learn how to repair cracks of varying complexity.
Polyurethane foam adheres perfectly to various surfaces and quickly hardens in air. So you are guaranteed a good result in the process of eliminating deep cracks and holes.
- Before you start work, prepare the place - clean it of dirt, dust and other debris. Wet the wall surface.
- Before applying the foam, you need to shake the can well so that its contents turn into a homogeneous mass. This will take you at least a minute.
- During operation, hold the container upside down, since the gas contained in it, which displaces the polyurethane foam, is lighter than it.
- Vertical cracks should be filled from bottom to top.
- If the hole is too deep, apply the contents of the can in layers, applying a new layer after the previous one has dried.
- After filling the hole, do not touch the damp polyurethane foam with your hands, this can change the structure of the material and slow down the process of its hardening. Wait until it dries.
- Remove excess dried foam with a knife and putty the surface.
- When the putty is dry, smooth the area with fine-grit sandpaper.
Now you can see for yourself that it is simple and easy to repair any hole in a concrete or brick surface, no matter what size, without outside help.
The main thing is to correctly assess the scale of the repair work and carry it out in accordance with the rules for using the material that you will use when restoring your wall.
Step-by-step instructions for filling small holes
After removing a nail or screw from a wall or moving a shelf or cabinet, small holes are formed. You can cope with sealing such a hole using putty or concrete mortar and several tools. The sequence of work for the restoration of minor defects includes the following activities:
- widening the hole with a screwdriver, knife or nail for deeper penetration of the mixture;
- cleaning the hole with a vacuum cleaner or brush from dust and small debris;
- spraying with water to moisturize;
- priming the surface with a sponge or spray gun for better adhesion and less consumption of putty material;
- after the primer has dried, putty is applied and the surface is leveled;
- cleaning the surface with sandpaper after drying.
Useful tips
Regardless of what exactly is used to seal cracks - homemade putties, putties or sealants, there are uniform rules.
Knowing the rules, the work on sealing cracks will become better and more durable:
- Carry out such events in the warm season, at above-zero temperatures.
- Before applying any composition, thoroughly clean the surface to be treated from debris, dirt and dust.
- Make sure that the tree is not wet after rain. Choose dry weather for such events.
- If the split is serious and large, pre-glue its edges with masking tape. This will prevent the composition from reaching other places.
- If sealant is accidentally spilled on the surface, wait until it dries and carefully clean the area with sandpaper.
- After finishing the work, the former crack is moistened with water and leveled (you can use a brush). This will give the log a neat and smooth look.
What means would you use to repair cracks in logs?
People's Professional
When planning to build a cottage, house or bathhouse from a log house, select only high-quality logs. It is better if they come with pre-treatment with antiseptic compounds and after prolonged drying. This will protect the wood not only from splitting, but also from the appearance of mold and fungal colonies.
- How best to get rid of mold on wood: types, causes, overview of control methods, sequence of actions to eliminate the problem, as well as measures to prevent recurrence
- How to choose the best decking board: types, criteria for choosing products from natural and heat-treated wood and WPC, review of reliable manufacturers
- The best way to treat wood to protect it from rotting: chemical compositions, antiseptics, how to choose the optimal composition, their pros and cons
Mixing epoxy concrete repair mortar
Epoxy repair mortars have resin fillers and a hardener. For deeper holes up to 150mm deep, you can use deep fill repair mortar. This epoxy solution has a fairly large (up to 4 mm) aggregate in the resin and, as usual, is mixed with a hardener.
If a smooth finish is required on the surface, a regular (as opposed to deep fill) high performance repair mortar should also be used. Repair mortar for deep filling should be left at a distance of no more than 50 mm from the surface.
For holes smaller than 50mm, it is best to use a regular epoxy repair mortar. This repair mortar has a much thinner polymer aggregate.
If you want to get started on your repairs quickly, you can also use a quick-cure epoxy repair mortar.
The last repair solution that can be used is called liquid repair compound. It is mixed in the same way as both of the above solutions, but the amount that gets into the crack produces a wet, smooth, flowing mixture.
How to repair a crack in a wall
The appearance of cracks requires repair work. If the damage is not corrected at the initial stage, it will lead to more serious damage.
To figure out how to repair a crack in a wall, you need to pay attention to the material from which it is made.
Repairing cracks in brick walls
Two types of cracks occur on brick surfaces. Some appear in masonry joints. In this case, the bricks are not damaged. Others lead to disruption of the integrity of masonry elements.
To seal the crack, a cement composition is used. It is made independently. For mixing you will need 1 part cement and 3 parts sifted sand. Add water to the resulting dry mixture and knead until a homogeneous consistency is obtained.
To ensure the strength of the structure, a reinforcing layer of metal rods is mounted on the wall. To do this, cuts are made across the crack. Brick sawing is carried out using an angle grinder with a concrete disc. Holes are drilled along the edges of the slots. The diameter of the drill is selected taking into account the thickness of the rods.
The edges of the metal blanks are bent at right angles. The resulting parts are in the form of a bracket. They are driven into pre-drilled holes. This increases the strength of the structure and eliminates the possibility of further propagation of the crack.
The hole is filled with repair compound. To do this, use a rubber spatula. The solution is pressed into the crack. This technology allows you to fill the cavity as much as possible. The hardened composition is ground and finishing materials are applied.
In plasterboard walls
Cracks in walls occur due to mechanical stress. If damp wooden beams are used as sheathing, damage may occur when it dries out. It is preferable to seal this type of hole in the wall with a gypsum mixture. The work is carried out in the following order:
- Expand the site of damage. This is necessary for normal filling of the cavity. The crack is widened with a utility knife.
- Remove dirt. You can use compressed air, a hard bristle brush, or a vacuum cleaner.
- Apply primer. It improves adhesive properties and protects the slab from rotting.
- Apply the first layer of putty. Use a starting composition with large fraction filler.
- Lay the reinforcing mesh. It is pressed against the first layer.
- Apply the composition with fine filler.
- Wait until completely dry.
- Grind the restored area with an abrasive mesh.
After repair, the wall is ready for finishing. The installation method depends on the type of finishing material.
In concrete walls
You can repair a crack in a concrete wall with your own hands. The repair technology is no different from restoring brickwork.
Seal the crack in the wall with cement. It is pressed into the previously expanded cavity. If necessary, install a reinforcing layer of metal rods.
You can repair a hole in the wall with your own hands. Before starting work, take into account what material it is made of. To increase the strength of the structure, a reinforcing layer is used. This approach makes the surface resistant to mechanical damage.
We also recommend watching a selection of videos that will reinforce your knowledge and answer any remaining questions.
Repairing holes in the wall with your own hands.
How to cover a groove or hole in one go? How to prevent the plaster from retracting?
So that there are no cracks
If you think in advance about how to make a screed so that it does not crack, you can avoid the hassle of repairing it. To do this, several conditions must be met.
- The thickness of the screed at its thinnest point should be at least 20 mm, and if the base is sand, expanded clay or insulation boards - at least 30 mm.
- When installed on a weak or shrinkage-prone base, the screed must be reinforced.
- The screed must be poured over the entire area at once, without taking long breaks.
- If this is not possible, arrange expansion joints at the junction of the dried and fresh mortar.
- Observe the proportions exactly when mixing the solution, taking into account the brand of cement and the moisture content of the sand.
- If, after leveling, puddles of water form on the surface, it means there is too much of it in the solution; it is better to immediately redo this area.
- Avoid drafts during the first days of drying the solution.
- As soon as the screed sets, cover it with film.
- If the air in the room is dry and hot, periodically moisten the surface with water so that the concrete dries evenly.
How to repair a hole in a concrete wall
First, let's look at how to repair a hole in a concrete wall. Let's come closer to our wall and take a closer look at it:
Scary, nothing to say. When you completely remove the wallpaper and remove all the excess, this is what it will look like. Everything must be removed down to the concrete. White spots on the wall may remain if these are pieces of stubborn old putty or glue that have already grown together with the concrete and cannot be intensively cleaned.
In a separate article, we discussed in great detail and step by step how to prepare a wall for wallpapering. In the worst case scenario, deep holes will have to be repaired in it, and then it will need to be plastered (Lesson 1) and putty.
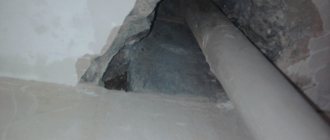
How to fill a big hole
After the very first intensive treatment of the wall, which is described in detail in this article, holes of a very different nature may form on it. Let's go to the corner of the wall:
When we beat off the old crumbling plaster, pieces of cement fell off along with it. Moreover, in old buildings, if you touch it, all the cement will fall out. I’ll say right away that what crumbles easily, beat it off in any case!
Well, in the end, in the very corner, from the ceiling to the floor, a long hole appeared! What to do with it? How to repair holes of this nature? You can’t just plaster it, because the hole is deep enough and the plaster will gradually crumble. It is in these cases that foaming is a good option. That is, we take polyurethane foam and pass it along the entire seam.
Here is a detailed video tutorial on working with polyurethane foam and sealing such a hole.
I ASK FORGIVENESS IN ADVANCE. In the video tutorial, a mistake was deliberately made so that readers would guess what was going on (there was such a competition): foaming, of course, is done from the bottom up, and not vice versa, as shown in the video. But, unfortunately, this video tutorial was not re-shot as needed. Therefore, everything in the video is correct, except for this nuance:
And this is what polyurethane foam looks like. In fact, there are a lot of types of foam on the market today, and here is one of the options:
Now let's move on to another part of the wall and see a fairly large chip on it:
Deep chips cannot be plastered (too deep) or foamed (there is nothing for the foam to hold on to). In this case, such a wonderful tool as the Kreps repair composition comes to the rescue:
The packaging shown here is in polyethylene, but there is also paper packaging. Repair composition is a special fast-hardening and very durable cement mixture intended for repairing deep chips in walls, concrete floors and other concrete structures.
Watch a detailed video tutorial on working with repair materials for filling large holes:
How to repair small chips
We just have to consider the case when you assessed your primed wall and found that it is smooth, and there are only small chips and roughness not exceeding 5 mm:
How to repair a hole in the wall in this case? The answer is simple - ordinary putty will do:
A separate article describes in detail how to putty a wall (and this, accordingly, is suitable for the topic of repairing small chips).
Briefly about the main thing
In order not to have to decide how to repair the blind area, you must initially follow the technological process.
Before restoring the screed, you need to find out the root causes.
The seam between the blind area and the plinth can be sealed, the cracks can be expanded and tightened, and finally rubbed with cement mortar.
If the cause of the damage is a poorly prepared foundation, then it is better to redo everything.
Write in the comments what you think - is there any point in repair work with a blind area, or in any case is it better to disassemble everything and redo it again?
Hello, dear readers!
Using a cement-based mortar with sand allows you to eliminate the gap between the bathtub and the wall with your own hands. For high-quality processing of joints, it is important to know the basic principles of working with cement mixture.
Pros and cons of sealing cement joints
A durable layer of cement mortar seals the gap well. To replace it, a plaster composition with a thick consistency is suitable. Any of these mixtures is enough to cover the joints so that water accumulates on the floor.
Sealing joints with cement mortar is reliable if there is an opening of up to 4 cm.
If the gap is larger, then you need to strengthen the supporting element on the wall for laying the composition. This could be a wooden strip of the required length
, which will serve as an obstacle to prevent peeling and destruction of the cement mortar.
Additions of latex or polymer additives to cement mortar enhance the moisture resistance of the material. For more convenient cleaning, there is no need to paint the cement when caring for treated joints.
It is enough to coat it with epoxy resin or water-repellent impregnation.
The main disadvantage of the method of sealing seams with a cement mixture is due to the fact that the hardened mortar no longer has the property of elasticity. If there is renovation work going on in a neighboring apartment that causes the walls to vibrate, the composition will quickly crack. This breaks the tightness of the joint treated with cement mixture. In terms of reliability, cement mortar is inferior to polyurethane foam.
Preparing the solution and carrying out work
The cement-concrete mixture can be replaced with tile adhesive left over after repairs. The wall surface must first be prepared. To do this, it is necessary to perform the following types of work.
- 1. Wash off all contaminants by cleaning the seam.
- 2. Carefully prime the surface, which will ensure the best adhesion of the composition to the wall.
- 3. Carefully study the instructions for the cement composition on the packaging.
- 4. Prepare a portion of the mixture in the required volume, checking its thickness.
- 5. Pre-fill the gap with a rag soaked in the compound to enhance the reliability of the seam processing.
Serpyanka tape, which increases the strength of the sealing layer, is suitable for sealing wide openings. If the gap is large, it can be plugged with a rag soaked in a liquid cement-concrete composition. This is necessary so that the mixture does not fall into the gap under the bath.
It is better not to prepare a lot of cement mortar at once, since the composition hardens quickly. To seal the joint, you must perform the following steps in stages.
- 1. Fill the joint with mortar, level and compact the composition.
- 2. Cover the dried strip of mortar with putty.
- 3. Paint the prepared seam.
- 4. Lay a ceramic border or plinth.
The mixture hardens in a short period of time
Therefore,
experts recommend
using
medium-thick cement mortar
. To best perform the work, you should prepare all the necessary materials and tools in advance. You can properly putty the dried composition with waterproof tile adhesive.
Source