It is generally accepted that funeral services are a fairly profitable business. And its integral part is the production of tombstones/monuments and their subsequent installation. Concrete ritual products belong to the economy class segment, so the demand for them remains stable.
To open your own production of monuments made of concrete and polymer concrete, you need appropriate premises and simple equipment - a mixer (installation for preparing the mixture), a vibrating table, as well as container shapes of various types and sizes (crosses, rectangles, ovals for the monument - production depends on the wishes customer) for molding monuments. However, the production process involves some features that a person planning to open a workshop for the production of concrete tombstones should be aware of. This will be the subject of our article.
Features of the preparatory stage
Do not start making monuments with your own hands without preparation. You must have:
- casting mold of the required size;
- fittings;
- cement M 500, DO marking;
- sand;
- water;
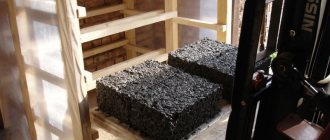
- filler (marble chips, crushed stone);
- plasticizer
You also need tools: shovels and bayonets, brooms, buckets, hammers, nails, a saw for producing formwork and a number of other materials.
Foundation of the monument: stages of work
They begin to make the foundation by digging a pit, then step by step:
- fill the pit with sand;
- make a frame from boards;
- reinforced mesh is placed in the finished frame;
- cover everything with tiles.
Completion of all work may take several hours.
Foundation reinforcement
Installation of formwork
Preparation of the solution
Workflow stages
The cement for the monument is mixed in a concrete mixer, after which:
- the form is attached to the vibrating table;
- fill it with the prepared mixture (fine stone or premium marble chips, reinforced metal are added inside);
- The monument is dried in the form.
The finished monument is treated with a solution that prevents the penetration of moisture and painted. The photo is taken on a ceramic tablet, and the date and time is taken on a board made of basalt or metal.
Making a concrete sculpture with your own hands
To sculpt a concrete sculpture, a master needs:
- make a sketch (drawing) of it on paper;
- sculpt a model from clay, plasticine on a metal frame;
- make a copy frame;
- weld a frame from pipes;
- lay concrete on the frame.
Kawabanga!
Chutes for transporting concrete. The resulting flaws are corrected by removing excess with a knife. A week after the sculpture is completed, it is polished. Decorative concrete is used in production (white cement and colored chips are mixed).
Installation of a tombstone
Concrete is made at the feet of the grave, which, in fact, serves as the basis for the pedestal. Its surface must be strictly horizontal and have sufficient thickness. This will not only allow you to correctly install the monument in a vertical position, but also ensure its stability for many years.
Do-it-yourself installation of monuments is done using a cement-sand mixture with the introduction of steel reinforcing rods. Their number varies, but not less than three units. After completion of the work and hardening of the solution, the formwork is disassembled. Prepared and fertilized soil is poured into the flower garden. The installation of the tombstone is completed, and the memory of the deceased will remain for a long time.
We arrange a flower garden for the monument
- periwinkle;
- irises;
- crocuses;
- pansies;
- lobelia;
- marigold;
- petunias;
- ragwort;
- hosts.
Lawn grass is also often used to decorate a flower garden. It can be used throughout the flower garden, or combined with other plants. The option of planting lawn grass around the entire perimeter of the flower garden is extremely practical and easy to use.
Also, before planting plants, it is worth considering whether there are tall trees or shrubs nearby, and based on this, you need to decide which flowers to plant, because many of them are light-loving.
Manufacturing technologies
Made from concrete
What the process looks like
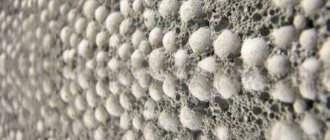
The concrete mixture consists of one part cement and three parts filler (for example, sand). To improve quality, various plasticizers are added (for example, “Plasticizer C3” or “Superplast RT”).
It is possible to produce tombstones and monuments in grey, white, brown, black or burgundy if iron oxide pigments are added to the mixture. There are technologies that allow you to combine several colors and produce complexly colored elements (fences, flower beds).
The process of making a grave monument
From natural and artificial stone
If monuments are made of stone, then it should be taken into account that marble is more malleable in processing than granite. It is best to purchase ready-made monument blanks (polished), especially if you do not have the funds to purchase machines. In this case, you only need to engrave the inscriptions and the portrait. If the portrait is made on a separate board, you need to make holes for attaching it.
Do-it-yourself mosaic monument production technology
When producing monuments from marble chips, the solution consists of 5 parts marble, 3 parts cement and water. All components are placed in a concrete mixer and mixed for about 5 minutes. The finished solution is placed in a mold and placed on a vibrating table for 5-7 minutes, then dried at a temperature of 16-20°C for up to 48 hours. After drying, the finished product should rest for two days. Then you can do engraving or other type of processing.
Sometimes it is not enough to make a monument; the customer wants it to be installed. To carry out this work, pipes (diameter 4-5 cm), a level, cement mortar, a shovel, a hammer, and wood beams are required. The pipes are installed first and filled with mortar. Pins are inserted into the cabinet (on the same solution), and wooden beams are placed next to them. A stele is placed on the bars, pins are inserted into it, gradually removing the bars. The position of the stele is checked with a level.
Pros and cons of concrete headstones
The main advantages of concrete memorials include:
- low price and availability
- automated production process
- light weight of the monument
- ability to choose the color of the future obelisk
Concrete tombstones also have disadvantages:
- cannot be engraved
- they do not come with a warranty
- cannot be restored or restored
- fragility of the tombstone
- susceptibility to cracking and overgrowing with moss.
Monument care
Concrete monuments require no maintenance. From time to time, dust is removed from them with a dry sponge and even washed, but such a stove does not need polishing or regular cleaning. If it has been standing on the grave for more than 5 years, the plates with photos and inscriptions may need to be replaced.
Concrete monuments are cheap and beautiful. They are easy to make if you have the knowledge and equipment. The material can also be used for formwork, foundations, and sculpture. Neither gravestones nor sculptures require special care.
Source
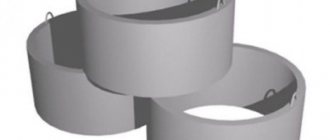
Monuments made of concrete for the grave: production of concrete structures
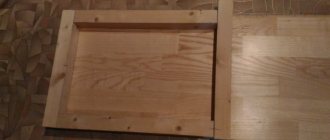
In the photo: the forms for making concrete monuments are varied, it is important to choose the option that suits you best
Features of the preparatory stage
At this stage, you should prepare everything you will need for work.
Let's consider what should be on hand so as not to be distracted during the manufacturing process:
Kawabanga! Technologies for the production of polymer concrete and the production of products from it
There are many different forms on the market for making monuments with your own hands.
- To increase the strength and durability of the structure, reinforcing elements are also needed, which are most often used as reinforcement 10-12 millimeters thick or a metal circle. The size of the elements depends on the configuration and mass of the monument and is calculated individually in each individual case.
- You also need high-quality cement; it is best to purchase the M500 brand without additives (the bag should be marked D0). The strength of the resulting product directly depends on cement, so you should never skimp on it.
The presence of GOST standards on the packaging is an additional evidence of product quality
The plasticizer allows air to freely escape from the solution
Workflow stages
As you know, concrete grave monuments are subject to many unfavorable factors, so the technological process must be followed very scrupulously. Let's look at its main features (
Product molding
Molds for concrete slabs are made from:
- polystyrene;
- PVC plastics;
- ABS;
- fiberglass.
Polystyrene and PVC are the cheapest materials. The forms turn out to be fragile, and sometimes defects appear. ABS is an elastic material that delaminates over time and requires constant treatment with silicone lubricants. It is most profitable to use fiberglass templates for filling the monument. They are durable and easy to repair if damaged. No additional formwork is needed to help contain the liquid cement.
The product is formed in several stages:
- the form is cleaned;
- pour 1-2 cm of cement onto the bottom;
- reinforcement is laid;
- fill the remaining space with cement, to which crushed stone or marble chips have been added;
- concrete is compacted;
- lay another layer of reinforcement;
- add a layer of cement with a plasticizer;
- Level the surface with a trowel.
The dried slab is removed from the mold after 4 days; it must settle for another 1 month. From time to time the monument needs to be moistened. This will give it maximum hardness.
Marble chips give gray concrete a noble shade.
Installation of a granite monument
If you decide to install a granite monument yourself, then you need to approach the matter responsibly in order to complete the work efficiently and for many years to come.
This type of granite structure consists of 3 elements:
The monument is usually erected a year after the burial. Because after this time the earth will settle and become compacted.
Before starting work, it is necessary to evenly level the soil and make sure that the ground does not sag anywhere.
If necessary, a sand or stone cushion is made, depending on the soil.
Also, in the place where the monument itself will be installed, you need to place several rods in a vertical position, on which the pedestal will later be installed. The distance at which they will protrude must coincide with the one drilled in the pedestal.
We make a frame from timber and a base
For this operation, a beam 50mm x 50mm and 2 meters long was used. I used an old parquet board (2 boards) as a backing. We fasten the finished bars to the substrate with self-tapping screws.
To create the circumference of the top of the stele, a simple option was used. Take a piece of hardboard. We cut it out in width a little more than the width of our stele, and in height, that is, 50mm.
We cover the hardboard with tape to prevent the concrete from sticking to the surface. I also recommend covering the entire surface of the substrate with tape.
We attach the hardboard to the block.
We are preparing the reinforcement for the stele. Reinforcement with a diameter of 12mm was purchased. In general, 10 or 8 mm reinforcement is also suitable for this purpose.
We drill holes in the lower bar for the fittings outlets. In the future, the outlets of the reinforcement will fit into the holes in the base of the stele and will be concreted.
We attach the reinforcement to the substrate. For this purpose, self-tapping screws were screwed into the substrate, to which the reinforcement was attached using ties.
Preparing the concrete mixture. For this purpose, Portland cement M500 and construction sand were purchased. The stele itself was filled with concrete without crushed stone. The base is already using crushed stone. Proportions cement:sand 1:1. Water was added 0.5 liters per 1 liter of cement. Approximate grade of concrete is M400.
We evenly place the concrete mixture in the formwork. It is necessary to bayonet the mixture with a spatula so that there are no voids. This is an important point. The more voids there are in the finished concrete, the lower the strength of the concrete.
After pouring, when the concrete begins to set, it is necessary to water the surface with water. After watering, cover with film. This must be done during the concrete hardening process for a week.
After 14 days we remove the formwork. If you have covered the entire surface with tape, then there should be no problems with removal.
Making the base of the stele.
For the holes in the base, a children's construction set covered with tape was used.
We fill the holes with sand concrete (you can just use mortar or ceramic tile adhesive). We also apply the solution to the surface of the base in the place where the stele will stand. We connect the stele with the base. Drying takes about 2-3 days. All the stella is ready. Now you can attach the ritual tablet to the glue.
Source
Financial indicators of the project
Proper business planning will ultimately lead to success. It is important to carry out calculations at the very beginning of your journey and compare the amounts of expenses and expected income in order to find out how profitable the business is.
Cost of opening and maintaining a project
The amount of starting investments consists of the following expenses (in rubles):
- registration of activities – 1000;
- purchase of equipment and inventory – 120,000;
- raw materials for the manufacture of the first batch of monuments - 20,000.
Total: 141,000 rubles.
The entrepreneur will spend monthly funds to support the project. Current expenses include expenses for:
- utility bills – 5,000;
- rental of industrial premises – 12,000;
- worker’s salary with deductions – 30,000;
- depreciation – 5,000.
Total: 42,000 rubles. This amount does not include tax deductions.
The amount of future income, payback period of investments
Having 4-5 different forms for pouring concrete, you can make 15 monuments in a week. The average cost of the finished product is 7 thousand rubles, and the cost price is 2 thousand rubles. By fulfilling the average monthly plan of 60 products, the entrepreneur will earn 300 thousand rubles. From them you should subtract the amount of current expenses, which is 42 thousand plus tax deductions. Net profit for the month – 240,000–250,000.
Attention! It will be possible to reach this level of income 2–3 months after the launch of the project, provided that the entrepreneur actively searches for wholesale customers.
Under favorable circumstances, investments in the monument production business will pay off within 3 months of operation. In the future, the monthly net profit will be 80–250 thousand rubles - the demand for grave memorials increases in the warm season.
The business of making monuments has a number of features. Those who are already engaged in similar activities and have achieved success advise beginners not to give in to fear and uncertainty, but to start moving towards the goal. The main condition for the development of production is not to save on equipment, because if it fails, problems will arise with customers. Another key to success is concluding contracts with several funeral agencies. By collaborating only with them at first, you can quickly get on your feet, expand production and open your own retail outlets in the region.
Which taxation system to choose for a monument manufacturing business?
The best option when choosing a taxation system is the Simplified Taxation System (STS), which involves paying 6 percent of revenue, or 15 percent of profit (the balance between income received and costs incurred), the interest rate is chosen by the entrepreneur himself. As an option, you can indicate when filling out an application for UTII (single tax). In this case, the individual entrepreneur will pay a fixed amount to the budget, which will be determined for him. It does not depend on the volume of business, but it is not applicable to a specific business in all regions of the country.
Market and competition analysis
Before opening a business for the production of monuments for graves, you need to collect information about existing manufacturers of similar products in the city and its surroundings. It will be difficult for a beginner to get promoted if there are even 1-2 competitors.
We'll have to find out what kind of monuments are made in the city. If already operating companies are engaged in the production of tombstones from granite and marble, there is no reason to give up. For a novice entrepreneur with a small amount of investment, it is much easier to start with concrete products. They will be in demand among people with incomes below average.
Preparing for work
So, in order to make a monument or tombstone with your own hands, you should first make sure that you have everything you need at hand - tools, materials. It is also important to know the basic proportions for mixing concrete. Particular attention should be paid to the containers in which the monument will be cast.
Tools
The key point of the technical line is the vibrating table for moldings. Necessary to evenly compact the solution. It is on this table that during the production process containers will be installed into which the liquid source will be poured. Next, the tabletop will make movements, they will help compact the containers. As a result, the products are strong, high quality, and durable.
! A table is an indispensable machine tool for manual labor. Therefore, you will need to purchase it for production in any case. You will have to spend from 50,000 rubles.
One of the necessary tools is a vibrating sieve.
Production cannot be done without a vibrating sieve. It is needed in case the purchased cement turns out to be of poor quality (sometimes it may contain foreign objects, pieces, pieces of paper, and so on). Under no circumstances should such impurities be allowed to enter the solution. Therefore, the cement should be sifted before mixing. Otherwise, the finished product may be unsuitable for use and will be written off as defective. By the way, you can replace the vibrating sieve with a manual device, but be prepared for the fact that sifting in this case will take much longer, which means it is not economically viable. The price of a vibrating sieve is from 10,000 rubles.
Making a foundation for a monument in a cemetery
Any plastic container of suitable size will do;
As you can see, from a non-standard material, for the production of marble from concrete, a pouring mold-matrix is required. In this case, you can purchase a ready-made form, or make it yourself.
So, to fill the window sill, a tray of the required size is made from scrap materials (waterproof plywood and boards), and to fill the tabletop, you can use plastic panels fastened together into a single whole.
Advertising production: how to find clients?
The first customers for the monuments may be ritual agencies operating in the city. You need to visit each of them, show examples of your work and agree on cooperation. If you manage to conclude a deal even with one company, then orders will soon arrive. Other advertising methods:
- advertisements in local newspapers;
- creation of a personal page on social networks, where samples of monuments and customer reviews will be posted.
You should think about creating a website later, when the investment has paid off and the project begins to make a profit. Around the same time, you can open an order acceptance point; in fact, it is a retail outlet. Premises for these purposes are rented in the central part of the city or in one of the densely populated areas. You will have to buy office furniture and office equipment - a table, chairs, a printer, a laptop, a telephone.