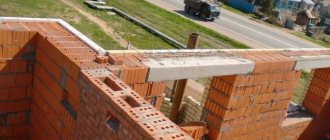
When building every house, reinforced concrete lintels are almost always used. Thanks to them, it is possible to strengthen the openings in the walls, which has a beneficial effect on the strength of the structure. The plant uses GOST 948 84 for reinforced concrete lintels, which allows achieving the required parameters, but they can also be made independently.
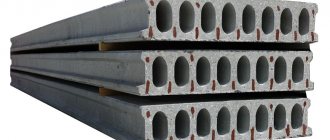
In the photo - factory reinforced concrete jumpers with markings
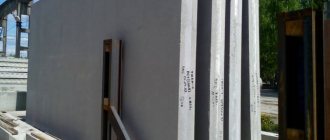
Factory models are delivered to the construction site after pre-order. If you consider the price of the product, the thought arises: isn’t it better to make it yourself?
It is believed that factory designs are of higher quality and more reliable. But homemade products are no less high quality, and making them is not difficult. In addition, you will get obvious cost savings, since you only need to pay for the purchased materials, and you will do all the work yourself. This article will help you prepare and complete it correctly.
Dimensions of reinforced concrete lintels according to brand
Brickwork of ordinary lintels. Jumpers made of reinforcement
Category: Brickwork
Ordinary jumpers
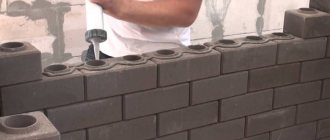
Ordinary lintels are laid from selected whole bricks, observing the horizontality of the rows and the rules for tying ordinary masonry. The height of an ordinary lintel is 4-6 rows of masonry, and the length is 50 cm greater than the width of the opening. For laying lintels, use a solution of grade no lower than 25.
Under the bottom row of bricks in the lintel, in a layer of mortar 2-3 cm thick, at least 3 reinforcement rods made of round steel with a diameter of at least 6 mm are laid, usually at the rate of one rod with a cross-section of 0.2 cm2 for every half-brick of wall thickness, if the design does not stronger reinforcement is required.
The reinforcement absorbs the tensile forces arising in the masonry. The ends of the round rods are passed beyond the edges of the opening by 25 cm and bent around the brick (Fig. 1).
Ordinary lintels are made using temporary formwork from boards 40-50 mm thick. A mortar is spread over it, into which the reinforcing bars are then embedded. The ends of the formwork are supported by bricks released from the masonry; after the formwork is removed, they are cut down.
Sometimes the ends of the formwork are inserted into the grooves on the slopes of the openings, which are laid after the formwork is removed. Yes If the opening width is more than 1.5 m, then a stand is placed under the formwork in the middle and supported on wooden circles (boards placed on edge).
Rice. 1. Laying ordinary lintels: a - facade; b - section; c - masonry on plank formwork; d - masonry on inventory circles. 1 - reinforcing bars; 2 - boards; 3 - wooden circles; 4 — tubular circles
Inventory tubular supports-circles are used. They are made from two pieces of pipe with a diameter of 48 mm, inserted into a third piece of pipe with a diameter of 60 mm.
When laying circles, the pipes are moved apart so that the ends of a smaller diameter go inside the grooves left in the masonry.
Two circles are placed on each opening; they can also be installed when the opening already has window and door blocks. With other types of circles, the opening can be filled with blocks only after removing the lintel formwork.
Brickwork - Row lintels
Video
For information on pouring reinforced concrete lintels in practice, watch the following video:
Jumper Installation Using U-Blocks
Scheme for manufacturing a monolithic lintel
Reinforcement frame for window lintel
Prepared formwork
Lintel after pouring concrete
Removing formwork
Construction of houses
When building any house, there is a need to use reinforced concrete lintels. You can order them or make them yourself. But given the price of reinforced concrete lintels, it is preferable to choose the second option. Of course, many people think that factory-made products are more convenient or reliable, but making high-quality jumpers with your own hands is quite simple. In addition, you will significantly save your money, since you only have to pay for materials. In this article we will look at the technology of self-manufacturing jumpers.
Content:
Types of reinforced concrete lintels
Reinforced concrete products are widely used in the construction industry. Their strength, durability and versatility place them at the forefront of today's building materials. Concrete lintels occupy a high place among other reinforced concrete products, despite their small size and weight. Without lintels, you will not be able to construct a single house from concrete and foam concrete stones, bricks, etc. Reinforced concrete lintels are needed to support the part that is located above the door or window opening. They are used to cover window and door openings in block, stone and brick walls.
A simple technology for the production of reinforced concrete lintels gives very effective results. This is due to the fact that the concrete composition is poured into the formwork with pre-laid steel reinforcement. Metal reinforcement takes the load for various bends and tensions, and concrete reinforcement takes the load for compression.
Lintels can be arched, steel, brick, reinforced brick, etc. There are several types - timber, prefabricated, window and load-bearing lintels. They are made of heavy grade concrete and are designated by the corresponding letters, which indicate the length, design load and standard size.
Reinforced concrete prefabricated lintels are the most popular. They are marked with the designation PR and consist of classic reinforced concrete bars and slabs. The prefabricated property is a huge advantage, since during the masonry you can install the lintel and continue to do the masonry. It is not necessary to cut bricks and lay out rows, due to the modularity of the lintel dimensions.
Concrete window lintels are used to cover window openings. This type is widely used in brick buildings, but can also be used in buildings made of natural or artificial stone.
Load-bearing reinforced concrete lintels are used when it is necessary to close the openings of load-bearing walls. Reinforced reinforced concrete lintels are needed to accommodate the loads from the partition slabs. Load-bearing beams take the load only from the wall located above the opening. Purlins are large lintels, and crossbars are horizontal beams with a shelf, which is necessary as a base on which higher structures will rest. Like all other types, they are widely used in the construction of various objects.
There is another type of reinforced concrete lintels. These are pencils - thin load-bearing jumpers, which are often used in interior partitions with a thickness of 120 millimeters. They are also often used in door openings. The most popular are lintels for window and door openings.
Methods for manufacturing reinforced concrete lintels
To make reinforced concrete lintels you will need the following materials - reinforcement, angles, boards, nails, a concrete mixer (optional), strapping wire, cement, crushed stone and sand for the concrete composition. You may need other materials that you can use if you wish. Before starting work, you need to choose the right type of jumpers.
For small buildings with lightweight construction, regular lintels can be used for additional savings. They should also be used in cases where the ceiling vaults of all floors place emphasis on reinforced belts, which themselves take the loads and distribute them evenly.
Let's look at the technology for making reinforced concrete lintels with our own hands. You can pour the lintel directly above the opening or make it first on the ground, and then install it in the opening. You can use a more convenient option. If you prefer the first method, you will have to tinker with the formwork, if the second method, you will have to lift and install the already made lintel yourself.
The latter option is heavier; you may have to hire a crane to lift it. In this case, it is necessary to make even two jumpers, the width of which is 150 millimeters. At the same time, the thickness of the backfill masonry is 300 millimeters - 100 millimeters of insulation and foam block.
Making formwork for lintels
But if you give preference to the first method - filling the lintel already in the opening, you will save your effort, money and time. An additional advantage is that in this case only one jumper is needed. Installing formwork may raise some questions, but we will try to answer them.
What are lintels over windows, and why are they needed?
If you approach a house under construction and look at the rectangular openings for doors or windows, you will notice that its upper part is made up of special masonry or a beam stretched across it. It is this simple structure that bears the load from the building elements above it. Regardless of the size of the jumpers, they are needed for:
- making the wall structure reliable - the load-bearing surface becomes the support of the entire building, and it cannot be allowed to collapse;
- creating a certain shape of a window recess - the lintels can be a classic horizontal beam, or they can be made in the form of a playful arch;
- bases for the ceiling and continuation of the arrangement of the walls.
The calculation of the opening area occurs long before the start of construction work. Although it is possible to change its dimensions or shape during the construction of a building, it may require significant changes in the design in order to evenly distribute the weight load of the structure.
How to make a reinforced aerated concrete lintel?
Question: Please tell me how best to make lintels in aerated concrete walls, what materials to use, what reinforcement to use?
When constructing houses and buildings from aerated concrete, it is rational to use reinforced lintels, which, in comparison with reinforced concrete lintels, are easier to construct.
In our projects, in order to save money and time for the construction of aerated concrete structures, we very often use such a constructive solution.
How to properly make reinforced lintels in aerated concrete walls?
When constructing external aerated concrete walls, builders always strive to get rid of “cold bridges” at the lintel level. Therefore, monolithic or prefabricated reinforced concrete lintels made of heavy concrete should be insulated. To do this, either heat-insulating U-shaped aerated concrete blocks (expensive and very fragile elements during transportation and installation) are used as permanent formwork, or, after removing the removable formwork during the exterior finishing of the building, the timber lintel is insulated with slab insulation. It should be emphasized that such measures are quite expensive and are not always justified.
Unlike reinforced concrete lintels, reinforced lintels have an important advantage: they do not need to be insulated , since steel reinforcing elements are located along the lintel and do not create “cold bridges”.
Reinforced lintels can be used for door and window openings up to 1.2 m .
It is best if a monolithic reinforced concrete belt is placed above such lintels, which will distribute the pressure from the interfloor structures to the walls of the building. In the case of direct concentrated support of beam structures on a reinforced lintel, it is necessary to reinforce the lintel strictly according to calculations. This calculation can be performed by an experienced design engineer.
How to reinforce lintels?
- bar reinforcement of a periodic profile (rebar of classes: A-III; A400C, A500C) with a diameter of 8, 10 and 12 mm, see photo 1a;
- rigid reinforcement from steel angles (63x5; 63x6; 75x5; 75x6 mm), see photo 2;
- rod reinforcement and steel corners (combined version), see photo 1b.
Photo 1. Reinforced lintels: a) with rod reinforcement; b) with corners and rod reinforcement
Photo 2. Jumpers reinforced with angles
The lintel reinforcement elements should be placed beyond the opening (on the piers) by at least 350 mm in order to anchor them into the walls and securely support the lintel on the piers.
The procedure for constructing a reinforced lintel in aerated concrete masonry
Reinforced lintels are manufactured in the following sequence:
- Laying of aerated concrete walls is carried out up to the level of the lintels.
- Removable formwork is installed, which can be made of wooden beams or panels (planks, plywood or OSB boards).
Photo 3. Formwork made of wooden beams for making a reinforced lintel
Photo 4. Panel formwork for making a reinforced lintel
- Preparation of reinforcing elements: preparation of elements of the required length, laying them in the design position (when using corners, they are primed or painted with enamel).
- Making grooves in aerated concrete blocks, see photo 5.
Photo 5. Aerated concrete block with grooves for laying reinforcement
- Applying glue to the grooves and installing aerated concrete blocks in the design position, see photo 1.
- Removing formwork. Usually the formwork is removed 1.5...2 weeks after the lintel is made.
- Elements from the corner are plastered with cement-sand mortar over a metal mesh (expanded sheet metal or woven plaster mesh are used).
Good luck with your construction of reinforced lintels. I hope our tips will help you save a lot of money on construction))).
We also recommend reading the article about laying aerated concrete blocks using homemade hand tools.
see also
Comments 50
Thanks for the link.
Please. A person has enough strength to answer all the questions asked about GB (within reasonable limits, of course).
Yes, I see that you are a consumer!;-D
The downside is that I don’t like the service life of the blocks themselves. It’s very short :-( Yes, the brick is cold.
Please link to studies on the short service life of autoclave GB. Chat with Gleb Grinfeld (executive director of the National Association of Autoclaved Aerated Concrete Manufacturers), he still has experience and his own books on GB. www.forumhouse.ru/threads/298788/ Please note that I am not a seller of GB, I use it as a building material for my own home.
I also made lintels in my house. And they put jumpers on the corners and fittings. Even if you tell the owner how to do it correctly, guest workers refuse to do this
Moreover, they persuade the owners to do as they want. You need to talk to jamshuts like this - single out one commander with whom you communicate (often this is the eldest in age), don’t listen to the rest - they’ll sit on your ears and won’t work.
They refused to pour it for my neighbor, they put it on the corners. Yes, and bent walls too. I did it for him. And this team has already installed about a dozen houses in our village. What can we say about the quality
We have a new village, everything is being built at the same time, I’ve seen enough of the super-crews and the cracks in the new houses.
similar. It’s also a new village. The houses aren’t even 10 years old.
Our oldest houses are hardly 3-4 years old.
If you do, then it’s a family nest;-) With a brick guarantee of 200 years or more.
Brick over 200 years old and more!:-D
I won’t try to convince you otherwise, just look on the Internet for such an indicator as the frost resistance cycles of bricks and dispel your misconceptions. Masonry from F15 to F50 (freeze/thaw cycles), mostly F35, as well as autoclaved GB.
Like timber. The service life of wood is 70 years:-(
It’s just a shame that these blocks have a short service life :-( It’s a pity to throw away millions for 50 years. In 200 years, all that will be left of these blocks is dust! :/
My box with a foundation, a ceiling, an integrated heating system, basic utilities and sewerage, a roof without finishing the walls so far costs less than 1.5 lamas, which can never be achieved with a brick building, I’m generally silent about the heat loss of a brick building.
You build for yourself. -D But it’s not scary (+ resentment) that so much time and money spent will only last for 50-70 years:/
No, not for myself. Children, grandchildren. Doesn't scare me. The absence of life after death, corrosion of a car body, wear and tear of pants, deforestation, GMO products, ozone holes can also be frightening...
All sorts of things, not without it.
I understand that you are building with 1 helmet. -(
Yes, one and a half helmets (one day a week my 12-year-old son helps at a construction site, while he’s studying). For heavy work - pouring concrete for the UWP, floors, I asked a relative to help.
I wish you more time and a lot of effort. I know what it is! Good luck.
Thank you! There really isn't enough time. Construction is carried out without interruption from the main work.
True, the price of 1 brick is 100 rubles:/
Not a bad scale!;-) How to heat with a coal-fired boiler with automatic equipment? :-D And the service life of the house is 50 years:-(brick is better!;-) There is a brick block in the 1st brick of 14 bricks!:-D I dream of something like this build;-)
GB is fragile, but it is a large item. That’s why I chose it for construction (I build it myself, without hiring workers). The service life of a house made of GB is 75 years, brick is 100 years. In Riga there are unfinished GB houses built in the 30s (we draw our own conclusions). Heating is gas, and later it is planned to add a heat accumulator and add a geothermal circuit. It is possible to use helopanels in place of the geothermal circuit, but this is already exotic.
How many floors and total area? -)
There will be 2 full floors, often ribbed ceilings, roofing with soft tiles. The building area is 125 m2, the total area of the house is about 220 m2.
Purely out of curiosity... I understand how they were made above the window openings. What about the doors? How is the bottom row (the one supported by the board) held?
Due to adhesion to concrete (believe me, you can’t tear it off with your teeth without completely destroying the GB block).
Mmmmmmmmmm... If I didn’t see it, I wouldn’t believe it! Noted, thank you. Cool!
Good masonry. Everything is very neat.
Thank you. The seams were additionally passed to reduce the blowing factor of the masonry.
What kind of covering is planned?
I saw it, it’s interesting... But I’m also interested - is it possible to put channels or beams or will it be a collective farm?
Do you mean resting the GB blocks on the corners above the window? It’s possible, you just need to recess the sides a little into the walls. Disadvantages - it does not protect against cracking in loaded areas, it is quite difficult to finish, you need to make sure that the floor beam does not rest on such a lintel (if the building is being built without an armored belt, the brick belt is not an armored belt). Pros: speed of construction.
I meant about the overlap... I’ll probably create a separate thread
Metal floors have low fire resistance ratings (no matter how strange it may sound). Even a wooden floor resists fire for up to 20 minutes. I can't advise.
I found something similar - www.kolumb.ru/smp-prosto.php how would you rate it?
Prefabricated monolithic floors from Itong, Columbus, etc. They have every right to life. However, their cost stops them. Look at this option, designed back in the distant Soviet times (sheet 1): www.forumhouse.ru/entries/comments/4224/ You may be interested. The difference with the ceiling that I poured is that the fillers (GB blocks) are simply buried in the body of the ceiling, so you only have to fill in the load-bearing beams, as well as the reinforced belt along the load-bearing walls. By the way, pay attention to the test data - it was not possible to squeeze one block out of the ceiling even with a load of 5 tons on it, such is the adhesion force of concrete and GB.
Fine! Most people do this!
I don’t argue, but in more than 40 houses around us there is only one with similar jumpers, and those factory-made, U-blocks, which cost much more.
We also rarely use U-blocks, and rarely lay the blocks on the bottom of the boards, like yours. Usually they put up sidewalls from partition walls, tied them together with anchors or just scraps of reinforcement, with frames and concrete inside. But yours looks prettier and nicer. Good luck!
Thank you, the design you described has its own nuance - freezing above the window lintel, because... the window profile does not provide a sufficiently high thermal resistance.
This is if you just plaster it - I mean the slope.
Apparently I didn’t quite understand the description of the jumper pie. I can't say anything without a cut.
Methods for pouring armored belts between floors
In buildings made of aerated concrete, to reduce tensile loads, it is customary to make strapping belts (“armour-belts”). They “pull together” the walls of the wall box into a single system and prevent them from falling apart due to various deformations of the base. Armored belts are usually made under the roof and under interfloor ceilings.
- Strapping belt in removable formwork - wooden formwork is assembled along the perimeter of the wall, and reinforcement is laid inside. The empty space is then filled with self-compacting mortar. After the concrete has hardened, the formwork is removed.
- The strapping belt in permanent formwork is made from tray blocks (U-blocks) or from ordinary blocks of smaller thickness. Further progress of work is no different from the version with removable formwork. The difference is that the formwork does not need to be removed.
Jumper. Buy or make it yourself
You can buy a ready-made reinforced concrete lintel. With this solution you gain time, because you don’t need to make it yourself and wait until it gets stronger to continue construction. However, then you will have to spend money on buying a jumper and delivering it. The finished reinforced concrete lintels are laid on the mortar.
You can make the jumper yourself on the ground, and then install it in the right place. The advantage of this method is that it can be done in advance. And by the time you need it, you just need to install it.
Making a lintel using permanent formwork. The essence of this method is that in the place of the future lintel (window or doorway) the following is placed:
- three reinforcement rods with a diameter of 12-14 mm, located at a distance from each other, and pre-treated with anti-corrosion solutions. The reinforcement is laid so that it extends onto the walls from the opening by at least 500 mm, and the distance between the rods does not exceed 50 mm (if the distance is greater, it is better to add another reinforcement rod). This method is used very rarely and only on small openings. In this case, only aerated concrete blocks can be laid on top of the reinforcement;
- A pre-fabricated structure is installed on top of the opening, consisting of two corners (minimum 40 mm), between which reinforcement is laid and then welded. In this case, the width of the resulting product should be the same as the thickness of the wall. This method is used often, because it can be used on small and large openings, and both aerated concrete blocks and bricks can be laid on top of the structure. The only caveat is that the larger the opening, the larger the corner will be needed.
Making a lintel using removable formwork. This method is used when filling the lintel in place. In this case, formwork is installed above the opening, the sides of which are attached to the walls, and its lower part is fixed above the opening using spacers (the lower part of the formwork does not rest on the walls). It should be remembered that the formwork, and then the poured lintel, must extend onto the walls in different directions from the opening by at least 200 mm.
Next, inside the formwork, at a height of at least 50 mm from its bottom and at the same distance from the sides, a pre-prepared mesh welded from 12-14 mm reinforcement is laid. To prevent the mesh from falling onto the lower part of the formwork during pouring, crushed stone granules or brick fragments are placed under it. After the preparatory work has been completed, concrete can be poured into the formwork.
To fill the lintels, concrete is used, made in the following proportions:
- Cement - 1 portion
- Sand - 2 servings
- Slag - 1 serving
- Crushed stone (fraction - up to 15 mm) - 3 portions
- Water - depend on the situation.
When pouring the solution into the formwork, it must be compacted and leveled so that no voids form anywhere, which will subsequently lead to cracks.
After the jumper is poured, it is left for five days until completely hardened. Then the sides of the formwork are removed and construction work continues, and the lower part and spacers are removed only after the concrete has completely hardened. Typically, concrete gains its full strength after 14 days, but this also depends on weather conditions.
Some recommendations
- During construction, it is better to use either ready-made reinforced concrete lintels (purchased or poured in advance) or lintels made using removable formwork.
- The height of the reinforced concrete lintel should be at least 1/20 of the length of the opening, and it is advisable to make the width according to the width of the wall so that there are no extra ledges.
- It is better to fill the lintel so that its upper part is flush with the top of the last laid brick or gas block. This will make it possible to continue laying without any changes.
- When making a lintel yourself, it is better to use reinforcement with a diameter of 14 mm to make the reinforcing mesh. This will add strength to the reinforced concrete belt.
- When pouring the solution into the formwork, it must be compacted well to avoid the appearance of voids.
- It is better to remove the spacer and the lower part of the formwork no earlier than after 25 days.
- If you don’t know what lintels are needed for your building, then it’s better to consult with professionals.
Materials used
- Ready-made jumpers
- Solution
For the manufacture of
- Armature
- Corners (if necessary)
- Binding wire (or welding)
- Boards and nails for formwork
- Cement, sand, slag and crushed stone for mortar
- Concrete mixer (if necessary)
Preparing the box
Manufacturing of formwork
Work on arranging the lintel begins with the manufacture of a wooden frame (box), which is used to pour the concrete mixture and obtain a building element of a given shape. To install such a box, you will need one bottom and two side wooden panels, from which you can subsequently assemble the formwork.
The linear dimensions of the finished panels must correspond to the dimensions of the window opening, and the side panels must cover it both in height and width. The bottom shield is made exactly to the size of the opening being closed. In the sides of the formwork, holes are prepared in advance for the binding wire, through which the panels will be held in a given position. The bottom and side surfaces of the boards are then lined with polyethylene film, which is attached to the formwork using glass nails.
Laying reinforcement
- The assembly of the box usually begins with the installation of the lower shield, which is carefully adjusted both in width and length to the dimensions of the window opening. The correctness of its horizontal installation is controlled using a building level, after which several supports are installed under this shield (taking into account maintaining the leveled position).
- Side shields are placed in a certain sequence; in this case, one of them is first fixed on the wall (using self-tapping screws, for example) and only then fixed on the already mounted lower panel. Note that for walls made of silicate or gas silicate blocks, this task is significantly simplified, since the panels can be fixed to their surface using ordinary nails.
- The second side panel is also fixed first on the wall, and then attached to the bottom of the box using self-tapping screws. When securing the formwork, you should not skimp on self-tapping screws, since when dismantling the structure you can unscrew all the fasteners and use them for other purposes.
- To avoid the “collapse” of the panels under the pressure of the concrete solution, the side walls of the structure are fastened together with binding wire. Such wire (pre-cut into pieces) is threaded in a double ring into previously prepared holes in the shields. After this, a suitable sized reinforcing rod is inserted in the center of the twist, with which it is tightened.
- Then the ready-made reinforcing mesh is placed into the formwork. It is placed in such a way that the reinforcement bars do not touch the walls of the box; At the same time, small pebbles are placed under its lower row.
To fill homemade lintels, it is best to use concrete mixed with fine gravel.