When building a small country house, garage, bathhouse, it is not necessary to build a powerful strip foundation with your own hands or, especially, a monolithic slab. For such purposes, a brick foundation is quite suitable, which, despite its cheapness and simplicity of construction, has very good strength and performance characteristics. In this article we will look at all the intricacies of building a brick foundation.
Advantages and disadvantages of a brick foundation
Advantages:
- — In case of destructive impacts on the foundation, for example, during soil movements, the foundation will suffer only partially, since it is a flexible foundation;
- — Repairing a brick foundation is incredibly simple, you just need to dismantle the damaged bricks and replace them with new ones;
- — The brickwork of the base allows for complex turns and bends of the tape, and this does not require special formwork;
- — Everything that is needed to build the foundation is light in weight, which can be carried by hand.
Flaws:
- — The service life of a brick foundation is relatively short - 30-50 years, which is less than its concrete counterpart;
- — The high hygroscopicity of the foundation requires high-quality waterproofing;
- — The use of a brick base is permissible only in dry and hard, non-heaving soils, with a low groundwater level.
Insulation and cladding
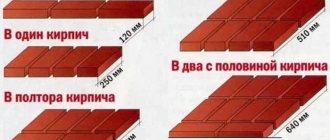
The work includes the use of facing bricks. When the structure is located on a strip foundation, the masonry rests directly on the base. To finish, you should dig the area underneath and measure the free protrusion. To organize cladding with white brick, the width of the base must be at least 13 cm. This is due to the typical construction of the brick. Insulation and cladding at home is carried out according to the customer’s wishes. The type of material is chosen independently, provided that it is appropriate in this situation.
How to choose a brick for the foundation
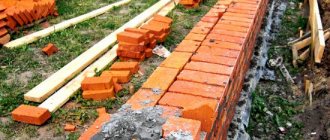
For the construction of the foundation, only red solid brick is suitable, the firing of which was carried out in compliance with the technology. Poorly or poorly fired bricks, as manufacturers often do, will begin to crumble within 5-10 years, destroying the foundation. But if the red brick is burned out, which is a violation of technology, then this will be the best option, since such a brick is the most durable and moisture-resistant. Well, besides, it is usually sold at a low price, considering “overcooked” bricks to be defective.
Among other things, an important indicator when choosing a brick for a foundation is its grade (M), frost resistance index (F) and water absorption. For the construction of the base, it is recommended to choose a brick with the following indicators: M-150, M-175, M-200, M-250, M-300. F from 35 to 100, water absorption – 8-16%.
The most suitable brick is clinker, and although it is a ceramic type of brick, it is durable and moisture resistant. Clinker acquires such properties when fired at a temperature of more than 1200 degrees. It must be remembered that only solid clinker bricks are suitable; hollow bricks, although equal in strength, will inevitably accumulate moisture in the cavities in the form of condensation, which will freeze and thaw, gradually destroying the structure. But an obstacle to the use of clinker bricks is its high price.
Formwork “with three heads”
As already mentioned, permanent formwork for foam concrete can be different. It differs in that it is possible to simultaneously carry out external and internal finishing work. However, removable formwork for foam concrete is distinguished by lower costs, which will undoubtedly follow in the future when the question of facade cladding arises.
Permanent formwork is selected depending on the number of storeys of the future house or weather conditions in the region. But no matter what you focus on, remember that the operating principle is essentially the same. Only the stages of constructing the formwork itself differ depending on the type.
Brick Sandwich
Fixed brick formwork
Brick permanent formwork for monolithic foam concrete is rightfully considered the most durable and reliable. Even multi-storey buildings can be erected using this technology, unlike block construction.
Foam concrete in such a tandem plays the role of insulation, therefore, they take small grades in density. It is difficult to determine the thickness of such walls, since everything depends on the thermal data of the construction region.
Such formwork can be made with either double-sided or single-sided brick well masonry. In the latter case, various slab materials of increased rigidity and density are used for the inside of the formwork.
Brick formwork on a metal frame with an internal part made of DSP
Attention! Brickwork is a labor-intensive task that requires some experience. If you have never personally encountered such work before, it is best to use the services of professional masons. Anything is better than tearing down the existing wall and rebuilding it again.
The biggest advantage of this monolithic construction technology is that simultaneously with the construction of the walls, facade finishing and interior roughing are carried out. Therefore, the seemingly unnecessary costs of purchasing and laying bricks are completely justified and much lower than when carrying out additional external cladding.
How brick permanent formwork is erected for pouring foam concrete, the video below will tell you in more detail.
Light version
Formwork for monolithic foam concrete from CSP boards
The variety of modern sheet materials gives complete freedom of choice for permanent foam concrete formwork:
- cement bonded particle boards;
- plywood;
- OSB sheets;
- moisture-resistant or fire-resistant GVL, but this is an unreliable option, since the sheets may warp under the pressure and temperature of foam concrete.
However, this method is more expensive, when the use of sheet materials for the entire formwork allows you to “stretch out” construction costs and do the cladding gradually. For many, this is a very profitable option.
Lego constructor
Formwork for monolithic foam concrete
There are also special permanent formwork systems for monolithic construction made of foam concrete. They are hollow polystyrene foam blocks reinforced with a polypropylene frame and equipped with special fasteners.
They are very light and easy to assemble. Our builders nicknamed them “Lego blocks”. And indeed, they are simply assembled like a construction set.
Part of permanent formwork
Such blocks do not provide simultaneous façade cladding. But on the other hand, they provide high quality insulation to the house. Although, it’s worth thinking about before giving preference to such formwork. After all, rodents simply love to shred such materials for breakfast, lunch and dinner.
However, the developers of such permanent forms guarantee that such troubles are not expected. Moreover, the price of such formwork pleasantly surprises with its relatively low level.
There is also another variation of the material used for monolithic construction. According to this technology, hollow blocks made of wood concrete are used. They are a standard product with two large holes.
Blocks for creating permanent formwork
Such a system can be reinforced both longitudinally and horizontally. Moreover, it is suitable not only for foam concrete embedment. Ordinary concrete can also be used as a “filling”.
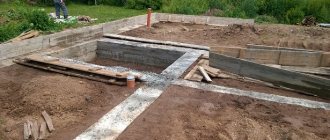
Excavation
First of all, the foundation tape is marked for digging a trench. When marking, you should take into account not only the width of the tape, but also take into account heat and waterproofing, and in addition, if the soil is heaving, there is still room for backfilling with sand.
After the trench has been dug, a “cushion” is placed on the bottom - first, a layer of sand and gravel mixture, 15 cm thick, is carefully compacted.
The second layer is waterproofing, preferably modern polymer, but roofing felt in 3-4 layers, applied to the walls of the trench, is also suitable.
Basic rules for laying a foundation
Whatever option you choose for the foundation for the stove, and whatever size you decide to implement, there are a number of basic rules that you should not ignore:
The foundation for the stove must be made independent, in no way connected with the foundation of the entire house. Why? The fact is that during operation, the house may shrink slightly. When lowering, it should not pull the stove along with it, as this can lead to its deformation, deterioration of draft and disruption of technical properties.
The foundation for the furnace is separated from the general one
In some cases, it is possible to partially combine two bases by connecting them with one wall.
- If both foundations (for the house and for the stove) are located close to each other, you need to fill them with sand 50 mm thick.
- If the foundation for a common house is strip, then the base for the stove should in no case be in contact with this foundation.
- When choosing a place for a stove and, accordingly, a foundation, you should not only rely on wishes, but also on factors such as: the location of doors, windows and roof beams. The location of the chimney should be taken into account so that the pipe does not fall into the ceilings and beams during the construction of the stove.
- When calculating the size and depth of the foundation, be sure to take into account the weight of the floors and the weight of the stove along with the chimney.
The size of the foundation is influenced not only by the dimensions of the furnace, but also by the density of the soil on which it is built. The main load in the furnace is usually created by the chimney, so when designing the furnace, it is necessary to place it closer to the center of the base. This will help avoid asymmetrical loading and premature incorrect shrinkage of the oven.
Sometimes, when designing a very large and massive stove with a stone chimney, stove makers create a separate base for the chimney.
Also, the choice of foundation depends on the material of the furnace. For a metal structure and a stone one, it will be different in depth; the entire mass of a brick oven is at least 400-500 kg, while a metal oven weighs approximately 150 kg.
How to calculate the weight of a stone stove
In principle, for a small metal stove you don’t have to build a separate foundation, especially if it is being built in a house that stands on a tiled monolithic foundation.
The density of the soil and the degree of its freezing play an important role in determining the size of the foundation. The climate in Russia is accompanied by fairly harsh winters throughout almost its entire territory. Therefore, the foundation for the furnace must be laid to the entire depth of soil freezing.
The type of soil is also of great importance.
Types of soil
It comes in three types:
- clay;
- sandy loam;
- loam.
In places where a large number of rivers, reservoirs, and lakes predominate, sedimentary types of soil are usually found. Here, it is better to entrust the construction of the foundation for the stove and the house to professionals, so calculations of the water passage point must be carried out.
In Central Russia, the most common type of soil is loam, which is a mixture of sand and clay. It is clay that predominates in it, so this soil is less plastic.
Loam
Building a foundation on such soil is usually associated with hassle and additional problems, since when dry the loam is crumbly, when frost sets in it begins to “heave”, and when there is a large amount of sediment it becomes viscous.
Clay soil
Therefore, in this case, the depth of laying the foundation for the furnace must be made above the freezing point.
But in forested areas, on the contrary, it is necessary to lay the foundation for the stove below the freezing point of the soil and the foundation must be built on a sand cushion 60-90 cm thick.
One of the most reliable types of soil for building a foundation is gravelly and rocky, but, unfortunately, sometimes you have to build a house and stove on an unstable one. Proper construction of a reliable foundation will help offset this fact.
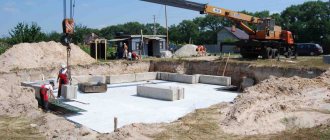
Preparatory work
Not everyone recommends taking the next step, but if we are talking about building a house, then we recommend doing it. We are talking about reinforced concrete preparation, 100 mm thick. To reduce delivery costs and avoid waste, you can use composite reinforcement, which is tens of times lighter than steel, the price is low, and due to the fact that the composite is sold in coils of 100-200 meters, there is almost no waste or scraps left.
Concrete preparation will increase the load-bearing capacity of the base and create a flat surface for laying bricks. However, this will significantly increase the cost of the foundation, so it’s up to you to decide whether to do it or skip it.
Where is edge laying used?
Professional builders do not use the correct name for the method - quarter brick masonry. Instead they say edge-on masonry, and a wall raised in this way is called a “quarter-brick wall.” For reference: the bed is the long side of the brick, the spoon is the long narrow side of the brick, the poke is the short narrow side of the product.
Wherever edge-on bricklaying is used, in partitions or external walls, it significantly saves building materials, time, and labor costs. The disadvantage that clearly manifests itself with this method of masonry is visible in the construction of internal partitions. It is necessary to carefully control the verticality of the masonry; horizontal deviation can also be easily missed due to the fact that the wall is built quickly, since it is laid with the high side vertically, and the brick is relatively small in size. In such conditions, missing a level and plumb check of two or three bricks for the evenness of the masonry means a possible deviation. Therefore, most often, quarter brick masonry is used where it is easier, namely:
- When constructing internal interior partitions, when remodeling or adding premises to a private house. Masonry in one row and in a quarter of a brick requires periodic reinforcement of the wall - after 3-4 rows between the brick rows, reinforcement is laid, which at the ends of the partition is attached with anchors to the load-bearing walls. And also, if the partition is installed on a finished floor, then the floor under it must be removed, and after raising the wall, fill the base with concrete mortar to the level of the existing floor.
- When constructing partitions for decorative purposes, low and short. For example, to protect the space under the bathroom, as a railing in a private house, etc.
- In load-bearing walls, if calculations require maintaining the exact thickness of the wall, and laying half a brick or brick is impossible. Such powerful structures are also built using reinforcement through 3-4 rows, but not only along the long side, but also across, where the levels of the bricks coincide.
- When decorating the walls of a house with facing bricks. In addition to reinforcement along the rows, transverse reinforcement is used, in which the pins are placed on one side into the quarter wall, and on the other side they are driven into the finished load-bearing wall of the house.
Laying on edge requires constant monitoring of levels. The possible error should not exceed 10 mm in the height of the wall, counting from the bottom of the wall or partition. This minimum deviation angle can be easily leveled with a layer of plaster.
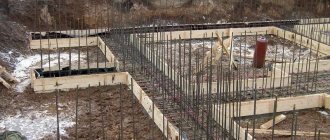
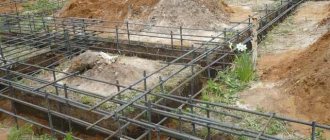
Laying a brick foundation
After the concrete preparation has gained strength (2-3 days), masonry can begin. And they start it in the standard way - from the corners, and it is performed with the obligatory dressing of the seams. The thickness of the joints should not exceed 1 cm, the joints in the underground part are filled flush, in the above-ground part internal joints are made with a depth of about 1 cm, for better adhesion of the plaster and the foundation.
To strengthen the structure, reinforcement is performed. The first belt, in two bars of reinforcement (6-8 mm, corrugated) is laid horizontally along the tape with an indentation from the edges into the floor of the brick, laid on the first row of bricks, with transverse mesh reinforcement (4-6 mm).
The second belt is laid on the penultimate row of bricks, similar to the first. Please note that the solution should cover the reinforcement by 3-5 millimeters.
We will not dwell on the laying process itself in detail; it is no different from ordinary brick laying, which you can read about here.
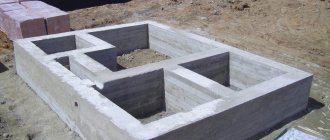
After finishing the masonry work, the foundation is left for 2-3 weeks so that the structure gains strength.
Final works
So, the solution has set, the structure has gained strength sufficient for further work. For better drainage of melt and rainwater, fill the space between the slopes of the trench and the foundation walls with sand or a sand-gravel mixture; broken bricks and similar construction waste will also work.
To prevent water flowing from the roof from falling directly under the foundation, it is imperative to make a blind area sloping away from the house, along the entire perimeter of the walls. We wrote earlier about how to properly make a blind area.
Before erecting walls, waterproofing is applied to the upper horizontal part of the foundation.
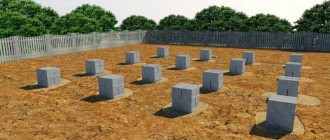
Brick columnar foundation
Due to the simplicity of the device, columnar brick foundations have gained the greatest popularity. This foundation is excellent for building extensions to a house, bathhouses, sheds, and gazebos.
Advantages of a brick columnar foundation:
- 1. Low construction costs;
- 2. Easy to implement with your own hands, does not require special knowledge and experience;
- 3. No blind area needed.
Minuses:
- 1. More thorough protection from moisture and soil heaving is required;
- 2. A building with a columnar base does not allow for a basement or subfloor;
- 3. It is impossible to build in moving soils, since the pillars will skew after a short time, which will damage the entire structure;
- 4. The structure of the building should be made only of light materials - wood, frame. Foam blocks, and even more so brick or reinforced concrete slabs, cannot be used categorically;
- 5. Cannot be used in areas with differences in surface heights of 2 meters or more.
The choice of the size of the pillars and the depth of installation depend on the project, where the loads and type of soil are taken into account; if there is none, then the pillars are usually made rectangular or square.
- A) Size 38x38 cm. Used for light extensions.
- B) Foundation with sides 38x51 cm - for heavier one-story buildings.
- B) 51x51 cm - reinforced foundation, suitable for building a two-story house, but only using lightweight materials.
- D) A section of 25x38 cm is used for pillars inside the foundation, for internal load-bearing walls.
In addition, columnar brick foundations are:
- 1. Shallow, with a laying depth of 40-80 cm. Suitable for sandy soils;
- 2. A recessed columnar foundation is built at a depth of 1.5-2 meters, that is, approximately 30-50 cm below the freezing level of the soil.
Properties of monolithic foam concrete
Although foam concrete mostly acts as insulation in monolithic construction, you still need to know its basic properties and the quality characteristics that it must meet. Especially if you are going to build a house with your own hands using similar technology.
Ready-mixed foam concrete poured into permanent formwork
Depending on what formwork is used, foam concrete is used with a density of D250 - D800. Such brands may also vary depending on the project conditions. It is very important that commercial foam concrete is of good quality, since the hardened solution inside the formwork cannot be dismantled or replaced with a new one.
Wall made of monolithic foam concrete in permanent formwork
The main reasons for the production of low-quality foam concrete:
- unstable foam;
- too much/too little foam in the concrete solution;
- dirty sand;
- low quality cement;
- temperature difference between water in solution and foam.
Only by thoroughly understanding these issues can you find out how to get the “correct” foam concrete. Let's present several options for solving such problems.
But they cannot “work” equally effectively in all cases. In each specific situation, there are additional unfavorable circumstances that also need to be taken into account.
We improve the quality of raw materials
I would like to warn you right away that foam concrete is a rather capricious material.
And in order to find out what he doesn’t like, you need to start selecting with basic materials, which must be tested in the laboratory for compliance with quality standards:
- Cement M400D0 or M500D0 with the 1st group of activity during steaming. If, based on the results of the study, it turned out that the purchased batch of cement has a second or even third activity group, then it is necessary to urgently reconsider the selection of the composition - namely, increase the amount of cement. If this is not done, hardening will take much longer, and during this time the foam in the solution will begin to collapse. This means that shrinkage, defects, and losses are inevitable.
Carrying out testing of cement beams
Such a test lasts approximately 24 hours from the moment the sample is received until the protocol is issued. So you can quickly “rebuild” the selection of foam concrete composition.
With the strength of cement, everything is much more complicated. You can, of course, get results in three days, but they are not reliable. State standard tests last 28 days. If the strength of the cement is insufficient, then the quality of the foam concrete itself will also suffer. Therefore, test in advance all available cement in your region and choose the best quality one.
- River sand with a fineness modulus of 1 mm to 2.5 mm must be clean, at least without lumpy clay inclusions and aggregate debris. Clay reduces the “strength” of cement. Debris can damage the equipment if foam concrete is poured into the formwork using a gerotor pump. Its blades will be irretrievably lost. Therefore, it is recommended to sift the sand before each batch on a large technical sieve or regular mesh.
Production vibrating sieve
The moisture content of the sand, which it will give into the solution during its manufacture, also plays an important role. This means that the water-cement ratio will increase, which, as you know, only harms concrete. Accordingly, you need to adjust the composition again, only now to the amount of water in the solution.
- The water must be clean and free of any inclusions or other debris. In principle, the same as for a regular solution. But in foam concrete it plays a special role - the difference in temperature of water in the solution, in the foam and in the environment leads to the destruction of the cellular foam-forming structure. Therefore, it is better and cheaper to heat water than to get low-quality concrete.
A clever way to heat the water in the pool. It is also suitable for heating water on site
In principle, these are the main parameters of components for foam concrete, which can be monitored in the “field” conditions, and adjustments can be quickly made to the selection of the composition so as not to get defective.
“Bad” foam and how to deal with it
And now about the painful part - about the foam. This is the very first difficulty any foam concrete worker faces. And some she constantly pursues. How to deal with it?
Let's look at the main problems that foam concrete manufacturers often encounter:
- The concentrate is not suitable for the type of generator. When purchasing equipment, be sure to clarify this nuance.
- Too much water in foam.
- The pressure in the pump may not be adjusted.
- If your foam is generated under pressure through a metal pipe with filler, it may be worth replacing it. The most advantageous material for this role is plastic balls of small diameter, for example, bullets for a children's pistol. This part of the generator must be constantly washed with a cleaning agent.
- The air temperature may be too low.
- Be sure to weigh the foam. Its weight should be equal to, or its value should be as close as possible to the manufacturer’s data.
- Do not use concrete additives. They only extinguish the foam.
Quality foam
After receiving several successful batches, learn to “by eye” determine the quality of the porous filler.
Note! There is one “bearded” way to stabilize foam made with SDO. The fluff is preliminarily quenched to a solution density of 1.055–1.05 kg/l. This is approximately a 10% solution. Add the resulting milk of lime to the concentrate, approximately 70% by volume. But remember that such an additive is included in the pre-calculated amount of water in the foam.
A similar recipe will help achieve a more stable foam for the mixture. But don't overdo it. Excessive lime in concrete is useless.
Construction materials
- 1. Red solid brick, well-burnt, maybe over-burnt, but in no case poorly burned. Firing gives the brick good moisture protection, and moisture is the main enemy of a brick foundation.
- 2. Cement-sand mortar, using cement grades 400 or 500, with waterproofing additives.
- 3. Concrete for concrete preparation.
- 4. Sand for the “cushion” and ASG for filling between the slopes of the pits and the walls of the foundation pillars.
- 5. Reinforcement with a diameter of 6-8 mm, masonry mesh for reinforcing pillars with rods 5-6 mm.