May 22, 2022 Stroyexpert Home page » Foundation » Installation
Foundation pad
The reliability and durability of a structure depends on various factors. However, the quality of the foundation construction is of great importance. At one of the stages of building the base of the house, a foundation cushion is created, which is the most important moment of the construction process.
Making the pillow right
If the base is of poor quality, then the walls may be cut, the base will be destroyed, and other problems will appear.
Geotextiles must be placed under the base of the foundations. This product reduces the risk of moisture penetrating the base material. Next you need to pour a layer of the selected material.
When all the material is filled in, close the water-repellent material. At the end, sand is added, but no more than half a centimeter, so that a shallow foundation on a sand cushion does not deteriorate the properties of the protective coating.
Sand cushion on clay is also used in house construction, but sometimes it is better to resort to more durable options. The decision is made depending on the soil on which the building will be built. If the groundwater is near the surface, it is better to create a solid base to avoid problems in the future.
According to SNIP - building codes and regulations, what kind of sand is used and the height of its embankment is determined from calculations and terrain conditions. If they are normal, then:
- For a strip foundation, a fifteen-centimeter embankment is sufficient. After compaction it should be up to 30 cm high.
- A tiled base requires a backfill of 10-15 cm, and a brick base - 25 cm.
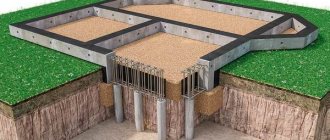
- If the foundation is on columns or piles, then a mixture of crushed stone and sand up to 30 cm, and sometimes up to 60 cm, is required.
If the area is swampy or the groundwater is too close to the surface, then you need help from people who understand these issues. They will determine what the sand cushion under the foundation is for in this case and what to make it from. It is not advisable to use a regular layer for such cases. To increase efficiency, it is necessary to continue drainage and drainage.
The purpose for which an intermediate link is installed between the soil and the foundation is to connect the building to the ground.
During pouring, you need to follow a number of recommendations:
- Form slopes with a steepness of 1:1.15.
- Sow grass, make turf and strengthen the soil in other available ways.
- Make a slope of at least three degrees from the center to the outside.
- Geotextiles must be placed under the base of the MIT foundations.
For ordinary sand, any available means is suitable, but if you add gravel, you will need heavier artillery in the form of:
- vibrolegs. To operate it, a motor is installed that runs on diesel fuel. The large heel compacts the material.
- vibrating plates. Suitable for slab-type foundations;
- vibratory roller It is used to compact the sand layer on large construction sites.
This approach to creating a substrate has many advantages:
- no need to spend a lot on materials;
- mail does not suffer from excessive load;
- there is no need to rent expensive construction equipment, since the embankment can be made more dense using affordable means.
Therefore, such foundations are very popular in construction. They ensure the stability of the foundation and protect the house from shrinkage, destruction of the base and other damage that can entail significant financial costs.
Intermediate layer thickness
The level of location of the intermediate crushed stone layer must correspond to the design documentation. Usually its width exceeds the width of the foundation.
The thickness of the pillow should not be less than 30 cm. 10 cm should be sand, the rest should be crushed stone.
A concrete pad under the foundation will be a more reliable and durable structure. It can be used for many years.
But laying such a base will take a lot of time and require significant financial resources. The height of the concrete layer must also be more than 30 cm. The width must exceed the width of the foundation base by 15 cm.
Execution of work
We found out whether a pillow is needed for a strip foundation and what materials are best used for this. Now all that remains is to figure out how to properly arrange such a foundation with your own hands.
In order to level the bottom of the foundation trench or pit, a layer of sand or gravel ten centimeters high is poured. In places where it is planned to expand the walls, concreting is used. The same option with a concrete pad is used when it is planned to build a strip foundation with reinforced piles from FBS blocks.
The crushed stone backfill is easy to install; just remember that the height of the embankment should not exceed the base, and the width parameters will be twice as large as the same foundation size. As a rule, the crushed stone layer is thirty centimeters, one share of which is sand.
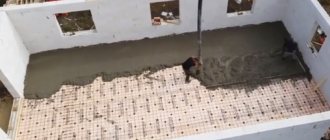
Having leveled the base, we begin to arrange the pillow. First, a layer of sand is poured, which is spilled with water and compacted. The same applies to the gravel layer.
The most reliable option is a concrete pad. The process of arranging it takes a lot of time, but it can be done on your own. Just remember that you will have to spend money on the necessary materials. The thickness of such a support should exceed the parameters of the foundation by thirty centimeters.
Sand backfill
This type of foundation is the easiest to implement and most economical option, and is chosen by developers who are trying not only to save money, but also to speed up the construction process.
And although at first glance such a base does not inspire confidence in its reliability, it copes quite well with the tasks assigned to it. Sand under the foundation saves it from being washed away and ensures acceptable load effects on its lower part. The bulk material is leveled and compacted with a vibrating plate, periodically sprinkled with water.
If the soil is weak-bearing, gravel is used in addition to sand
Preparatory measures of this kind practically eliminate the shrinkage of the foundation, and here it is very important to perform the compaction correctly
Construction of crushed stone cushion
Before pouring this material, a sand layer up to fifteen centimeters high is arranged, which is leveled and compacted. After this, crushed stone is poured, the size of the stones being 2 - 2.5 cm, and also compacted. The crushed stone layer should be twenty to twenty-five centimeters.
During work, it is necessary to ensure that the stones lie tightly next to each other, filling all the empty areas. To complete this process, you will have to use a vibrating plate, which is guaranteed to help create the desired density.
The construction of the foundation will begin with a crushed stone layer, so the height of the cushion should reach zero level. Such a substrate for a strip foundation allows you to construct objects from any materials.
Concrete pad
Now let's figure out how to mount a concrete mortar platform. This design has only one negative point - it is quite expensive compared to other options, and everything else in this project is a complete advantage.
To begin with, it should be noted that the base will be durable if you follow the technological process, which looks like this:
- the construction site is cleared of vegetation and other debris;
- the soil is leveled;
- a layer of crushed stone is poured, the height of which is ten centimeters;
- compaction is performed;
- a formwork structure is installed around the entire perimeter of the cushion;
- the entire site is reinforced with steel rods before pouring the mortar;
- a concrete mixture is poured, the grade of which is determined taking into account the mass of the future object;
- the solution is carefully compacted with deep vibrators;
- It will take at least four weeks for the structure to fully gain strength.
The basis for the construction of the facility is ideal, but requires significant financial expenses.
Sand backfill
A sand cushion for the foundation is the simplest and cheapest type of bedding, so it is chosen by those who want to save money, speed up the construction process and do it themselves . Although such a platform does not seem very reliable, it completely copes with the mission assigned to it. A sand cushion under the strip foundation saves the foundation from erosion and also ensures a permissible load on its lower part.
To make a good backfill, choose coarse sand and cover it with a layer of at least 20-25 cm.
The loose mass must be thoroughly leveled and compacted using a vibrating plate. When compacting, do not forget to flood the area with water for greater compaction.
As you already understand, the foundation cushion is made exclusively from coarse sand. On weak-bearing soils, sand alone is not enough, so the site is additionally reinforced with gravel. Such preparation for the foundation practically does not allow shrinkage after the construction of a massive house with any area, and that is why it is very important to carry out the compaction correctly, especially if you do all the work with your own hands.
Concrete cushion under a monolithic slab
Finally, let’s look at how to install a concrete platform with your own hands. This design has only one drawback - its high cost, but otherwise such a project consists of continuous advantages.
Construction of a monolithic base slab
First of all, I would like to note the durability of the pillow, provided that the installation work is carried out correctly, and they look like this:
- The area is cleared of plants and debris.
- The soil is carefully leveled.
- Crushed stone is laid in a layer up to 10 cm thick.
- Crushed stone is being compacted.
- Wooden formwork is installed around the entire perimeter of the cushion.
- The foundation site is being reinforced.
- Concrete is poured. Its brand depends on the weight of the future building.
- The solution is compacted with a deep vibrator.
- The structure is left until completely dry (1 month).
This foundation is ideal for future construction of a house, although it is the most difficult to make with your own hands.
Following the recommendations of the article, as well as weighing all the pros and cons, there is every reason to say that a pillow under a strip foundation is definitely needed, and it is categorically not recommended to save on it.
Source
Features of formwork installation
As soon as all the corner sections of the foundation are marked and repeatedly checked, the installation of the formwork structure begins. To keep the wooden panels in place and not move, they are fixed with U-shaped brackets.
The formwork is placed in such a way that the base walls are located strictly in the center of the cushion.
When installing the formwork, it is necessary to check the right angle at the intersection of the extreme foundation corners.
If gaps form in some places when joining the boards, they should be closed with additional lumber. You should not pay attention to the appearance of the pillow. The main thing is to calculate the indicators and ensure proper strength.
Once the installation of the formwork structure is completed, it is recommended to pour a small amount of soil into the weakest points at the joints. This will prevent the concrete mixture from seeping under the formwork panels.
Pillow under the ribbon
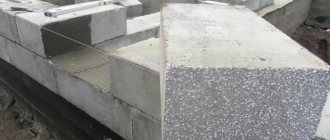
Today you can find a huge selection of ready-made reinforced concrete foundation pads on sale. Structurally, they are trapezoidal products made of heavy concrete reinforced with a mesh frame. Such blocks optimize the load on the bottom of the foundation and reduce the pressure of the building on the ground.
In addition, the installation of ready-made blocks reduces labor costs during construction. The foundation pads are placed on a sand bedding and connected with cement mortar. Subsequently, foundation blocks are installed on them.
Foundation padExperts advise placing a pillow under any tape, regardless of its size and depth. Any sub-base can be laid under the tape: concrete, reinforced concrete, sand, gravel, combined. What specific material can be used depends only on the properties of the soil in the construction site, the ground level and the budgetary capabilities of the future homeowner.
The most common method of constructing a cushion is sand technology, which is most suitable for stable soils with a fairly low groundwater level. Careful layer-by-layer compaction of the sandy base will prevent its subsidence. Sand is poured in layers of 10-20 cm and compacted with a roller or tamper to an approximate density of 1.6 tons per cubic meter. Such density cannot be achieved by trampling, so it is better to rent special equipment. You usually have to roll the sand 5-6 times.
Video - When and how to make a sand cushion under the foundation
In addition to a carefully compacted sand layer, you can use a mixed material. The mixture of sand and gravel should be in the following percentage: 40% sand, 60% gravel with a fraction of 20-40 mm. This type of substrate does not require tamping. This is an excellent option for one-story brick houses and any houses built from lightweight building materials: timber, aerated concrete, etc. In capital construction, it is useless to increase the dimensions of the cushion under the tape. Definitely need to use concrete as a substrate.
What sizes would be suitable:
- Regardless of the material chosen to create it, the thickness of the cushion under the tape should be 3 times the area of the lower part of the foundation wall;
- The width of the tape cushion depends on the stability of the soil. On sand it can be 50 cm-60 cm, on loam or sandy loam - 80 cm;
- if you plan to build a basement, the cushion under it should be the same size as under the foundation.
Since a sand cushion is most often poured under the tape, let’s look at the stages of organizing the work when installing it:
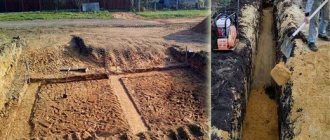
- Digging a trench. The sand cushion should extend to the zero level of the foundation.
- Formwork organization: the boards should also extend to the zero level.
- Laying waterproofing: pouring bitumen or laying roll material. A layer of waterproofing will prevent capillary suction of moisture into the interior.
- Laying and pressing sand in layers.
- Removing formwork.
- Waterproofing device on top.
- Foundation construction.
Installation of prepared formwork with reinforcement
This is interesting: Laying paving slabs in the garage - let's figure it out in order
What else do you need to know?
Proper reinforcement will give greater strength to the foundation. For this, 12 mm corrugated reinforcement is used, and in case of heavy loads, other diameters are selected. The minimum cross-sectional area of the reinforcement should be 0.1% of the cross-section of the foundation where it is laid.
If work is carried out in the heat, the concrete is covered with heat-insulating material (rags, films, fabric, sawdust, etc.). It is advisable to water the surface several times. With increased groundwater level, the water resistance of concrete should be no less than W4. In this case, it will not lose strength throughout its service life.
When building a foundation, you cannot skimp on concrete. An incorrectly made foundation will cause constant problems both at the stage of construction and during operation.
Why is bulk material laid?
To briefly answer the question of whether it is always necessary to make a sand cushion under the foundation, the answer will be negative. Bulk material under the sole is needed to perform three functions, which are described below.
Block foundation
The construction of a sand cushion is an event inherited from Soviet times. At that time, the foundation of the house was mainly made from standard factory-made elements, FBS foundation blocks. According to SP 50-101-2004, for a prefabricated supporting part, preparation from bulk material is mandatory.
For a prefabricated foundation, the pillow acts as a leveling base.
The preparation from sand here is justified by the fact that when installing individual elements on the foundation soil, which has even slight differences, they may become distorted. The blocks are not interconnected enough and cannot cope with the uneven ground beneath them. It follows that the first function of the sand cushion under the foundation is the need to create a flat surface for the installation of individual elements. In addition, bulk material, unlike the soil available on the site, can easily adapt to the shape of the supporting part of the building and prevent its displacement during operation.
Monolithic concrete fills all uneven ground.
Heaving soils
Frost heaving is a phenomenon that frightens everyone who is involved in construction or who is planning to build a private house with their own hands.
It is important to understand the causes of this problem. It occurs when two factors are present simultaneously:
- water;
- low temperatures.
If you exclude at least one of them, heaving does not occur. Clay foundations are especially prone to this phenomenon. According to SP 50-101-2004, a cushion made of non-heaving (conditionally) materials (that is, of coarse-grained or medium-grained sand or coarse-grained material) is required to be provided for foundations constructed on heaving soils. In this case, only non-buried or shallow-buried supports are considered. Thus, the rise of water from the soil to the base of the building is eliminated, that is, one of the factors for frost heaving is eliminated.
Essentially, a sand cushion protects the sole from rising capillary moisture, which can lead not only to heaving, but also to corrosion of the reinforcement. In most cases, this property is not relevant, since modern concrete mixtures include special additives that increase the resistance of the material to moisture penetration, and only a protective layer is needed to preserve the reinforcement.
https://youtube.com/watch?v=oCBtt4-1d28
If you make a buried foundation, the support of which occurs lower than the freezing thickness of the soil, the second factor for the occurrence of heaving is eliminated - temperature. It is worth remembering that the soil itself is not a source of cold, it comes from outside from the atmosphere, so the deeper the base of the house is located, the higher the temperature next to it in winter. In this case, preparation for protection against backlash is not necessary, since there is no reason why it should be provided. The only exceptions are those cases that involve the presence of other reasons.
Presence of weak soil
Sand preparation will be required if the geology of the site includes fill soil. Such a foundation has a loose structure and is highly not recommended for erecting slab, strip or column foundations on it. In this case, you will need to replace part of the soil yourself. Sand is used as a replacement material.
This reason leads to increased labor intensity of work. The thickness of the layer, which will increase the reliability of the base, can be quite large, sometimes the values reach 1.5-2 m. When laying, the sand must be compacted in small layers (15-20 cm).
If we summarize the reasons why you need to prepare sand with your own hands for the foundation, we can say the following:
- alignment for prefabricated structures;
- elimination of capillary moisture in case of insufficient depth of the underground part of the building in heaving soil (MZLF, shallow slab);
- replacing a loose foundation prone to shrinkage with a more durable one.
In other cases, it is useless, and sometimes can be harmful:
- if the soil on the site does not allow water to pass through well (clay), then all the moisture will accumulate in the sand preparation, like in a trough, which will lead to excessive moisture in the soil near the foundation;
- sand or gravel does not prevent water vapor from penetrating through the bottom; because of this, condensation can form on the bottom of the sole, which negatively affects the structure.
Conclusion
Today, the use of concrete for foundation pads is considered the most reliable and durable material. A concrete pad can withstand any load from the structure being built. It is used for the construction of buildings of any number of storeys, and with any weight of the structure.
However, it is worth remembering that installing a pillow is an important stage in the construction of buildings, which requires painstakingness and compliance with all rules. High-quality construction of a concrete pad guarantees the strength and reliability of structures for many years.
Why does a foundation need a pillow?
The building will last as long as possible if its underground part is done correctly. The pillow allows you to:
- Get a high-quality, smooth bottom of the pit.
- Comply with the conditions for uniform distribution of the weight of the structure and loads on the ground due to resistance to soil compression.
- Minimize the likelihood of foundation freezing.
- Ensure the stability of the entire structure.
- Minimize shrinkage of various origins.
- Avoid getting moisture from the soil into the base of the building.
The stability of the base is ensured by correct dimensions, sufficient compaction and leveling of the surface of the cushion. It must have a width greater than the width of the slab, and the height is chosen taking into account:
- The depth to which the soil freezes;
- The height of groundwater rise at the construction site;
- Approximate magnitude of loads on the future foundation;
- Geological and seismic data of the area.
If a cushion is not placed under the monolithic slab, it may undergo significant deformation when the soil freezes. Freezing water expands and increases the volume of soil, which is why cracks appear in the foundation of the house, leading to violations in the waterproofing of the building.
A slab foundation involves using the entire area under the house as a foundation. Therefore, for greater stability of the building, two pillows are usually poured under it - the lower one made of sand and the upper one made of crushed stone. Sand reduces the flow of moisture to the base, and crushed stone makes it more stable; both materials reduce the likelihood of foundation shrinkage during operation.
Concreting floor cracks
To complete this stage of repair you will need the following tools and auxiliary materials:
Scheme for repairing a crack in a seam.
- Ready frames for cracks.
- Container for mixing cement-sand mixture.
- Sandpaper (coarse grain).
It should be noted that frames for cracks are usually made of wooden slats, with edges no larger than 2 cm. The dimensions of the frames should be 2-3 cm larger than the dimensions of the cracks on each side. The process itself will not take much time. First, the cement-sand mixture is mixed. As a rule, the ratio of cement and sand is either 1:3 or 1:2. A 1:3 mixture is used in cases where additives are added to the cement to increase the wear resistance of the mixture. However, if you do not plan to use additives or plasticizers, it is better to choose a cement to sand ratio of 1:2.
The cement itself must be M400 or M500, otherwise the patches on potholes will not last long
When mixing the mixture, pay attention to the details. It is advisable to choose fine- or medium-fraction sand, clean, without lumps and random large fragments
The water for mixing the mixture must also be clean, without the slightest impurities, as they lead to cracks in the installed patches. However, you should not add too much water: the patch mixture should not run off the shovel, but fall off it in large fragments.
To ensure that the repaired floor lasts a long time, reinforcing elements such as fiberglass or fiberglass can be added to the patch mixture. Both 900 g and 600 g fiber packs are available for sale, so purchasing a small amount of fiber will not be difficult. When reinforcing fibers are added to the cement-sand mixture, the service life of the patches, their abrasion resistance and impact resistance increase significantly. In addition, a plasticizer (complex additive) can be added to the mixture. For example, M5Plus, which combines well with reinforcing fiber and improves the wear resistance of patches. The sequence of work when applying patches during repairs is as follows:
- Installation of the frame.
- Applying cement to the area of cracks.
- Removing the protruding upper part of the patch using a grinder (grinder) or sandpaper.
Removal of the protruding part of the patch should be done only after the cement has completely set. Considering that the thickness of the patch is relatively small, it is quite enough to wait 7 days and then process the patch with a grinder or sandpaper.
After the DIY floor repair is completed, you can go over the floors with compounds that help protect the concrete from corrosion. This procedure is called concrete dust removal. Thin-layer protective compounds (Elanor-PU, Neomer-LP, Amphor-formula) and polymer protective compounds (Retroplay, Elanor-ED Grunt, Elast-Pu) are used for it. All of them are applied with a brush in 2 layers. Dust removal will help further increase the service life of repaired concrete floors. If desired, the supplied patches can be even more durable than the base on which they are placed.
Construction of the base for the foundation
If you try to install a concrete foundation directly on crushed stone, without adding sand, part of the foundation strip or slab will be overloaded, and part will remain unloaded. In such a situation, the concrete casting of the foundation will quickly become unstable and cracks and deformations will form.
Functions of sand filling
Sand plays the role of glue and elastic cushion, which allows you to compensate and distribute all forces, including when the soil swells or the foundation settles.
The sand material used in preparing and filling the base must meet certain requirements and criteria:
- Gravel sand, very coarse and clean, is considered the best; fills made from such material have the lowest specific gravity, but at the same time easily allow water to pass through;
- Minimum amount of inclusions of clay, earth, lime and salt contaminants;
- Sand should not contain any forms of organic matter, silt, peat, plant remains - everything that natural bodies of water are rich in. When such material is used in preparing the base, after a certain period of time the sand cushion turns into a dense waterproof layer of mud, saturated with organic decomposition products.
Advice! The quality of sand can be easily checked using available tools. For example, if you pour 5-6 liters of water into a hole dug in the ground, covered with sand, then if the quality is good, the water will go away in a few minutes; in dirty sand, a puddle will remain on the surface.
Classic foundation design for foundations made of crushed stone material
In the classic version, the technology for preparing a cushion under a concrete slab or tape uses crushed stone as a material that provides drainage and a rigid base. Therefore, the base is covered with at least one layer of crushed stone. The use of crushed stone material requires considerable costs associated with the purchase of building materials, delivery and planning work. Despite the high cost and scarcity of high-quality crushed stone, it is impossible to refuse its use in preparing the base for the foundation.
In cases where, in the process of surface leveling, large volumes of soil are removed and moved by bulldozers or excavators, crushed stone embankments are used to level the slope of the base. It is not always possible to perfectly level a gravel bed, so builders often use intermediate concreting or concrete preparation. Essentially, this is a thin layer of concrete laid on a sand-crushed stone base of the pillow and perfectly leveled with the horizon. After such preparation, it is enough to simply lay the waterproofing and insulation layer.
If the soil has high load-bearing characteristics, the preparation technology can be significantly simplified. In this case, the construction of the base for sand foundations is carried out in a simplified manner. A polyethylene film is laid on the leveled and compacted layer of sand, a layer of fine gravel or screenings is poured, and after compaction, a layer of waterproofing and insulation is laid. At the next stage, the reinforcement is laid and the concrete solution is poured.
Mixing components
1. The first base that is poured into the cement mixing device is sand.
2. After this, cement is sent into the device. In a concrete mixer they will mix for 5 to 10 minutes. The exact time depends on the volume of ingredients. To prepare a leveling screed under the floor, the ratio is usually 1 share of cement and 2 shares of sand.
3. After the first two components are mixed, water is added to the mixing device. It is difficult to name the exact proportion, since this indicator directly depends on how wet the sand poured into the device was. You can determine the required amount of water by eye. This is not difficult to do even for a non-professional. The ideal consistency can be called the mixture that rolls inside the concrete mixer, simulating wave-like movements, and does not stick to its walls.
In order for the plasticizer to mix better with the concrete mass, it is better to dilute it in advance in some container with water, and then add it to the cement mixing device. That's it, the preparation of the mixture to make a base for concrete floors is complete.
Types of pillows for the foundation
Concrete pad for a strip foundation with ready-made reinforcement
Create a support for the base from the following materials:
- Sand,
- Crushed stone,
- Concrete.
Sandy
Sand cushion strip base
It is used when it is necessary to invest in a minimum budget. Also, this building material is available in almost any region and has excellent performance for such use.
Scope of use:
- Areas with deep groundwater levels. Otherwise, there is a need to install a drainage system - this will protect the sand layer from erosion and the concrete from gradual destruction.
- Construction of houses or other structures made of materials with low actual weight. The sand structure does not withstand high loads well, so it is always worth considering the effectiveness of use in a particular case.
- The sand cushion is optimal for single-story structures.
To construct a pillow, you need to use only sand with large particles. It is strictly prohibited to use fine particles for such purposes.
Layout of the sand cushion in the foundation
When installing it, or rather filling the material, you need to ensure the evenness of its surface and the quality of compaction. The layer should be within 20-40 cm.
Crushed stone
Cushion for a crushed stone foundation
A cushion can be used under a strip foundation made of crushed stone, as well as for other types of foundation, if necessary, to equip a surface that can withstand high loads.
Depending on the conditions of use, crushed stone of different fractions and from different rocks can be used.
The most durable cushion is a layer of mid-fraction granite.
Concrete preparation using this material is carried out as follows:
- To begin with, the soil surface is leveled with sand. It is enough to fill and compact the layer within 11-15 cm - it is used exclusively to increase the density of adhesion of the next layer to the soil surface. It’s great if specialized equipment is used for compaction. As mentioned earlier, you should use only coarse sand.
- After the first layer has been compacted and its surface is as smooth as possible, crushed stone is backfilled with the optimal fraction for specific conditions. The layer width in most cases is 20 cm.
- Crushed stone is also compacted using special equipment.
This is what the scheme for creating a sand and gravel pillow looks like
To create an optimal cushion, calculate the dimensions of the foundation and create its bedding 30 cm larger than the obtained value - only in this case can the stability of the structure be achieved under the influence of the weight of the structure.
Concrete
Concrete preparation
This option is rightfully considered the most reliable and is used in cases where it is necessary to obtain a foundation with the maximum ability to withstand the load-bearing load. The disadvantage of preparation using concrete is its cost - this is due to the need to purchase additional amounts of cement of a certain brand.
Installation is carried out according to the following algorithm:
To begin with, a small layer (about 10 cm) of crushed stone is poured into the already prepared pit. It performs the task of rough litter
Particular attention should be paid to its compaction - it must be performed at the highest level. Naturally, this cannot be achieved without special compacting units. The formwork is installed from boards at a level that is equal to the lower mark of the future foundation - this allows concrete preparation to be carried out with an accuracy of half a centimeter
Considering the mass of concrete, it is worth taking care of strengthening the structure from the boards - reliable fixation will prevent deformation and uneven distribution of the solution. Depending on the specific construction conditions, reinforcement is carried out with bars of the required cross-section. As a rule, they are tied in the form of a grid with a step of 1.5-2 cm. The trench ready for pouring is filled with cement mortar. To compact it, special vibrating devices (called a mace) are used - under its influence, air bubbles come out. The surface of the concrete preparation is leveled.
Concrete pad for blocks
Although such a pillow requires the maximum amount of material costs, in some situations it is impossible to do without it.
A reinforced concrete pad for a strip foundation is created taking into account special requirements, which should be considered as a separate item.
Pouring and compaction
When the process of installing the formwork and reinforcing bars is completed, they begin pouring the concrete solution. After laying, the mixture is compacted. Compaction will remove air and excess water from the solution. The mixture is compacted with a special electric vibrator, with the help of which the concrete becomes fluid and the crushed stone is compacted, raising air bubbles upward.
After compaction, the concrete solution takes on a dense and durable structure. Manual compaction of mortar is carried out with a long pin, a thin tube or a piece of reinforcement. After compacting the concrete mixture, the poured structure is left to dry under optimal conditions. To prevent the solution from drying out, it is necessary to maintain its constant wet state; for this, the surface is periodically irrigated with water.
Return to contents
What sand do you need?
Sand backfill is created from coarse-grained and medium-heavy sands, which have increased moisture permeability, high compression resistance and are able to resist shrinkage.
The most suitable are:
- River sand, containing a minimum amount of impurities. However, increased compaction of the sand layer will be required due to the round shape of its particles.
- Construction sand extracted from quarries. It is cheaper, but contains clay impurities. It is used to create a cushion only after screening and washing, since clay inclusions can provoke subsidence of the foundation.
- Sea sand. It is used less often than quarry and river. After cleaning and hydromechanical treatment it becomes almost similar to river water.
Functionality of a concrete floor
The floor in the garage should be a durable, moisture-proof layer. Only a concrete floor can reliably preserve your car and other items that we like to store in garages.
There is, of course, the option of purchasing ready-made concrete slabs, but it does not save you from the need to lay them, as well as seal and waterproof the joints. Therefore, it would be more optimal (and more economical) to pour a solid concrete floor yourself.
Man has been using concrete in construction for more than two and a half thousand years. Of course, its composition varies from culture to culture, from century to century, but, nevertheless, it is concrete: a binding element and a filler, often with various additives for greater plasticity. Modern attempts to recreate, for example, the concrete that the Romans used, prove that such compositions were very durable. In Rome, concrete was often used not only for construction, but also for finishing purposes.
How to prepare a leveling compound for leveling a concrete floor under laminate
In principle, preparing a dry building mixture does not present any particular difficulties. The whole process consists of diluting it correctly with water - the entire technology for its preparation is described in the instructions for use directly on the bag with the dry mixture.
The bucket is filled approximately two-thirds with water, after which the dry mixture is poured into the water. You will have to experiment with its quantity; you will not find the exact proportions on any bag.
At the time of its preparation, it is important to understand what you want to get, what thickness of the layer you need
Preparation for laying laminate - self-leveling mixture
If you are satisfied with just a flat floor surface without maintaining a level, then it will be enough to pour a thin layer of leveling compound - it will smooth out all the unevenness, but you will not get a clear zero. In this case, the thickness of the mixture needs to be minimal - if we draw parallels, it can be compared with sour cream with 15% fat content. Such preparation of the floor for laying laminate will be quite sufficient.
It's another matter if you want to get a perfectly flat floor with all levels respected. In this case, you have to knead a fairly thick mixture and install beacons to be sure.
Particular attention should be paid to the uniformity of the prepared solution - by stirring the composition with a construction mixer and observing the whole process with your own eyes, you will see how it changes shade and small lumps gradually disappear. The process is very long, but the most important thing is that it is simply impossible to spoil the solution by very long stirring
Laying technology
When preparing a leveling layer for the floor, you need to make it as even as possible.
The most important thing when preparing a leveling layer for the floor is to make it as even as possible. This means that the selected plane arrangement must be respected. Aluminum beacons will be good helpers for this. They look like aluminum strips that have small holes in the base. In construction stores, these planks are usually sold in lengths of 2 and 3 m. On top of this beacon there is a spike measuring 6 and 9 mm in height. The height of the tenon is usually selected depending on the location of the screed and its purpose. The screed device is aligned with the lighthouse spike. But before you start leveling, you need to install the aluminum strip itself on the floor.
Scheme of the screed device.
Installing the plank on the floor should begin with preparing the base of the floor surface, which will be leveled using a screed. This process involves removing and cleaning dirt, debris and dust from the entire surface. After this, the places where the beacons will be installed are marked. For convenience, experts advise placing them on the floors no further than one and a half meters from each other. These areas should be wetted using a hose or watering can with a splash attachment. This must be done so that later, when the concrete mixture is placed on the surface, particles of debris, sand and dust will mix with the finished solution and harden with it. The layer will be more uniform.
When the beacons are securely installed, you can begin the final stage of preparing the construction of the leveling screed device.
After this, the actual concrete work begins. It is necessary to lay a layer of mortar on the floor in the marked places for installing beacons. Externally, the device will resemble a slightly oblong tubercle. This device will serve as a lining for the pendulum. The height of this lining will depend directly on the thickness of the screed that will need to be obtained in the end. The beacon is placed on a concrete hillock and pressed in slightly. This is done to more securely fix the beacon. Next, use a level to level it. Whether the floor is level or not depends on the correct installation. Therefore, you should approach this process very responsibly and carefully. It is necessary to give the concrete a little time to set.
When the beacons are securely installed in the dried concrete, you can begin the final stage of preparing the construction of the leveling screed device. To begin with, the surface is wetted over the entire floor area. The concrete mixture is placed in the resulting space between the beacons and leveled. Any work involving concrete mortar must be done very quickly so that it does not have time to set. Once the work is completed, there is no need to remove the aluminum beacons. They remain in the screed.
Using this scheme, it is possible to construct not only leveling concrete coverings, but also concrete screeds for various purposes.
Construction technology and care of concrete preparation for floors
Concrete preparation must be carried out at a temperature of air and the base on which the concrete mass is laid not lower than +5 degrees. Otherwise, chemical additives should be used, concrete should be electrically heated, and greenhouses should be installed. The work is carried out strictly according to the project, in compliance with the recommendations and the designed grade of concrete and its thickness.
- Before laying the concrete mixture, the base is watered.
- We lay reinforcing mesh if this is provided for in the project (when the preparation will bear heavy loads).
- We lay the concrete mixture, compact it with vibrating laths or vibrators and level it before the concrete begins to set.
- If the design provides for an expansion joint (for large concreting areas), then we carry it out. To form expansion joints, boards are installed, wrapped in roofing felt, or planed and coated with hot bitumen. The boards are removed before the concrete has set, and the seams are filled with bituminous compounds and sealants.
- If the weather is dry and hot outside, then the completed concrete preparation should be watered with water to avoid cracking; on the second day, covered with a layer of wet sawdust (20-40mm) and kept moist for a week.
As has already happened, on my blog I published SNiP standards for the consumption of components for preparing solutions when installing cement screeds and plastering walls. Today I am publishing the consumption rates for components for preparing concrete mass by brand, depending on the inert components.
Concrete in large quantities is received at the construction site centrally from a mortar-concrete unit, and if we need a small amount of concrete for repairs in a country house, house, or garage, we are at a loss and mix the components in approximate proportions. I offer the opportunity to be guided by SNiP standards.
Consumption of materials according to SNiP for preparing 1 m3 of concrete (on gravel)
| Concrete grade | Cement brand | Cement (t) | Gravel (m3) | Sand (m3) | Water (m3) |
| Concrete M-100 (B 7.5) | |||||
| Concrete M-150 (B 10-12.5) | |||||
| Concrete M-200 (B15) | |||||
| Concrete M-250 (B20) | |||||
| Concrete M-300 (B22.5) |
Consumption of materials according to SNiP for preparing 1 m3 of concrete (on crushed stone)
| Concrete grade | Cement brand | Cement (t) | Crushed stone (m3) | Sand (m3) | Water (m3) |
| Concrete M-100 (B 7.5) | |||||
| Concrete M-150 (B 10-12.5) | |||||
| Concrete M-200 (B15) | |||||
| Concrete M-250 (B20) | |||||
| Concrete M-300 (B22.5) | |||||
| Concrete M-350 (B25) | |||||
| Concrete M-400 (B30) |
Quality requirements:
When accepting concrete preparation for floors, its evenness, horizontalness and actual strength are checked. The evenness of the concrete preparation is controlled in all directions by a 2 meter long lath. The clearance between the concrete preparation and the lath should not exceed 2mm. The deviation of the screed surface from the floor plane does not exceed 0.2% of the actual area of the room.
We looked at how concrete preparation for floors is carried out. If you are planning to complete a not very large area of work, then you will be able to do it yourself where necessary. Good luck and strong, smooth surfaces.
Concrete floors are simply necessary in some facilities: in warehouses, terminals, garages and others. That is, where a high load on the floor is expected, which another coating simply cannot withstand. The popularity of this coating is also explained by the fact that the installation of concrete floors, although it requires adherence to technology, is quite possible to do independently.