Beton-House.com
Website about concrete: construction, characteristics, design. We combine the experience of professionals and private craftsmen in one place
Concrete mixer device
Modern designs for preparing concrete mixtures are reliable devices that, when used correctly, will last for many years. When building a house, a concrete mixer is simply irreplaceable - how to use it correctly?
Unit breakdowns that may occur over time can be eliminated quite easily, even by people who do not have great skills in carrying out repair work. The article suggests getting acquainted with the types and features of structures, adjusting components for proper operation of the unit, and will tell you how to disassemble a concrete mixer and eliminate some of its malfunctions.
Differences between concrete mixers by type of action
Having found out about the mechanism of operation of concrete mixers and their parameters, you will be able to choose the right design for a particular construction site. You don’t have to make your work difficult if you can use a simple mechanical device.
In addition, if you load the concrete mixer to the very top, it will not be possible to complete pouring the foundation faster, as this will cause overload of the motor and rapid breakdown.
When choosing the design of an apparatus for mixing a solution, you need to take into account the principle of its operation:
- Mechanical models. Driven by hand crank. When it is necessary to mix a large amount of concrete, you will need two people to rotate the handle;
- Electric options. They operate from the mains, and connecting the motor will require good knowledge of auto mechanics.
Concrete mixer assembly
Open the box and check the contents as recommended in the instructions. The package for a concrete mixer necessarily includes a frame with the lower part of the drum and a gear ring, the upper part of the drum, legs, drive box, handle for tipping, blades, wheels, and a package with mounting bolts. Mount the legs so that the wheels are on the side of the drive box. Install the wheels on the axle and secure them with plastic plugs.
Manual and electric models
When there are 2-3 strong people at the construction site, it is possible to settle on a handmade product. The components of the mixture are immersed together or one by one.
One disadvantage of a design with a moving barrel, rather than a shaft moving in the middle, is the inability to add water while mixing.
- You will need to stop the barrel, open the hatch and add water. The hatch is screwed in and mixing of the mixture continues.
- Electrically powered concrete mixers make it possible to mix large volumes of mortar in a short time.
- The work process can easily be controlled by one person.
It should be taken into account that high-power motors require a three-phase line, so when selecting the capacity of the tank, you need to calculate the motor power in advance. If a 220 volt line is connected to the site, then it will not be possible to create heavy solutions.
Symptoms of a problem
You don’t need to be “single minded” to understand that something is wrong with the unit. Even with proper care, a concrete mixer is a tool that is subject to significant stress. First of all, its most vulnerable part, the bearing assembly, suffers.
The first signs of a malfunction are:
- Crackling, crunching and extraneous sounds in the drum.
- The drum stops even with a slight load.
- In an empty concrete mixer, the drum has some play.
These are all characteristic signs that it is time to change the bearings.
IT IS IMPORTANT TO KNOW!
Friends, even if only one is broken, a pair of bearings are always replaced!
Variety of options
Apparatuses for mixing concrete are divided according to the principle of operation, and from this the type of construction emerges:
- Compulsory products. They are characterized by a stationary container in which blades mounted on a shaft rotate.
- Gravity models. The concrete is mixed by rotating the container, in which the blades are attached to the walls.
- Vibration options. They do not have great productivity, but they provide a high-quality and homogeneous mixture without air bubbles.
- Periodic species. They are characterized by low power, so they require frequent stops. For private construction this is an acceptable option.
- Gear or crown type.
- Permanent action. These concrete mixers work without interruption and are used for large volumes of work.
All of the above types of concrete mixers come in both mechanical and electric models. The difference is that a forced-action mechanical stirrer has a horizontal axis, while an electric one can accommodate a vertical axis.
The design of any concrete mixer allows you to evenly mix cement with different components in the form of: gravel, sand, crushed stone, expanded clay with water. Due to this, the pace of construction is greatly increasing.
Preparation of concrete mixture
After the device has been assembled, the owner has familiarized himself in detail with how to use it and checked the unit for functionality, it is necessary to prepare the mixture in a certain proportion.
For example:
- To prepare one cubic meter of concrete, 125 liters of water are required. Do not allow excess liquid. This may lead to a decrease in the strength of the solution.
- Sand with a grain size of up to 5 mm is required. Its amount should be 30-45% by weight of the finished solution.
- Gravel takes up 55-70%.
- The ratio of sand and gravel is 1:1.2. When using crushed stone instead of gravel, the ratio should be: 1:2.
Approximate ratio of materials in a concrete mixture
High-quality concrete can only be obtained using clean sand and water, without contamination with oils or any aggressive substances. In summer the water is used cold, and in winter it is heated to 40°C. The concrete mixer is ready for operation - what it looks like before turning it on is shown in the photo.
Preparing the unit for switching on
To better imagine how to use a concrete mixer, the video lesson will tell you in detail. After finishing the work, the question is how to clean the concrete mixer?
Wherein:
- The internal and external surfaces of the unit are washed.
- The drum is washed with crushed stone and water.
- Solvents must not be used.
- Do not allow water to come into contact with the engine.
- The tightness of all fasteners should be checked periodically.
- The engine ventilation openings should always be kept clean.
The video in this article shows in detail how to properly assemble a concrete mixer or disassemble it after use.
What is a concrete mixer made of?
Many people are interested in the question: what can a concrete mixer be made from? Let's take a closer look at this issue, taking into account the available products: barrels, cans, you will also need pipe cuttings and other scrap metal, which will be useful in creating a homemade concrete mixer.
Necessary tool
Depending on the volume of repair work being carried out, different tools will be required. For example, to eliminate defects in the electrical part you need: a screwdriver, a tester and sandpaper. To repair a bearing assembly, you need to have a set of plumbing tools. Sometimes it is impossible to repair a concrete mixer without the help of a qualified turner.
Due to constant contact with water, the bolts securing the bulb to the bearing shield become unusable and cannot be unscrewed. In this situation, a grinder will come in handy. Based on the maximum amount of work, the following tools and devices will be required:
- a set of metalwork tools;
- Bulgarian;
- drill;
- screwdriver;
- pliers and wire cutters;
- puller or drift;
- tester or multimeter;
- sandpaper;
- set of necessary spare parts.
Troubleshooting in the field can be carried out with a minimum set of available tools and auxiliary equipment.
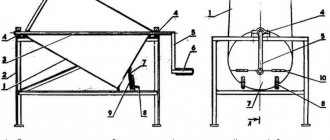
Making from a barrel
This design has an unusual line of movement. In it, the rotation axis passes obliquely through the container. Therefore, the solution in it turns over from one wall to another. The design is simple and effective.
The important thing is that there are no difficulties with welding joints of different types of metal.
Consists of elements:
- Metal barrel;
- Base made of metal corner;
- Pipe shaft;
- Bearings;
- Handle with handle;
- Manhole cover;
- Locks, seals.
In the upper section of the frame, bearings are mounted in the center, into which the handle is threaded. Thanks to them, a 200 liter barrel rotates with ease.
It is advised to select a barrel with thicker walls, then it will last longer.
- In the middle, the additional blades are not welded: they are able to hold the ingredients, preventing mixing and making unloading difficult.
- The device contains a loading hatch in the bottom.
- This is a section cut off by 1/3, secured with loops to the bottom, equipped with a sealing elastic band along the plane and closed with 2 locks.
- To load the barrel, turn it in such a position so that the hatch is on top.
- For unloading, it turns with the hatch down.
- The solution itself is dumped into the container located below, and the adhering material is removed by hitting the barrel with a sledgehammer.
Preparation for repair
Typically, repairing a concrete mixer comes down to replacing a failed part. The first thing you have to do is determine which part was damaged, and then purchase exactly the same new one somewhere. The concrete mixer is repaired by the owner himself, without seeking help from specialists, since this does not require any special skills or tools.
Every owner can easily find everything needed for repairs on his farm.
The list of tools that you cannot do without when repairing a concrete mixer includes:
- spanners;
- hammer (or in special cases a sledgehammer);
- pliers (they are used to remove and install retaining rings);
- screwdrivers;
- multimeter;
- tweezers.
However, this list is only conditional, since much in the repair of concrete mixers depends on the nature of the breakdown.
Making from a milk can
A simple manual concrete mixer can be made from the usual metal flask in which milk was sold. You will also need to cut pipes and metal. The design is simple and such an apparatus for mixing concrete can be made in 2 hours, the main thing is to weld the frame.
It will take 20-30 minutes to assemble the concrete mixer structure.
The steps for the work stages are as follows:
- The bed is prepared, a handle is bent from a round pipe.
- In the upper half of the frame, two couplings from the water supply are welded. Their internal diameter should be slightly larger than the cross-section of the tube.
- The pipe is pulled through the flask and welded to the body.
- In order for the barrel to spin easily, you need to find the center of gravity. To do this, you need to put it on some object and move it back and forth to determine this center. A handle stretches through it.
- By extending the handle, it is then attached to the walls of the case. Difficulties may arise here due to the fact that the barrels are made of aluminum and the handle is made of steel. It will not be possible to combine them by welding. An accessible solution is to do cold welding. It's really applicable. Another option is to weld plates onto the handle, which can then be riveted to the sides of the can.
- To prevent large play of the handle, nuts are welded to it on both sides of the coupling.
At this stage, the design is ready for use. 1 mixing in a 40 liter can can yield 2.5-3 buckets of solution. For use on a summer cottage or near a private house, without construction, this is quite enough.
Types of repair work
Button repair
If the button is damaged, the first thing you should do is clean it.
The buttons in concrete mixers are magnetic starters, not just an on/off design. This ensures the safety of operation, because if there is a sudden power outage, the machine will stop, but when turned on, it will not start working unexpectedly, thereby harming someone.
If the button has become unusable, slowly remove the casing (by unscrewing the screws that hold it in place) and the button itself. Inspect the part and, if necessary, clean the contacts. Also disassemble the button, cleaning it inside.
Return to contents
Belt repair
Sometimes it can happen that the motor works, but the container does not (no rotation occurs). In this case, the reason may be the belts. Remove the protective cover of the electric drive and assess the situation. Most often, the strap simply slips off - in this case, it needs to be put back in place. Sometimes, even if the belt is intact and not torn, it may be unsuitable for further use. This means you can’t do without buying a new one. To install it, loosen the bolts securing the motor (there are two of them), install the belt. Start with the small pulley (near the motor), gradually moving to the large one. It is advisable to use someone's help - it is very difficult to do it on your own, because you need to pull the engine back and immediately tighten the bolts. Actions happen simultaneously.
Return to contents
Repair of drive gear and rings
Before replacing the gear and rings, you need to try to rehabilitate them - thoroughly lubricate them with lithol. Turn the bowl upside down. Turn on the concrete mixer and spread the crowns with a spatula.
If the gear slips over the teeth of the ring, it’s time to change it. The gear consists of 12 teeth and a hole (14 mm in diameter) for the shaft. Unscrew the fixing bolt (a 10mm wrench will help), remove the washer and pull out the gear. Be careful not to lose the key (it is small, located in the gear). Place the key on the new gear and return it to its place by doing the steps in reverse order.
Return to contents