How to make a TISE drill with your own hands - drawings, photos, instructions.
Construction of a private house is a complex and costly matter in terms of effort and resources. To speed up the process, you can use several methods, for example, contact a company that will provide a team of workers, which will facilitate construction and empty your wallet ahead of time, or use modern tools and technologies that make it possible to solve all problems and achieve results with your own hands.
Modifications
Before making your own, you need to consider various models of hand-held eartheners. Taking a suitable design as a basis, one should determine its characteristics: productivity, cutting force, ability to work with hard soil. Perhaps for individual use you will have to make a combined device that combines successful solutions from several models.
Basic diagrams of auger tools
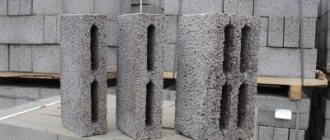
The basis of the earth rotor is the screw part - the auger. It is made welded from thin-walled steel disks. The latter are cut from the center to the outer diameter and bent. As a rule, from 1 to 4 rings are taken to make a screw. The volume of soil that can be extracted in one pass depends on their quantity. However, with a larger number of rings, the drill is more difficult to rotate and remove from the ground. The soil is cut by the auger itself or additional blades. In the first case, the working edge quickly dulls on plant roots or stones. And the blades are made of durable steel and do not require periodic sharpening.
Advantages and disadvantages
The advantages of the TISE type foundation include:
- low cost;
- no need to use heavy construction equipment;
- autonomy of work during construction: to perform technological operations, no connection to the electrical network is required;
- high speed of construction and minimal labor costs;
- the possibility of independent construction by individual developers who do not have experience or special skills;
- ease of installation of utilities even at a fully constructed facility.
Disadvantages of TISE foundation technology:
- this construction method cannot be used in swampy areas, waterlogged and silty soils;
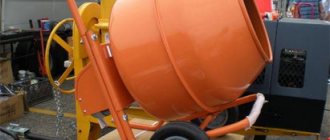
- using only manual labor: this makes the construction process very difficult on rocky and hard soils. True, they have now begun to produce TISE drills with a mechanical drive powered by a light gasoline engine;
- it is not possible to build a basement under the entire house;
- a blind area of increased width is required.
The above disadvantages of the TISE foundation are offset by advantages, so this technology can be considered the most economical and progressive for private construction.
Materials and tools required for making a drill
Manual drilling diagram.
Before you start working directly, you should stock up on all the necessary materials and tools. The master will need:
- a piece of gas pipe (for making a vertical stand);
- a fragment of high-strength sheet steel (for the production of propeller blades);
- a piece of smooth reinforcement (metal rod) with a diameter of 16-20 mm (for making a handle);
- welding machine;
- welding clamp;
- lathe;
- emery wheel;
- electric drill;
- set of metal drills;
- angle grinder (grinder) with a metal disc;
- gas key;
- assembly vice.
Application benefits
The main advantages of this tool, intended for the production of pile holes, are:
- The simple design of the Chise drill makes it easy to do it yourself.
- Safety – using a hole drill does not harm the environment.
- Can be used on soils of any complexity.
- Versatility - the Tise foundation drill can be used for recesses for various purposes.
- The ability to carry out construction in any season, including winter.
In addition, one of the important characteristics is ease of operation: to operate the tool you do not need to undergo special training.
Step-by-step production of a drill
Draw a circle on a metal sheet, marking the center. This will be the blade. Next, this circle needs to be cut out using a grinder, and then a cut line must be drawn that runs along the diameter line. Then we draw a cutting line, which should correspond to the circumference of the collar. The resulting disk must be divided into two parts and holes for the knobs must be cut.
At the end of the pipe, which will act as a wrench, we use a grinder to cut four longitudinal lines, 3-4 cm in length. After this, you need to form a tip from them using a hammer, while you need to collect the cuts at the very center of the pipe. The resulting tip must be processed by welding and ensure that the knob does not become clogged with soil during operation.
The next step is to connect the knob to the disk by welding. This is done at a distance of 5 cm between them and at an angle to the plane of rotation of 20 degrees.
Next, we proceed to the extension pipe, which should be equipped with a handle. This part must be welded in the letter “T” and be sure to weld the amplifiers to it in the form of a “kerchief”. The workpiece is threaded through the driver, and a hole is made through them so that the parts can be fastened with a pin. Several such holes need to be made in order to be able to adjust the length of the product.
The work ends with sharpening the blades. The edge of the cutter must be processed in such a way that when rotating, the tip of the blade is directed downward.
Protective covering
To avoid rust on the parts of a homemade pole drill, you need to thoroughly clean them with sandpaper and treat them with a primer and phosphating solution. After this treatment, the finished product can be painted.
When using the device, you need to disassemble it after each use and clean all connections from dust and dirt, and also coat them with a special lubricant that repels water. You should not miss this moment, since proper care of the tool will be a good prevention of bolt jamming and will allow it to work smoothly for a very long time.
Ways to improve the tool
When drilling holes, the master may encounter a large number of plant rhizomes that lie tightly in the soil. The sharp edges of the blades will make working with the drill much easier. For ease of use, you can cut several teeth on the sloping area of the blade or round off its cutting area.
You can improve the design and make removable cutters for the drill. Thanks to them, it will be possible to drill holes of any diameter. In addition to the manufacture of spare parts, it is necessary to provide for their attachment to the collar. The easiest way is to connect them with two iron plates, which are secured by welding.
In the mounting plates, as well as in the blades, you need to drill two holes for the sides. The cutters are fastened with M6 bolts. To ensure that the bolts do not interfere with work, they must be screwed in with the threads facing up.
There is another way to improve your homemade pole drill. You can increase the efficiency of the lower end of the knob. To do this, you need to cut out a narrow metal plate (10x2 cm) and grind it into a cone shape using a grinder, making a kind of point.
There is no need to make cuts in the collar; turned metal plates are inserted into its end, fixed by welding and flattened. The result should be a peak.
There is another method for making a pike. A metal plate is cut to a length of about 17 cm and a screw is made from it, similar to a corkscrew. Further, the algorithm of actions is the same as in the described first option.
A suitable drill can act as an auger, which can easily handle wood as well as metal. Such a tool will penetrate the ground much easier and will drill a hole to the required depth without any problems.
Builders who work on dense deep layers of soil will need one piece of advice. Between the pick and the cutter you need to weld a small flat cutter. Thanks to this design, it will be possible to loosen the earth and center it when drilling. For such a part you will need 2 metal plates 3x8 cm. This trick will significantly speed up working with the tool.
Milling cutters can also be made from grinder discs, which are designed for working with stone. The circles need to be cut along the radius and the hole in the center should be expanded according to the diameter of the knob. Bending the disk with the sides apart gives the appearance of a corkscrew or auger. All that remains is to weld the part in the manner described above.
The cutter is very easy to make from a circular saw blade. The teeth of this model can easily cope with plant rhizomes and hard soil.
The master can choose how to modernize his drill independently. It is worth saying that making a drill for poles with your own hands is not a complicated process at all and requires minimal physical and financial costs from the master. The entire manufacturing process takes two hours at most.
Finally, there is one important piece of advice: before the drilling process, it is best to loosen the soil with a shovel, then the device will fit into it more easily and the work will go much faster. The recommendations given will certainly help the master make a functional and effective tool that will serve him for decades and become a very good assistant.
Auger drill
Due to the large number of turns, an auger auger creates significant resistance, that is, it is much more difficult to work with it than with a garden auger. But augers are used mainly in the presence of a mechanized drive - when making a drill for deep wells - for water, for installing underground probes for a heat pump, etc.
This is what an auger drill looks like
To make a homemade auger drill, you will need several metal disks. The number of disks is equal to the number of turns. The disks are cut identically, a hole is cut in them in the center for the rod, as well as an identical sector - so that they can be welded.
A sector is marked in the rings and cut out
The discs are welded on one side, then, slightly stretching the resulting accordion, the seam is welded on the other side. Rings are welded on the outer disks. The welded discs are placed on the rod, the lower edge is welded.
It turns out to be such a big spring
Next you will need a winch. The blank for the auger is secured, the winch hook clings to the ring and is stretched to the required length, after which the auger is boiled.
Almost done
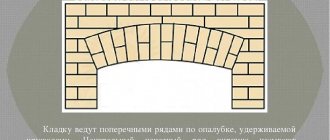
Construction
A universal foundation built using TISE technology is in demand, because it is inexpensive, and its construction does not take much time, and besides, everything can be done with your own hands. Initially, carefully prepare the site, namely, remove the top layer of soil and install cast-offs.
Then mark the location of the piles and the site. A hydraulic level is used for this. Then cut down the pegs a little and place nails on the outer corners of the area, fixing a rope on them, you can also use a strong fishing line. When this job is done, install stakes for the load-bearing walls.
To install the frame of the cast-off, round timber from a board 50 mm thick is used. It is recommended to use a garden auger. It is more economical and convenient to make a semi-solid cast-off, on which the zero level must be determined.
Then the installation of smooth bars is carried out, which are attached to the boards. There should be a zero level on top
Please note that the cast-off is installed for control, then it is dismantled. Dig a hole around the area and start drilling. To begin with, it is recommended to make approximately 5 wells, after which they need to be expanded
To begin with, it is recommended to make approximately 5 wells, after which they need to be expanded.
If there is a small amount of sand in the soil, then drilling will be difficult and this work will take a lot of time. To make the process easier, pour 5 buckets of water into each well overnight, this will soften the soil and it will be easier to expand the well the next day. This way you can do it without special equipment.
When installing the TISE base, do not forget about the reinforcement. You can find out the length of the rod based on the depth of the support. If the reinforcement is barely noticeable from behind the column, it can later be used as a vibratory compactor for concreting, which will remove remaining air from the concrete.
The next procedure is waterproofing, for which roofing felt is used. For installation, the material must be divided into pieces and twisted into a cylinder. The product is placed in the well, but only when the fittings are installed. The visible end of the shirt is sprinkled with soil. Installation of the TISE foundation requires concreting as quickly as possible.
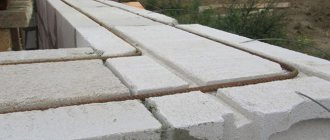
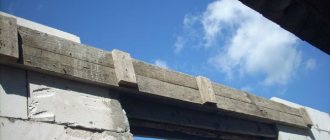
Once you have poured the pillars and backfilled the supports, begin making the grillage. To do this, shields are installed and covered with durable polyethylene. The formwork is secured with pins, and holes are made in the timber on both sides. One end of the stud is bent behind the other, on which a washer and nut are fixed. Reinforcement is installed on the studs and secured with plastic ties.
The undeniable advantage of this foundation is the lack of drainage. There is no need to insulate the blind area and fence. And so that the drains do not have a destructive effect on the areas adjacent to the blind area, storm gutters are installed outside.
How to make a cable impact drill
The mechanism of the impact drill is quite simple in design. To manufacture and assemble it, you will need the following material resources and equipment: a thick-walled pipe of the required dimensions, angles, sheet steel, a tape measure, an angle grinder, a welding machine and a manual or automatic winch. To make and assemble an impact drill, you should perform some steps in the following sequence:
- A tripod is assembled with a height of no lower than 2 meters.
- The top of the tripod is equipped with a special unit that allows you to install a manual or automatic winch.
- A percussion instrument is being made.
To do this, you need a pipe with an outer diameter that matches the diameter of the future well. A piece of thick sheet steel is welded onto one end. Then a hole is made in it in order to fix the cable. And at the impact end of the pipe, sharpening is made around the entire circumference. To ensure the strength of these elements, they need to be hardened. The instrument should also be equipped with additional weights.
The basis for placing the working tool is being prepared. A shallow hole is cut in the ground. The wireline drill is then mounted on a tripod and positioned so that it can be completely immersed in the prepared area under its own weight.
Why are different blades needed?
Since the diameter of the hole that the tool can drill is limited by the size of the blades, it is best to prepare several different options with different diameters. Then you will have the opportunity to choose the most optimal drill diameter for each individual case when you need to drill a hole.
For home use, it will be enough to make two or three different sizes. Choose one small one for small fences, a medium one for more serious ones, and one large one if you decide to build a more serious and massive fence around the entire site.
Which drill is better?
Drills for drilling wells come in two types: spiral (disc, auger) and spoon. Each type has its own advantages and disadvantages and is used for a specific type of soil.
Spiral drill - advantages and disadvantages
The versatility of the spiral type allows it to be used not only for constructing wells, but also for other gardening and construction work.
Advantages:
- Wide range of applications. Used in the construction of fences, pile foundations, planting, etc.
- Fast and easy penetration into the ground.
- At shallow depths, soil is automatically removed from the well using a drill auger.
- Easy to make with your own hands.
Flaws:
- To excavate the soil, it is necessary to disassemble the boom.
- Not suitable for loose and rocky materials.
- Small passage depth.
- You have to frequently clear away the worked-out soil.
Spoon drill – is it worth choosing?
The advantages of a spoon drill over other types of hand drills justify its use.
- Used for loose soils.
- Soil excavation is carried out by the lower and side edges of the drill.
- The width of the passage is greater than the diameter of the drill, which makes it easier to remove it from the well.
- You can rotate the drill not only manually, but also with a drill or hammer drill.
- The simplest design and manufacturing method.
How to drill wells?
Access to the shallow aquifer can be done with your own hands using one of three types of drilling:
- manual;
- shock-rope;
- percussion.
The method of constructing the well is selected depending on the type of soil and the depth of the passage.
Manual well drilling
If you do not use additional equipment, a drilling tripod (tower) and a block system, you can drill a “well” to a depth of up to 20 m.
Drilling technology:
- A tripod is installed in the selected area for passage. The height of the tower should be 1-2 m higher, the length of the drill rod section.
- A shovel is used to make a recess of one or two bayonets to center and guide the passage of the cutting edge of the drill.
- To bury the drill at a depth of more than one meter, you will need the help of a partner. One person cannot continue to drill for piles.
- If difficulties arise with removing the drill from the hole, it is necessary to turn it in the opposite direction of drilling 2 - 3 turns and remove it.
- Every 500 mm of penetration it is necessary to remove the drill and clear it of soil.
- The drilling process is repeated until the drill arm reaches ground level.
- The drill rod is taken out along with the drill and extended with an additional section.
- All operations are repeated until you reach the aquifer. This is determined by the type of soil being extracted.
- After reaching a layer with water, you need to continue drilling to a solid (water-resistant) layer. This will allow the well to be filled with the maximum volume of water.
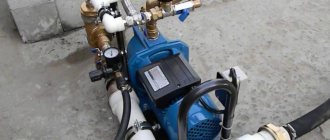
- Pumping out water containing soil can be done using a manual or submersible pump.
- After pumping out 3 - 4 buckets of muddy water, clean water should appear. If clear water does not flow, then it is necessary to increase the depth of the excavation by 1.5 - 2 meters.
Tip: Use the design capabilities of the installation to extract the maximum volume of soil, since this operation takes a lot of time.
Tools:
- tripod;
- Boer;
- hoses for pumping water;
- composite drill rod;
- pump or pump.
Percussion-rope drilling
A well made using this drilling method has a long service life of 80 years or more, increased water supply and inflow. The work process consists of destroying and crushing rock in a closed cycle with a special impactor.
Drilling process:
- The drilling rig is placed above the point for deepening the driving glass (ramp, drill bit).
- A guide recess is made for the passage of the ramp.
- Punching the first meter of the well can be done manually.
- Next, a guide is installed in the form of a steel pipe with a larger diameter than the diameter of the glass.
- The discharge of the slope into the pipe is carried out by releasing the winch; upon impact, the soil is destroyed and crushed, thereby filling the glass. The presence of a special valve prevents soil from spilling out of the projectile.
- After which the glass is lifted and the broken soil is removed.
- The cycle repeats again until you reach the aquifer.
This drilling method is labor-intensive and takes up to several weeks. Therefore, it is better to use it for drilling wells on the following types of soil:
- clay;
- on loams;
- on soft (watered) soil;
Percussion drilling
The principle of shock passage as shock-rope. The difference is that the drilling bits are located in the face and are struck using a hammer. In this way, depths of more than 100 m can be passed.
Drilling can be carried out on many types of soil:
- soft earth - a wedge-shaped chisel is used;
- viscous soil - an I-shaped bit;
- hard rocks - cross-shaped chisel;
- boulders - pyramidal shape of the chisel.
How drilling happens:
- a drilling rig is installed;
- a chisel selected for a specific soil is inserted into the face;
- a projectile, weight from 500 to 2500 kg, is launched from a height of 300 to 1000 mm;
- after the impact, the soil splits, the chisel buries into the soil;
- the projectile rises and the cycle repeats;
- cycle frequency – 45 – 60 beats/min.;
- After passing every 200 - 600 mm, the bit is removed from the face and cleared of soil.
How to make an auger drill
You can make your own spiral drill of 2 types for rotary drilling of wells: with a spiral cutting element, with a hemispherical disk knife. For work you will need:
- A metal rod or strong pipe is the base, a hollow pipe of larger diameter is for the container on the rod of the spoon.
- Couplings for connecting rods, metal handle - a piece of reinforcement, rod, up to 40 - 50 cm long.
- Metal sheet if a spiral knife is planned.
- Steel discs with teeth from an electric saw.
Metal circles of different diameters are suitable for forming a cutting surface
Spiral simple and two-stage drill: drawings
How to make a classic drill with a spiral band knife for a sand well? It is difficult to make such a tool with your own hands without special machines for working with metal. The difficulty lies in the preliminary hardening and bending of the metal strip. It is necessary to select steel with a thickness of 1.5 - 2 mm. Next, the hot strip is bent on a machine, giving the strip a spiral shape.
A spiral drill with a long cutting band cannot be made without equipment
Only after this is the tape welded to the base. During the connection, symmetry is monitored: the turns must be positioned strictly parallel to each other and at a certain angle to the horizontal line. The edge of the tape is sharpened and the surface is painted.
Drawing of a simple drill with two knives at an angle
Starting from the simplest design, you can improve the tool and make a drill that is suitable for drilling shallow wells of different diameters.
For production, take 3 disks of the same thickness with different diameters. Each is cut into 2 halves, one edge (bottom) is sharpened. Holes are drilled in all parts to connect the petals.
Drill parts
A circle of smaller diameter is welded to the base so that the edges of the two halves form an angle of 30 degrees. Larger diameter knives are attached to the upper one using nuts and bolts.
Ready-to-assemble drill with replaceable blade sets
The rod is formed with thread cutting or a coupling with finished thread is welded to the upper edge: in this case, there is no need to install protection against unwinding during operation.
Useful tips
If you need a very long drill rod, you can do it in several ways:
- A good option is to use threaded couplings to connect the rods. So, inside each pipe section there is a thread corresponding to the diameter of the pipes. Then a threaded coupling of the required length is made. To protect against spontaneous separation of elements, a cotter pin retainer is made.
- For small pipe diameters, you can use a bolt and nut welded to the ends of the sections. However, this method is not very reliable due to the fragility of the welded joint.
- The simplest and most effective method is to cut a coupling from a piece of pipe with a larger diameter than the dimensions of the rod. The coupling is then welded to the end of one section, and the other section is loosely inserted into the coupling and secured with a bolt and nut inserted across it.
Making one-piece drill pipe that is too long makes the job more difficult. It is better to make a detachable connection. To do this, it is enough to use sections 100-120 cm long. This way it will be easy for you to select the required length of the drill pipe and increase it as the work progresses.
Types of drills
A drill is a type of construction equipment whose function is to make a hole of the required size. It is used in various fields. For example, in the construction of bridges and fences, for gardening work (when planting trees and other vegetation).
They can be divided into:
- Hand drills. They are often used in everyday life by both beginners and advanced summer residents.
- Designs with automatic drive. Modernized hand drills. A motor is installed on them.
- Mounted. These are the same mechanized drills, only with the possibility of installation on special agricultural equipment (tractors, walk-behind tractors, etc.).
The first ones have the weakest design and purpose. They drill holes of small diameter and depth. Without the effort of the worker, such a tool is useless. But its advantage lies in its compactness, since it is small and light. It is quite convenient to transport it. With this tool you can easily make a hole for a fence or seedlings.
In this video we will look at how to make a hand drill:
It consists of a rod and a T-shaped handle on top of the structure. There is a metal tip at the bottom that performs the function of centering the tool. A little higher is the drilling mechanism itself, designed in a spiral shape. Often consists of 2-3 rows of metal round cutters. As an alternative, use a saw blade as the cutting part.
Power drills are made with a drive system. The design is more complex, but most summer residents can make such a manual drill for poles on their own. The drill also has a metal pipe with a handle, a tip and a cutting part. But an additional motor with a gearbox and drive part is installed. The auger (cutting) part moves due to rotational movements transmitted through gears from a gearbox with a motor.
This design is more powerful, but its strength depends directly on the performance and strength of the motor. The hole can be made deeper, up to 3 meters.
Mounted drills are designed to perform more complex work. The width and length of the holes are much larger. They are often used for the construction of bridges, train stations and other industrial purposes. With their help, you can make sheet piling fences for pits and trenches. Thanks to attachments, the cost of construction work is significantly reduced, as they have greater productivity and power.
https://youtube.com/watch?v=4j8lJtYjAVs
Details of the pit drill and features of its operation
Areas of application for garden augers:
Purpose – excavation of soil of the required diameter and depth by human physical efforts.
Productivity directly depends on:
It will take about 2-3 hours to make a hole up to 3 m deep with a diameter of 25-30 cm using a standard earth drill.
For deeper drilling, special equipment in the form of drilling rigs is used.
The manual design contains the following parts:
For cutting elements, it is recommended to use steel as a material - this guarantees a long service life of the tool.
Drill for making piles
The classic version of a drill for TISE is blades with a container for collecting soil. There is also a wider knife, which is necessary to create an expansion at the bottom of the pile. Using such a homemade drill for personal purposes is not very convenient, since the additional folding knife gets in the way.
In this regard, such structures are often made collapsible, where the folding knife can be dismantled. In general, it is recommended to use a regular garden drill to make a pile for personal purposes, and for expansion, make a separate knife with a container for collecting earth. The work is much easier in this case.
For this design, a scrap from a shovel is used as a knife, and a container for collecting soil can be made from a herring can. The knife is fixed on levers, and when lowered along the pile, it is in the uppermost position, as it is tensioned with a cable. When it reaches the bottom, the cable relaxes and the knife falls onto the walls of the pile, beginning to remove the soil and form an expansion of the desired size.
Alternatively, a dredger can also be made from an old propane tank. To reduce friction, the well is constantly doused with water. This tool can also be used on hard soils.
This is interesting: gas drills for earthworks.
Features of manual drilling
A home well means savings, water quality, and ease of maintenance. The services of drilling specialists are expensive, so many drill wells on their own. Sometimes this is the only way out of the situation if you plan to loosen the soil in a place where special equipment cannot enter. Is it difficult to drill the soil to the water yourself?
It all depends on the depth of water in the chosen location and on compliance with drilling rules. Following all the rules, you can easily drill a well using a ready-made mechanism.
Hand drill design
A garden auger is a very useful device for any summer resident. It is very compact, convenient and easy to use. As a rule, it is made of solid metal. It effortlessly splits small stones and plant rhizomes into pieces.
With the help of such a device, you can easily dig a hole by rotating it around its axis like a corkscrew.
The main purpose of the drill is to dig holes for posts. Small wells are made by the cutting part of the device, which can be of various shapes:
- Two-blade;
- In the form of half-discs;
- Helical;
- Screw-shaped;
- Multi-tiered;
- Solid or removable.
There are models that start with small blades and gradually increase the top to larger sizes. A factory drill is not functional and effective in all situations, because the tool simply will not be able to penetrate the soil to the required depth, or its attachments will not be of the required diameter.
Although the cost of a factory-made pole drill is relatively affordable, it is quite possible to make a useful tool yourself, and at the same time it will meet all the necessary requirements. The technology for making a drill with your own hands is very simple, and its cost will be much cheaper than a factory one. You just need to decide on the parameters of the product.
Let's look at several different designs that are responsible for the efficiency and functionality of the drill:
Baking powder. This part consists of a pair of planes or a screw. The auger looks like a spiral, the knife is located on a rod. Soil receiver. This part collects soil, and it greatly facilitates the drilling of holes up to 35 cm in size. Forming plow. It is located in the lower zone
This design allows you to strengthen the columnar foundation, which is very important in the construction of massive structures. The auger is attached to the handle with a bolted connection. The length of the ready-to-use and fully assembled product is about a meter, which allows you to easily make holes up to 70 cm deep
If the hole needs to be deeper, then the structure can be expanded using a tube (500 mm). This element is a part with a nut and bolt, which are located at the ends of the pipes.
Preparing for independent drilling
Before making a drill for drilling a well with your own hands, you should determine the following factors:
- Estimated depth of the water basin . If the water layer is located at a depth of no more than 10 m, the well can be awakened by any of the 4 methods above. For water intake with a surface electric pump, a small channel cross-section is sufficient, so it is more rational and simpler to use driving technology using a needle drill or screw penetration with a small diameter drill. If you plan to use a submersible pump in a column of standard casing pipes, a bailer or spoon-type structure is made. For drilling to great depths, as well as to shallow ones, there are no competitors to auger hydraulic drilling in terms of speed and efficiency; the use of the percussion-rope method with a bailer or a spoon drill is significantly inferior in time to auger drilling using water and may turn out to be economically unprofitable due to high physical stress and significant loss of time.
- Well diameter . For water intake from depths greater than 9 m from the surface level, you will need to use a submersible electric pump, which requires the use of a large diameter casing; in this case, drilling can be carried out using any of the above methods. An effective option for sinking clay structures is to use drilling in the casing, in which water is poured into it, and the soil in the form of liquid mud is extracted out with a bailer or spoon device.
Homemade spoon drills
Making a spiral screw drill
For auger drilling, drills equipped with a helical spiral are used. Such devices are driven into the ground not by blows, but by rotation around its axis. Making a homemade drill for a well with your own hands of a similar design is a little more difficult than a bailer bit. However, if desired, it is quite possible to create such a device.
The basis of the auger drill is a 32-50mm steel pipe. Sharpened knives cut from hard steel are welded to the lower end of the pipe. A piece of old spring is perfect for them. The length of the protruding parts of the knives should be equal to the diameter of the auger or slightly exceed it. With the help of knives, when the drill rotates, dense layers of soil are loosened, and then removed upward using turns of a spiral auger.
Screw
Making an auger is the most labor-intensive and complex process in making a do-it-yourself auger drill. Its petals are cut from a steel sheet 5-6mm thick. The first step is to mark the workpiece. Using a compass, draw a circle of the required size on the sheet. The diameter of this circle should be equal to the diameter of the well. Then we draw another smaller circle inside it: the diameter of the inner circle is equal to the diameter of the pipe taken as the basis of the drilling mechanism.
The next step is to cut out both circles using an autogen machine. The result should be a donut-shaped piece. We cut one edge of this “donut” and bend the edges of the cut at an angle of 25-40° relative to each other. This will be the first turn of the auger spiral of the drilling device.
We put the resulting workpiece on the base pipe and weld it. In the same way, we make another turn of the auger, put it on the pipe above the first turn, connecting them to each other. The number of turns depends on the height of the drilling device, and can range from 2 to a dozen or more.
The easiest way to deepen an auger drill is with human muscle power. To do this, levers from two pieces of pipe from half a meter to one and a half meters in length are attached to the top of the pipe with welded spiral petals. The greater the length and diameter of the drill, the longer the levers should be. They are secured by welding, bolts or keying.
Peculiarity
The peculiarity of auger drilling is the need to regularly lift the drill to remove loosened soil. With a large depth of the well and a significant mass of the drill, it can be difficult to perform such an operation by hand. To make the task easier, you will again need a frame with a lifting device - blocks and a collar. If possible, you can also use an electric winch for lifting.
Use of hand-held drilling devices
A small drill you make yourself can be used for more than just creating wells.
Using the device, support posts for fences, gazebos are installed, temporary structures are erected, etc. A hand drill will always be necessary where you need to make a hole of small depth and diameter. But homemade structures are only suitable for drilling relatively soft and loose soil. They will not work on hard rocky soil. The depth of a well made with a manual device can reach 20 m. The indicator directly depends on the characteristics of the soil and the strength of the main structural element - the detachable drill pipe. Fig. 2: Drilling device diagram
The detachable pipe is the main part in the structure of the drill, the length of which increases as the device deepens into the soil.
It is important to pay attention to the physical limits of the handheld device. After passing a certain depth, turning the cutter becomes difficult and excavating the earth becomes more difficult.
When making a drill with your own hands, you need to carefully consider the design of the handle, on which the ease of use of the device depends. When designing an element, it is important to consider the following factors:
- how many people will work as a drill (one or two);
- maximum drilling depth;
- soil characteristics.
The handle and the top of the pipe are connected by welding. The rolled stock from which the handle is made must have a high strength index.
Fig. 3: Connection diagram of elements
Drawings and dimensions
The product diagram is a template and allows you to visually estimate how the stages of the manufacturing process of the future tool are located. The dimensions of the garden auger can be as follows:
- handle (if the product is handmade) - crossbar 0.5 m long;
- rod – about 1 m (without additional sections);
- the diameter of the disk cut into pieces is 15-25 cm (reference point is ready-made saw blades for an angle grinder);
- tip length – up to 10 cm (peak or drill);
- the distance on the axis given for the installation of disks (taking into account the slope), after a peak or drill - up to 15 cm;
- The upward tilt angle of the knives is up to 30 degrees.
In an auger drill, the length of the “screw” (a monoblade with several turns) can reach up to half a meter. The tilt of the screw stroke can reach the same 30 degrees (at any point of the monoblade). The remaining parts of the auger drill are the same as those of a simple two-blade drill.
The dimensions of the drill for planting seedlings, such as tomatoes, generally coincide with the dimensions of the working part of an ordinary bayonet shovel. Its cutting edges are trimmed so that the bayonet of the shovel goes from round to straightened and pointed at an obtuse angle. The leaf fold is cut off from the opposite (upper) edge. A long (more than half a meter) concrete drill can be welded into the hole from which the handle is pulled out (under the universal hammer drill clamp). It is advisable to use a drill made from a shovel bayonet with a drive, since for manual drilling it requires more effort than the inclined screw of an auger or half-disc of a conventional garden drill.
A drill of any type can be equipped with additional sections. Each of them increases the depth of soil drilling by a meter. These extension sections are used when the owner decides to drill a well for water himself. One such section is used when the ground is soft. These can be posts for fences and other non-permanent structures, buried to 1.4 - 2 m.
Having decided what kind of hole drill you need, cut out a sketch for the blades from cardboard. It made cutting sheets easier and faster.
Making a pole drill with your own hands: step-by-step instructions, dimensions and photos
If you are the owner of a plot of land, then at least once you have been faced with the need to dig holes for supports and pillars when decorating the appearance of the territory. Sometimes it happens that a hole is needed in a not very convenient place.
It is quite difficult to cope with this task with a simple shovel. You can, of course, borrow a hand drill from a friend or call a specialist who can handle the appropriate tool.
But if you plan to carry out such work from time to time, then you can make a garden drill for poles with your own hands from scrap materials.
The tool will be easy to use and compact, which is very convenient for storage. Typically, hard metal is used for such work. With its help, you can split plant rhizomes and small stones into pieces. Such a device will allow you to dig a hole by rotating the equipment around an axis like a corkscrew.
Selection of cutting part
The main purpose of the drill is to dig holes. Wells are made with a cutting part, which can have different shapes, namely:
- half-disc shape;
- type of auger;
- two-blade;
- helical;
- removable;
- multi-tiered;
- whole.
If you want to make a pole drill with your own hands, you must determine the design features of the device. Some models have small blades at the bottom, while at the top they increase to larger sizes.
By purchasing a factory drill, you will receive an effective and functional tool for use.
But it is not always possible to insert it into the soil to the required depth; in addition, the nozzles of such devices may not have the correct diameter.
Why is it worth making a drill yourself?
Despite the fact that the cost of a factory drill is affordable, you can make it yourself, having received a tool that will meet all the requirements. The technology for carrying out the work is very simple, and the cost will be much lower. You just need to decide what parameters the product will have.
What size to choose for a drill
The most common sizes of garden augers, in terms of diameter, range from 100 to 300 mm. The height of the working part should be approximately 400 mm. The angle between the disks ranges from 25 to 28˚. You must choose the height individually, because it will depend on your height.
Recommendations for the manufacture of individual parts
Before you start making a pole drill with your own hands, you must understand the components of this tool, among them the following should be highlighted:
- baking powder;
- soil receiver;
- shaper plow;
- screw.
The baking powder consists of two planes or a screw. The latter is similar to a spiral; in this unit the knife is located on a rod. There is also a soil receiver in the drill. Soil is collected here, which makes it easier to drill holes with a diameter of up to 35 cm.
When making your own post drill, you will need to equip it with a shaper, which will be located at the bottom.
This unit allows you to strengthen the columnar foundation, which is required when constructing large buildings.
The drill also has an auger. It needs to be fixed to the handle using bolts. The length of the finished product that can be used in work is a meter, which allows you to make holes up to 70 cm deep.
If the hole should have a more impressive depth, the structure can be extended with a half-meter tube. This element is a part with a bolt and nut, which are located at the ends of the pipes.
Preparation of materials
If you decide to make a drill for poles with your own hands, then at the first stage you need to start preparing everything you need. Among the details it is worth highlighting:
- nut;
- drill;
- vice;
- pieces of metal pipe.
You will also need an M 20 bolt. You need to take 2 disks with a diameter of 100 to 150 mm. As for the drill, it must have a tip with a diameter of 20 mm. A metal pipe will lie at the base.
You will need two sections of 500 mm and one of 400 mm. It is better to take a pipe with a wall thickness of 3.5 mm and an outer diameter of 40 mm. With these parameters, the finished product will be durable and will be able to withstand hard ground.
Preparing tools
You can borrow the discs from a regular circular saw or make them yourself. To do this, you should find 3mm sheets of metal. Among the tools that will be needed in the work are:
- angle grinder;
- welding machine;
- metal drills;
- hammer;
- drill.
If you do not have a tip with a drill, you can replace it with a drill with a shank that looks like a cone. Its diameter must match the screw. In order to prevent injury, you should use soft bicycle handles.
Step-by-step work
If you decide to make a manual post drill with your own hands, draw a circle with a center on a metal sheet. This part will be the blade. The circle is cut out with a grinder, after which a cutting line should be drawn along the diameter line.
At the next stage, you need to draw a cutout line that will correspond to the circumference of the collar. The disk is divided into two parts, after which a hole for the knob should be cut. At the end of the pipe, which will serve as a wrench, four longitudinal lines must be made with an angle grinder.
These are formed into a point using a hammer. In this case, you need to make cuts at the very center of the pipe.
The tip is processed by welding. The driver should not become clogged with soil during operation. When making a drill for fence posts with your own hands, in the next step you will need to connect the disk to the collar using a weld. This is done at a distance of 5 cm between them. It is necessary to maintain the angle of the plane of rotation, which is 20˚.
Working on an extension pipe
Next, you can begin working with the extension pipe. It must be equipped with a handle. This part is welded in the shape of the letter T. An amplifier in the form of a scarf is attached to it. The workpiece should be inserted into the driver, making a hole between these parts.
This will allow you to fasten the parts with a pin. There should be several holes so that the length of the product can be adjusted. You can complete the work process by sharpening the blades. The edge of the cutter is processed so that when rotating the tip is directed downward.
Application of protective coating
Having made a drill from a pipe for poles with your own hands, you must protect it from external influences and premature aging of the material. This will prevent rust from occurring. The parts of a homemade drill are processed with sandpaper and coated with a primer. A phosphating solution is applied on top. The finished product after this treatment can be painted.
When using a tool, after each use it is usually disassembled and cleaned of dirt and dust. Particular attention should be paid to connections. They are coated with a special lubricant that helps repel water. You should not miss this moment, because proper care will be an excellent prevention of bolt jamming and will allow the equipment to operate uninterruptedly for a long time.
When making your own garden post auger, you can think about improving it. When drilling holes, you may encounter large rhizomes that lie tightly in the ground. Sharp edges make work easier. For ease of use, teeth should be cut on the sloping area of the blade or the cutting part should be rounded.
The design can be improved by adding removable cutters. They will allow you to drill holes of any diameter. In addition to the manufacture of spare parts, it is necessary to provide for their attachment to the collar.
They are connected by two iron plates, fixed by welding. Two holes are drilled into the mounting plates and blades for the bolts. The cutters are fixed with M 6 bolts. The bolts may interfere during operation.
To eliminate this problem, they are screwed in with the threads facing up.
If you want to make the best DIY post drill, you can improve it using one more method. To do this, a narrow metal plate is cut out and turned into a cone using a grinder.
This will improve the efficiency of the lower end of the knob. The dimensions of the plate are 10 x 2 cm. As a result, you should get a kind of point. There is no need to make cuts in the collar. Metal plates are inserted into the end and secured by welding.
They are flattened to form a peak.
If you want to use a pike, you can base it on a different method of making it. To do this, take a 17-centimeter metal plate, from which a screw similar to a corkscrew is cut out. The further algorithm of actions will be the same as in the first option.
If you decide to make a pole drill with your own hands, photos of such structures will allow you to understand which design to give preference to. If a screw is provided, a drill can play its role. It should be able to handle wood and metal. Such a tool will penetrate the soil more easily and will drill holes of the required depth.
If you are working with dense deep layers of soil, you can weld a small flat cutter between the cutter and the pick. This design will allow you to loosen the ground and center it when drilling. For such a part, you need two metal plates 3 x 8 cm. A trick of this kind will speed up the work with the tool.
When making a drill for installing pillars with your own hands, you can supplement it with cutters made from disks that are designed for working with stone. The circles are cut along the radius, and the hole widens in the center. It must match the diameter of the knob. Bending the disk allows you to get something like a screw or a corkscrew. This part will only need to be welded using the algorithm described above.
The cutter can be made from a circular saw blade. The teeth will cope with rhizomes and hard soil. You can upgrade the tool at your discretion. But no matter how high-quality it is, before the drilling process it is better to loosen the soil with a shovel, then the device will penetrate the soil well and the work will go faster.
Finally
You can also buy a garden drill in the store. But such tools are not always suitable for working with difficult soil that may be on your territory. Having spent very little time, you can independently make a tool that will suit all parameters. We hope our tips will help you with this.
A simple means of small-scale mechanization for the garden
It is easiest to make such a tool yourself. Its design includes:
- cutting part made of steel sheet;
- drill tip;
- a rod made of round or square pipe;
- handle.
The cutting blades of the drill are made of two steel semicircles with a thickness of 4 mm and pointed edges. Their diameter is calculated according to the size of the required wells. In the center of the semicircles, a recess is cut out in the shape of the rod for a better fit. Blades are usually welded to a rod with a diameter of ¾ inch or 20×20 mm, but it is more convenient to make several replacement pairs and bolt them to the rod. To do this, you need to weld fastening shelves made of strong steel at the desired angle and make holes in them.
A 0.5 meter long handle is attached perpendicular to the rod, the length of which is made up of the depth of the hole and an additional 60 cm. A drilling tip is attached to the other side. It is needed for stability and initial loosening of the earth. If the garden auger turns out to be too long, you can make a collapsible, folding or telescopic rod.
Blade knives can be made from two round halves or from an open circle with offset edges. In any case, the edges of the blades should be separated by 30°. This is necessary for successful work on dense soils. Angles or stops made of thick steel will enhance performance.
DIY pole drill
This is what the new drill looks like
Surely, at least once in their lives, owners of land plots have had to deal with the need to dig holes, which are required to install pillars, supports, arches and other parts involved in the arrangement of the exterior.
Narrow holes and wells sometimes have to be made in inconvenient places or difficult soils.
An ordinary shovel cannot cope with digging deep holes, so the owner has to rent a drill or hire a specialist to handle the tool.
A garden drill is a useful tool for a summer resident. It is light and compact, easy to transport and easy to use. Made of hard metals, it splits small stones and plant roots hidden in the depths of the earth. To dig holes, use it by placing it in the desired place and making several rotational movements, similar to a kitchen corkscrew.
Description of design
The main purpose of the drill is to dig wells to the depth of a columnar foundation. The holes are made by the cutting part, the shape of which can be different:
- In the form of a screw;
- Two-blade;
- Helical;
- In the form of half-discs;
- Multi-tiered;
- Removable or fully welded.
Some models start with small blades and gradually increase to the largest blades at the top.
But factory-made drills do not always turn out to be functional in practice, because the tool may not penetrate into the ground to the required depth or its attachments may not coincide with the expected diameter of the hole.
And although the price of the finished product is low, it makes sense to learn how to make it yourself. The technology for creating a drill at home is simple and inexpensive; it is only important to decide on the configuration of the model.
Let's look at a few differences between different designs that are responsible for the functionality of the tool:
- Baking powder. The part looks like a pair of inclined planes or a screw. In the second case, a spiral-shaped knife is located on a rod.
- Ground receiver. Soil accumulates in the so-called storage facility. The part facilitates work when drilling holes with a diameter of 35 cm.
- Plow-former of the lower extended zone. The use of the structure helps to strengthen the columnar foundation, which is important when constructing massive structures.
The bolted connection of the drill secures the auger part to the handle. The length of the assembled product slightly exceeds 1 m, thanks to which the tool makes holes up to 700 mm. If you need to dig holes of greater depth, the structure can be supplemented with a connecting pipe (500 mm). The element looks like a part with a bolt and nut, the location of which is the end sections of the pipe.
Manufacturing and selection of components
When making a hand drill for digging wells under pillars with your own hands, there are usually no difficulties. But during the production process, the craftsman will need parts and materials from which the finished product is made.
Parts List
- Bolt and nut M20
- 2 discs with a diameter of 100 and 150 mm
- Tip and drill 20mm diameter
- Three pieces of pipe: two - 500 mm each and one piece of 400 mm. Additional parameters: wall thickness – 3.5 mm, outer diameter – 40 mm.
Necessary materials
The requirement for the wall thickness of iron pipes (3.5 mm) is explained by the strengthening of the product and the ability to work in hard soil. Discs for work can be removed from the circular saw or made independently. They will require metal sheets with a minimum thickness of 3 mm.
Tools that will be useful:
- Hammer and grinder
- Welding technology
- Locksmith kit
- Electric drill with metal drills
- Sharpening wheel for cutting elements.
If there is no tip with a drill, they are replaced with a drill with a tapered shank. The diameter must match the screw part. To avoid injury in home production, use soft bicycle handles.
Step-by-step description of tool manufacturing
- Draw a circle on a piece of sheet metal and mark its center - this will be the blade.
Cut the workpiece with a grinder. Then a cut line is applied to it (it should go along the diameter line) and a cutout that coincides with the size of the collar circumference. The resulting disk is divided in two and holes for the collars are cut with a grinder. - At the end of the blank pipe intended for making a knob, using a grinder, make 4 longitudinal cuts about 3 - 4 cm long. Then a point is formed from them, armed with a hammer and collecting the cuts at the center of the pipe.
Next, the tip is processed by welding so that the pipe-collar is not subsequently filled with earth. - Weld the halves of the disk with the knob, maintaining a distance between them of 5 cm and an angle to the plane of rotation of 20°.
- The extension pipe is equipped with a handle.
The part is welded perpendicularly, achieving the resemblance of the letter “T”, and reinforced with a metal “kerchief”. The workpiece is inserted into the collar pipe and a through hole is made through which the parts will be connected with a pin and wings.Several holes are drilled in the extension - they will help adjust the length of the knob.
- The work is completed by sharpening the blades. The cutting edge on the cutters is processed so that the tip “looks” down when rotated.
Methods to improve tool performance
In the process of work, builders have to deal with an abundance of roots of various vegetation lying in the ground. The sharply sharpened edges of the knives make the drill easier to operate. Also, for ease of work, you can cut teeth on the sloping part of each blade or round off the cutting area.
Ways to improve the design
Drill with replaceable cutters
The first “highlight” will be the manufacture of a drill with replaceable cutters. Thanks to this tool, the master will be able to dig holes of any diameter. In addition to making spare elements, it is important to provide a method for attaching them to the collar. The easiest way to connect products is with two welded iron plates. In relation to the plane of rotation, welding is performed at an angle of 20°.
Holes for bolts are drilled in the blades and mounting plates - 2 pieces each. on every detail. The cutters are screwed with M6 bolts with washers and nuts. To prevent the bolts from interfering with drilling, they are inserted with the threads facing up.
The second way to improve the drill is to enhance the functionality of the lower end of the driver. A narrow plate of 10 x 2 cm is cut out of sheet iron and ground into a cone with a grinder, giving it the appearance of a point. No cuts are made at the end of the knob - a turned plate is inserted into this part of the product, welded and flattened. The result should be something like a peak.
This is how the pike is made differently. The plate is cut longer (about 17 cm), heated and rolled into a screw (like a corkscrew). Work on creating the peaks continues, as in the first version.
Under the auger, you can use a drill of a suitable diameter that can handle wood or metal. An unusual tool can easily be inserted into the ground and drill it to the desired depth without problems.
The third tip will be useful for builders working on compacted deep soil layers. If a small flat cutter is welded between the peak and the cutter, the device can be used to perform preliminary loosening of the soil and additional centering during drilling. To make this part you will need 2 plates measuring 8 x 3 cm. It speeds up the work process.
Fourth. You can get friezes from grinder discs designed for stone processing. The circles are cut along the radius line and the central hole is expanded, adjusting the hole to the diameter of the knob. Its extension with the ends moving apart in different directions gives the appearance of a screw. All that remains is to weld it, as described above.
Making a cutter can be easily done from a circular saw blade. The sharp teeth of the modernized model will easily cut through unruly roots of even the strongest vegetation. What you choose for yourself, decide for yourself. In general, making a drill is not difficult and requires minimal costs. The whole process takes about 2 hours.
DIY hand drill
The operation of a universal hand drill will be more productive if the auger blades are removable and not tightly coupled to the stand. And if you supplement the product with round blades of various sizes and configurations, the drill will become a truly multifunctional device that will be useful to a person in many household matters.
Experienced craftsmen say that blades with a diameter of 9 and 12 cm do an excellent job of drilling holes for water wells and seedlings, arranging holes for the construction of greenhouses and for installing tunnels for laying underground communications.
Large knives with a diameter of 17 and 25 cm will serve as a rational solution for those who fill the supports of fences and small buildings, arrange compost pits and plant plants with strong rhizomes, build wells and surround the area with a fence.
Step by step photo guide.
To maintain a given angle of inclination of the lever, which will serve as a handle, when connecting the part to the stand, it is recommended to use a welding clamp. The handle must be attached to the stand itself at a right angle.
And one last piece of advice: on the eve of drilling, loosen the top layer of soil with a shovel. Then the tool will go into the ground easier. We hope our recommendations will help you, without any extra effort, make a functional drill that will last for many years and bring many benefits to your household.
Car homemade products Homemade products for the dacha Fisherman, hunter, tourist Construction, repair Homemade products from unnecessary things For the radio amateur Communications for the home Homemade furniture Homemade light Home craftsman Homemade products for business Homemade products for the holidays Homemade products for women Origami Origami Paper models Homemade products for children Computer homemade products Homemade products for animals Homemade healer Food and recipes Experiences and experiments Useful tips
In this article I will show how you can make a good earth drill with your own hands from scrap materials.
Here comes the spring time! This means that work begins in the garden and garden, as well as various construction projects. So I decided to replace the rickety fence in my yard after the winter, namely, replace the posts. To dig new holes, I needed an earth drill, but since I didn’t have one, I decided to make it myself. And now I want to share with you what I got:
- pieces of pipes; - saw blade; - Bulgarian; - welding machine;
- small glands.
Using a hammer drill to make a drill
Homemade drills have some disadvantages, despite the fact that they are made according to their own drawings, taking into account their own height and type of soil. Among the main disadvantages, it should be noted that with the help of such devices it is possible to dig not very deep holes, and working with them on hard soils can be quite difficult. All this, as a rule, applies to manual devices.
If you connect the working part with a hammer drill, you will be able to increase labor productivity. Such a drill will be based on an earth auger, a hammer drill and an adapter. The latter can be replaced with a gearbox. An important factor is the number of revolutions of the hammer drill and power. The optimal value of the last parameter for a manual model is 2 kW.
Depending on the number of revolutions, the drill can be connected to the hammer drill chuck through a gearbox. If the power is 2 kW, then a gearbox is not needed. If you want to make an earth drill from a hammer drill with your own hands, then you will need a tool that produces a working attachment speed of up to 300 per minute. This value may decrease. It depends on the properties of the soil on the site. To make a drill from a hammer drill, you need to prepare some materials and tools, among them the following should be highlighted:
- Angle grinder.
- Electric drill.
- Metal fittings.
- Cable.
- Sockets.
- Welding machine.
- Material for the cutting part.
If you are wondering how to make an earth drill with your own hands, then you need to pay special attention to the nozzle. To make it, you need to cut a piece 1 m long from a rod or tube using a grinder
Knives should be attached to the lower end. The base is cut off from the drill to install the attachment in the hammer drill chuck. The cut fragment must then be welded to the tube.
You can make an earth drill from a drill yourself using the same technology. If you do not use the base from an old power tool, you should cut out a seat for the chuck from a rod. An adapter can be inserted there. In addition to the manual model, you can make a stationary drilling rig. To ensure power supply, you should purchase or make an extension cord yourself.
Foundation calculation
At this stage, it is important to find the correct location of the piles and calculate their total number. Maximum distance between units – 3 m
When marking the territory to scale, determine the projection of the internal walls. A pile must also be installed at the places where they connect with the load-bearing façade part. To facilitate the calculation, experienced craftsmen use the following formula - the average weight per 1 m2 of a finished house is the following values, depending on the material of manufacture:
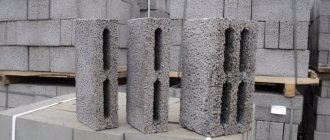
- buildings made of bricks and blocks - 2400 kg:
- foam concrete, aerated concrete - 2000 kg;
- frame, wooden houses no more than 1800 kg.
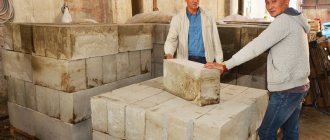
The bearing capacity of a pile with a diameter of 250 mm using TISE technology varies depending on the soil from 1.5 to 5 tons. Only a highly qualified specialist can make an accurate calculation. But the information given above may be enough to use these values to independently design a foundation based on minimum indicators. A frame house with an area of 100 m2, when built on loose soil, must be erected on piles in an amount approaching 100. They are distributed as evenly as possible along the entire perimeter and projection of the walls inside the building. If the soil is reliable, then the number of piles can be safely halved. The examples given are given for the option when a TISE foundation with a grillage is made. Support foundations require fewer piles. A strip foundation, a structure made of concrete beams and slabs buried in the soil, takes on part of the weight of the house.
Calculation of pile-strip foundationSource stroy-dom-pravilno.ru
Drill for TISE piles
In the author's version, the TISE drill is a blade with an earth receiver and a folding wider blade, which forms an expansion at the bottom of the pile. But working with such a projectile is inconvenient - the folding knife gets in the way. Therefore, in some designs it is made removable, but in general, it is recommended to drill the holes themselves with an ordinary garden drill, and for expansion, make a separate folding knife with an earth receiver. This makes the work easier and faster.
Do-it-yourself drill for TISE piles - one of the options
A cut-off shovel serves as a knife, and the land receiver is made from a herring can. The knife is fixed movably; when lowered into the pit, it is pulled up by a nylon cable tied to the end. Having reached the bottom, the cable is weakened, the blade begins to trim the sides of the hole, forming the necessary expansion.
The photo below shows the second version of a homemade drill for TISE piles. The design is more complex, but also more effective. The plow blade is made from a piece of spring, sharpened and welded to a folding structure with bolted joints.
More complex design
The dredger is made from an old propane tank. The collection of soil occurs from below, which is why the receiver is made with a rounded bottom. It has two holes, their edges are sharpened.
Bottom view
This projectile works well even on dense clay. True, to reduce friction, the well must be constantly moistened with water.
Components
The TISE drill consists of:
- sliding rod with handle;
- two cutting planes;
- soil intake;
- additional metal strip;
- vertical “cutters” for loosening the soil.
To make a TISE drill with your own hands, you will need:
- metal rod with handle. If the wells are planned to be made deeper, a sliding structure with a lock is required;
- two halves of a circular saw;
- part of a metal pipe to create a soil receiver - its diameter will be equal to the diameter of the well;
- metal plate;
- three metal loops and a rod that will control the additional part of the drill - the plate.
- welding machine.
Making a garden drill
A garden auger is the simplest but most effective design. It consists of:
This is a basic design, and there are many modifications to it. But let's first talk about what an earth drill can be made from.
Materials
As already mentioned, the rod is most often made from a round or square pipe. Diameter - from 3/4′ to 1.5′, profiled pipe can be taken from 20*20 mm to 35*35 mm.
Blade knives can be made from:
It is easier to make blades from a saw blade. In this case, the cutting edges are already ready. It will be possible to further sharpen the side edges to make the soil easier to cut.
The spear-drill is made from different materials - there are many different designs. They just make a sharpened rod. Then you need a piece of large diameter rod. The second option is to make something like a drill from the steel strip. And yet - a combination of these two.
Pike - one of the tip options
And finally - about the pen. It is more convenient if it is made of a round pipe. Its diameter can be selected according to the circumference of the palms. The main requirement is that you should be comfortable.
Knives and fastening method
First of all, you need to decide whether you are making a drill with your own hands with removable or stationary blades. If the blades are removable, weld shelves made of thick steel at one end of the rod. The shelves are made at an angle - so that the planes of the knives are separated at an angle of 25-30°.
After the shelves are welded, two or three holes are made in them for fasteners. Then the same holes will need to be made in the blades, and installed on bolts of substantial diameter.
One rod can have several sets of cutting blades - for holes of different diameters
You will have to cut holes in the center of the disks themselves so that they fit more tightly to the rod, but this operation is also required for the monolithic version - with welded blades.
Sheet steel
If you are going to make the blades from sheet steel, cut out a template from paper and use it to create a circle of steel. Drill a hole in the center - you will need to insert and weld a rod into it. Circle or square - depending on the chosen rod. The hole dimensions are slightly larger than the dimensions of the rod.
The edges should also be separated by 25-30 degrees. In this case, drilling efficiency will be maximum. If you work on dense soils (clay, loams with a predominance of clay), the blades may collapse under load. To avoid this, stops are added from a corner or a thick strip of steel.
The blades bend due to the fact that unhardened steel is used, but it is almost impossible to find it in the sheet, and even if it is possible, it is unlikely to be bent.
From a saw blade
If you have an old saw blade of a suitable diameter, you have found an almost ideal option. They use hardened steel, which is elastic and durable. But such a disk cannot be bent, so it is sawed in half and these halves are placed at the required angle.
This homemade drill for excavation works shows quite high productivity. Even used wheels have a well-ground edge. And to make drilling even easier, they also sharpen the drill on the sides with their own hands.
Modifications
In dense soils, it can be difficult to cut the soil with large blades. In this case, several blades of different sizes are welded onto the rod. From below, near the peak, the smallest ones are welded; above, retreating a few centimeters, the large ones are welded. There can be three such tiers, maximum four. The entire cutting part should not be more than 50 cm, otherwise it is physically very difficult to work.
If a drill is needed for shallow holes - for installing poles, etc., then this design is optimal - it is relatively light in weight and easy to work with. The working process is as follows: they lowered it into the hole, turned it several times, pulled it out, and poured out the soil stuck between the blades. But if you need to drill deep holes, you will suffer from carrying a small amount of soil from the depths. For such cases, a box for collecting soil is welded above the blades.
And all these are hand-made drills. All of them are highly efficient - it’s much easier to work than store-bought ones.
Calculation of the TISE foundation
The calculation method is no different from the calculation in the general case. The load from the house is calculated and then compared with the total load-bearing capacity of the planned number and diameter of piles.
First, place the piles on the house plan. They must be in the corners and at the junctions of the walls. If the distance between the piles is more than 3 meters, intermediate ones are placed between them. So you place all the supports on the plan, adhering to the rule:
- minimum distance - 1.5 meters;
- maximum 3 m.
Then calculate the load from the house. To do this, you first need to calculate the weight of the house (all building materials + furniture, plumbing, heavy household appliances).
Average loads from different types of house components
Speaking on average, for buildings made of brick or shell rock, 2400 kg can be taken for each square of area, for light building blocks (foam concrete, aerated concrete, etc.) - 2000 kg, for wood and frames - 1800 kg. These average standards can be used as a preliminary guide. If you decide to take everything seriously, you will need to follow the entire methodology: counting materials of walls, ceilings, roofing, finishing, etc. Since the technologies and materials used may be different, the discrepancies can also be significant.
We multiply the resulting value by a correction factor - 1.3 or 1.4. This is a safety margin. The resulting figure is the load that will need to be transferred through the piles.
Now, using the table, you select what diameter the pile should have so that it can transfer the required weight.
Load-bearing capacity of piles of different diameters in different soils
If the planned number of columns with an expansion of the selected diameter can transfer the required load, you do not need to redo anything. If the transferred mass is too small, it is necessary to either increase the number of piles or make a “heel” of a larger diameter.
Manufacturing of tape circuit
When pouring the grillage, remember that it must be a strong concrete structure, reliably reinforced around the perimeter
Pay attention to the quality of the mixture and the reliability of the reinforcement connections. Sequence of events:
- install and level wooden panels;
- cover the inner surface with plastic wrap;
- install reinforcement cages, connecting them with wire into a rigid contour;
- fix the immobility of the formwork using steel pins and transversely located bars;
- fill the prepared circuit with concrete mortar, remove air from the mass;
- Allow the concrete mixture to harden for 4 weeks.
Expansion and reinforcement
It is estimated that on average, three extensions per day can be easily done, but the filling itself is very time-consuming. So, for example, with a well diameter of up to 30 cm, the expansion will be up to 60 cm. In this case, about 30 kg of cement will be used per column
But it is important to ensure that the solution is not liquid.
It is recommended to take into account that if there is little sand in the soil, then water can effectively help. So, if you pour about 5 buckets of water into the finished wells overnight, expansions will be made much easier.
The next step is reinforcement. The length of the reinforcement should be equal to the length of the pillar itself plus 15 cm to form an air gap for the grillage and bend the lower and upper parts. So, if the length is about 1.5 m, then approximately 2 rods will be needed per post.
Having completed the reinforcement completely, it is worth taking care of high-quality waterproofing to increase service life, especially if the groundwater level is quite close to the surface. Typically, roofing felt is used for waterproofing.
The drill can be purchased at the store, or you can weld it yourself
The order of operations is as follows:
- cut the roofing material into pieces, you can directly on the ground;
- roll it up;
- fasten with paper clips and insert into the hole.
It is better to place it in the recess after the expansion is completely filled and all the fittings are installed. The protruding ends of such shirts can simply be sprinkled with soil previously removed from the recess and compacted.