Proportions of components for preparing plaster
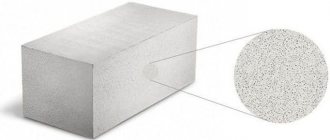
Plaster is a widely demanded building material, without which no residential building or structure can be built. It is used to cover walls and ceilings as a finishing treatment or as a base layer for further coating with finishing materials.
The main components that make up the plaster composition are the following:
Lime, gypsum and other additives are used as additional ingredients to improve the characteristics of the final product.
When making the composition, it is necessary to maintain proportions in order to obtain a satisfactory result. If there is too much or too little of one or another component in the composition, this error leads to poor quality of the plaster.
Plastering technology inside
Plastering walls with cement-sand mortar is carried out in several stages. Each of them has its own purpose and application technique. Three of them are main: spray, primer and covering, and one auxiliary one - grouting the plaster layer for painting. Each layer is applied after the previous one has dried in the sequence given above.
Spray. Practice has shown that immediately applying a thick layer of mortar to the wall leads to various negative consequences:
- cracking of the plaster surface;
- detachment of the central coating from the wall.
Choosing cement for plaster
Cement is the basis of the plaster composition, and its quality depends on the brand used. The rules here are:
- To cover external walls that are exposed to temperature changes and high humidity, CEM 32.5 grade Portland cement is generally chosen.
- To treat interior walls, especially in dry rooms with moderate temperatures, ready-made compositions are used: dry mixtures of the M100 and M200 brands.
To improve the quality of the plaster mixture, the following components are added to the composition:
- Adhesive components. They dissolve in water and displace air bubbles from the composition. Therefore, plaster using these additives lies on the surface smoothly, without cracks.
- Fatty clay performs similar functions to the components mentioned above. The maximum level of its presence in the composition: 100 g per 15 liters of water. If this level is exceeded, the final product will become cracked after application.
- Lime paste is a useful additive that improves the adhesion of the composition. It is especially necessary for use indoors in damp areas.
Solution preparation technology
Cement-sand mortar
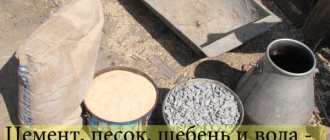
Cement plaster is considered the most optimal option for finishing the facade. Most often, a simple cement-sand mortar is used, a little less often - with the addition of lime or clay. For mixing, you need a container: it can be a special wide box or trough, and if the volume of work is large, then it is better to take a concrete mixer.
Trough for mixing plaster
Concrete mixers
Prices for concrete mixers
Concrete mixers
Additionally, you will need a shovel and a measuring bucket.
Measuring bucket
Let's consider the step-by-step preparation of a solution for three-layer application of plaster.
Builders call the first layer spray or spray. The consistency of the solution should be slightly liquid in order to easily fill all the pores on the wall surface. The application thickness does not exceed 4 mm. The proportions are given for preparing a solution from one bag of cement (25 kg). It is recommended to use cement grades M400 and M500.
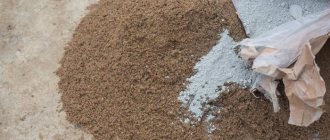
Step 1. 6 buckets of sifted sand (10 liter bucket) are poured into a container, and cement is poured on top.
Dry sand and cement
Mix everything well with a shovel.
Mixing ingredients
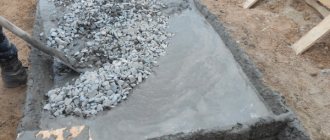
Step 2. Pour in 15 liters of water and begin to stir vigorously, breaking up the formed lumps. The mass should become homogeneous.
Add water
Step 3. Add another bucket of water and mix the solution as thoroughly as possible to remove even the smallest lumps. After this, you can begin applying plaster.
Spray application
The primer layer is applied after the spray has set, but before it has completely hardened. The application thickness should not exceed 15 mm if the plaster is performed without mesh reinforcement. The consistency of the solution is much denser and resembles stiff dough.
Applying the second layer - primer
For mixing, take 25 kg of cement, 75 kg of sand (about 5 buckets), 17-20 liters of water. The components are mixed in the same order, but liquid soap is added along with water - about 1 teaspoon per bucket of cement. Many people add PVA glue, dishwashing detergent, and antifreeze to increase the frost resistance of the coating. Only purchased plasticizers can be used. These additives are not mandatory components, but they significantly improve the quality of the plaster and make it easier to apply.
Plasticizers improve the properties of the composition
The third layer is called covering, and sand of the finest fraction is used to mix the solution.
Sand for plaster
The layer thickness should not exceed 3 mm. Professional builders recommend adding lime paste to the finishing layer, which makes the mixture very plastic, easy to rub in, and does not shrink.
Lime dough
Cooking proportions:
- cement – 25 kg;
- fine-grained sand - 100 kg (about 6.5 buckets);
- lime dough – 56 l;
- water – 25 l.
If you have a concrete mixer, the mixing process occurs differently: first, 2/3 of the required amount of water is poured into the concrete mixer, then cement is poured in, and mixed for 2-3 minutes. Next, add sand, add the remaining water and stir again for 3-4 minutes. If lime is used, it is added at the same time as cement.
Preparation of lime dough
Lime paste should be prepared at least two weeks before the start of plastering work, and even better – a month. Properly slaked lime can be stored for a very long time and used as needed.
Step 1. To extinguish you need a deep metal container without traces of corrosion. When mixing lime with water, a lot of heat is released, the temperature can reach 100 degrees or higher, so containers made of plastic, especially thin ones, are completely unsuitable. So, pour lump lime inside and fill it with cold water at the rate of 1 part water to 2 parts lime.
Important! Quicklime is a very caustic substance, so you need to wear protective gloves and a respirator when working with it. Avoid contact with skin and mucous membranes - this will cause severe irritation.
Ground quicklime construction lime
Step 2. Use a shovel or wooden stick to thoroughly mix the contents of the container to speed up the hydration process. Depending on the composition of the lime, slaking can take from 8 to 30 minutes. As steam formation decreases, the mass is stirred again, and so on several times.
Preparation of lime
Step 3 . After the reaction stops, the lime is mixed again, cover the container with a lid and leave for 2 weeks. The mass becomes plastic, all lumps dissolve without a trace and it can be added to plaster solutions.
Lime solution
For large volumes of extinguishing work, dig a hole at least 1 m deep, pour lime into it and water it with a hose. When the mass stops boiling, pour a thick layer of sand on top and cover the pit with boards or a wooden shield. After 15-20 days, the lime dough can be used for its intended purpose.
Clay for mortar
To mix the cement-clay mortar, the clay is prepared in advance. It must be well soaked, otherwise the quality of the plaster is very low. Since it is much more difficult to sift dry clay than sand, before soaking it, simply remove all the debris, blades of grass, and large stones from it with your hands, and before mixing the solution, strain the clay dough through a sieve.
Step 1. Pour 1 part clay into a wide trough or solution box and fill it with 3 parts cold water. Stir with a shovel until the clay is thoroughly wet, and leave for at least 5 hours, or better yet, for a day.
Step 2 . When the clay is completely soaked, mix it again and knead the remaining lumps with your hands.
Step 3 . When mixing cement mortar, clay dough is added after mixing sand and cement if the work is done manually, and together with cement if the mortar is prepared in a concrete mixer.
Clay plaster
Example of façade plastering
Factory plaster mixtures
Everything is very simple here. To knead, you need clean containers, water and a construction mixer. Read the instructions on the package, take the indicated volume of water and pour into the container. Now you need to pour the dry mixture from the bag into the water and use a mixer to bring the mixture until smooth. After this, you need to leave the solution for 5-7 minutes (the exact time is written on the packaging). Then mix again and plaster the surface.
Let us remind you that it is recommended to use a special construction mixer for mixing.
A series of works before applying the plaster composition to the facade
Features of plastering building facades
Prices for mixtures for leveling walls and ceilings
Mixtures for leveling walls and ceilings
Types of plaster
The purpose of the final product affects the ingredients used and their ratio:
- To treat external walls, a composition of cement, lime and sand is created. The same composition is suitable for coating interior walls in wet areas, for example, in showers, bathrooms, and basements.
- If the expected indoor or outdoor humidity level is low, plaster is made from cement, sand, clay and gypsum.
- There is a special composition for medium humidity levels. Clay and cement are added to it.
Treatment of brick surfaces with installation of beacons
To produce high-quality processing of brick walls, you should adhere to the following plan:
- Make notches on the surface of the wall with a 1 cm deepening of the masonry joints.
- Attach nails for mounting beacons.
- Treat the surface with water.
- Set the beacons to the thickness of the plaster layer and spray.
- Distribute 2 layers of primer solution, and after it dries, level the surface.
- Dismantle the beacons and apply the next layer.
- Perform final leveling and smooth the surface of the walls.
Also read whether decorative plaster can be applied to plaster. The process of applying plaster is as responsible as the process of preparing the solution itself. After all, the strength and durability of the applied layer will depend on strict adherence to the proportions and quality of the ingredients used. Carry out all the work slowly, carefully and conscientiously, then you are guaranteed to get the desired result. You may also be interested in a video on how to make structural plaster for interior work. Here you can see a photo of decorative plaster for interior wall decoration. The link lists the types of plaster for interior decoration. Information on the proportions of the mortar for plastering the stove can be found at the link.
Proportions of cement and sand for plastering walls
The proportions of the components described above depend on many factors. The table below shows the main points that need to be monitored to achieve a good final product.
| Conditions | Proportions (cement to sand, parts) | Comments |
| Regular composition, without special restrictions and conditions | 1:5 | When mixing the composition, add water to achieve the desired consistency. The volume of water is also important for obtaining a quality product and is therefore added gradually. |
| Fatty composition for coating walls after spraying | 1:3 | Spraying is the preparation of walls for the application of plaster. This is a preliminary stage of working with concrete walls. A liquid solution, which includes cement and sand, is applied to the wall, previously moistened with water. |
| Cover layer | 1:1 | The covering is the third layer of creamy plaster. It is applied to the primer (second layer), which was applied to the first layer - spray. |
When we talk about a “part” of components, we mean any container. It can be a bucket, or a shovel, or a ladle. It is important to stick to the container once chosen throughout the entire preparation to avoid mistakes.
With a plaster layer thickness of 20 mm or more, per 1 sq.m. On average, the surface requires 6 kg of cement, 20 kg of sand, if the proportion is 1:4.
The table below demonstrates the interdependence on the composition of the plaster and the required proportion of components used:
| Type of solution | Spray | Priming | Covering |
| Calcareous (lime:sand) | 1:(2,5-4) | 1:(2-3) | 1:(1-2) |
| Cement (cement:sand) | 1:(2,5-4) | 1:(2-3) | 1:(1-2) |
| Clay (clay:sand) | 1:(3-5) | 1:(3-4,5) | – |
| Lime-clay (lime:clay) | 0.2:(1-3) | 0.2-(1-5) | 0.2:(1-3) |
| Lime-gypsum (lime: gypsum: sand) | 1:1:2 | 1:0.5:2 | 1:1:5 |
| Clay-gypsum (clay: gypsum: sand) | 1:0.2:3 | 1:0.2:3 | – |
Correct recipe
Cement mortar for plastering walls is considered a classic material, which different finishers prepare according to their own recipe. By trial and error, they adopted a certain ratio of components, which the master follows unconditionally. Exceptions arise only in situations where it is necessary to change the main ingredients due to the lack of the necessary ones.
But there are standards regulating the proportions of plaster mortar. They can be used at home.
The ratio of sand and cement for plaster is determined by the labeling of the substance and the purpose of the composition.
- for exterior finishing, cement marked M 400 , less often M 500, ;
- indoors - M100 , M200 .
When mixing the finishing mixture for walls yourself, the proportions of the substances are determined by the container:
You cannot change the selected item because the proportions will be incorrect.
- The classic ratio of sand and cement is 4:1, where there are 4 portions of sand and one portion of cement.
- For wet rooms or building facades, the composition is mixed in a ratio of 2:1 or 3:1, respectively, a large portion of sand and a smaller portion of cement.
- If brand M 500 , the proportion of sand is increased by one dose.
Important! For a high-quality mortar, the main factors are not only the proportions of cement and sand for plastering walls, but also the amount of water that is poured into the mixture. The finished solution resembles thick sour cream. But there is a classification of the leveling mass, which depends on the dosage of the astringent:
- fatty mixture - the proportion of cement to another substance is greater than the standard, the composition turns out thick, settles quickly, and is more difficult to lay on the base;
- lean mass - the proportions of cement are reduced, which increases the fluidity of the material along the plane;
- normal weight - the binder/filler ratio is within normal limits, which makes it easier to apply to any wall.
Important! A simple way to determine the amount of cement for wall plaster is to study the instructions on the packaging of the ready-made mixture in the store. Using the ratio of plaster ingredients from the package, it is easier to understand what the paste should be for leveling or decorating walls inside or outside a building.
Let's look at the photo:
How to prepare plaster correctly
The production of plaster mortar is not limited to maintaining the required ratio. Equally important is how exactly the composition is prepared. Technology must be strictly followed.
The following tips will help you do everything right.
- Each dry component (sand, lime) must be passed through a special sieve before it is added to the mixture.
- Excess components are no less harmful than deficiencies. Any deviation from the ideal proportion will degrade the quality of the final product.
- An important parameter for the quality of plaster is fat content. Its degree is determined by the instrument used to mix the composition during preparation. If the mixture sticks to it, it means it has a high degree of fat content. To return to balance, sand is added - it reduces fat content. If the composition does not stick at all, then it is skinny. The adhesion will be poor, and to improve it, binders are added. Good plaster sticks to the tool, but not too much.
The nuances of plastering outside
The step-by-step technique for plastering walls from the inside and from the street side is the same. The nuances lie in the preparatory work and the choice of the type of solution.
- For the facade, it is better to prepare a cement-lime mortar for plastering the walls. It is stronger and better able to withstand moisture. Therefore, more durable.
- The walls must be covered with plastic or metal plaster mesh.
- Before covering, the corners of the walls and the slopes of doors with windows are closed with a special reinforcing corner.
- Before the final operations, the plaster primer is treated twice with a deep penetration primer.
- Each layer of plaster cannot be thicker than 15 mm.
Finally. The conditions for applying plaster yourself do not contain problems. It’s easy to find out what components and how many of them are needed in the solution, to understand how each layer is laid. A little more difficult in the final stages. But even here, a little training in inconspicuous areas allows you to complete the work with good quality.
Source
How to dilute cement for pouring foundations and plastering walls
Cement is the main constituent of most buildings and other structures . Today it is difficult to find buildings that did not use cement in their construction. It is very elastic, easy to use and prepare, durable, and the low cost of the product determines its popularity. Due to a number of advantages, the reason for its active spread becomes obvious. It is worth mentioning right away that cement is used only as part of a mixture; in dry form it is not suitable for construction; the cement must first be diluted.
Use of special additives
Let's see what else is added to the mixture with sand and cement intended for plastering walls. First, let's look at what is poured in as a binding component, in addition to cement.
For private construction, many people use mixtures made in factories. It’s convenient to work with them, but large-scale finishing will require serious financial expenses. It is more profitable to mix the solution for plastering walls with your own hands, observing the established proportions.
Lime is used as an additive that improves the plasticity of the solution. The boiling water obtained after high-temperature processing of lime raw materials (quicklime) contains a small amount of clay.
By exposing it to a small amount of water, we create a reaction - lumps of boiling water begin to get wet and disintegrate, resulting in a powder known as fluff lime. Lime paste is prepared from it, which is an excellent plasticizer for cement-based plaster mixtures.
Clay can be added to the plaster mixture, which also improves plasticity. But here we have to take into account the fact that clay by its nature is a moisture-resistant material, from which plaster receives the corresponding characteristics. A cement-based mixture, after adding clay to it, increases its resistance to the effects of a humid environment and perfectly waterproofs the vertical surfaces of basements.
We know everything about sand, all that remains is to say a few words about water. It turns out that its quality also has a certain impact on the characteristics of the solution. Only tap water is used; waste water or water taken from nearby natural bodies of water is not suitable.
Liquid soap or dishwashing detergent is added to the solution mixture at a rate of no more than three percent of the total volume. This increases ductility and makes the plaster better in contact with the wall surface.
It is allowed to use PVA glue, the amount of which should not exceed five percent. It polymerizes the solution, improves its adhesion, and extends the service life.
If you need to prepare a complex solution with certain characteristics, you can use the following additives:
- crushed mica. This material is needed to protect the finished plaster layer from exposure to ultraviolet light. In addition, with the help of such a mineral, the alkalinity in the mortar mixture significantly increases;
- crumbs or flour of marble stone. This ingredient is often used to give the plaster composition a decorative appeal and increase its hardness;
- quartz sand. Considering the expected effect, the mineral fraction varies from 0.1 to 0.6 mm. This improves the decorative features of the solution and increases the level of its resistance to acid-base environments;
- metal shavings. In private construction, such an additive is rarely used, but for industrial buildings it is used to increase the strength of the coating;
- polystyrene foam. The polymer component is used for insulation;
- crushed barite. It creates protection from radio waves and is used in the finishing of medical buildings, industrial facilities and residential premises built in contaminated areas.
Basic factors
The key question is how to prepare cement, and how to prepare it correctly. An incorrectly prepared solution is doomed to rapid destruction. The formed building will begin to crumble, over time layers of plaster will begin to peel off, and the release of sand from the outside of the wall increases.
All these factors provoke, in the near future, the reconstruction of the building or one of its elements.
Correct placement of cement can only be done by knowing its purpose, since the corresponding requirements are provided for each individual type.
To properly dilute the cement mortar, several factors should be taken into account:
- water is needed, for a stronger and more integral structure it is better to use rainwater or obtained from snow, since tap water contains additives;
- filler. They can be various slags, sawdust, sand, clay and crushed stone . Sand is necessarily used, and other fillers are considered auxiliary, which are used for specific tasks;
- purpose of cement. Depending on the purpose, the consistency and components of the solution differ. Most often used for laying foundations, plastering, forming floors, laying tiles, etc.
Functions of cement-sand plaster
Cement-sand plaster has several tasks:
- level the walls inside and out;
- protect the façade and interior walls from excess moisture. To enhance the effect, special modifiers can be introduced into the solution;
- create a comfortable microclimate in an apartment or house - the plaster is vapor-permeable, which allows the walls to “breathe”, regulating the indoor air humidity;
- block, while effectively, the path of street noise into the house. Sound-absorbing ingredients will help enhance soundproofing properties;
- reduce heat loss - thermal conductivity is only 2 times higher than that of mineral wool (0.93 W/m*K);
- serve as the basis for finishing finishing work.
In what proportions should it be diluted with sand?
To properly dilute the cement mortar, you must first know the purpose of use . This factor affects the grade of cement.
In general, there is a division into several types:
- For plastering surfaces, solutions M10 – M50 are used.
- For installation, M50 – M200 is used.
- The formation of the screed and foundation requires M150 or M200 cement.
Within the specified limits, it is necessary to select a suitable brand of cement. The higher the number, the higher the strength. Thus, the higher the load on the flooded area, the higher the grade is needed . Sometimes construction companies may deviate somewhat from this pattern for specific tasks, but in general the condition is correct.
Having decided on the direction and required grade of cement, you can easily determine the amount of sand to be added. Each solution has its own brand, knowing it and the volume of sand required for your task, you can determine the volume of sand based on a simple mathematical formula.
Formula – brand of cement / required brand of mortar = amount of sand in fractional form. For example, to create an M100 mortar from M400 cement, you simply need to calculate 400/100 = 4, this is the ratio of sand or other filler to cement. That is, for 1 bucket of cement you need to add 4 buckets of sand.
In addition to the calculation formula, there are general recommendations; the ratio of 1 to 3 is widely used.
For 1 part cement, 3 parts sand are used, although in some specific situations the condition is not fair.
Nevertheless, a similar pattern is suitable for most options.
What is concrete
Let's start with the basics to make it easier. So, concrete is an artificial stone that is formed after the hardening of a mixture of sand, crushed stone and a binder, which is most often Portland cement. There are clay, lime and gypsum concretes, but they are not used for foundation construction.
The most important characteristic of artificial stone is its compressive strength - the value that determines the load-bearing capacity of the base, which means the weight (structural materials, number of floors) of the building. And it is determined by its brand. So, to make your own foundation in private housing construction, concrete grades from M100 to M300 are used. And the number following the letter just indicates how many kilograms a square centimeter of concrete product can withstand.
And now about these brands in more detail.
“Sotka” is the lightest and most easily laid of all concretes used in foundations, but also the most fragile of them. In this regard, it is comparable to class B 7.5. That is, it can withstand a pressure of 7.1 megaPascals. Here and further, you always need to multiply the numerical value by a correction factor of 0.95.
How to stir
To create a solution, the amount of sand has already been determined; now you need to use the tool. For large quantities of the required mixture, a concrete mixer is best suited , which independently mixes all the components.
When small volumes of mixture are required, it is enough to have a drill with a mixing attachment , it will quickly and effectively bring the solution into a homogeneous state. You should not set a high number of revolutions initially, since cement is very volatile.
As a last resort, make sure you have trowels, a spatula or any other tool for mixing the mixture.
To properly dilute the solution, you should follow the following basic recommendations:
- Initially, water is poured into the container. Usually the amount of water is calculated from a 1 to 1 ratio with cement. When the sand contains a certain amount of moisture, this coefficient can be reduced slightly;
- immerse half of all sand in water;
- all the cement is poured at once . Now you need to thoroughly stir the mixture, about 2 minutes will be enough for the procedure;
- the sand that remains must be added to the solution. Mix again using your chosen method;
- Check the consistency and, if there is a need for a thinner mass, add more water. The consistency greatly depends on the purpose of the solution.
Experienced builders point out several main factors that are characteristic of properly prepared cement mortar. First of all, it is important to make sure that the mixture stays on the trowel and does not have a layer of water, due to which everything falls off, which is typical for poor stirring.
It is recommended to make several patterns on a small volume of cement; they should retain their shape, which indicates sufficient density.
It is necessary to thoroughly mix the solution, otherwise areas with a high content of cement and a low amount of sand, or vice versa, will instantly crack. It should also be remembered that cement is added to water, and not vice versa.
For more information on how to properly mix cement mortar, watch the video:
Preparatory work
Professional builders believe that good quality plaster can only be achieved if a third of the allotted time for leveling walls is spent on preparatory work. Conventionally, they can be divided into several stages:
- I - cleaning the walls of everything unnecessary, including old finishes;
- II - surface repair;
- III - elimination of various types of pollution;
- IV - ensuring good adhesion of the plaster to the wall;
- V - display of beacons.
In addition, some experts include the preparation of a solution as preparatory work.
Stage I: cleaning the walls. Work to prepare for applying plaster begins with the removal of lamps, sockets, switches, and various fasteners from the walls. At the same time, we must not forget about the insulation of exposed electrical wires. This operation is required even during a power outage.
After this, the old finish is removed. The nuances of the technology are outlined in the material “How to prepare walls for plaster?”, which details how to remove old wallpaper, paint, ceramic tiles, and loose plaster.
Stage II: surface repair. The walls, after removing the finishing and plaster, are carefully inspected. In a reinforced concrete wall, all defects: microcracks, chips, peelings are repaired with repair mortar. A little more difficult with brickwork. Here you may encounter a continuous crack formed during the shrinkage of the house, loose bricks and damaged masonry seams.
Through cracks are reinforced with a metal rod, medium-sized cracks are reinforced with self-tapping screws. After this, they are treated with a primer or cement laitance, and then sealed with CPR. Loose bricks are removed from the masonry. The masonry mortar is knocked off from the sides and top. The removed brick is reinserted onto the mounting foam (possible, but not advisable) or onto the cement mortar.
How to dilute and mix for plaster
The principle of creating consistency is somewhat different when preparing a solution for plaster. In some cases, additional impurities are added .
To prepare the mixture you should:
- mix cement and sand in a container using a ratio of 1 to 3 (1 part cement and 3 parts sand). It is necessary to take cement grades M150, M200; they showed themselves best when plastering interior spaces. For increased strength, you can use M300, but it is more often used for outdoor work;
- gradually add water and stir the solution, its amount usually corresponds to 1 to 1 to cement;
- If necessary, you can add lime or clay; these components soften the composition and make it easier to apply thin layers. For lime, the ratio is 0.5-0.7 to 1 share of sand;
- check for proper consistency.
If due to any errors you get a thick solution, you need to add more water; otherwise, you can add a little to the mixture, but this may negatively affect the homogeneity of the mass. Some people add a thickener in this case.
It should be noted that the time to use the mixture is limited . Most solutions must be used within 1.5 hours; some, such as concrete, can be easily used within 1 hour.
If the solution is not worked out within this time, it will begin to harden and will no longer be plastic; applying such a consistency will lead to its crumbling soon.
Necessary materials
To prepare a plaster mortar, three components are needed: cement, sand and water.
You definitely can’t do without cement, but is it possible to do without sand or replace it with something? Theoretically, it is possible to prepare an aqueous mixture from cement alone, but it is used only in rare cases - when you need to quickly repair small cracks. Without filler, the dried coating crumbles.
You can replace sand with fine slag (waste from metallurgical production) or stone chips. But such a replacement will lead to significant changes in appearance.
Cement brands
The strength of cement can be determined by markings.
The brand indicates the amount of load that the material can withstand, the class indicates how much pressure it can withstand. The cement marking is as follows: M300 (up to 300 kgf/cm2) or the more modern B32.5 (pressure up to 32.5 MPa). The following brands can be found on sale:
- M300 (22.5);
- M400(32.5);
- M500 (42.5);
- M600 (52.5);
- M700 (62.5) - white.
The higher the class, the better the strength of the coating, and the less cement is needed to mix the mortar.
When making your own mixture for plastering walls, it is better to use cement grades M300, M400 and M500. The M700 grade is rarely used, only in cases where external characteristics are more important (this cement is white).
Which sand is better
Sand for construction is taken either from quarries with excavators or washed in rivers.
The resulting material differs in particle size and shape. River sand grains are smaller and round in shape. There are almost no impurities in it, i.e. it is cleaner and does not require sifting and washing.
Quarry sand contains clay, soil particles and small stones. All this reduces the strength of the plaster. But its grains are rough and uneven, and this improves the adhesion of the mortar to the wall.
If the plaster mixture is prepared at home, then washed quarry sand . To make the finishing layer smoother, it is better to mix the solution with river sand.
Proportions of cement mortar for masonry, screed and concrete
Bricklaying requires a slightly different ratio, so the 1 to 4 pattern is usually used. In this case, M300 or M400 cement is used.
In some cases, to ensure greater plasticity and viscosity, slaked lime is added with a ratio of 0.25 to 1 cement.
You can test experimentally to obtain the desired consistency by placing the mixture on a plane with an inclination angle of 40 degrees. When the mixture flows, you need to thicken it somewhat, if it stays in place, then it turned out perfect.
The floor screed uses a standard proportion of 1 to 3. M400 cement is used. The amount of water added is slightly less than 50% of the volume of cement, but when laying a cement screed on the ground, you can pour an almost unlimited amount of water, the excess will go away on its own, help to perfectly level the floor and somewhat compact the surface.
Areas of application of cement
Portland cement is a building material used to perform the following work:
- preparation of concrete of various grades;
- pouring the foundation and floors;
- production of various mixtures for construction, repair and finishing work;
- production of reinforced concrete products (curbs, road slabs, paving stones, etc.) and compositions for creating various objects of decorative and applied art.
Cement acts as a binding component and is used to connect individual parts of structures or brickwork. In order for the finished product to have the stated strength, the mixture must be prepared correctly and using traditional methods.
How to properly mix cement with water - recommendations
In order to mix cement with sand efficiently, it is necessary to take into account the condition of the sand itself. Quite often it is collected illegally on beaches, and therefore does not undergo any processing.
Thus, the sand contains a large amount of debris; shells are not a problem, but debris, soil, roots and other organic matter can cause significant harm. first sift the sand onto a sieve with a mesh width of 3x3 mm.
Then pay attention to the color of the sand; if there is a dark shade, then it probably contains a lot of impurities of earth and dust. It is necessary to pour the sand into a container in advance and fill it with water. Stir it little by little and the debris will begin to float.
Currently, it is impossible to imagine any repair without the use of cement. Here is everything about the characteristics of M400 cement.
Sand is a loose mixture that is formed as a result of the destruction of various rocks under the influence of water. By clicking on the link, you will find out how much sand is in a ton.
Tile adhesive can be used to glue a wide variety of building materials in terms of properties and quality. Here is a complete description of the composition of tile adhesive.
Then drain the water, you may have to repeat the procedure several times if the sand is very dirty. You should also check the consistency of the cement; it should not be lumpy. Normal consistency is considered homogeneous; if this is not the case, then the resulting lumps should be sifted and crushed.
Many experienced builders recommend adding liquid soap to the mixture. It increases the plasticity of the solution. In this way, cement should be diluted with about 100 ml of soap added to it. If it is necessary to create plaster in large layers, plasticizing additives can be added.
The advantage of this approach is that after application, the mixture is easily formed and hardens, which is difficult to achieve with a large layer of cement. Hardening means covering with a hard surface.
In construction, the approach is called "false grasp". Despite the visual hardness of the material, it hardens even longer than without the use of a plasticizer. False setting has a negative impact on the cement compaction process.
Sand requirements
What else does the plaster mixture for wall finishing consist of? The second element added to the composition is sand. There is no clear opinion among builders about which is better to use for making the cement-sand mass - quarry or river.
They take sand that meets certain requirements:
- it must be sifted and washed, it is necessary to leave large and medium fractions, excluding dust particles and clay;
- The adhesion to the wall surface and the rigidity of the resulting plaster layer depend on the size of the fractions. If the sandy material is coarse-grained, it is allowed to add no more than five percent of clay, ground into powder. If clay lumps get into the mixture, or its volume exceeds the specified value, cracks will appear on the repaired surface;
- Excessively fine material will give the solution excessive plasticity and slipperiness. The plaster layer will not adhere well to the wall. Such a solution must be stretched in a layer no more than three millimeters thick.
To prepare the plaster mortar with your own hands, use dried sand. The moistened component does not mix well with cement, the batch turns out to be uneven, and the plastered surface subsequently crumbles and crumbles.
Taking into account the above requirements, the following conclusions can be drawn:
- sand extracted from the river is considered more purified, water washes away unnecessary impurities and clay from it, the grains of sand are more rounded;
- The material from the quarry is characterized by sharp and uneven edges, which improves its reinforcing properties. But in such sand there is a high probability of the presence of clay, which worsens the hardness of the solution.
Sand masses of brown, red or bright yellow shades are not suitable for making cement batches. Strange shades indicate that the raw material contains a large amount of alumina.
Freezing
In small volumes the mixture dries quite quickly, but this is a negative factor. It is important that there is a gradual equalization of the amount of moisture in the cement. If it is too hot outside or indoors, the outside of the mixture is covered with a dried crust, and the inside is still wet cement.
Cracks may appear on the outside, which leads to deformation of the building. To prevent this effect, wet the surface using a spray bottle.
In general, the solidification of the solution is indicated by its lightening, so it becomes clear that the moisture has evaporated. Not everything is always so obvious, for example, a screed, especially one more than 20 cm deep, takes a long time to dry, even when it is not visually visible. To find out whether the screed has dried and to proceed with further work, you can use oilcloth.
Cover the screed overnight and check for condensation in the morning. In general, the screed mixture takes about 7 days to dry. After hardening, it must be taken into account that cement acquires full strength only after 30 days, provided that the average daily temperature is above 10 degrees.
At the moment of acquisition of final hardness, it is already possible to carry out other work, preferably not involving a strong deforming effect on the cement.