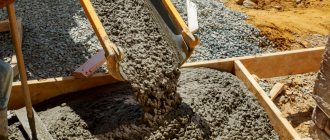
Hello, dear friends! To prevent repairs from turning into failure, you need to know how and with what materials to work. Today on the agenda is a cement-sand mixture for plastering walls. Or just TsPS.
This is one of the types of building materials that are used to level the walls outside and inside the facade.
I want to tell you how to plaster walls with cement-sand mortar. But first, let's talk about what kind of plaster it is, what the mortar consists of, and how big a role cement plays in creating the plaster composition.
A mixture of cement and sand: technology
DSP is available in several types, they differ in the number of additives. For simple work, a pure compound without impurities is suitable; for other purposes it is better to purchase universal compounds.
Universal cement-sand plaster is used for:
- facade work and interior creation in any premises;
- leveling the screed or blind area;
- improving the protection of the base from moisture.
Any plastering of walls always makes sense.
The work algorithm is always the same and is carried out in 3 stages:
- Rough layer.
- Primer covering.
- Covering, final stage
There is a special high-tech application method, but it will require special tools. The technology is used in a professional environment, as it is quite difficult to apply and is mostly used where there is high humidity. Cement-sand mixture for plastering using machines is applicable for facades or large volumes of work, but requires high costs. The mechanical method requires expensive equipment; it is cheaper to rent the installation.
How to do it yourself?
Let's try to figure out how to prepare cement-sand plaster with our own hands.
In the classic version, the batch is made from one part of cement material and three parts of sand. But if it is necessary to obtain certain strength indicators, the recipe is allowed to be changed.
The approximate amount of sand, taking into account the brand of binder used, is given in the table:
| brand of plaster mixture | M 300 | M 400 | M 500 |
| 25 | 9.5 | — | — |
| 50 | 5.8 | 7.4 | — |
| 75 | 4.2 | 5.4 | 6.7 |
| 100 | 3.4 | 4.3 | 5.3 |
| 150 | 2.6 | 3.3 | 3.9 |
Please note that any individual batch differs to a certain extent from previous analogues, and there is a simple reason for this - compliance with construction standards established at the state level at a construction site is almost impossible.
The mortar mixture begins to set approximately one hour after preparation, so it is recommended to mix optimal volumes.
A trowel will tell you about the amount of water added to the composition of cement-sand plaster: if there is a lack of water, a ragged mark will be left after the blade is applied; an excess will be indicated by a floating stripe.
If we talk about the standard proportions of the starting materials (1 to 3), it should be noted that they differ depending on the brand of the binder component. Eight parts of sand are used for M 400 cement; no more than two parts are used for M 100.
The quality of the dry mixture remains almost identical.
To make the solution more plastic, it is allowed to use construction or universal PVA glue at the rate of 100 ml per 10 liters of the mixture.
The technological process of finishing walls with cement-sand plaster consists of three working stages, for each of which it is necessary to prepare a separate mixture.
Approximate proportions of sand-cement mortars for plastering walls are given in the table:
| for minimum moisture levels | ||||||
| base | mineral | wood or plaster | ||||
| method | splash | priming | covering | splash | priming | covering |
| CIPS | 1х0.5 – 0.7х4 – 6 | 1x0.7 – 1x3 | 1x1 – 1.5x2 – 3 | 1х0.5 – 0.7х4 – 6 | 1x0.7 – 1x3 | — |
| at constant humidity | ||||||
| base | mineral | |||||
| method | splash | priming | covering | |||
| DSP | 1х2.5 – 4 | 1x2 – 3 | 1x1 – 5 | |||
| CIPS | 1х0.3 – 0.5х3 – 5 | 1х0.7 – 1.2х2.5 – 4 | 1x1 – 1.5x1.5 – 2 | |||
If you plan to add lime, prepare lime dough first.
At this stage, it is necessary to comply with safety requirements, since a large amount of thermal energy is released during lime slaking.
The algorithm of actions looks like this:
- For every kilogram of lump lime raw material, two liters of water are added;
- as soon as the reaction is completed and the mixture has cooled, it is passed through a fine-mesh sieve;
- the strained mass is placed in a container, covered with a lid and kept for ten to fourteen days.
The plaster solution is prepared as follows:
- all dry ingredients are combined (if necessary, lime dough is added);
- everything is thoroughly mixed;
- add the required volume of water (it is recommended to do this in portions);
- the solution is kneaded to a homogeneous consistency.
Features and composition of cement-sand mixtures - what do you need to know?
The key features of DSP are increased wear resistance and durability of the coating. The composition is used for finishing walls inside and outside, especially in places with high humidity (bathrooms, rooms without heating, swimming pools, etc.).
In the case of leveling walls with internal defects, the DSP layer improves noise and heat insulation, and also somewhat protects against water absorption. The most important advantage is low cost due to the use of common materials.
Cement-sand plaster is a mixture of different types
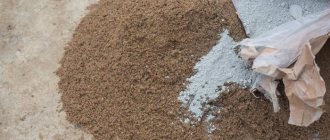
Composition of cement-sand plaster:
- cement. The base can use various grades of substance from M100 to M500. According to the recommendations of experts, M250-M500 is optimally suited for external walls, and internal work is carried out with the composition M100-M200;
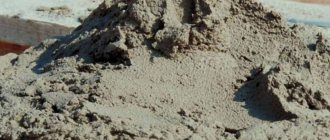
- sand. Acts as the main binder, is a filler and binder for cement. The quality of sand directly affects the result: strength, color, reliability, wear resistance. There are two types of sand: river and quarry. The DSP is based on any variant of the middle fraction. Professionals prefer river sand.
Traditionally, to prepare the mixture, a proportion of 3 parts sand to 1 part cement is used. The features of the plaster may vary depending on the manufacturer, since additives are mainly added to the composition: plasticizers, redispersible components, copolymers. The listed substances improve the strength of the coating, prevent wear, simplify the work with the composition, and give the mixture elasticity and flexibility. When working in sub-zero temperatures, in addition to the cement-sand mixture, it is necessary to add aggregators to protect against freezing; ready-made compositions are available in stores.
Review of manufacturers
Weber Vetonit TT and TT40
products have universal application and adhere well to different surfaces. Used for facades and inside the house. The manufacturer guarantees quality, increased strength, and there are options for manual and machine application.
The plastic solution Ceresit CT 24 Light has gained popularity because it is suitable for any substrate. However, its vapor permeability is slightly reduced.
Knauf Unterputs is a leveling compound for universal use. The mixture does not set within 2 hours. The medium grade filler creates a smooth surface that is suitable for adhesion to the finish. Experts note low consumption.
Founder Profi Startwell RS22N is used outside and inside buildings. The layer is durable and retains its properties for a long time. It fits well under tiles, but painting will require finishing putty. Increased flexibility allows the composition to be used in vibration conditions.
What sand is needed for plastering walls: main recommendations
Sand-cement plaster includes various sands: sea, river or quarry, but there is no clear opinion among builders which one is better. Many believe that the use of cement with sea sand leads to a better effect, since it has a more uniform structure. Another argument in favor of the marine appearance of the material is the absence of any impurities that could damage adhesion.
Here, the opinions of the masters, interestingly, differ; for example, some pros believe that only sea or river sand can be used
Facade cement-sand plaster with quarry or river sand costs slightly less and has the same performance characteristics.
Required Tools
For work related to plastering walls, you will need a basic kit, which includes:
- ladle;
- smooth slats (can be wooden or aluminum);
- putty knife;
- building level;
- painting beacons;
- shovels, buckets and a container for preparing the solution.
As auxiliary devices, it is recommended to keep on hand a thin cord, a hammer, a chisel, a spray bottle, and a paint brush.
Sand to cement ratio
The proportion of mixing ingredients depends on the purpose. Before diluting cement with sand, you should clarify the purpose of the solution, the presence of filler and the brand of cement.
Most often, sand plaster is mixed in the following ratio:
- standard mixture: 1 part cement to 3 parts sand;
- the use of cement grade M400 or M500 is 1 to 4 or 5, respectively.
The proportions of cement and sand for floor screed approximately correspond to the standard ones. If you plan to add slag or gravel, choose a ratio of cement, sand and filler of 1 to 2 to 4-5.
It is important to consider the labeling of building materials and the recommended brands of final compositions. For brickwork, M100-M150 mortar is used, the consumption of cement mixtures is 0.062 m3/m2. For laying M350 facing bricks, use M115 mortar. Plasticizers are added to increase viscosity. Similar compositions are used in the plastering process for better adhesion.
Proportions are calculated depending on the desired result and the purpose of using the mixture
Key Specifications
Since plastering with cement-sand mortar is actively practiced for internal as well as external work, a number of technical characteristics need to be taken into account.
Simple mixtures have a characteristic gray color. But this is not so fundamentally important.
I want to focus on the following points:
- Resistance to tearing
. The average is approximately 0.4 MPa; - Compressive strength
. Varies from 6 to 12 MPa. Marking is applied for this parameter. 10-25 means adding clay, and 50-100 comes with lime. 150 are simple universal formulations; - Frost resistance
. Typically 50 cycles; - Shelf life
. The warranty period in sealed packaging is 1 year. If storage conditions are met, the indicators will not change for 2 years; - Layer thickness
. In one go it is allowed to apply a layer from 5 to 40 mm; - Consumption
_ In a dry state at the lower limit it is 10 kg per m2; - Proportions
. To make a solution, 1 kg of dry mixture takes from 150 to 400 ml of water.
To cover 1 m2 with a layer 10 mm thick, you will need about 1.5 kg of composition.
Varieties of plaster compositions - not everything is so simple
A simple mixture is used in rooms located inside a heated building for:
- rough leveling before installing the reinforcing mesh, which must be applied to create a decorative type of material;
- sealing various defects: cracks, gaps, grooves and irregularities. Acts as a preliminary layer for finishing;
- creating an antibacterial surface, but special additives are added to the composition to protect against fungus.
A simple composition of sand-cement plaster is used for installation using a two-stage system: preliminary spraying of the surface and a primer layer.
The composition of the plaster changes if it is necessary to perform work in difficult conditions: high humidity, exposure to ultraviolet radiation, temperature changes. In the above conditions, a universal DSP is used. The characteristics of cement-sand plaster with additives differ due to increased resistance to negative influences. A universal type of product is used to increase waterproofing, including for reinforced concrete rings, septic tanks, etc.
The universal mixture used to plaster walls is applied in 3 stages (discussed earlier), but to improve quality, 4 steps can be used (a primer layer is performed 2 times).
A simple composition is used where the quality of the finish is not particularly important
If walls with high humidity are plastered, it is recommended to use high-quality compounds that require certain skills and tools. For high-quality plaster mortar it is necessary to install beacons; for other plasters they are optional. It is recommended to iron the covering layer for waterproofing and increasing the strength of the surface.
Preparatory stage of work
Before plastering walls using sand-cement mortar, it is necessary to prepare the surface for finishing. The preliminary stage of processing depends on the characteristics of the walls.
| Surface material | Method of preparation |
| Tree |
|
| Brick |
|
| Concrete |
|
The preliminary stage of preparing the external surfaces of buildings involves the use of sheathing, stripping and subsequent application of a primer layer. Treatment of external surfaces made of brick, concrete or wood must be carried out at positive temperatures.
The preparatory stage of work, regardless of the surface material, involves removing construction imperfections (gaps, bulges, protrusions), cleaning from dirt, dust, and stains. Applying a protective layer using glue and a primer mixture provides waterproofing. If desired, you can use an antibacterial solution to prevent the occurrence of fungus and mold.
Before plastering the walls with sand-cement mortar, it is necessary to install construction beacons on the surfaces, which are metal fasteners that are fixed vertically along the height of the wall. Additional elements are auxiliary means for accurately determining the level of the finishing layer. To install the beacon, it is necessary to use gypsum, which is applied pointwise along the height of the surface at a distance of half a meter from each other. To secure the elements proportionally, it is necessary to use diagonal levels. The horizontal distance between paint beacons should not exceed one and a half meters.
DIY plaster
If the solution will be used for plastering large surfaces, it is recommended to mix the composition on a flat surface with sufficient rigidity; ordinary asphalt will do.
Procedure for mixing the composition:
- 3 buckets of clean sand are poured onto the asphalt: without weeds, dirt, stones, dust, shells, etc. It is better to first sift the composition, and rinse if necessary.
- Level the sand layer and create a circle.
- 1 bucket of cement is scattered over the entire area.
- After this, it is necessary to mix the composition thoroughly; as a result, no light areas should appear.
- The material is leveled in the shape of a circle, and most of the CPS is removed from the inside to form a “volcano crater.”
- A little water is poured into the excavation, gradually adding cement and mixing the composition.
- After the crater has dried, water is added again until the entire mixture is prepared.
- At the end, the CPS is thoroughly mixed to create the same consistency.
In the case of preparation, 75 kg of sand and approximately 2 buckets of water are added to 25 kg of cement.
The cement-sand mixture is mixed on a flat and hard surface
The result of preparing the solution should be similar in consistency to sour cream, but:
- for laying tiles on the wall, the mixture is prepared rather dry;
- if it is planned to use mechanized plaster, the solution is made liquid;
- When plastering over beacons, the DSP should not flow and be too dry. To improve elasticity, slaked lime is added.
Useful tips at the preparation stage:
- It is important to thoroughly mix the CPS with water to prevent the appearance of large particles or areas without cement. Due to the occurrence of such technology violations, air pockets or areas of low strength are formed;
- for mixing it is better to use a construction mixer; it is inexpensive, but simplifies the mixing process and also improves the quality of the mixture;
- mixing can be done with a drill or hammer drill when installing a special attachment.
Preparing walls for application of cement-sand composition
The solution manufacturing technology allows you to treat any surface, but the preparatory stage differs from their type. The composition can be processed:
- brick walls;
- wooden bases;
- concrete facades;
- reinforced concrete structures;
- aerated concrete houses.
If you are plastering a large surface using beacons, the solution should not be dry or flowing.
For plastering wooden walls, a sheathing must be installed; it can be made from slats or shingles. Industrial metal mesh is easier to install, but the surface is first primed. Lathing is a necessary measure for brick walls; only an adhesive composition is applied on top of them for installing a metal mesh.
Preparing concrete walls is the easiest thing to do; it is enough to clean it and treat it with a primer. Facade cement-sand plaster is applied to the treated surface using the same methods, but frost-resistant and moisture-proof additives are added to the composition. Despite the relative resistance to temperatures, application of the composition must be carried out at temperatures above 5°C.
Technology of using sand and cement based mortars
The first stage of application is spraying. Some tips for getting the job done:
- The procedure can be done manually using a ladle or trowel. Some novice builders find it more convenient to spray by hand;
- An old vacuum cleaner is suitable for application if it is capable of blowing air. The vacuum cleaner will replace the spray gun;
- The thickness of the layer directly depends on the complexity of the irregularities. In general, a layer of 6-7 mm is applied to brickwork, 4-5 mm to reinforced concrete bases, and 1 mm to wood.
The second step is to apply the primer layer. Now it is important to follow basic recommendations:
To make cement-sand plaster more viscous, special plasticizers are used
- the solution is prepared somewhat thicker than during the spraying process;
- It is better to apply the DSP primer in 2 stages;
- the first coating step is designed to level the base; be sure to wait 30 minutes or more before applying the second layer;
- at the second stage it is important to fill all visible defects and completely level the surface
Finally, a covering layer up to 4 mm thick is applied with a liquid solution. If the preliminary steps have been carried out correctly, covering will not lead to difficulty. To eliminate unevenness, the wall is treated with grout or polish. During mashing, make circular movements, otherwise noticeable abrasions will appear.
Decorative plaster “Sand whirlwinds”
Today, a new type of plaster is in trend - “sandstorm”. To create a special effect, sand is added to the finishing material. The composition is simply applied to the surface, and the result is a durable, elastic material with protection against air penetration. An additional advantage is the absence of solvents and unusual odors.
There is a wide variety of plaster colors, depending on the design idea. Violet shades are the most popular today.
Number of layers
Plastering walls is carried out in three stages, each of which uses a solution of a certain consistency. And each such mixture has its own name - spray, primer and covering.
Splash
This is a creamy solution, somewhat runny.
Its purpose:
- form a layer with high adhesive characteristics on the wall;
- cover large wall defects, such as seams between bricks, wide cracks, chips, gouges.
Prepare a solution with plenty of water. Apply with a thickness of 2-5 mm. The process is carried out with effort. That is, the mixture is taken into a trowel and thrown with force onto the surface being processed. The movements must be sharp so that the throwing speed creates pressure on the defects, which would be completely filled with the material.
Priming
This is the thickest layer - up to 5 cm. The plaster itself is a dense solution with a low water content. It is this that is aligned with the beacons. That is, they fill the space between the profiles with the mixture and pull it out from the bottom up, making wave-like movements from side to side.
If the difference in the plane of the wall is large, then the soil is applied in several layers. But leveling the surface is usually carried out only after the entire space has been filled with material.
The beacons are removed after the soil has dried. The grooves remaining in their place are filled with plaster mortar.
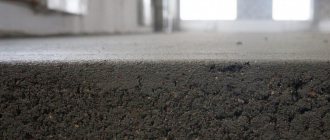
Covering
This layer can be attributed to the final formation of the plastered wall. After applying it, the surface becomes as even and smooth as possible. Therefore, the mixture is made almost liquid.
Apply the solution with a trowel, and use it to level the surface in a circular motion, distributing the material evenly. It is important to prepare the mixture correctly here. Application thickness – no more than 2 mm.
Each previous layer must be thoroughly dried before applying the next one. The applied mixture must acquire a certain strength in order to withstand the weight of the next applied layer.
Plastering walls with cement-sand mortar: 3 important tips
Experts note the importance of 3 tips that beginners may get confused about:
- To prepare DSP at home, PVA glue can replace the role of a plasticizer. From 7 to 10 ml are added per 1 liter of solution.
- If you plan to spray a smooth surface, the solution may fall off and not adhere well to the wall. Tile adhesive will help improve adhesion. If you want to treat wooden and other surfaces with a poor connection with cement, it is useful to know what concrete contact is.
- All substances are slightly different; before mixing, it is recommended to study the manufacturer's instructions. Differences may occur depending on the type of work; recommendations for a specific type are indicated on the packaging.
Paint for cement mortar will help improve the appearance of plaster; color will help create an interesting design even without a finishing layer.
Flaws
The composition is not without several drawbacks, the most significant of which is the large weight of the finished solution, which creates an additional serious load on the plane.
Another drawback is the labor-intensive finishing work, which involves applying cement plaster in several stages, which also affects the implementation time of the rough layer.
In addition, the mixture itself reaches its maximum strength only after 3-4 weeks. Failure to follow the mixing instructions will inevitably lead to cracking of the applied layer.
The material is incompatible with plastic, previously painted, or other smooth or wooden surfaces. Even with a very smooth concrete base there can be some difficulties.
It should also be remembered that cement-based plaster for interior work requires additional putty. Such solutions are not suitable for final finishing.