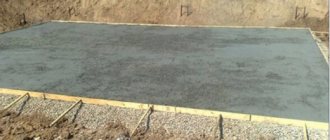
The screed for a warm water floor is a simple cement pour. It is called roughing and is done to level the surface, prevent heat loss, and pipe deflections. In addition, it affects the durability of the finishing layer, which is poured on top of the heating system. It can be laid in three ways. Let's talk about them first.
Types of finishing screeds
Dry
It consists of expanded clay, foamed vermiculite, expanded polystyrene or perlite. The granules are covered with sheets of moisture-resistant plasterboard or chipboard. All this is quite easy to install - anyone can do the job.
pros
- High laying speed. Even in a large room you can do it in a day.
- You can install the finished floor covering the very next day.
- The load on the floors is three times less than in the case of wet pouring.
- Easy installation.
- Excellent sound and thermal insulation.
Minuses
- If water gets inside the floor, mold will appear and the entire structure will have to be dismantled. Requires a waterproof finish.
- GKL and chipboard boards may not withstand additional heavy partitions.
- For some time after the repair is completed, rustling sounds will be heard when walking.
Instagram @alexpracapl
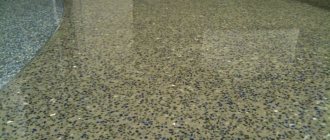
Wet
Usually this is a cement-sand mortar or concrete mixture. Doing everything yourself will be a little more difficult than in the case of dry backfill, but it is quite possible. Ideal for floors with ceramic and stone finishes.
pros
- Strength. Will withstand new, heavy partitions.
- The dried layer can be left as a final finish by simply painting it.
- Excellent sound and thermal insulation.
Minuses
- Labor-intensive process. The solutions are liquid, but pouring and leveling them without skills can be difficult.
- Heavy weight. If the floors are weak, this filling will not work.
- Long hardening time. It will take a few weeks before final finishing.
- You will need equipment for mixing - a construction mixer or a drill with an attachment.
Instagram @mastersanuzlov
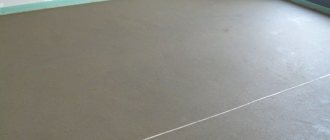
Semi-dry
It is difficult to make such a coating with your own hands - it requires a pneumatic blower, a mixing machine, and a grinding machine. In a small area, you can try to do everything without equipment, but it will be more difficult. The material is not easy to level on your own, since it is a hard sand-cement mixture. Plasticizers and a small amount of water are added to it.
pros
- Tiling can begin after two to three days. For other coatings, the time frame is longer, since moisture will be released within a month.
- Light weight.
- Good sound and thermal insulation.
- Relatively clean working conditions.
- There is virtually no shrinkage.
- Moisture resistance.
Minus
- Need for equipment. It can be rented from a construction company, but this is an additional expense.
Instagram @stiazhkapola39
What is better to choose
It is difficult to answer unequivocally which screed is better for a water heated floor. Based on weight, the best option is dry mixtures. They are much lighter, the load on the floors is not so strong. In addition, they can be cheaper if renovations are being done in a small apartment. In terms of installation speed, they outperform the other two options. You can do everything in a couple of days. But such a floor is not recommended for use in the bathroom.
For large-scale work, when there is time before moving into a home and a large batch of material is needed, it makes sense to purchase wet concrete or cement-sand screed. This option is also suitable for those who need a durable coating that is not afraid of moisture.
A semi-dry mixture could be a compromise - it is durable and dries faster than wet. But it requires equipment or the workflow will be labor-intensive.
Materials used in work
To install a water heated floor, you can mix the materials yourself and get a solution of the desired consistency. To do this you need to prepare:
- sand with a fraction of 1.8-2.00 mm;
- Portland cement - categories no less than M-400;
- plasticizer - at the rate of 1 liter per 100 kg of cement used;
- polypropylene fiber - added to the desired consistency, up to approximately 900 g per batch;
- water in the right quantity.
The presented materials are kneaded until smooth so that there are no lumps. If the mixture does not work, it is recommended to use a mortar pump. The resulting composition is used for one and a half hours for its intended purpose, in accordance with the installation techniques for water-based underfloor heating.
This mixing method helps save money, and the resulting solution is not inferior to the properties of purchased ready-made compounds.
Requirements for screeds
First of all, we note that the coating must be smooth and horizontal. A difference of 5 mm is allowed. Otherwise, the top finish may crack, sagging may appear, and heat will not be distributed evenly. Let's talk in more detail about other requirements.
Which material to choose
For warm water systems in residential buildings, the recommended grade of concrete is M150 or self-leveling compounds for creating heated floors. For a mortar made from a cement-sand mixture, you will need cement grade M500 or M400 and sand with a fraction of no more than 3 mm. If it is necessary to make the layer thinner than the recommended values, plasticizers, fiberglass or PVA glue are added to the mortar or concrete composition.
The recommended particle size in dry backfill is 5 mm. As for the filler, foamed vermiculite, expanded polystyrene or perlite is considered a more preferable option. They are lighter than expanded clay.
Instagram @shakirov1758
Instagram @housemaster63
Optimal screed thickness for a warm water floor
This indicator is important for any coating. Not only the quality of heating, but also the strength of the system as a whole depends on it. The thickness is chosen depending on several factors.
- Ceiling height.
- Pipe diameter.
- Type of laying mixture.
- Strength of floors.
The minimum height for residential premises is 3-3.5 cm. The maximum is 5-10 cm. Layers that are too high, especially the top one, prevent the room from warming up quickly and eat up the distance to the ceiling. In some apartments this will be very noticeable. If you make the coating too thin, the structure will become less durable and will retain less heat. On average, the best option is considered to be a finishing layer thickness of 7-8 cm, with 4-5 cm in the space above the pipes. For rough filling, 3-3.5 cm is enough.
The thickness of the dry coating should be such that there is no empty space between the backfill and the gypsum board sheets, and the heating circuits are located at a depth of at least 2 cm from the surface.
The video contains more detailed recommendations on choosing the maximum and minimum thickness.
Manufacturers' recommendations
HENCO
German manufacturer. It is worth paying attention to the demands of such pedantic Germans. Preferring a clear calculation and specific numbers, we recommend a screed thickness of 45 mm. This coincides with the majority opinion. Detailed recommendations here.
KAN
German manufacturer. The recommended thickness of the screed is 45 mm above the heating pipe, but not less than 65 mm from the thermal insulation material. Using especially durable materials when pouring the screed, the thickness can be reduced to 25 mm. You can read more on the manufacturer's website.
REHAU
Builders' favorite material. The manufacturer has developed its own standards for quality and work performance. According to the regulations 45 mm. – this is the thickness of the minimum screed. Do not neglect the maximum figure - in residential premises it is 61 mm, for industrial floors 92 mm.
Rough screed technology
You will need a mixing container, a construction mixer or a drill with an attachment, beacons, a level, a rule, a spatula, cement, sand and water. Before pouring the rough layer, you need to complete the installation of all communications and window slopes.
Step-by-step instruction
- Pre-plaster the walls and ceiling so that the mortar does not fall from them.
- Close the drain holes, secure the cables in a semi-movable state, and seal all fittings that may come into contact with the cement.
- Remove all debris from the surface, determine the level of height differences, and make markings.
- Install metal beacons, secure them with alabaster (it dries quickly) at a distance equal to the length of the rule.
- Combine cement and sand in a 3:1 ratio, add water and plasticizer (or a liter of PVA glue). Too much water will cause cracking, so don't make the mixture too thin.
- Immediately pour the prepared solution between the beacons, compacting it at the same time. This is necessary to release air bubbles.
- Align the composition with a rule. Move it in wave-like movements towards you.
- Protect the room from sunlight and drafts.
- On the second day, cover the cement with film and leave it under it until the surface is completely dry.
This technology minimizes the risk of cracks. Even if you have chosen the minimum thickness of the screed for a water-heated floor, the coating will be durable. Drying may take several weeks (3-4). After this, you can lay the heating system.
6 photos
Instagram @failedmaster
Instagram @remont_gavryanka
Instagram @remont_gavryanka
Instagram @remont_gavryanka
Instagram @remont_gavryanka
Instagram @remont_po_pravilam
Purpose
This design solves several problems at once:
- formation of a flat floor surface;
- preparing the base for laying the finishing floor covering;
- uniform temperature distribution when operating the “warm floor” system;
- fixation of heating elements;
- insulation of the heating system from the external environment and reduction of heat loss during its operation;
- protection of heating elements from damage.
Methods for laying finishing screed
There are two general rules for all material laying options. Before pouring or backfilling the top layer, builders recommend sketching the location of all elements of the system, as well as checking its performance. You can test it in two ways.
Testing of heated floor elements
- With operating temperature. Start bringing the system to operating temperature at 20°C. Raise to 5°C after three to four hours. Drain the coolant if leaks appear and repair them. Then start again. Leave for 2-3 days. If all is well, you can do the finishing touches by first cooling the system.
- With high blood pressure. Run the coolant into the system and create a pressure 2-3 times higher than the working one. Leave it for a day. If the pressure drop is no more than 1.5 Bar, proceed to filling.
When pouring the screed, the pipes must contain coolant heated to 25°C.
During pressure testing, it is recommended to additionally secure the pipes. After a successful trial run, you can proceed further. We will give step-by-step instructions for each installation method.
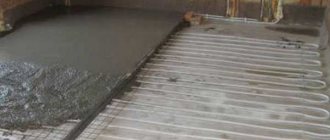
How to fill a wet screed
Filling in one room should be done in one day, and interruptions in work should be minimal. The exception is a surface divided by a damper tape. In this case, areas can be filled intermittently.
- Attach damper tape around the perimeter of the room. It is needed so that the frozen floor does not crack due to temperature changes.
- In a large room, fix it every 20 m2, between adjacent contours. The pipe passes through it and is enclosed in a corrugation at the passage point. You can use T-shaped strips instead of tape.
- Protect the installed hinges of the water floor from mechanical damage with boards.
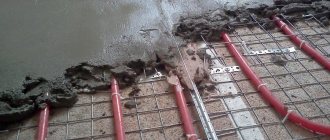
- Insulate the pipes supplying water to the collector. If they are plastic, hide them in the grooves made in the floor insulation.
- Place a metal mesh with 10x10 cm cells on the heating system.
- Using a level, install metal beacons with a height equal to the thickness of the layer. Fix the first one at a distance of 20-30 cm from the wall. The next ones are in increments less than the length of the rule by 20 cm.
- Secure them with alabaster and wait until it sets.
- Prepare a sand-cement mortar in a 3:1 ratio or dilute the finished composition with water.
- Spread the material over the surface while tamping it down to remove air bubbles.
- Smooth out the mixture using the rule.
- Cover it with film the next day.
Instagram @_alexey_denisov
Instagram @styazhka_pola__
Instagram @rusteplopol1
Instagram @rusteplopol1
Drying usually takes 20-28 days. During this period, no other finish can be laid on top.
The damper tape should not cross the thermal contours themselves. She is always located between them.
How to install a dry screed
All components of the composition and the surface on which they will be poured must be perfectly dry.
- Fix a damper tape around the perimeter of the room and between the heating circuits to compensate for the expansion of the material.
- Using a level, install the beacons. They should be equal to the thickness of the mixture.
- Lay two guide rails parallel to each other on top. The outermost one is at a distance of 25 cm from the walls. The gap between the slats should be less than the length of the rule.
- Place the rule on the guides and start aligning from the far wall towards the exit.
- The slats can be left or removed. In the second case, the furrows from them are leveled with a wide spatula.
- In the area where the work was completed, secure the first sheet of drywall or chipboard. The recommended gap between it and the wall is 10-15 mm.
- Apply glue to the edges of the sheet and carefully lay the next sheet.
- Fasten them with self-tapping screws. Sew the entire floor in this manner.
- Fill the gaps near the wall with foam.
The final finish can be installed the next day, when the glue has dried.
Instagram @gkpartiya
Instagram @stroypolrf
Instagram @sk_tehnologiya
Instagram @slavianskiiterem
How to lay a semi-dry screed
- Install damper tape around the perimeter of the room and between the thermal circuits.
- Lay a reinforcing mesh with 10x10cm cells on top of the thermal system.
- Mix cement and sand with a shovel in a ratio of 1:3. You can add fiberglass, plasticizer or PVA glue.
- Set some of the mixture aside and pour some water on it.
- Repeat this with the entire slide, leave it for half an hour.
- Then mix the material two or three times with a shovel.
- Check its readiness. The finished material easily sticks together into a lump, remains moist, but water does not flow out of it.
- Place the beacons and add the mixture in small parts.
- Lift the mesh so that the composition is evenly distributed inside the thermal contours.
- Compact the material and level the floor surface using the rule.
- Seal the furrows from the lighthouse the next day in the same way, but add a little more water.
- If you do not have time to fill the entire room in one day, cut the edge at a right angle.
- Cover the floor with film for two weeks to prevent water from evaporating. Air should not get under the film.
Watch the video for a visual presentation of these instructions.
Option 3. Semi-dry screed on heat-reflecting boards
To simplify the installation of heated floors, companies began to produce special slabs of remarkable designs. These slabs, on the one hand, are ready-made channels for laying cables or underfloor heating pipes, on the other hand, they take on part of the operational load and create a layer of heat insulation.
In this version of underfloor heating, a semi-dry screed is usually made, based on cement-binding mixtures with the addition of plasticizers. The best quality of such a screed can be achieved by using ready-made mixtures of levelers for heated floors or by purchasing ready-made semi-dry factory-made mixtures.
Pros and features of semi-dry screed
- A semi-dry screed does not require reinforcement and dries much faster than wet screeds.
- The semi-dry screed is laid with a damper tape.
- The thickness of the screed should ensure that the pipes (cables) of the heated floor are covered with a layer of 40-60 mm.
Minuses
- However, a semi-dry screed, porous and in the construction of a heated floor, will significantly increase its inertia;
- In addition, semi-dry screed requires serious professional skills, which makes it difficult to recommend it for independent use.
Filling the heated floor
Carry out the filling process according to the following algorithm:
- Install the beacons on the solution, ensuring a distance between the guides of 1.4–1.6 m.
Preliminary procedures before pouring include filling the pipes and creating a slight pressure in them
- Create operating pressure in the heating system to control the tightness and pour concrete into the pipes in working condition.
- Fill the gaps between the beacons with the solution, distribute the concrete mass evenly along the guides.
- Compact the solution, form a flat floor surface in the room.
Pay special attention to the accuracy of the work, during the production of which it is important to ensure the integrity of the pipes. With an increased base area of more than 50 m², a fixing tape should be installed to prevent cracks from forming due to temperature changes.
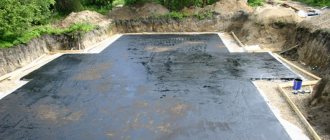
Thermal insulation of the base
Before installing the heating system, it is necessary to insulate the base. The thermal insulation layer will protect the water circuit from heat loss going into the basement or foundation of the house. The following is used as insulation:
- Styrofoam;
- extruded polystyrene foam;
- foil-coated backing.
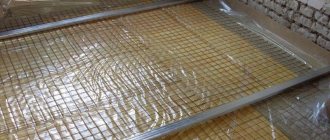
The listed materials are characterized by high strength to mechanical load, resistance to moisture and temperature changes. The thickness of the insulation is 30-50 mm, it is laid on a layer of waterproofing polyethylene film. The canvas is laid overlapping on a clean, dry base; it will protect the insulation from getting wet. Thermal insulation boards are laid end to end, the joints are coated with glue or blown in with foam, the excess of which is cut off.
Penofol or a similar sheet of reflective insulation is placed on top. A layer of aluminum foil is directed upward, this will reflect the bulk of the heat back towards the room. The joints of the foil insulation are taped with special tape. Penofol will protect the insulation from the aggressive effects of concrete. A metal reinforcing mesh is laid over the thermal insulation. This element evenly distributes the high load from the water circuit system and the concrete structure.
Risk of cracks
When using the traditional wet type of screed, it is very important to prevent cracks from occurring. Their appearance can lead to many negative consequences:
- It will become impossible to uniformly warm the room, which will negate the advantages of a modern heating system;
- uneven heating of floor areas will lead to overheating of individual thermal elements and their subsequent failure;
- the finished floor covering may be damaged.
To prevent the occurrence of cracks when making screeds with your own hands, you must:
- correctly observe the proportions of the solution, as well as the drying mode;
- use plasticizers to increase the elasticity of the composition;
- strengthen the structure with reinforcement or reinforcing mesh;
- install a damper between the wall and the screed.
Damper tape or low-density foam can be used as a damper. Its main task is to compensate for the expansion and contraction of the material as a result of temperature changes.