This flooring can most often be seen in sales areas, office premises, educational institutions, and medical institutions.
They are extremely popular due to their high degree of strength, durability, resistance to various types of mechanical damage, abrasion and the effects of cleaning agents that contain chemicals. In addition, a distinctive feature of floors made from marble chips is environmental friendliness and a high level of hygiene.
Technological process
Marble is a natural stone, the destruction of which produces crumbs in the form of crystals of different shapes and sizes. After technical sorting, it is divided into fractions of approximately the same size.
Thanks to the qualities given by nature, marble is famous not only for its durability. The crumbs obtained after its processing are non-flammable, fire-resistant, easily formed into individual tiles and used to create mosaic floors.
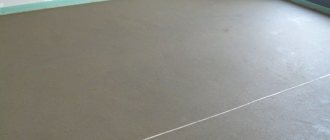
This type of coating is durable and beautiful.
After adding seals and other components, products are obtained that are successfully used to construct high-quality, durable, reliable floors, decorated with a pattern or pattern.
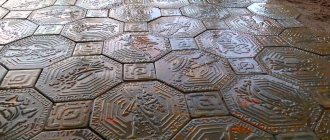
Mosaic floors made of marble chips are created from white, gray and colored stones. In turn, the color range of the third group of stones is quite wide and varied.
The marble particles needed to create an interesting and vibrant mosaic are pink and red, green and blue, brown and lilac.
The technology for flooring made from marble chips is quite simple, but requires strict adherence to the sequence of work:
- preparation of the base;
- installation of dividing strips;
- preparing the solution;
- pouring the mixture.
The final stage is thorough sanding of the topcoat, which is performed no earlier than a week after pouring.
Care instructions
Despite the high strength and excellent technical characteristics of artificial marble, it still requires some care.
You can provide care by following simple rules:
- Do not use cleaning agents that contain drying oil;
- It is undesirable to use detergents with silicone;
- It is better to use a soft cloth to remove dirt;
- It is undesirable to use brushes, sponges and other devices that can scratch the finishing layer;
- It is better to replace abrasive cleaning products for the care of countertops with gel ones;
- Regular cleaning of artificial marble products is best done with detergent or soap;
- You can maintain the glossy shine of surfaces by wiping them with special solutions (1 cap of liquid soap made from natural ingredients for 3 liters of water) and rubbing with a dry towel.
Self-made artificial marble can be an alternative to ceramic tiles. It can be used to decorate kitchens and decorate fireplaces. It can be used as a floor covering, demonstrating good taste and extraordinary abilities to guests.
Preparation of the base and construction of dividing conductors
Separating veins will allow you to create patterns.
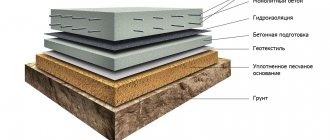
The main condition for the construction of not just a beautiful, but also durable surface from marble chips is proper preparation of the base.
It must be absolutely smooth without any defects in the form of voids, crevices or cracks and chips.
To do this you need:
- clean the stove from all kinds of dirt;
- seal detected cracks and crevices with foam;
- fill voids and chips with cement-sand mortar.
Use a special brush or concrete contact compound to roughen the surface. After the composition has dried, install the beacons using alabaster or any gypsum mixture.
If the surface of the subfloor was treated using an electric brush, you will have to collect all the dust with a vacuum cleaner to ensure a high degree of adhesion of the solution.
The cleaned surface can be treated with concrete contact, after which it dries and becomes rough. Using a level, determine the zero level and make the necessary marks on all walls, after which you can begin installing the dividing cores.
Creating a mosaic involves preliminary marking in accordance with the future drawing or pattern. These veins will help break the entire surface into separate sections intended to be filled with a mixture of a certain color or shade. Such areas are called pattern maps.
At their core, veins are strips no more than 5 mm wide. They are made of aluminum, brass or plastic.
It will be possible to achieve a repetition of the pattern only if precise markings were made on the floor surface before installation.
It is along this that dividing strips are installed. The installation of separations begins by pulling the non-elastic cord in accordance with the marked zero level point.
In some cases, it is necessary to make an additional leveling screed, which is necessary if there are significant differences in the surface of the subfloor.
Installation of floors made of marble chips
Typically, marble mosaic floors are made from a concrete solution filled with marble chips. They have good strength characteristics, a high degree of fire resistance, abrasion resistance and, as a result, decent durability. The method of arranging them is very simple: A rough cement screed with a thickness of at least 2 cm is made onto the constructed floors on the ground, a concrete base or an interfloor ceiling. To create a pattern and expansion joints, copper, glass or bronze veins 4 mm thick are used.
We make marks with a pencil on the walls at the level of the “finished” floor. Near them, to arrange the initial or contour rows of veins, we install beacons from wooden blocks on the mortar to level the floor. Their height should correspond to the height of the planned “finished” floor, i.e. marks on the walls. Along the rows we stretch and load a cord to the beacons, along which we “freeze” our veins in the solution. If necessary, cut off excess. We finally fix the vein with cement mortar and let it dry.
Important! For fixation, the solution must have a grade of at least M150.
We do this in the following proportions: 1 cement (grade no lower than M400), 3 marble chips, 0.5 water. It is best to add crumbs with grains of different diameters (also of different colors) into the mosaic mixture. Thus, the entire surface will be uniformly saturated with filler.
Preparing the solution and pouring the mosaic floor
The entire process of creating a floor from marble chips is divided into two stages. First of all, prepare and pour the preparatory layer, to create which you will need to prepare a fairly liquid cement-sand mixture and pour it in a thin layer over the entire surface of the floor, moistened with water. For more information on how marble chip floors are installed, watch this video:
For convenience and reliability, distribute the solution with a spoon or a broom (depending on the size of the card).
The thicker cement mortar is carefully laid out on the cards, leveling it with a wooden spoon (trowel). The surface should be flat and smooth, and the thickness of this layer will be 20 cm.
Now they begin to prepare the second batch of solution. Marble chips cannot be added to the composition in dry form. The dust present on its surface will subsequently cause the loss of small fractions and the formation of voids on the floor surface, so all components are thoroughly washed with clean (without silt and dirt) water.
For a durable coating, use cement grade M500
The number of components required to prepare the solution depends on the required coating strength.
To achieve the maximum level, you will need cement grade M500 and clean sifted sand, taken in equal parts, as well as marble chips, the amount of which is twice the amount of cement.
For every kilogram of cement used, 0.5 liters of water will be required to ensure the solution reaches the desired consistency.
The quality of the solution is affected by the introduction of dye and whitener into its composition, so it is necessary to carefully ensure that the amount of dye is no more than 15% of the total amount of cement.
The mixture should be laid out on the cards after the first layer has set, but before it has completely hardened. In accordance with the project, the composition is laid out in the cards with the addition of crumbs of the desired color. For more information about installation, watch this video:
Tamp carefully but thoroughly, making sure that the established level is not violated. After filling all areas of the mosaic, the surface is left untouched for a week.
Installation of slats/veins
Terrace covering can be single-color or multi-color.
For a single-color floor, beacon slats are installed on the base every 1 - 1.5 m. The slats can be replaced with gas pipes with a diameter of 25 mm.
Multi-color mosaic coating is made according to a pattern specified by the project or developed based on available materials. In this case, an ornamental marking is applied to the base, along which the gasket (vein) is installed on the edge. The separating veins are made from strips of glass 3 - 5 mm thick, brass, aluminum or polymer materials. The top of the veins is carefully aligned so that it is level with the finished floor. The veins are fixed with cement mortar or slightly recessed in a freshly laid screed under the mosaic layer.
Surface finishing
The final stage of work on creating mosaic floors from marble chips is grinding. Before it begins, the top layer of hardened cement is removed from the floor surface, using abrasive materials with coarse chips for this operation. To learn how to sand such a coating, watch this video:
Often the floor is sprinkled with quartz sand, moistened and scrubbed. This treatment will help identify small voids that need to be immediately filled with cement mortar and rubbed using a block made of marble.
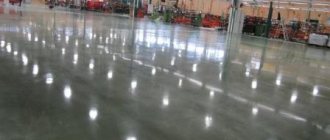
A grinding machine equipped with a stone with fine abrasive chips will help to achieve a smooth surface without bulges and depressions. Having removed dirt and dust, the stone on the grinder is replaced with a felt wheel and the finished surface begins to be polished.
Rubbing the mosaic coating with wax mastic
Rubbing the mosaic coating with wax mastic begins after grinding or polishing the coating.
Preparation of wax mastic. Prepared on site. Stearin, paraffin, and wax are cut into small chips, mixed with rosin powder and melted in a water bath until a homogeneous mass is obtained. The mixture is removed from the bath, slightly cooled turpentine or gasoline is poured into it in a thin stream with continuous stirring until a homogeneous mass is obtained.
Composition of wax mastic, wt. parts: turpentine or gasoline - 10; stearin - 2; paraffin - 1; wax - 1; rosin - 0.25.
Coating the surface with mastic. It is applied to a dust-free base with a brush in a thin, even layer in the form of parallel strips, overlapping each other by 20-30 mm.
Rubbing mastic. The surface covered with mastic is polished with an electric polisher or a mosaic grinder with felt or cloth wheels. Work begins in longitudinal strips on the side opposite the entrance to the room.
Polishing the floor in hard-to-reach places (corners, wall areas) is done manually with polishing brushes or wooden blocks covered with felt.
What fillers are most often used by craftsmen?
- mineral: crumbs remaining after processing minerals - marble, granite, slate, lapis lazuli, dolomite, quartz sand;
- wooden: shavings, cuts of different types of wood;
- ceramic: special mosaic or tile fragments;
- glass.
The size of the aggregate fraction affects the decorative properties. Typically, marble chips come in three sizes:
- large (10-15 mm);
- medium (5-10 mm);
- small (up to 5 mm).
After finishing work is completed, the surface must be filled with crumbs by at least 75%. Craftsmen advise choosing a large fraction - this will give the surface a more attractive appearance. However, it is worth adding crumbs of different sizes to the solution: if you use only coarse filler, cracks will appear in the coating when it dries.
Advantages of floors made of marble chips
The main advantage of the material in comparison with analogues is that the finished coating is a monolithic slab without seams or joints. Therefore, it is more durable than other materials and practically does not require repairs. however, if necessary, it can be easily restored.
In addition, stone chip floors:
- have unique decorative properties;
- hygienic - mold and mildew do not form on the surface;
- harmless, completely environmentally friendly - suitable for use in residential areas where children and allergy sufferers live;
- resistant to stress, friction, moisture, fire, chemicals;
- do not require special care.