The garage must, in any weather, as well as at any time of the year, fulfill its main function - to ensure the safety and protection of the car. The second point involves everything that makes up the garage - the roof, walls, and most importantly - the floor, which must meet many parameters, including:
- strength (physical stress is a common occurrence for such floors);
- chemical inertness to various types of chemicals;
- moisture resistance (if there is a possibility of roof leakage or liquid leakage from the machine itself);
- wear resistance (the floor in such buildings is often subject to exploitation).
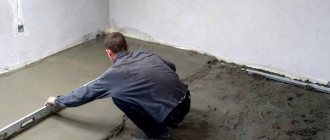
Thickness of concrete floor in garage
The best choice in this matter is a concrete floor that meets all these parameters and has many advantages - resistance to physical and chemical influences. However, this choice has its drawbacks: due to the long hardening of concrete, namely, gaining the main percentage of its strength in a week, and subsequent hardening in a month, the process of finishing the floor is delayed, which is not always to the benefit of people building a garage.
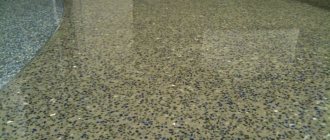
Concrete floor hardens within a month
SP 31-105-2002. 5. Foundations, basement walls, ground floors
SP 31-105-2002. 5. Foundations, basement walls, ground floors
Garage floor requirements
So that during operation the flooring in the garage does not create problems during repair work on the car, it must meet the following requirements:
- Strength and reliability of the floor against mechanical damage. Almost every day its surface is subjected to abrasive friction, impacts and high loads, since the vehicle has significant weight. Therefore, an incorrectly executed garage floor screed can make the top finishing layer unusable. Resistance to fuel and lubricant mixtures and chemical reagents. Both laminate and linoleum will quickly deteriorate under their influence.
- Fire safety. Based on this requirement, it can be argued that wooden floors cannot be laid in garages due to their increased flammability.
- Wear resistance. The room where the car is located is intensively used.
- Moisture resistance. Heating in garages is infrequent, which leads to the formation of condensation on the walls and ceilings. In the winter season, snow falls off the fender liners and wheels of cars and melts. Therefore, the floor covering material must be moisture resistant.
Based on the above requirements, a concrete garage floor can be called the best solution.
Changing the thickness of the floor due to the concrete layer and the consequences of this manipulation
By reducing the thickness of the concrete layer in the overall floor structure, the following calculations are ultimately obtained: the thickness of the concrete layer in the ratio of each layer and the total thickness is less than the sum of all other layers, which, in essence, protect and strengthen the concrete floor. Increasing the concrete layer will not harm the overall concept - on the contrary, it will increase the level of reliability of such a floor. But at the same time, the following parameter is also important - between the ground located up to the garage and the garage floor there should be either a uniform descent or a slight gap. Otherwise, entering and leaving the garage will harm both the wheels, the body and the entire car as a whole, as well as the floor - this design will not be able to tolerate such experiments for a long time and, sooner or later, will begin to crack and collapse.
Thus, by following the technology, you can get an excellent result that will delight its owner for many years.
A reliable base for garage flooring
The main problem with arranging a garage floor is that it is located close to the ground, which contains a large amount of moisture. This feature can cause serious trouble to the car owner and cause significant material damage. The concrete floor screed in the garage is laid on the prepared base. Concreting the floor in the garage and installing the floor covering is carried out according to the so-called “pie” principle, which is considered the most optimal option.
The sequence of layers in the direction from the ground upward looks like this:
- Gravel (crushed stone) embankment. Performs the function of a kind of drainage that helps remove excess liquid and prevent its penetration into the concrete.
- Soft clay or sand. This layer is responsible for removing moisture from the concrete and transferring it to the gravel.
- Strengthening layer of concrete mixture.
- Waterproofing. Thanks to it, groundwater does not penetrate into the floor of the building. The starting layer is made of mastic, and the main layer is laid in two layers.
- Insulating material.
- Concrete screed plus reinforcement.
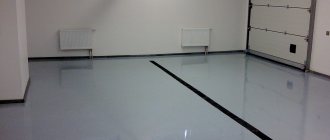
- Self-leveling floor covering. This layer is poured at the request of the garage owner and is not necessary, but it will significantly improve the quality of the concrete-based screed. By the way, a properly made base allows you to pour inexpensive compounds.
Implementation methods
As practice shows, only a concrete floor can withstand such loads. It can be created in two ways:
- Lay the reinforced concrete floor slab.
- Pour a thick concrete screed (up to 10 cm) over the ground.
Let's just say that the first option is faster, but more expensive. The floor slab is not cheap; its installation can only be done with the help of a crane, for which you will have to pay for its services. But even a beginner can do concreting on the ground with his own hands. The main thing is to know the technology and nuances of the process.
Types of waterproofing materials for garage floors
There are restrictions on materials used for waterproofing: you should not use membrane or film products, since they do not have the required elasticity and are not able to cope with the amount of groundwater in spring and autumn.
Experts consider inexpensive roll coatings with good consumer characteristics to be the best choice of materials for the waterproofing layer in the above-described pie. Professionally performed waterproofing work in a room will protect it from dampness, prevent the appearance of mold and the spread of fungus, and thereby prevent the building from collapsing, and the property located in the garage will not deteriorate.
There are several types of waterproofing floors in a garage building:
- anti-pressure, which protects against the ingress of groundwater;
- non-pressure - prevents the harmful effects of flood runoff and rain;
- anti-capillary – protecting the structure from the negative effects of capillary moisture.
In addition to creating waterproofing in the garage, it is necessary to install an effective ventilation system.
Possible problems
After some time of operation, cracks may appear in the concrete floor.
During the period of operation of the concrete floor, surface defects such as cracks and cavities may form. They are eliminated by filling with cement-sand mortar. Pre-embroider, removing all loose particles, remove dust and apply 1-2 layers of primer.
One of the troubles when using concrete surfaces is the formation of specific fine dust. It can be removed by priming, ironing or finishing with facing materials.
The hygroscopicity of concrete is reduced using special means - water repellents. One of them is Penetron. The solution is prepared in accordance with the manufacturer's instructions and applied to the floor surface with a paint brush or roller. For these purposes, you can use other compositions:
- "AQUATRON";
- "HYDROHIT";
- "KALMATRON";
- "HYDROTEX";
- "WASCON"
They all work on the same principle: they fill the smallest pores of concrete, crystallize and form a moisture-proof layer.
Phased construction of a concrete screed in a garage building
When installing a floor screed in a garage with your own hands, all steps are performed in stages.
Carrying out preparatory work
The previous floor covering must be removed. A new screed should not be installed on an old base.
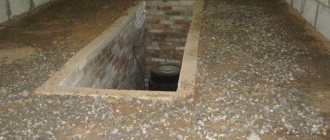
A high-quality result can only be achieved by replacing all the layers of the previously existing “pie”. If there is an inspection hole in the building, the remains of used waterproofing, wall coverings and the old floor structure are also carefully dismantled. The lower level in the room must be cleaned down to the ground as much as possible.
Laying a bed of sand and gravel
The soil, well cleared of debris and various debris, is compacted and leveled. To create a sand and gravel cushion use:
- crushed stone (gravel);
- fatty clay (sand is fine).
When choosing gravel, experts recommend using single-caliber medium-fraction material. The fact is that the use of bulk material of large or small size leads to a decrease in the quality of the finishing surface. The “pillow” is poured and leveled, focusing on the level. The ideal thickness of the compacted layer should be 4-5 centimeters, and the minimum – 2 centimeters.
Before leveling the floor in the garage, a layer of river sand is poured 10-12 centimeters high. You can use soft clay. Then the gravel-sand cushion is carefully compacted. Both layers in total should have a height of approximately 15 centimeters. After completing the work, check the quality of installation using a level.
If there is an inspection pit in the garage building, a bed of gravel and sand is laid not only on the floor of the room, but also on the bottom of the basement. To make the work easier to carry out, the layer level is marked along the perimeter of the walls or posts with marks are installed.
Fixing sand level
Before screeding the floor in the garage, professionals recommend covering the sand and gravel cushion with a 1.5-centimeter layer of cement with the addition of sand in a ratio of 1:4 or 1:3 to make the coating more durable and reliable. Next, you need to take a break in work for about a day so that the concrete is completely dry.
Performing initial waterproofing and gluing rubber-based tape
The inspection hole and the base of the floor are covered with a thin layer of bitumen mastic, partially covering the walls at a low height. Before this, the places where the walls of the room meet horizontal surfaces are glued with self-adhesive rubber tape with waterproof properties.
Laying layers of basic waterproofing
In order to protect the premises from the destructive effects of groundwater and various types of precipitation, before pouring the screed in the garage, it is necessary to select the appropriate waterproofing roll material.
Suitable for this job:
- hydrostekloizol;
- bitumen roofing felt;
- polyethylene film with a thickness of 1 millimeter.
Rolled waterproofing material is laid evenly, avoiding waves and folds. The pieces of canvas are overlapped by 15-20 centimeters and glued to the walls using waterproof tape. When creating waterproofing, the material is placed at the bottom of the pit and the floor of the building so that it extends onto the walls at a distance of about 10-12 centimeters.
There must be at least two waterproofing layers. In this case, a combination of different materials is allowed. For example, a plastic film is laid down, folded twice, and roofing material is placed on top of it. If in doubt, you can additionally add another waterproofing material. As a result of such measures, a favorable microclimate will be created in the room, and tools and objects will not be damaged by humidity and corrosive processes.
Installation of the thermal insulation layer
A necessary step before making a screed in the garage is laying insulation. Building materials for thermal insulation are selected taking into account the climate in a given region and the functioning or absence of a heating system in the room. High-quality insulation work will allow you to stay in the garage in comfortable conditions at any time of the year. You can use either mineral wool or glass wool, or polystyrene foam. Extruded polystyrene foam is also used.
The insulation is installed in a layer 7-10 centimeters thick - if necessary, the material is folded several times, and to create a temperature gap, the joints and the perimeter are fastened with damper tape. Thermal insulation must be performed on all surfaces inside the garage building without exception. It is recommended to insulate the area where the entrance to the room is located more; for this, more material is rolled out there.
Concrete reinforcement
There are a number of recommendations on how to properly make a screed in a garage. To prevent it from cracking and spreading, a reinforcing mesh consisting of metal rods with an 8-9 mm diameter, which form cells ranging in size from 15 to 20 centimeters, is placed on the floor base and on the surfaces available in the inspection hole.
When screeding in a garage with your own hands, you should not forget that the area where the car will be located and heavy equipment or other objects will be placed is additionally reinforced with another layer. It is allowed to lay metal mesh with larger cells. As a result, the coating will become more wear-resistant, since it will be protected from the appearance of defects.
The reinforcement is fixed in such a way that before starting work it is located in a suspended state, rising above the level of the base by 4-5 centimeters. To do this, it is customary to use supports made of metal or plastic. The distance between the edge of the mesh and the walls of the room is maintained within 5 centimeters.
Pouring screed in the inspection hole
A reliable coating is made from a solution containing fine gravel, M200-M400 cement and river sand in a ratio of 5:1:3. The thickness of the screed in the garage in the inspection hole, as a rule, should be 10-12 centimeters, and it is not necessary to level its surface perfectly.
Installation of beacons
In order to obtain an even floor covering, before pouring the screed in the garage, you should use beacons made of metal profiles or tubes with a cross-section of 2.5-3 centimeters (read: “How to pour a garage floor with your own hands - instructions”). They are fixed to the flooring using a thick concrete mixture. The guides are placed at intervals of 1.5-2 meters from one another. The beacons are treated with machine oil to make them easier to remove after completion of work.
Preparation of concrete solution
To do this, usually take 1 part cement, 3 parts sand and water in an amount equal to ½ cement volume. In some cases, a little fine gravel is added. Now on sale there are ready-made building materials for creating screeds, containing fiber fiber and special plasticizers that ensure the creation of a strong and durable coating. Uniform mixing of the solution is ensured by the use of a low-speed mixer.
Pouring concrete
The components have been purchased and everything is ready for concreting and flooring. It remains to decide on the implementation methods: mix the solution manually or using a concrete mixer. The latter option will improve the quality of concrete and increase labor productivity. It is not at all necessary to buy a new unit for this; you can rent it.
Do not forget about the ratio of concrete components - crushed stone, sand and cement, as well as the amount of water added.
The liquid mixture fits better, but its grade will be lower, the hard mixture is more difficult to work with, but the slab will be strong and reliable. As a compromise, it is possible to purchase a ready-made mixture at a concrete mixing plant - it will be produced and delivered directly to the site, in the required quantity and with the required quality. It is highly advisable to use a vibrator or vibrating screed to fill voids well.
Repairing cracks
Cracks are the most common defects.
To eliminate them you need to do the following steps:
- Widen the crack using a chisel. This way it will be possible to detect hidden defects and fill them as efficiently as possible.
- Clean the crack from dirt, dust and loose concrete.
- In case of deep cracks, perform reinforcement - creating recesses across the cracks and placing metal rods in them.
- Rinse the crack with water to remove dust and wait until it dries completely. Treat the crack with primer.
- Preparation of the solution. Mix M400 and water to the consistency of sour cream, then add PVA glue or liquid glass to the solution in a 1:1 ratio. Use a stand mixer to mix.
- Fill the crack with mortar. Fill so that the solution extends beyond the crack, since shrinkage will occur during the hardening process.
- Sand the hardened surface using a grinder or coarse sandpaper.
Different combination - does it change the concept?
In various instructions you can see different versions of laying this type of floor - in most cases, the only difference between these theories is the sequence of stages of laying the floor. Some people's eyes widen, but in their heads there is the same, very adequate question - is there a fundamental difference between the numerous options for the sequence of laying layers and is there a most successful option?
The answer is simple - consistency does not play a huge role. It is much more important to adhere to the norms of layer thickness of one level or another.
An example of arranging a floor on the ground. Scheme
Option No. 7. Acid resistant tiles
Naturally, we are not talking about the tiles that lie in the bathrooms and decorate the walls in the kitchen - such tiles will not withstand the loads typical of a garage. Special acid-resistant tiles, which are usually used in workshops of industrial enterprises, are suitable. The material is produced on the basis of refractory clay, to which substances are added that provide resistance to negative environmental factors.
Pros:
- high strength and ability to withstand heavy loads. The material can easily withstand the weight of heavy factory machines, so it will certainly withstand garage loads;
- moisture resistance;
- resistance to aggressive substances;
- resistance to temperature changes and frost;
- the tiles do not absorb grease and dirt, therefore they are easy to clean;
- The non-slip surface will make moving around the garage safe in any weather.
Among the minuses, one can note, perhaps, a small assortment of tile shades, but when we are talking about arranging a garage and not an apartment, then this nuance can hardly be considered a serious minus.
A few important final recommendations
In Soviet times, every car owner did not think much about the thickness of the concrete floor in the garage. Building materials cost pennies, so they were not spared, and energy-saving technologies were unheard of then. Since then the situation has changed significantly. Therefore, when calculating the total thickness of the “pie,” we must take into account what kind of room we are dealing with—a “cold” or a heated one.
If it is heated, it would be more advisable to insulate the floors, for example, with expanded polystyrene (which will make the “pie” slightly higher). If it is unheated, then there is no need to insulate it.
Waterproofing does not affect the thickness of the layer, but it should be laid with a fold over the walls. Use damper tape around the perimeter of the garage.
And finally, the last thing. You need to make sure that the concrete floor in the garage is grooved or at least rough: the slopes need a sufficient degree of friction.
Damper gap
A concrete floor on the ground is often called “floating”. This is because it is made incoherent with the walls of the building. In this case, the walls and floor can sink or rise independently of each other, maintaining integrity.
To prevent the floor in a concrete garage from being connected to the walls, a damper tape (sold in hardware stores) is laid around the perimeter or thin sheets of foam plastic (10 mm thick) are cut into strips. The width of the strips is 12-15 cm - they should protrude slightly above the finish of the floor. The excess height of the damper is then cut off flush with the floor.
Work order
Below are step-by-step instructions on how to properly grout your garage floor.
Digging a pit
The depth of the pit should be 30 cm relative to the intended floor level. After digging, the soil is thoroughly trampled down
It is important to remove all fertile soil with plant seeds that can destroy the coating below
In temperate climates, it is advisable to insulate the floor with foam plastic slabs laid under the reinforcing mesh above the waterproofing. In this case, the pit is dug another 10 cm deeper.
Making a pillow
For the cushion, you should only use materials that can be compacted tightly: broken bricks and similar construction waste are not suitable. The most reliable option includes (from bottom to top) a layer of clay as additional waterproofing, a layer of river sand and a layer of fine crushed stone or expanded clay. Sand and crushed stone are laid in several passes, each portion is compacted, and the sand is also watered. The pillow is sealed with a thin layer of concrete and left to settle for 2-3 days.
Waterproofing
The concrete base is coated with molten bitumen resin and overlapping strips of roofing material are laid. An edge strip is glued to the walls along the entire perimeter so that its height exceeds the zero mark by several centimeters: after laying the floor, the excess will be cut off.
Reinforcement
Rods with a cross-section of about 8-9 mm are laid on supports (for example, bricks) overlapping in increments of 15 cm and tied with wire.
Installation of beacons
Perfect leveling of the coating for a garage is not as important as in a residential building, so you can save on a beacon profile and use wooden blocks. They are installed at a distance of 20 cm from the walls and then at intervals of 10-15 cm less than the length of the rule. Beacons are leveled at zero level.
Some sources advise installing beacons with a slight slope towards the gate so that the water condensing in the spring flows towards the exit. However, this is a dubious decision: during the melting period, night frosts are not uncommon, and the accumulated water can turn into ice by the morning and block the gate.
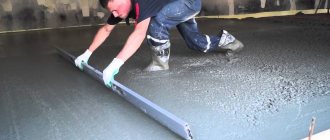
Fill
Dry concrete weber.vetonit S 100 is ideal for preparing the mixture. It has high moisture and frost resistance, and is also resistant to vibration, which is an important advantage for a garage floor. The concrete is laid in layers until it reaches a level just above the beacons, and is leveled using the rule.
Freezing
During the entire curing period, the screed is protected from drafts and sudden temperature changes, so it is better to pour the concrete floor in the warm season. For 3-7 days, depending on the outside temperature (the hotter, the longer), the screed is watered with a small amount of water and covered with polyethylene. After a day, you can take out the beacons and seal the resulting seams with the mixture. You can use the garage one month after filling.
Briefly about the main thing
The modern market is able to provide the developer with any materials. Moreover, the garage owner can decide what he will focus on when arranging the floor. Will he choose only practicality and try to save as much as possible, or will he spare no expense to add beautiful decor to the interior. Everyone only has their own capabilities.
But most garage owners follow the classic path and choose pouring concrete. Moreover, screed is necessary for many coatings. Without it, you cannot lay porcelain stoneware and acid-resistant tiles. It is also needed for self-leveling coating. Rubber, steel and even wooden floors cannot do without it.
But in the case where simple concreting is chosen, you can always modify and embellish the surface. The easiest way is painting. But, if you try, you can even make a good imitation using improvised means.
Preparation of the solution
M250 concrete is used for the garage floor. It is suitable in terms of strength and frost resistance, even for an unheated room. For a garage of 24 sq.m. (4x6 m) you will need approximately 2.5 cubic meters of ready-made concrete. Filling must be done in one day. Taking into account the slope and various losses, all 3 cubes of concrete are needed. This is a large quantity that can be provided by two mixers and a team of assistants. Or you can order a mixer to the pouring site. When pouring with a mixer, you will need a receiving tray that will direct the flow of solution to the center of the garage.
Creating a Basic Fill Layer
For a self-leveling mixture, which forms a layer of up to 10-15 centimeters, a reinforcing mesh is not needed. If you want to get a strong screed with a thickness of more than 150 mm, you can lay a mesh of 8 mm reinforcement with a cell of 100-150 mm. It should occupy up to 50% of the planned thickness of the self-leveling floor layer.
Beacons will be useful for work, especially if you need to make an inclined surface. They are installed so that the horizon of the self-leveling floor covers them by about a centimeter. After preparing the mixture, it is poured out in sections and leveled. Degassing must be done using a thorough treatment with a needle roller.
The next portion of the fill is done so as to overlap the surface of the previous floor area by 3-4 cm. You should work from the wall farthest from the gate. If you are making a sloping floor, you need to start pouring from the top point of the future surface. To make the work easier and simpler, it is recommended to dilute the self-leveling mixture to a fairly thick consistency, and not runny, as recommended by the manufacturer.
Concreting a site for a car
One of the primary tasks of owners of personal vehicles when arranging their personal territory is concreting the site for a parking space. Proper organization of the drive allows you to protect the lawn from marks left by wheels, and the car from the dirt into which the soil turns after rain.
To concrete a site, select an area near the house and cover it with a specially prepared concrete solution. Recommendations from our specialists will help you learn how to pour the solution correctly and perform all stages of the work yourself.
Repairing cracks
Over time, cracks form on old screeds or newly filled screeds, but incorrectly.
In order to eliminate such defects:
- Insert a chisel into the crack.
- Start hitting the chisel with a hammer to expand the damage. This is necessary to fill the voids as much as possible with the leveling mixture, and also allows you to identify hidden chips.
- Remove loose concrete pieces, dust and dirt.
- If the cracks are deep, it is recommended to perform reinforcement. To do this, create small depressions at several points across the crack and place short metal rods in them.
- Rinse the inside of the crack with water to remove dust.
- Wait until it dries completely and treat the crack with a primer.
- Prepare the leveling solution by mixing M400 cement and water to a creamy consistency. After this, you need to add PVA glue or liquid glass to the composition in a 1:1 ratio and mix the solution using a construction mixer.
- Pour the mixture into the crack (it should protrude slightly above the surface, as shrinkage will occur during hardening).
- After the mixture has dried, grout it (it’s most convenient to use a grinder, but if you don’t have one, you can get by with an abrasive wheel or coarse sandpaper).
Advantages and disadvantages
Concrete is characterized by high strength and fire resistance.
The main advantages of concrete are strength and durability . These are undeniable advantages that have ensured the widespread use of this building material. In a garage, such a floor is convenient due to its resistance to various types of oils, solvents and flammable liquids. Other benefits include:
- fire safety;
- easy to clean surface;
- ability to withstand significant, including uneven, weight loads.
The disadvantages of concrete pavement include:
- damage from blows from sharp, heavy objects;
- long period of gaining brand strength (at least 28 days);
- difficulty of dismantling.