One of the best options for paving roadways, paths, sidewalks, blind areas and platforms is clinker paving stones, which are often called bridge or sidewalk bricks. Clinker is one of the few man-made materials made from natural raw materials that are not only affordable and have excellent decor, but can also be used without problems in outdoor conditions under the influence of enormous mechanical and abrasive loads. Over the course of several centuries of use as a road surface, clinker paving stones have clearly demonstrated that specially fired clay can have super strength, durability and excellent aesthetic content, provided that it is laid correctly, correctly selected layout and error-free arrangement of the load-bearing base and seams.
General description and production technology
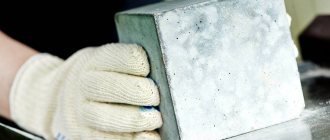
Externally, these piece products are very similar to solid rectangular or shaped bricks. Some types of paving stones are even almost the same size as bricks. Therefore, its second name is paving clinker brick. But there are also figured and mosaic products that do not look like brick at all.
The main difference between paving stones and tiles is their increased thickness, which is never less than 40 mm.
Paving clinker paving stones are made from refractory types of clay of uniform composition. If it is necessary to change the color of the product, then mix two or three different types of clay or add metals crushed into dust. The correct choice of feedstock is a very important technological task.
The manufacturing process is as follows:
- the clay is crushed and pressed through toothed rollers;
- using magnets, all metal particles are removed from the clay;
- add water to the clay and knead it until a homogeneous composition is obtained;
- products are formed using extrusion equipment, which are then dried at a temperature of 150°C for 1 day;
- The dried blanks are fired in a tunnel kiln for 2 days.
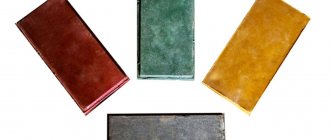
The color of the final product depends on the type of clay used, the firing time and temperature, and the addition of additional components. For example, adding coal dust darkens the product, aluminum oxide adds yellowness, and iron oxide colors it red.
Standard clinker sizes
Clinkers with rectangular or square dimensions are made from a resin module from 100 to 300 mm. Also, smaller sizes are these mosaic clinkers (see picture.
The values and dimensions of this standard are not regulated. Factory production size depends on the type of packaging and must be agreed upon prior to delivery. Here it is necessary to consider whether the clinker pavers are intended for laying with a narrow joint - from a width of 3 mm to a max.
5 mm (E) - or for laying with wide stitches - with a seam width of 8 to 10 mm (F). The requirement for clinker paving is determined by the selected size and shape of the scrub.
Clinker pavers can be supplied with or without clips.
Additional intermediate sizes and special sizes are possible, as well as paving blocks with shaped elements.
Advantages and disadvantages of the material
Like any other material, clinker paving stones have their positive and negative qualities. Its advantages include:
- high strength and durability of products;
- high moisture resistance;
- frost resistance exceeding 50 cycles;
- resistance to weak acids;
- excellent environmental performance;
- ability to maintain color throughout the entire service life;
- possibility of mechanical processing.
Disadvantages include increased cost and an insufficiently wide range of shapes and colors.
Dimensions of clinker paving stones.
Comparison of clinker and concrete paving stones
Clinker paving materials differ from vibro-cast and vibro-pressed concrete by having significantly greater strength, abrasion resistance, better color retention and higher frost resistance.
In addition, ceramics are not susceptible to the effects of weak acids, while concrete is destroyed due to them.
The main advantage of ceramic paving stones is its increased moisture resistance. Unlike concrete, this material practically does not absorb moisture and is therefore much more durable.
The estimated service life of paving bricks is more than twice that of concrete products and is about 50 years. Concrete products can only be laid flat, but ceramic paving stones can be placed in any spatial position. The base for laying both types of paving stones is prepared in the same way, as is the laying, which is carried out using a similar technology.
How to lay clinker steps
Based on knowledge of the properties of the produced material, the manufacturer develops detailed installation instructions and, for convenience, indicates it on the packaging.
The staircase can be rectangular or semicircular, which affects the number of individual elements and the angle of the cut.
Clinker is placed on a base made of concrete, metal, reinforced concrete and old cleaned surfaces.
For work you will need the following tools and materials
- Clinker, ready-made corner elements
- Tile cutter for cutting regular clinker.
- Putty knife
- Special frost-resistant glue, elastic mixtures.
- Grouting joints with waterproofing properties with markings up to 10 mm.
- A building level and a ruler to see and remove deviations from adjacent elements and the evenness of the entire row.
- Special plastic crosses for installing uniform
Next, we will consider the main stages of laying clinker tiles for outdoor use.
Preparing the base
The base for installation is leveled with solutions or putty, and covered with a primer. If necessary, use a stiff brush to remove debris, dirt, lime, rust, old paint and paint coatings.
Dusty and highly absorbent surfaces are primed with special emulsions for better adhesion and stabilization of the base.
It is important that the prepared surface does not shrink, is not subject to deformation and is leveled with cement-sand mortar.
It is necessary to maintain a slope of 2-4% from the wall to drain water.
Before starting work, waterproofing of the steps is prepared. To do this, apply 2 layers of acrylic primer.
A cement-based waterproofing compound creates a good waterproof barrier.
Before starting work, craftsmen advise mixing clinker from different packages to avoid sudden color changes. This technique gives harmonious color and shades.
Marking, fitting
When laying and trying on steps, follow the basic rules.
- The extrusion strips on the back side of the tiles and steps coincide in directions to maintain geometry.
- Withstands horizontal planes of elements
- Forms smooth seams
- Same step height
Before we move on to the description of installation, we will give the names of clinker steps used by manufacturers and professional craftsmen.
A step or tread is a tile that covers the top of the stairs.
The platform is called the top step. Sometimes it is made thinner than the other steps so that it matches the level of the floor covering.
The riser is the vertical part of the staircase, its side.
Spout, beak, capinos, profile for the step - this is the name of the protruding part of the horizontal step, which covers the upper part of the riser, protects from damage and from moisture getting into the seams between the tiles.
Before laying, try on the clinker without glue, plan the location of the steps so that a whole number of tiles fit across the width of the staircase.
First, lay the clinker from the right and left corners of the steps, then the rest.
If necessary, after fitting, the clinker is cut, adjusted to the size of the steps and the edges and ends of the material are ground.
Each clinker is numbered, then removed and stacked.
Laying
Clinker is laid only on special mixtures for external use, taking into account temperature changes.
The adhesive solution is prepared immediately before starting work. For exterior finishing, compositions marked “C2” and higher are chosen. The dry adhesive mixture is poured into water in the proportions on the package and stirred. Then leave for 5-15 minutes to dissolve and mix again.
The clinker is laid from top to bottom. This makes it more convenient to apply the solution to the steps. For installation, use a spatula with a tooth of 6-8 mm.
Stroeher recommends installing risers 3 mm below the base of the step structure. In this case, the nose of the step is extended 3 mm in relation to the riser. The solution is not applied to the inside of the spout to maintain an air gap of 3-4 mm.
The riser fits exactly under the nose of the step, but is never glued to it. This creates an open space that prevents internal stress after shrinkage or thermal expansion of the base. Excess moisture comes out through this gap.
The clinker tiles are laid and pressed by hand, and then moved a little to remove the voids inside. Be sure to check the uniformity of laying with a level. The width of the joints between the tiles ranges from 8 to 14 mm.
The glue is evenly applied to the clinker and the base, and then leveled and voids where water can accumulate are removed.
One layer of glue is placed no more than 5 mm. A thick layer reduces elasticity and leads to cracks and destruction of the material. The level of glue application is adjusted by tilting the spatula.
If there is not enough glue, then remove the tiles and add glue. Excess glue is removed so that it does not get between the lip and the riser.
The finished glue must be completely used within 2 hours.
After 24 hours, when the clinker steps have firmly “grabbed” the surface, they begin to grout the joints.
Expansion joints are filled with plastic compounds to compensate for temperature fluctuations.
Methods for correctly laying clinker on steps
Manufacturers have developed laying methods for their type of clinker. Therefore, questions arise: how to lay clinker correctly in order to avoid mistakes and consequences that scare store clerks.
Laying technology provides for two common options: from the upper or lower level.
The difficulty is that clinker is a heavy material and can slide under its own weight.
Another feature of the installation is that the steps are subject to constant mechanical load. Due to mistakes, tiles fall off, chip and crack.
We offer 2 technologies with a general technique, which is as follows.
The riser is attached vertically to the base rather than to the bottom edge of the clinker. The distance between the tiles and the riser was increased to 10 mm. In this case, the seam is filled with an elastic sealant to protect it from shrinkage of the building, temperature changes and humidity. This technique prevents the riser from being pushed up. Kapinos remains intact even in icing and frost conditions. The seam is not noticeable from the outside, and the tile retains its consistent appearance.
The first method of installing clinker
This is a hanging scheme for laying horizontal clinker tiles, in which the risers are made supported by polypropylene wedges.
On the top step, elements are laid on the left and right sides, then propylene wedges are laid, which help to lay and secure the clinker in a certain position.
The riser is glued so that there is a gap of 1 cm. The rest of the risers are leveled along it and laid on the glue, checking the plane of the cladding with a level.
The clinker is adjusted to the corner tiles of the steps. After the riser, a corner slab is laid. After all the risers are laid, they begin facing the tread. The adhesive is partially applied to the concrete, rubbed and leveled with a notched trowel. The other part of the glue is applied to the tile and a comb is made with a spatula in a perpendicular direction.
Each clinker is leveled horizontally and along the reach of the spout. The tread must be made with a slope of 3°-4° for water drainage.
After installation, leave for 4-6 hours for the glue to set, and then remove the remaining glue from the seams. After 24 hours, the joints are grouted with a waterproof mixture, and the gap between the spout and the upper edge of the riser is filled with silicone to match the color of the step.
Second clinker laying technology
Unlike the previous technology, here the upper treads are laid first. This method is called “suspended installation” and is suitable for stairs with defects or uneven geometry.
Provides for laying clinker with an increased distance of 7-8 mm between the top and bottom tiles.
After laying the tiles, blow a little foam into the tread gap and level the clinker horizontally. It turns out that the step tiles are suspended on a strip of hardened polyurethane foam, and the glue evenly fills the voids and defects of the steps. Then the remaining foam is cut off and the risers are laid. The height is checked with a square or ruler. Some of the glue is applied to the concrete, some to the tiles, then leveled and laid.
After 2 days, the adhesive base sets, the seams are cleaned of glue residues and rubbed with tinting grout diluted with a liquid with water-repellent properties. The grout is prepared so that when squeezed in the palm it does not crumble. Apply it with a rubber or metal spatula.
When the grout dries, the tiles are washed and dried several times. To seal the seams of the lower and upper edges of the riser, apply silicone along both edges and smooth them with a plastic spatula.
The work is completed, and until the solution dries completely, the stairs are covered with cardboard or polyethylene.
Important tips for choosing material and installation
It happens that frost-resistant clinker cracks in the first year after installation. The main reason is incorrectly selected materials and violation of instructions.
It is important to buy grout and adhesive with special markings for outdoor installation with frost-resistant qualities and elastic additives.
You cannot use glue to level the base under the tiles.
Clinker is a heavy material, so the adhesive composition must set quickly and have good viscosity so that the clinker does not slip under its own weight.
Classification of clinker paving materials
Clinker paving stones are classified according to their area of application and shape.
You can also distinguish this material by strength and size, but the first two indicators have a much stronger influence on the selection process. When classifying paving clinker paving stones by shape, the following types are distinguished:
- square;
- rectangular, with an aspect ratio of 1:2;
- half;
- transom, with aspect ratio 1:3 or 1:4;
- mosaic;
- shaped.
The half-shape is also rectangular, with an aspect ratio of 1:2, but in the middle it has a recessed transverse chamfer. As a result, after laying clinker paving stones, a visual impression is created that the coating is made of square products.
The mosaic form involves the use of two, three or more different stones, the joint placement of which allows you to create original patterns on the surface.
Shaped products include paving stones of oval, polygonal, rhombic and other regular geometric shapes. According to their intended purpose, clinker paving stones are divided into:
- sidewalk, 42 mm thick;
- road for passenger cars, 45 mm thick;
- road for trucks up to 5 tons, thickness 52-71 mm;
- aquatransit, for installing drainage trays;
- lawn, with holes for grass.
This also includes materials with a pronounced textured surface, which are called tactile and are used for laying paths along which people with impaired vision or the blind walk.
How to Make Stucco Without Using Experts
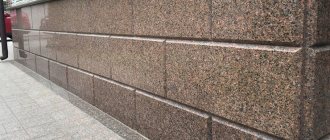
The thickness of the clinker paving is determined by the load characteristics of the wall and the expected traffic load. To cover an elastic masonry structure, in which the longitudinal joints extend transversely (eg masonry blades) or diagonally (eg "bone") in the direction of movement, has been found suitable for absorbing horizontally acting forces.
When shifting in the transverse direction, special requirements for slip resistance are taken into account; Paving stones can also be done with a rough surface. For clinker facing blocks with spacers, machine lining is possible.
Some sizes and design options for clinkers
product
Possibility of styling
Working surface dimensions, mm
Laying technology
The work of laying sidewalks and roads covered with paving clinker paving stones is in many ways similar to laying natural or concrete materials, but it also has its own characteristics. The entire process of arranging a paving brick coating consists of the following steps:
- marking;
- preparation of the base;
- laying clinker paving stones;
- finishing works.
Marking is done according to a pre-drawn plan using a tape measure or measuring tape, by hammering in pegs and pulling a cord along them. In addition, it allows you to visually evaluate and adjust the contours of the path before work begins.
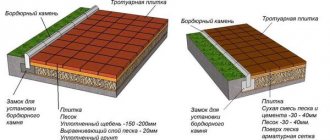
Choosing the type of base for laying paving stones
Sandy base.
Since clinker paving stones differ from tiles in their increased thickness and are more stable, they are usually laid on a compacted sand bed. In especially critical cases, with large expected loads on the surface, the last 8-10 cm of the cushion are made from a dry cement-sand mixture.
You can also build a concrete base, but given the characteristics of paving stones, it is not worth resorting to this very expensive method. There is also no need to use liquid cement mortars during the work. The stability of the coating is ensured by careful layer-by-layer compaction of the sand cushion and the presence of a drainage water-removing layer.
Laying paving slabs on concrete
Stage #1 - installation of borders
Curbs are needed to ensure that the paving slabs are fixed in place and do not move or move.
To install curb stones around the perimeter of the site, pegs are installed and the thread is pulled (you can leave the markings that were used when pouring the concrete base). The thread is placed at the level of the desired border height. When marking, it is important to take into account the slight slope of the paving for the outflow of rainwater.
A trench is dug along the thread. Its depth should correspond to the height of the part of the curb stone that will be underground and the thickness of the cement pad (3-5 cm). The pillow is placed under the curb for a tighter fixation. For example, if according to the plan the border should be 15 cm, the height of the available stone is 25 cm, then the trench must be dug to a depth of: 10 cm + 3 cm = 13 cm.
The width of the trench should accommodate the curb and a margin of 1 cm on both sides. Let’s say if the width of the curb stone is 8 cm, then the width of the trench will be: 8 cm + 1 cm + 1 cm = 10 cm.
Mix cement mortar (cement to sand ratio 1:3), lay a layer on the bottom of the trench. Next, install curb stones, driving them into the solution using a rubber hammer.
After a day, when the solution has hardened, the gap between the walls of the curb and the trench is filled with sand, spilled with water and compacted.
Stage #2 - filling with cement-sand mixture
Paving slabs are usually laid on a paving stone - a dry cement-sand mixture, which, after moistening, holds the paving elements to the base. The cement-sand mixture is prepared in a ratio of 1:6 (cement - 1 part, sand - 6 parts), no water is added.
Pour the prawn inside the area with a layer of 5-6 cm, level it with a rule or an ordinary flat board. The layer is compacted using a vibrating plate or a manual tamper.
Throttling of cement-sand base
Instead of a cement-sand mixture, ordinary sand is often used, but it does not fix the paving stones on the base worse, which leads to their subsidence, washing out by spring floods, etc. However, if it is necessary to repair a paving area, removing tiles from a sand base is much easier than using a durable paving slab.
In places where heavy trucks accumulate and in city squares, even the prancing device often turns out to be not very reliable. In this case, the paving stones are placed on glue or cement screed. This option is considered the most durable. However, it is completely unrepairable. If for some reason the concrete cracks or breaks, the tiles will no longer be suitable for secondary paving.
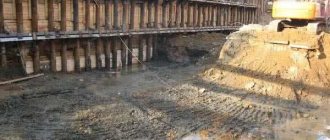
The order of work when constructing the foundation
After marking work is completed, the top layer of soil is removed and a so-called “trough” or trench is dug. Its depth takes into account the presence of a drainage layer and the thickness of the sand cushion and, depending on the purpose, is:
- for sidewalks - 35 cm;
- for roads with passenger traffic and parking lots - 45 cm;
- for roads with truck traffic - 80-100 cm.
After preparing the “trough,” its bottom is compacted and covered with geotextile fabric, on which 2-3 cm of sand is poured. It is needed so that the crushed stone of the drainage layer does not pierce the geotextile with its sharp edges. The thickness of the backfill of the drainage layer is 10-15 cm. The drainage layer is carefully compacted and covered with geotextile fabric to prevent the possibility of sand leaving the cushion into the drainage layer in the future.
Concrete base.
They begin to pour a sand cushion onto the canvas. This is done layer by layer with careful compaction of each layer. The quality of compaction determines the future stability of the coating and the likelihood of subsidence of the laid material.
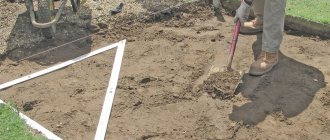
Marking paths and platforms
The technology for laying paving stones on sand involves marking the area. First, the paving area is calculated. At this stage, it is necessary to measure the width of the road so that the bars lie evenly and do not require modification. The thickness of the seams is also measured. For marking, pegs are installed in the corners of the future sidewalk. Beacon cords are needed to check the level of the road surface. Adjustment is also necessary for laying rainwater drains.
Possible patterns for laying paving stones in a pattern
The choice of laying pattern for clinker paving stones is largely determined by the following factors:
- configuration and dimensions of the paved area;
- paving stone shape;
- preferred pattern geometry.
Some of the most common patterns for rectangular products include checkerboard, herringbone, quarter weave and radial patterns. Clinker paving stones are laid in accordance with the pattern developed by the manufacturer, and shaped paving stones are laid at your discretion.
Laying options.
For centuries
In the photo, clinker paving stones look simply great, regardless of its age.
There are several reasons for this. When they say that it can serve you for decades, this is not an exaggeration: houses in Holland, created using clinker paving stones on a concrete base, have stood in their original form for more than a century. The same can be said about all European buildings of the 19th century that survived the world wars. Even in modern videos, clinker paving stones on the oldest houses in Europe look excellent. Of course, the result largely depends on the quality of the products you purchased and the method you chose. There are various methods and features of laying clinker paving stones, including:
• laying on a sand base; • work with crushed stone; • use of concrete.
The last option is the most popular in Moscow. Products from CRH - paving stones (sidewalk) Pisa - are well suited for the Moscow climate, allowing you to keep paths in their original form for many years. Most clinker products are famous for this: their amazing wear resistance and resistance to temperature changes have made them incredibly popular among Russians.
The technology for laying clinker paving stones on a concrete base is not particularly complicated, making this method accessible even to ordinary people. Of course, if you doubt your abilities, it would be best to call the professionals. However, installation of clinker paving stones on concrete is accessible even to the most ignorant person with just a couple of instructions.
Another product from CRH - paving stones (sidewalks) Radeberg - is suitable for colder regions with strong temperature changes. By the way, it is ideal for any base you prefer. In other words, it supports all options for laying clinker paving stones.
In Moscow, the products of this company can be purchased through our store, which provides the widest selection of various construction and decorative products. Among other things, here you can learn how to lay clinker paving stones yourself.
Installation instructions
It is recommended to install curbs before laying stone. They are needed to ensure the stability of the coating and prevent the outermost stones from moving to the sides. In addition, the curb will allow you to more accurately begin laying each row of paving stones.
The stones are laid on a substrate. This is the last layer of sand or cement-sand mixture that is poured. The thickness of the substrate is usually 3-5 cm. It is compacted by pressing the stone into place by tapping it with a rubber hammer.
On rectangular areas, laying clinker paving stones begins from the corner, laying out first a 1-meter longitudinal row, and then a transverse row of 1-2 meters. Next, the marked area is paved. After this, they begin to cover the next such area.
On round areas, paving stones begin to be laid from the center, gradually moving towards the edge and laying out circles.
How to choose material?
When calculating the purchase of material, it is necessary to take into account that it is advisable to make the width of the paths a multiple of the length or width of the clinker brick. Therefore, when taking measurements, you need to have a sample of several bricks from the exact manufacturer and batch from which the entire area will be paved. When purchasing paving stones, you need to take into account a reserve of 5-10% for all kinds of pruning.
Once the boundaries of future paving have been fenced and marked, you can begin excavation work. At this stage, differences appear in the preparation for laying clinker paving stones. After carefully studying the characteristics of the local soil, taking into account the load that the areas under the paving will experience, you need to choose the right method for preparing the base. Based on technical parameters and execution of work, there are three main types of preparation for high-quality installation. Let's look at each in detail.
Sandy base
Laying paving stones on a sandy base.
This preparation is used mainly for pedestrian paths and areas that will not be subject to loads. After making the markings, remove the plant layer and make a small depression, calculating that the entire layer will be approximately 7-10 cm plus the thickness of the paving stones. Sprinkle sand evenly into the bottom of the resulting bath in a layer of about 5-10 cm. Level it and pour water on it. One square meter of area requires 10 liters of water. Small puddles should appear on the surface. After this, the sand must be compacted.
Then we pour and form a supporting layer. To do this, take a cement-sand mixture in a ratio of 1:5 and, using the rule, distribute it evenly over the entire area, taking into account drainage. When installing a blind area around a building, it is necessary to make a slope from the wall of at least 5 mm per 1 meter. On the paths, slopes are planned either in one direction into the drainage system, or in two directions with the arched surface of the clinker paving stones. To avoid confusion during installation, slopes are marked with pegs and a cord.
Next, you need to install side slip limiters in the form of a curb. This is done like this: a trench of a certain depth is dug along one side of the marking. In this case, it is taken into account that the upper edge of the curb should be 5 mm below the laying area, and at the bottom stand on a cement-sand cushion of 4-8 cm. The outside of the curb is also compacted with mortar. After installing one side, we lay a couple of rows of paving stones to measure the distance between the curbs. Then we dig a trench and install the second row.
After compacting the bedding, we check the depth and slopes of the resulting layer. If the technology is followed, we proceed to installation. We tap the laid brick with a rubber mallet and constantly check the flatness. For pedestrian areas, clinker paving stones are installed without gaps. Upon completion of installation, sprinkle the entire paving plane with clean sifted sand and distribute it along the seams using a brush or broom. The remaining sand is carefully washed off with low pressure of water.
Crushed stone base
Laying paving stones on a crushed stone base.
This method is used for parking areas and moderate passenger traffic. This technology has gained wide popularity and is even used for garden paths and blind areas of buildings. After marking is completed, a trench is dug across the entire width of the paving area. For sandy soils, 25 cm is enough, and for clay soils – up to 40 cm deep. The base of the resulting pit is carefully compacted taking into account the slope to drain wastewater. Drainage sand is poured onto the bottom, leveled and compacted with water. The result should be a layer of 15-20 cm.
It is advisable to lay a geotextile sheet on top and you can begin filling the load-bearing layer of the path. For this, crushed stone with a fraction of 5 to 20 mm is used. Every 5 cm of crushed stone is compacted over the entire plane before pouring the next layer. In this way, they reach the design thickness, which ranges from 10-15 cm for pedestrian paths to 15-30 cm for parking lots and roadways of streets with light traffic. The quality of the plane of clinker paving stones without subsidence and sliding depends on the thoroughness of compaction.
Before the next layer, another layer of geotextile is laid so that the components do not mix. Sand is poured onto it and leveled taking into account slopes to drain water. It is advisable to select clean river or quarry sand, washed without foreign inclusions of dirt and clay. This will allow water to be drained from the surface of the sites quickly and without delay. The thickness of the sand should not exceed 3-5 cm.
Where the site does not abut the foundations of a house or fence, the paving should be protected with curbs. Installation of the curb is carried out in the same way as with a sandy base, only due to the larger area and load, a couple of steel rods need to be laid in the base.
If the design involves the installation of rain gutters, they need to be mounted 2-5 mm below the main area of the masonry. The slope to storm water inlets is made at 1-2% to ensure rapid drainage of melt and storm water. Installation of such trays must be carried out using cement-containing mortars or concrete.
Concrete base
Laying paving stones on a concrete base.
This method of preparing the laying of clinker paving stones is used for landscaping areas with heavy loads and in cases where the soil is not very reliable.
In the absence of a concrete platform, the base is prepared as follows. In accordance with the markings, remove the soil to a depth of 25 cm. Clean the bottom and compact it, observing the slopes. Fill in crushed stone with a fraction of 5-20 mm, level and compact it. Along the markings, formwork is installed from boards with a thickness of at least 40 mm. If the area of pouring concrete is more than 15 m2, it is recommended to make thermal joints, otherwise the base may crack. You need to prepare in advance a reinforcing mesh or individual rods for reinforcing concrete with a diameter of 10-15 mm.
The filling mixture is prepared from cement, sand and crushed stone in a ratio of 1:3:2. Fill a layer of 5 cm, level it and lay the reinforcing mesh. A layer of concrete 5-12 cm thick is poured on top to the design level. At the end of the pouring, you need to form levels and slopes.
After the base has hardened, curbs are installed at a pre-marked level. We remember that clinker paving stones should be 5 mm higher than the curb. Based on this, after removing the formwork, we clean the trenches along the concrete platform. We fill the bottom with a 5 cm layer of crushed stone. Cement-sand mortar and on top, tapping with a mallet, press the curb. We also strengthen the outside with mortar.
Pour and level a layer of sand or screenings onto the screed.
We compact it lightly until a worker can walk through without falling through.
The thickness of the sand is approximately 3 cm. The paving stones are laid on top of it. When finished, the seams are covered with sand and watered several times. The entire area is compacted with a vibrating plate.
A few words about the actual paving of clinker paving stones. The technology is the same for any base, whether you are laying a sidewalk path or a road surface. Start by attaching the orientation laces. One of them is pulled parallel to the wall and strictly perpendicular to the laying line. Lay out the first piece of the pattern and transfer it to the entire laying surface. Compact each paving stone into a single area using a rubber mallet. If the paving stones are buried below the level, they are removed, sand is poured into the hole and tapped into place again. If necessary, clinker bricks are trimmed using a grinder with a diamond wheel.
Upon completion of laying, the seams between the paving stones must be filled with sand, distributed over the site with a brush and sprayed with low pressure water. When the sand dries, the procedure must be repeated. The third time the sand wakes up after three weeks, when the fresh backfill subsides. After a month, it is advisable to repeat the procedure. Subsequently, the sand is cemented naturally, mixing with dirt and dust. Over time, the paving stones take on their final form and serve for many years.
Final work
After completing the masonry, it is necessary to seal the remaining seams between the stones. For this, it is best to use a dry cement-sand mixture in a ratio of 1:5. It is poured onto the surface and swept along the seams with a broom. After filling them, the surface must be watered. After 3-4 days, when the mixture settles, the operation should be repeated.
A more complex method is to fill the joints with liquid cement mortar. It is poured onto the surface of the coating and pulled with a spatula along the seams. Cleaning the surface of solution residues is carried out with a dry rag after it has dried.