Can elfplast, Plastic, 10 l
579 ₽ More details
Can elfplast, Plastic, 10 l
599 ₽ More details
Riveters
Concrete stairs have long ceased to be used only in the construction of multi-storey panel or brick houses. When planning to build their own house with two or more floors, many, even at the design stage, decide to build a strong and reliable concrete staircase indoors to move between different floors with their own hands.
This option for lifting to a height is very convenient to use, and when planning, you can take into account your own wishes. For example, design the height of the steps, depending on whether there are children or elderly people in the family, or set other desired parameters.
In this article you will learn how to pour concrete on a staircase.
Advantages and disadvantages of concrete stairs
If the main criterion when choosing a method for constructing a flight of stairs is the durability and reliability of the entire structure, then the most likely solution would be to pour the stairs from durable concrete. Such structures have a number of undeniable advantages:
- moisture resistance of the structure both inside and outside the house;
- resistance to fire, especially if the decoration and finishing are also made of fire-resistant materials;
- in terms of reliability and durability, they are comparable to the service life of the house itself;
- silent, the steps of this design will not begin to creak, like wooden steps;
- the possibility of a variety of designer finishes, decoration with wooden elements, marble;
- There are many options for location, shapes and designs when making concrete stairs.
Concrete in the construction of private houses is several times superior to all other materials used for such purposes.
In this video you will learn how to pour formwork:
They are able to withstand enormous loads and do not require special care or repairs during operation.
Of course, such connecting structures have some disadvantages. These include:
- high labor costs during DIY construction;
- relatively higher price than simple wooden structures;
- significant weight of the concrete structure, requiring reliable foundations below and above, support on the floors, which makes it impossible to erect such a staircase in light frame and wooden houses;
- the long period of construction of the staircase, due to the long hardening of the concrete;
- the need for preliminary calculations and volumetric preparation for the pouring process, which involves the production of formwork for the steps.
Despite all the listed disadvantages, the popularity of monolithic concrete stairs in private housing construction does not decrease. Especially when building two- or three-story houses made of aerated silicate bricks.
Step cladding
Concrete can be faced using different materials. This will extend the life of the porch, since the base of the concrete steps will be protected from environmental influences. In addition, the cladding will allow you to beautifully decorate the staircase. Builders use several options for finishing concrete porches:
- Porcelain tiles. This building material is made of white clay to which minerals have been added. Due to firing, it becomes very durable, so this cladding is considered one of the most durable. The addition of pigments allows you to give the tiles different shades.
- Clinker (red clay tiles). This material is recognized as safe for the environment, since the tiles do not contain any harmful additives. The tiles have different shapes.
Return to contents
Necessary calculations of material and dimensions of the structure
Before you begin calculating the parameters for the construction of a concrete staircase in a private house, you should determine its location. Since the concrete structure will be heavy, it must rest on a concrete base, so there is a need to first pour the foundation for the stairs. It is better to immediately provide a place for constructing a staircase when designing the entire house before starting construction.
You can calculate other parameters of a concrete staircase and understand how to make it yourself. The height of the rise is already known and is equal to the height of the ceilings, so it is necessary to determine the length of the future staircase and its angle of inclination. The maximum permissible angle for constructing a safe structure is considered to be 45°, but for convenience it is better to take this figure around 26-33°.
Having determined the angle of inclination, it is easy to calculate the length of the staircase itself and its projection onto the floor. This can be done using a special calculator or independently, using the formula for calculating the hypotenuse of a right triangle, knowing the value of the angle of inclination and one of the legs (the height of the room).
Based on the obtained value, the length of the space under the stairs is calculated. If the room does not allow for such a long structure, it is worth considering an option that includes several flights of stairs.
It is more difficult to build a spiral concrete staircase to the second floor, especially with an offset center, so it is better to trust a specialist.
Moreover, to carry out correct calculations, you will need knowledge in theoretical mechanics.
It should be placed in such a way that the height of the ceiling above the flight of stairs is approximately 2 meters or more. This will make climbing to the upper floors comfortable even for tall people. The recommended width of the structure for a private house is from 80 to 100 cm.
At the next stage, the width and height of the steps are calculated. The steeper the rise of the flight of stairs, the higher and narrower they will be. For a staircase with a small angle of inclination, on the contrary, the steps can be wide and their height smaller. You can determine the optimal parameters using tables, a special calculator, or by calculating yourself using a formula showing the relationship between a person’s step length, the height and width of the steps.
You need to correctly calculate the amount of material needed
Knowing the height of one threshold, you can calculate their number based on the height of the stairs. And, accordingly, based on the data obtained, determine the width of the step. The main thing is that the parameters of the steps must meet the requirements for ease of movement along them as much as possible.
The obtained values can be adjusted within 5 mm. If the width of the tread is too small and does not allow you to place your foot normally, then so-called overhangs are made.
An important value for a heavy concrete structure is the thickness of the supporting screed. Its width is determined based on the height and length of the flight of stairs.
Laying tiles on the porch of a house
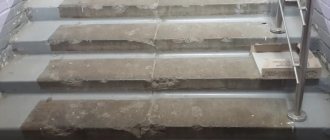
The adhesive for laying the tiles was specially selected to be elastic, water-repellent and frost-resistant. Before laying the tiles, I marked the middle of the steps and started laying from the middle, since a whole number of tiles did not fit on the step and I had to cut the tiles at the edges with a grinder. The steps turned out to be 16 centimeters high, and the risers were 20 centimeters, so the tiles also had to be cut to size.
Laying tiles on the porch of a house.
The tile had dimensions of 400x300x35 millimeters, but later, during installation, it was discovered that its thickness on one edge was normal, and on the other it was already 30 or 25 millimeters. We also had to take this nuance into account.
I glued the tiles from the bottom up, installing the risers first. When laying the tiles I used an 11 mm notched trowel. The glue was applied both to the steps themselves and to the tiles. The top of the porch itself was laid with porcelain stoneware using the same glue.
The top of the porch has a slight slope from the center towards the steps. The steps themselves are made with a slight outward slope so that water does not accumulate at the junction with the riser.
The grout for the tiles was elastic, frost-resistant and water-repellent. It was grouted with a rubber spatula, and since the tile on the front side had small corrugations, I was tired of scrubbing it off the grout.
Laying paving stones near the porch of a house
Photo of laying paving stones near the porch of the house.
Before laying the paving stones, the old paving slabs were removed and everything was cleaned down to the concrete base. A slab was poured onto this base, onto which paving stones were subsequently glued. The seams in the paving stones spilled out with a cement-sand mixture and were spilled with water.
The following tool was used to repair the steps of the porch of the house
- “baby” hammer drill with chisel and scraper;
- grinder, discs for it on stone and metal;
- crowbar, sledgehammer, hammer, rubber mallet;
- electric jigsaw, hand saw;
- level, tape measure;
- concrete mixer 140 liters;
- drill with mixer;
- spatulas - 11 mm toothed and rubber.
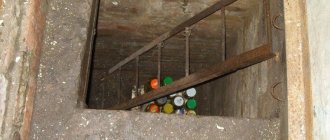
Installation of the main formwork
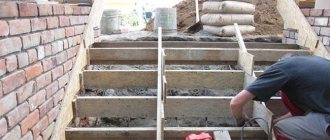
How to make high-quality formwork for stairs? To correctly install the formwork for the subsequent pouring of a monolithic concrete staircase, you should step by step follow all the recommendations specified in the instructions. If the staircase rests on one side of the wall, then before installing the formwork, you can mark the parameters of the future structure on the supporting wall. When designing several flights, it is worth making a groove (recess) in the wall of about 10 cm, on which the transition platform will then rest. The reliability and appearance of the future structure depends on the correct installation of formwork.
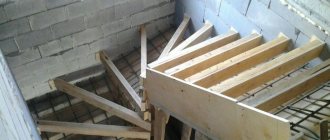
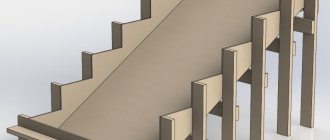
At the first stage, a board is installed perpendicular to the floor with a height equal to the height of one step and the planned floor screed. It is supported by flat, continuous moisture-resistant plywood with a length equal to the length of one flight, which will become the basis for the concrete slab. Installation of plywood at the desired angle is carried out using beams or special telescopic racks. The beams with parameters 100×100 mm will fully support the weight of the future structure. And to strengthen the formwork you can use metal corners.
The side parts of the formwork for the stairs are mounted to the plywood with self-tapping screws, and all wooden elements must fit tightly against each other so that the filling solution does not get into the existing cracks.
If non-moisture-resistant plywood and boards are used, they should be moistened with water or covered with film to prevent concrete from absorbing into the wooden structure.
What should you have on hand?
Concrete staircase for porch
In order for the porch of the house to acquire a concrete staircase, you will need to purchase certain material, as well as tools. To get the job done well you will need:
- concrete mixer;
- shovel;
- bowls or buckets in which you can mix the solution well;
- sand, crushed stone, water and cement powder;
- fittings made of iron or steel;
- materials for fixation (nails, dowels, etc.);
- planed wood beams;
- plywood;
- scissors for cutting metal;
- plane;
- hacksaw;
- hammer.
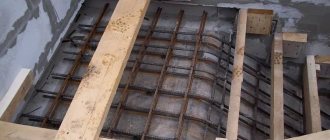
Before pouring concrete, metal rods are installed around the perimeter of the entire formwork, which are firmly tied or welded together. If welding is used, you need to tack the rods with a spot seam in increments of 10-15cm. Such actions will increase the strength of the structure and save you from the possible appearance of cracks and deformation of the formwork.
To protect the surface of the stairs from possible destruction, cover them with a metal corner. To do this, rods are welded to the corner, which are then immersed in liquid concrete.
It is very important to install a reinforced iron march. This will add strength to the middle flight of stairs, which has no support. If there is a solid base under the march, the concrete does not need to be reinforced. The flight can be installed either in the staircase or welded to metal plates that are embedded in the flight of stairs or in the structure itself.
Reinforcement
Reinforcing any concrete structure with reinforced concrete increases its strength. The first layer of reinforcement is laid at a distance of about 30 mm from the base of the formwork, and a mesh of rods with square cells 150-200 mm wide and long is constructed. You can place small steps or bricks under the structure. Longitudinal rods can be thicker than transverse ones, since they bear a greater load. Although most often they use reinforcement of the same diameter, for example, 14 mm.
It is recommended to connect the reinforcement together with a special wire; welding can weaken the entire structure. To strengthen the flight of stairs, you can lay out a metal mesh in two layers. In this case, the second row needs to be placed 30-40 mm higher than the first, and it can be made from rods with a diameter of 6 mm with a cell width of 150 × 150 mm.
When laying the reinforcing mesh, you need to ensure that its edges are at a distance of 20-50 mm from the side formwork. Thus, the rods will be protected by a thick layer of concrete from external influences, which can lead to corrosion and destruction of the reinforcement.
Completion of formwork installation, installation of partitions and risers
After laying the reinforcement, they begin to install risers, which will help to pour the concrete steps evenly and correctly. To do this, a rectangle is cut out of a sheet of plywood with a height equal to the height of the future steps or 10 mm more. All panels are cut the same, since all the steps on the stairs will also be the same size. Three parts are attached to the resulting rectangle - a support board and two side wooden parts.
The length of the support board will be exactly the same as the length of the plywood riser, and the side parts (lintels) with a board thickness of approximately 100-150 mm are needed in order to attach the resulting part to the sidewalls or wall of the finished formwork base.
Don't forget about the installation of formwork
Having made one riser, you should try it on at the installation site and, if necessary, make changes, and then complete the remaining parts for the formwork of exactly the same size. Attach the jumpers to the sides and wall using self-tapping screws or dowels. The installation of each panel should be accurately measured and adjusted so that all risers are positioned strictly perpendicular to the floor.
The risers should be installed strictly along the upper edge of the step, but they can be located slightly below the lower edge.
This is done in order to create a small barrier for the concrete solution, which will facilitate the pouring process.
Laying tiles on a round porch
Now in more detail about the cladding process itself. It cannot be used on wet concrete. With loss of moisture, even artificial stone shrinks, and therefore clinker glued ahead of time will definitely fall off. Therefore, wait ten days after constructing the stone foundation, and even twenty in wet weather, and treat its surface well with concrete contact.
The gluing of the tile itself should begin from the bottom riser, moving from the center of the arc to its ends. Simply apply glue to a pre-cut piece of tile with a comb and press it to the plane so that it is tangential to the circle. Now, if necessary, add glue to the sides of the tile and lay the next element next to it.
Now you can move on to the tread of the first step.
There are two fundamentally different technologies for laying tiles. The first suggests not matching the seams between horizontally and vertically laid tiles. The second, on the contrary, insists on this point. Let's say that the second method is more labor-intensive, but also gives a visually better result. Therefore, beat off radially directed lines from the corners of the vertically installed tiles and cut the tiles chosen for installation along them. Ideally, it will all be the same size; in practice, this rarely happens.
The next vertical row needs to be cut not only in width, but also in length. The size of this tile directly depends on the width of the back edge of the tile previously laid on the step. Otherwise, the process will be no different from facing the lower riser you are already familiar with. Let us only add that the tiles should be aligned with the upper step, and between it and the lower one, leave the same gap of 3-4 mm.
The gluing of tiles on the second step and third riser is also no different. As before, the top row should be cut according to the previous one.
There are only some differences in the cladding of the porch area itself. Here you should first form a semicircle of steps from wedge-shaped tiles, and lay the rest of the space in regular horizontal rows. Visually it will look like this.
Afterwards, wash the threshold thoroughly, remove excess glue from the seams and fill them with waterproof, frost-resistant grout. After which you can hang a canopy over the porch and invite guests to the viewing. If everything turned out as in the picture, you really have something to brag about.
Pouring concrete
Having figured out how to make formwork for pouring a monolithic concrete staircase, you can begin preparing the concrete solution and pouring the frame. For the construction of durable structures, concrete grade M250-300 is chosen. And for the construction of a porch made of concrete, it is worth choosing frost- and moisture-resistant materials. The solution for pouring a flight of stairs is prepared as follows:
- half of the water;
- one part of cement M400;
- two parts sand;
- four parts of crushed stone;
- superplasticizer S-3, 0.7% by weight of cement.
Pouring concrete begins with the first stage and gradually moves upward. Having filled the first two stages, it should be treated with a vibrator to remove the air inside the mixture. You can also lightly tap the formwork with a hammer so that the concrete mixture settles and you can add another portion.
Level the surface with a trowel and wait 10-15 minutes, during which time the mixture will harden a little and the next two steps can be poured. If, during further pouring of concrete, the first steps begin to rise under the pressure of the upper ones, they need to be leveled by removing excess concrete.
After pouring the concrete, the finished staircase is covered with polyethylene to prevent rapid hardening. The slower the concrete mixture hardens, the better it will set and the stronger it will be in the end. During the first week, the polyethylene is removed several times a day, and the surface is sprayed with water to avoid cracking of the concrete.
Preparing for work
When making calculations on how to pour concrete steps for a porch and drawing up a drawing, it is necessary to take into account a number of factors. The most important of them:
- Porch height. Measured from the top threshold to ground level.
- Porch width. Usually depends on how many people live in the house, as well as whether you plan to carry heavy objects, such as furniture, around it. Let’s say if only one person lives in a house, then you can make the width less than a meter, but if the house is designed for more people, then 1 m is the minimum width.
- To make it easy to go up and down, it is recommended to build an unpaired number of steps. Their optimal width is 25 cm and height is about 15 cm. These indicators, in turn, also depend on the total number of steps and the height of the building. The main thing is to make sure that your foot can easily fit on the step. In this case, the porch will be absolutely safe. You also need to remember who exactly will be walking on the steps. If these are elderly people or, conversely, small children, you should try to make the height smaller.
- To ensure that the door leading into the house does not touch the floor of the extension when moving, it must be poured a few centimeters below the threshold.
- The optimal angle of inclination of a flight of stairs is 35 degrees.
- If the extension will have a large height, then you need to decide in advance on the location of the railings.
Timely planning will help save time and ensure proper filling.
It should be carried out before all construction work begins. The shape of the porch, which can be either semicircular or square, is also important.
The order and timing of stripping
It takes at least 3-4 weeks for the concrete structure to set and reach its strength. Until the mortar has completely dried and the formwork has been removed, you should not walk along the flooded stairs; to do this, you need to provide other ways to move between floors. For example, using a simple wooden staircase.
A week after pouring, you can remove the formwork boards from the steps. This will allow you to evaluate the quality of the work done and, if necessary, fill the cracks again. After 2 weeks, the side boards are removed, and after another week and a half, you can remove the support in the form of beams and the lower part of the formwork. Now the ladder is completely ready to move along it.
Features of making a monolithic concrete staircase with your own hands
When it is already clear how to make a concrete staircase for your own home with your own hands, you need to think over a work plan. Since all spans and flights should be poured at one time, it is worth purchasing or renting a suitable concrete mixer and taking care of attracting help.
The process of installing formwork is also very labor-intensive, therefore, by inviting a specialist with experience in this field, you can avoid many problems in the future. If you make a mistake at the preparatory stage or during calculations, it is almost impossible to correct it later.
Having decided to build a reliable concrete structure in your house to reach the upper floors, you can consider a lot of possible finishing options. And after removing the formwork, the staircase can immediately be used to move along it, even without finishing. Possible construction options make the concrete structure suitable for small houses, and in a huge cottage it can become a real decoration.
Creating a foundation
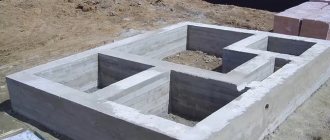
For a porch and steps made of concrete, you definitely need to build a solid foundation with your own hands.
The construction of such a foundation begins with digging a hole approximately 0.5 m deep. The exact figure characterizing the depth depends on how much the soil freezes. It is necessary to find out the level of its freezing and, when determining the depth, proceed from this parameter. READ Characteristics and scope of use of M100 concrete
It is best to dig a hole that is approximately 0.25 m below the freezing level. For example, if the soil freezes 40 cm in winter, then the hole for the foundation should have a depth of more than 65 cm. In general, the higher the level of freezing, the deeper you need to dig. The width of the pit should be slightly larger than the width of the porch itself.
After the hole is dug, you need to create a sand and crushed stone cushion . First, a 10-centimeter layer of sand is poured and thoroughly compacted. Then crushed stone about 5 cm thick can be laid on top of it. Such a cushion will protect the base from groundwater. Also, thanks to it, the foundation will acquire additional strength.
