The best price for reinforced concrete floors of a house!
In low-rise construction, practically the same requirements are imposed on floors as in the construction of large objects. First of all, this is, of course, strength, which is necessary in order to withstand the current loads. Rigidity is also very important - slabs under load should not allow deformations exceeding the permissible limits established by building codes. In a residential building, an important indicator is sound insulation, and here the floors must also have certain properties. And finally, efficiency. In the case of individual housing construction, significant savings come from the use of technology for pouring monolithic reinforced concrete floors.
Preparation for concreting
Next, a monolithic reinforcing belt is provided along the entire perimeter of the floor, in its plane.
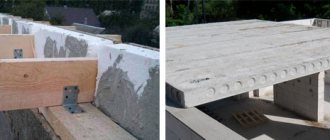
It allows you to reliably connect the floor with the load-bearing walls, as well as impart spatial rigidity to the entire building and prevent the appearance of cracks in it. A frame of four longitudinal rods with a diameter of 8 to 12 mm is attached to the reinforcement outlets at the ends of the beams. The reinforcement is connected to each other with metal wire with a diameter of 6 mm, the distance between the clamps is 200 mm. The reinforcing belt will be concreted simultaneously with the entire ceiling. Then formwork is constructed around the perimeter of the floor. It is made from aerated concrete blocks with a thickness of 100-150 mm. They are fixed to the walls in the same way as wall blocks - using thin-seam glue. On the inside, thermal insulation slabs made of expanded polystyrene - regular or extruded - are glued to the blocks. The standard thickness of the slabs is 50 mm. They serve as a thermal break - they prevent the building from freezing through the ceiling.
Aerated concrete blocks are laid between the beams, tightly joining them to each other. A welded reinforcing mesh with cells 100 x 100 mm is rolled out on top of the blocks and armored belt, its wire diameter is 5 mm. The mesh will be located approximately in the middle of the concrete slab (at a height of 20-25 mm), since it rests on the upper reinforcing belt of the beams, and it rises above the blocks. If necessary, plastic clamps are placed under the mesh, which prevent it from sagging and thereby guarantee a uniform layer of mortar under it during concreting. The mesh can be simply laid, or for greater reliability it can be attached to the reinforcing belt with knitting wire.
Let's get started
It is very important to know how to properly reinforce a slab. It should be said right away - give up welding
Overheating has a negative effect on the fittings. Under significant tensile loads, it usually breaks precisely in those places that were welded. In addition, damage to the crystal lattice makes the metal more susceptible to corrosion.
If you are working with a foundation slab, it is better to perform reinforcement using rods connected with a special knitting wire. The ties can be made by hand or using a tying gun. This is a very expensive instrument, but it is often rented out. The gun will significantly reduce the time spent. Even an inexperienced builder can easily make 30–40 ties per minute. When using a regular crochet hook, this indicator for a beginner will be no more than 10.
The reinforcement process is carried out in the following order:
- We beat off the outline of the foundation. Stretch the thread along the edge or draw it with a marker.
- We mark the locations of the reinforcement according to the project.
- Lay out 1 layer of reinforcement. If there is a shortage of one whole rod, we join them, but you should remember the rule that adjacent rods are not connected in one place, you should make a separation between the reinforcements. The overlap size is 42 reinforcement diameters.
- Align the rods along the edge, maintaining the protective layer. And we lay them across them, starting from the edge, with rods and mounts every 200 cm, and along them we decouple the mesh. Under the installations knitted two meters apart, we will place clamps for the reinforcement to provide a protective layer.
- We mark and lay the reinforcement of the 1st layer. We lay the rest of the reinforcement in 2 layers and knit it, observing the step. We deliver the clamps, and lay and tie the 2nd layer reinforcement. The lower reinforcement of the monolithic slab is completed.
- We install and knit spatial frames for the top layer of the mesh.
- We lay out the 3rd layer of the main mesh and tie it to the frames, strictly opposite the lower reinforcement. We lay the 3rd layer of reinforcement, and cover all 4 layers of mesh. Having knitted the reinforcement with the mesh, we lay out the last reinforcement of 4 layers. Pawns are knitted along the edge of the reinforcing frame.
- This completes the reinforcement of the foundation slab.
The finished frame is filled with concrete. It is necessary to pour continuously so that the previously laid concrete does not have time to set. Otherwise, delamination may occur—liquid concrete, falling on already set concrete, will not be bonded to it. Because of this, the strength of the foundation will suffer and, accordingly, the reliability of the constructed building will decrease.
At this point, the construction of the foundation is considered complete. After a few days, the concrete will set, and after a month it will gain sufficient strength to build a new house.
That's all. Now you know how to reinforce a monolithic foundation, choose the appropriate material and carry out the necessary calculations. This means that there will probably not be any problems during construction.
Basics of reinforcement of a monolithic foundation slab with drawings
Instructions for monolith reinforcement
It is necessary to cover the spans between floors using monolithic platforms. To make them as strong as possible, they need to be reinforced. The technology for carrying out this work includes a certain sequence of actions:
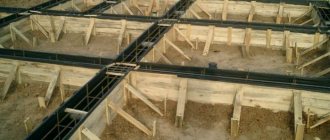
Installation of formwork. The first step is to make a box for which boards and also sheets of plywood can be used. To keep the formwork in place, tripods are installed underneath it.
You need to understand that concrete is a very heavy material, and therefore it is important to provide good support for it. To ensure that the concrete does not stick to the plywood or boards, and the box can then be removed, you should choose materials with a laminated or oil-treated surface.
Frame installation
To do this, steel rods are placed in a box and tied together. The cells should have a length and width of approximately 15-20 centimeters. If suddenly the length of any of the rods is not enough, you need to apply another one, but with more overlap.
Filling the box. At this stage, it is recommended to use factory-produced concrete mortar. Firstly, it clearly complies with all the necessary quality standards, as well as the proportions of the required components. Often the material also includes additional components that improve the strength properties of concrete. When the concrete solution is delivered to the construction site, the formwork is poured using a concrete pump. A special construction vibrator compacts the solution over the entire area of the platform and distributes it evenly, eliminating bubbles from the solution. At the end of this work, the surface is leveled again by hand and then sprinkled with dry cement on top.
It is worth considering that when filling the platform, the air temperature should be at least 5 degrees. Low temperatures can negatively affect the quality of the platform. An example is the appearance of cracks caused by the freezing of moisture in a concrete solution. Any cracks and damage to concrete structures entail a reduction in the service life of the slab, as well as a deterioration in strength characteristics. If conditions are favorable, the concrete platform dries completely within one month.
Features and reinforcement scheme
Modern technology for the construction of low-rise residential and commercial buildings involves pouring floor slabs directly at their permanent location. This is the only possible solution for structures with complex geometry.
In addition, by making the floor slab independently, the developer significantly reduces its cost and receives a ceiling without inter-slab joints, all other conditions being equal: the required load-bearing capacity and durability.
In order for these factors to be present, before pouring concrete it is necessary to perform single or double reinforcement of the floor slab with steel or composite reinforcement.
Typically, a drawing of floor slab reinforcement is developed by a structural engineer strictly individually. When calculating the reinforcement of a floor slab and drawing up a reinforcement scheme, the loads on the structure, the dimensions of the span and the places where the loads are concentrated are taken into account.
A difficult area in terms of concentration of loads is the contact of columns with walls and arches, contact with technological openings, the place where a fireplace is installed, etc. Therefore, here we will consider a special case of reinforcing the floor slab of a private house between the first and second floors. Main stages of reinforcement technology:
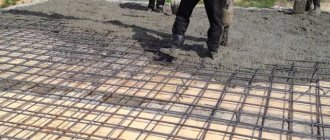
Calculation of the thickness of the floor slab. The thickness of the ceiling is directly dependent on the longest span, in meters divided by 30, but not less than 150 mm. In other words, the largest size of the slab between the supports is taken and divided by 30. For example, with a span length of 6 m, the thickness of the structure remains 6/30 = 200 mm. Assembly and installation of formwork. Preparation for knitting the frame. The reinforcement frame of the floor slab is a spatial structure consisting of the upper reinforcement of the floor slab, the lower reinforcement of the floor slab and spacer elements connected into a single whole by knitting wire. To create a reinforcement belt, a reinforcing rod of class A-III according to GOST 5781–82, with a diameter of 8-14 mm, is used. To connect the elements into a single whole, annealed steel wire with a diameter of 1-1.5 mm is used. Distance elements can be purchased at hardware stores or on the websites of manufacturing companies.
Important! The frame structure should be located in the thickness of the slab. Exits of metal elements outside are not allowed
In general, the outer surfaces of the frame must be protected by a layer of concrete with a thickness of at least 1 diameter of the reinforcement. To ensure the required thickness of the protective layer, improvised materials are used (pieces of wooden planks, pieces of brick, etc.) or special “purchased” distancing elements. Knitting of the lower reinforcement. In general, the reinforcement pitch for the floor slab is taken to be 200x200 mm. Longitudinal rods are laid out on the spacer elements in 200 mm increments. Transverse reinforcement of the floor slab is laid on top of the longitudinal rods in increments of 200 mm. Next, spacer elements are distributed over the entire area of the reinforcement chord to attach the second chord. Knitting of rods and spacer elements is carried out at all intersection points, along the entire perimeter of the frame. Knitting of the upper reinforcement. It is carried out similarly to the lower structure. In this case, the created mesh of reinforcing bars is attached to the upper part of the spacer elements. The structure is ready to be poured with concrete.
Knitting tool. To connect rods and spacers, you can use: a homemade or ready-made hand hook (price 280-300 rubles), semi-automatic pliers (price 1,000 rubles), an automatic gun for tying reinforcement (price 160,000 rubles) or ordinary metalwork pliers.
The listed tool provides approximately the same quality of knitting. The difference is speed. For example, an automatic gun speeds up the knitting process by 5 times compared to knitting with hand crochet or pliers.
However, if the task is to produce one or more floor slabs, it is economically feasible to use the last two options for hand tools or rent an automatic gun.
Additional reinforcement of floors - advantages and disadvantages
The need to strengthen concrete floors is related to the characteristics of concrete. The concrete mass is capable of withstanding increased compressive loads, but is susceptible to tensile forces and the influence of bending moments. Concrete is not capable of damping loads on its own and requires additional reinforcement. To compensate for tensile forces and maintain the integrity of reinforced concrete structures, additional reinforcement of floor slabs is performed.
A concrete slab, the strength of which is increased due to additional reinforcement, is a reliable structure with a number of advantages. Main advantages:
- long service life. Thanks to the increased safety margin, the service life of a reinforced concrete structure is calculated in decades;
- absence of butt seams, as well as smooth surface of ceilings and floors. There is no need to perform expensive and labor-intensive finishing work;
- reduced weight of the monolithic floor structure compared to purchased reinforced concrete panels. This significantly reduces the load on the foundation;
- increased strength characteristics. The combination of the properties of steel reinforcement and concrete makes it possible to increase the strength of the base and ensure its integrity under increased loads;
- increased reliability of reinforced concrete structures. Resistance to loads acting in different directions is achieved through reinforcement. Reinforced floors are capable of supporting from 0.5 to 0.8 tons per square meter of surface;
- Fire safety. The use of non-combustible building materials ensures the fire resistance of the structure. The stove is able to maintain its integrity for a long time under the influence of elevated temperatures and open fire;
This design weighs noticeably less compared to ready-made reinforced concrete slabs, however, this factor does not affect its strength
- reduced costs compared to using standard panels to form floors. The costs of constructing a monolithic floor are significantly lower compared to a similar prefabricated structure;
- no need to use special lifting equipment and rigging equipment. A crane is not required to form a monolithic slab;
- uniform transfer of forces from the monolithic slab to the load-bearing walls of the building or support columns. As a result of load equalization, the likelihood of crack formation is reduced.
Among other advantages, it should be noted the possibility of pouring a non-standard configuration of the ceiling. This allows the construction of buildings of varying levels of complexity with non-standard layouts. A serious advantage is the ability to create interfloor openings and communication openings at the concreting stage.
Along with the advantages, there are also weaknesses:
- increased labor intensity of carrying out activities for assembling the reinforcement frame;
- increased duration of the process of cement hydration and, accordingly, the gain of operational strength by concrete.
Advantages of covering with corrugated sheets.
Overlapping with corrugated sheets is characterized by the following advantages:
- Low cost of material and installation work. Since installing the ceiling is easy with your own hands, financial costs remain minimal. The material itself is sold at an affordable price.
- Possibility of implementing any architectural solutions and installation of different geometric shapes.
- The pouring process is relatively simple and eliminates the need for formwork. The use of ridges reduces the consumption of concrete mixture, which also has a positive effect on the final cost of the work.
- Even an inexperienced beginner can complete the installation of the system.
- The finished floor is lighter than a reinforced concrete structure with removable formwork, while the strength properties remain at the highest level. As a result, the system does not place large loads on the foundation and remains an effective solution for old buildings. With the help of a profiled sheet, you can achieve proper distribution of effort.
- Being an indispensable component of a monolithic structure, corrugated sheeting takes on the role of a reinforced frame.
- The thickness of the floor is determined by the location of its operation. In order for them to meet the required standards, a number of calculations need to be performed.
- The finished slab has good strength, and the presence of a metal profile strengthens the structure and gives an increased degree of rigidity.
- There are different brands and types of corrugated sheets available in the market. This expands your choice and allows you to find the best option for any application. The material is characterized by increased resistance to ignition. Fire resistance indicators are 30 minutes, and if we are talking about a monolithic system with a reinforced span - 45 minutes.
- The ceilings between floors are characterized by reinforced formwork, which allows you to install the ceiling without a finishing layer or other installation work. Corrugated sheets are indispensable for rooms with a metal frame. To connect the columns, reinforcement is used, making the frame rigid and resistant to various negative influences.
In our company you can buy corrugated sheets for monolithic flooring wholesale and retail at a reasonable price.
Monolithic floor thickness
In accordance with the calculations performed, we can recommend, for the installation of monolithic floors, in private houses, a floor thickness of 150 mm, for spans up to 4.5 m and 200 mm up to 6 m. It is not advisable to exceed the span of 6m. The diameter of the reinforcement depends not only on the load and span, but also on the thickness of the slab. The often installed fittings with a diameter of 12 mm and a pitch of 200 mm will form a significant reserve. Usually you can get by with 8mm at 150mm pitches or 10mm at 200mm pitches. Even this reinforcement is unlikely to work to the limit. The payload is assumed to be 300 kg/m2 - in a home it can only be formed by a large closet completely filled with books. The actual load in residential buildings is, as a rule, significantly less.
The total required amount of reinforcement can be easily determined based on the average reinforcement weight coefficient of 80 kg/m3. That is, to install a floor with an area of 50 m2 with a thickness of 20 cm (0.2 m), you will need 50 * 0.2 * 80 = 800 kg of reinforcement (approximately).
The cost of the service is 5,000 rubles. per m³
- Free consultations on any issue - seven days a week
- We create the most durable structures - 2 year guarantee
- Individual calculations - free specialist visit
- All materials are shipped within 4 hours after the application
- Experienced teams with a foreman at each site
- Own formwork. You don't need to look for a rental
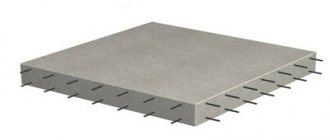
Monolithic flooring for any type of building. The best solution for your building is a monolithic floor. A monolithic floor reinforced with double reinforcing mesh with reinforcements.
Distributed load, increased design functionality. Monolithic ceiling - operation for up to 100 years. Place partitions on monolithic floors anywhere!
Reinforcing reinforced concrete floors - we reinforce reinforced concrete floors with our own hands
To strengthen the overlap you should prepare:
- linings for reinforcing bars. Clamps are installed to ensure a constant distance between the frame and the concrete surface;
- rods with a cross section of 12-18 mm and annealed wire for tying reinforcement. A crochet hook will speed up the connection of elements.
You will need a device for bending rods, as well as a grinder with a circle for metal.
To ensure that the lower mesh is located at the required distance, special plastic clamps are placed under it
When assembling the reinforcement cage, follow the given sequence of operations:
- Cut the reinforcing bars into pieces of the required sizes.
- Tie the rods with wire, forming a mesh with cells 15x15 or 20x20 cm.
- Place the bottom mesh on the supporting elements.
- Install vertical bars in 1 m increments.
- Assemble the top tier of the frame and attach it to the vertical rods.
When assembling the reinforcement cage, pay attention to the amount of overlap, which is 35-40 times greater than the cross-section of the rods
Installation process
As with all work, the first thing you need to do is purchase all kinds of materials and equipment. In particular, to make formwork, you will need either a collapsible structure, which can be rented from construction companies, or material for making this structure yourself.
If the installation will be done with your own hands, then for the formwork you need to prepare moisture-resistant plywood or boards. The plywood must be at least 2 centimeters thick, and the boards must be at least 2.5 centimeters thick.
When constructing a building, in some cases it may be necessary to install a special reinforcing element. It is called a monolithic belt for floor slabs. It is a reinforced concrete strip that runs along the perimeter of the building and serves as a support for the structure being constructed.
- The process of installing the slab begins with the installation of racks or supports that will support the slab during its installation and hardening. They are installed with a certain step - it is regulated by the distance between the floor beams and its size.
- Next, the longitudinal beams are installed. They need to be placed in special fastenings on previously installed supports. People call these mounts “crowns” or “forks.” When laying beams, you need to take into account that the surface of the formwork must be strictly horizontal. All beams are covered with plywood or boards. After forming the slab, these parts of the formwork will need to be removed, so it is necessary to take into account these nuances of their installation.
When the beams are laid, you can begin assembling the horizontal part of the formwork, checking the horizontal plane
It must be observed absolutely throughout the entire area. When assembling, you should pay attention to how smooth the plane will be - this determines how smooth the ceiling, which is its lower part, will be. In order to obtain a surface of the highest quality, as well as to prevent concrete from leaking into the cracks, a waterproofing film is laid. Next, the vertical elements are installed
They need to be installed so that after pouring, the edges of the slab overlap the walls with sufficient margin. The required distance is indicated in SNiP. After this, they begin to reinforce the entire surface of the future slab. Two rows of mesh made from reinforcing bars are laid. The cell of the resulting grid should be about 20 centimeters. The first layer is laid at a distance of about 2.5 centimeters from the bottom plane of the formwork. In order to raise the mesh, special plastic spacers are used.
- The second layer of mesh is mounted at the same distance from the upper plane of the future slab. To secure two layers of mesh at the required distance, special stands are bent from reinforcing bars. All layers of the mesh and all its elements are connected to each other with knitting wire.
- When the reinforcement is laid and all the formwork elements are in place, the process of pouring the mortar begins. The grade of concrete is chosen for a reason, but based on data on the expected load on the slab. Do not forget that all technological holes in the resulting slab must be fenced in advance with specially made boxes.
- After pouring the solution, it must be compacted with a special vibrating machine for concrete. This will make the poured ceiling more uniform in structure, and will also expel all air bubbles formed during pouring.
- The resulting surface is moistened within a week from the moment the solution is poured. After this, constant moisturizing is not required. But you still need to control the drying of the surface.
- It may take up to 30 days for the concrete to completely harden. It all depends on the chosen brand of concrete and the thickness of the structure being created.
After the specified period, the formwork is completely removed, and the ceiling is ready for use.
Floor load
The floor slab will be strong if the forces acting in it are less than the strength of its reinforced sections. The loads on the slab are also calculated. The following components are taken into account:
- Own weight of the slab (usually with a load safety factor of 1.2);
- Own weight of the floor in kg/m3;
- The weight of the partitions, reduced to the area of the slab in kg/m3 (the weight of a linear meter of the partition and the pitch of the partitions are taken into account);
- Payload (housing) - usually taken from 150 kg/m3 with a safety factor of 1.3.
All components are summed up to form the value of the total design load on the slab (result in T/m2).
Approximate cost of floors made of different materials
Of course, prefabricated monolithic floors cannot be called the cheapest (judging by the cost of the material). However, if you take into account the cost of materials, transportation costs, and wages for workers, you can understand that this is more profitable than, for example, pouring monolithic reinforced concrete. Let's try to compare the total costs when installing a floor between the first and second floors with an area of 10.5 × 8 m and a thickness of gas silicate walls of 30 cm. With these parameters, the cost (in rubles, as of the beginning of 2022):
- prefabricated monolithic floor 25 cm thick ≈ 198,000;
- reinforced concrete slab (25 cm + screed 5 cm) ≈ 241,000;
- self-leveling monolith 20 cm thick ≈ 254,000.
Similar installation is allowed, but only if blocks made of lighter materials are used and there is no additional load on top
VAT of floors
To determine the general principles of reinforcement of a monolithic floor, it is necessary to understand the typology of its operation through analysis of the stress-strain state (SSS). The most convenient way to do this is with the help of modern software systems.
Let's consider two cases - free (hinged) support of the slab on the wall, and pinched one. Slab thickness 150mm, load 600kg/m2, slab size 4.5x4.5m.
Deflection under the same conditions for a clamped slab (left) and a hinged slab (right).
The difference is in the moments of Mx.
The difference is in Mu's moments.
The difference is in the selection of upper reinforcement according to X.
The difference is in the selection of upper reinforcement according to U.
The difference is in the selection of lower reinforcement according to X.
The difference is in the selection of lower reinforcement according to U.
Boundary conditions (nature of support) are modeled by imposing the corresponding connections at the support nodes (marked in blue). For hinged support, linear movements are prohibited; for pinching, rotation is also prohibited.
As can be seen from the diagrams, when pinched, the work of the near-support section and the middle region of the slab is significantly different. In real life, any reinforced concrete (prefabricated or monolithic) is at least partially clamped in the body of the masonry. This nuance is important when determining the nature of the reinforcement of the structure.
Slab reinforcement
The monolith must undergo a reinforcement procedure.
- First you need to prepare the fittings. The required diameter of the rods should be selected, knowing the design loads. Typically, rods with a diameter of 12-14 millimeters are used for this.
- We lay the first reinforcing mesh at the bottom of the structure - it will become a monolithic slab in the future. This will be a kind of armored belt. First, you should lay the longitudinal rods, then the transverse ones. The best cell size for such a grid is 12-15 centimeters. If the overlap is not very large in area, then the size of the cells can be increased to 20 centimeters.
- The joints of the rods should be tied using steel wire.
- We lay the second reinforcing mesh similarly to the first. We carry out tying the meshes with wire. If there are not enough rods, then you can take an additional rod, which should be tied with an overlap equal to at least 40 times the reinforcing diameter. If rods with a diameter of just over a centimeter are used, then the overlap should be 48 centimeters. The joints of the rods should be placed in a checkerboard pattern. The ends of the reinforcement rods must be on load-bearing type beams.
How to calculate costs and productivity?
Thanks to the frame structure, the use of coffered floors makes it possible to significantly reduce the cubic capacity of the building, and therefore the cost of its construction. Their arrangement at industrial, civil and administrative facilities is considered the most profitable. With their help, spans up to 6 m long are covered, and the load-bearing capacity of frame systems is up to 500 kg/m2.
The financial costs of the device are minimized due to the economical consumption of concrete. This also affects the labor intensity and speed of construction.
However, when designing such systems, it is important to take into account that in the places where columns and capitals are located, the floor must be continuous - i.e. Caisson formers are not installed in these areas.
Photo 11. The process of concreting a coffered floor
Cost calculations for a monolithic floor of this type are carried out taking into account the consumption of necessary materials and devices:
- Formwork made of metal lathing and support posts, as well as plastic caisson formers, are in most cases rented.
- Concrete - usually a “mixer” is ordered with a concrete pump to automatically supply the mixture to the floor.
- Armature for reinforcement.
However, keep in mind that no one is insured against additional and unexpected expenses.
Floor slabs PK 25-12-8 (Ryazan reinforced concrete plant No. 2) Only new slabs from the factory. PC floor slab for all types of buildings, length 2.5m, width…
From 3567 RUR/pcsMore details
Floor slabs PC 60-12-8 AtV (Ryazan reinforced concrete plant No. 2) Only new slabs from the factory. PC floor slab for all types of buildings 6 m long, wide…
From 7764 RUR/pcsMore details
Floor slabs PK 63-12-8 AtV (Ryazan Concrete Concrete Plant No. 2) Only new slabs from the factory. PC floor slab for all types of buildings, length 6.3 m, width…
From 8157 RUR/pcsRead more
Floor slabs PK 58-12-8 AtV (Ryazan reinforced concrete plant No. 2) Only new slabs from the factory. PC floor slab for all types of buildings, length 5.8 m, width…
From 7699 RUR/pcsRead more
Floor slabs PK 48-12-8 AtV (Ryazan reinforced concrete plant No. 2) Only new slabs from the factory. PC floor slab for all types of buildings, length 4.8 m, width…
From 6929 RUR/pcsRead more
Floor slabs PK 42-12-8 (Ryazan reinforced concrete plant No. 2) Only new slabs from the factory. PC floor slab for all types of buildings, length 4.2 m, width…
From 6227 RUR/pieceMore details
Floor slabs PK 35-12-8 (Ryazan reinforced concrete plant No. 2) Only new slabs from the factory. PC floor slab for all types of buildings 3.5 m long, width...
From 5003 RUR/pcsMore details
Floor slabs PK 30-12-8 (Ryazan reinforced concrete plant No. 2) Only new slabs from the factory. PC floor slab for all types of buildings 3 m long, wide…
From 4349 RUR/pcsRead more
Floor slabs PK 72-12-8 AtVt-1 (Ryazan reinforced concrete plant No. 2) Only new slabs from the factory. PC floor slab for all types of buildings, length 7.2 m, width…
From RUB 11,477/pieceMore details
Floor slabs PB 60-12-8 (Ryazan reinforced concrete plant No. 2) Only new slabs from the factory. PB floor slab for all types of buildings, 6m long,…
From 9196 RUR/pcsRead more
Calculation step by step
An online calculator will help you automatically calculate the floor slab for a residential building - you just need to enter the geometric dimensions of the structure and the grade of concrete used. The calculation is made on the basis of standard parameters and loads, which are regulated by SNiP 2.01.07-85.
We will consider the method of independently determining parameters below.
Determination of the estimated length of the slab
The basic concepts when designing the geometry of a monolithic slab are design and physical length. The concept of “calculated length” should be understood as the minimum distance between the most distant walls. From this we can conclude that the physical length will always be greater than the design length.
A monolithic floor slab can be single-span (supported along the length by only 2 load-bearing walls) or multi-span (supported by 3 or more wall structures). Support on the walls can be done rigidly (with pinching) or hinged.
Figure 3. Scheme of rigid support
Figure 4. Scheme of hinged support
Figure 5. Scheme of a multi-span monolithic floor
The thickness of the slab can be calculated according to the ratio of 1:30 to the calculated floor area. Usually it is at least 200 mm.
Preliminary determination of reinforcement class and concrete grade
The calculation of the interfloor (interfloor) floor begins with determining the class of reinforcement. This can be done manually or selected from the table in Fig. 6.
Figure 6. Formula and table for selecting a reinforcement class
The reinforcement class without calculations is selected according to the aR value, indicating the distance from the center of the cross-section of the bar to the lower level of the slab. As this distance increases (its minimum value must be no less than the diameter of the reinforcement itself, but not less than 10 mm), the adhesion strength of the rod to the concrete increases. It can also be taken by the coefficient ξR, which is calculated using the formula shown in Fig. 6.
When choosing a brand of concrete, it is necessary to take into account that this material is heterogeneous, therefore its physical and mechanical properties (even if samples are made from one batch) are characterized by a significant scatter.
It is important to know that when making calculations, you need to take into account both the grade of concrete and the class of reinforcement. In this case, the compressive resistance of concrete is not allowed to be greater than the resistance of the reinforcement - i.e. in essence, it is the reinforcing frame that will work in tension
in essence, it is the reinforcing frame that will work in tension.
As a rule, when constructing floors in residential buildings, concrete mixtures of grades M250-M350 (B20-B25) are used. For the reinforcing frame, A400 or A500 reinforcement is usually used.
Determining the load on the slab
The calculation of a concrete floor slab is always aimed at determining the distributed load. To do this, you need to sum up the dead weight of the horizontal structure and the vertical loads.
The mass of a future slab 200 mm thick is determined taking into account the density of concrete and, as a rule, is within 500 kg/m2. According to building codes, the standard loads from overlying building structures on floors in residential buildings are taken to be from 200 to 800 kg/m2 - we take the average value of 500 kg/m2. As a result, we obtain a total distributed load of 1000 kg/m2.
The basic principles of how to calculate a floor slab are discussed in the following video:
The maximum bending stress always occurs at the center of the monolithic floor, which rests on the walls along the contour. To calculate the bending moment, you need to use the formula shown in Fig. 7.
Figure 7. Effect of bending moment and formula for its calculation
An example of calculating the bending moment acting on a monolithic floor slab during a span of 6 m:
Mmax=(1000×62)/8=4500 kg/m
Selection of reinforcement section
To create a reinforcing frame, corrugated reinforcement is used. According to building codes, the diameter of the rods is selected to be at least 10 mm for double-row and 12 mm for single-row knitting, depending on the length of the overlap. The size of the mesh cells is selected to be 200x200 mm or less, but in this case the total weight of the monolithic structure will increase.
Photo 8. Appearance of the reinforcing frame
When connecting formwork to a stone wall, a reinforcing frame is used in several ways, shown in Fig. 9
Figure 9. Methods for connecting formwork to a stone wall
How to install formwork for a monolithic floor
To make a formwork structure, prepare:
- moisture-resistant plywood up to 25 mm thick, covered with laminate. The smooth surface of the plywood will make it easier to remove the panels after the concrete has hardened;
- planed boards made of durable types of wood. Make the lower shield from a board 50 mm thick and up to 200 mm wide;
- wooden logs with a diameter of 120-150 mm or standard telescopic supports. They are designed to fix the formwork structure;
- boards or beams used as transverse beams of formwork. The cross members support the prefabricated panel frame.
- hardware and a standard set of tools, including a saw for cutting wood, a hammer and a building level.
The construction of a monolithic floor slab assumes that concrete will be poured into horizontal formwork
. Procedure:
- Mark the level of the formwork on the surface of the walls.
- Install vertical beams, logs or supports in 1-1.2 m increments.
- Secure cross bars or metal profiles into the support forks.
- Lay sheets of plywood or planed boards without gaps and secure them.
- Secure the vertical walls around the perimeter of the wooden formwork.
- Check the levelness of the surface and the tightness of the corner areas.
Dismantling of the formwork is carried out a month after pouring concrete.
Monolithic floor slab
Monolithic floor slab - we know how to act quickly so that you get the most reliable building without delays! Stroyproekt-Monolit offers a monolithic floor slab that is optimal in terms of time and quality, the price of which will always be lower than that of competitors. Our monolithic floor structures last for decades, have ideal strength, have reliable insulation and do not fail even in difficult operating conditions.
Just a few years ago, monolithic floor slabs were used quite rarely. The reason for its rare use was the process of installing and dismantling the floor formwork, which took quite a long time. In addition, the formwork was not reused, which made the process of constructing a monolithic floor slab in pulp very expensive.
The situation changed with the advent of reusable formwork for monolithic reinforced concrete floor slabs. Today, the installation of monolithic floors is actively used in low-rise construction and civil engineering. More and more construction companies are giving preference to monolithic floor slabs when constructing dachas, cottages and country houses.
The installation of a monolithic floor with formwork from Stroyproekt-Monolit will be fast, high-quality and not expensive for you.
- 1 All formwork systems are in stock - we will deliver them throughout the Moscow region.
- 2 Turnkey services - measurements, calculation of volumes, installation of reinforcement and formwork, concrete work.
- 3 5% discount for new customers plus cumulative discounts.
UNIQUE OFFER. WE WILL INSTALL FORMWORK - FILL THE COVER - 7,500 RUBLES PER M3
How much does it cost to pour a cube of concrete and install floor formwork?
The price of the service includes
- Delivery of floor formwork to the site
- Installation of floor formwork
- Reinforcement of a monolithic floor slab
- Pouring concrete mixture
- Dismantling of floor formwork
Delivery of formwork within the Moscow region is included in the cost of installing a monolithic floor
With our formwork the cost is 7,500 rubles per m3
Installation of monolithic floors
Do you want to contact a company that guarantees reliability and high quality of work on the installation of monolithic floors? Then be sure to contact Stroyproekt-Monolit - the combination of experience and attractive prices makes our company one of the leaders in the monolithic works market.
We offer all our clients high-quality and modern solutions based on their wishes and budget, including the installation of monolithic floors. What else can we offer?
√ All work is covered by a guarantee;
√ Only experienced specialists are engaged in the installation of monolithic floor slabs;
√ Prices that are much more favorable than the average market cost of installing monolithic floor slabs.
Do you need to rent formwork to work with monolithic floors? Contact us: we will provide formwork that meets all modern standards. Our floor formwork elements undergo constant maintenance, so they are fully ready to work according to your order.
The most reliable (but not always appropriate) option for interfloor slabs is a monolithic slab. It is made of concrete and reinforcement. Read about the rules for installing monolithic floors in this article. Analysis of the characteristics of types and applications, installation of monolithic floors.
Calculation and production of ceilings using corrugated sheets
The technology for pouring a monolith is practically no different from a similar process using boards, laminated plywood and laminated chipboard. Since the ceiling will be ribbed, it will have to be covered with a tension or suspension system. To create the formwork you will need a profiled wall sheet, which is characterized by increased strength.
The panels can be laid end-to-end or overlapping. This depends on the configuration of the support system. To prevent the sheets from moving, they need to be screwed to the beams. Cellophane laid on top of the formwork will protect the corrugated sheet from contamination and prevent leaks.
The formwork manufacturing procedure, reinforcement and pouring are carried out according to standard methods.
Installation
Installation of foundation beams will not be possible without the participation of special equipment - a crane. To be engaged by a winch, the grand beam must be equipped with special loops or sling holes, which are made during its production. Installation can begin only after completion of the preparatory work, namely:
- Conducting geological studies of the soil to determine the composition of the soil.
- Calculation of the total building load
- Completion of work on the construction of a monolithic foundation. A solid foundation is formed by compacting the soil and filling it with sand or other heavy soil.
- Organization of delivery and storage. During this work, it is necessary to check each product for integrity and absence of damage.
- Carrying out quality control of all materials.
- Clearing the construction site of dirt, snow and debris.
- Carrying out marking of the future structure. Marking is done using pegs, between which a thread is stretched.
Therefore, it is necessary to use a building level in your work.
When performing installation work, it is important not to rush. The slightest mistakes can be costly
There are often cases when the mounting loops of beams break due to errors in operation. After such a cliff, if the foundation beam is on the ground, it will be almost impossible to lift it. In addition, due to the hasty actions of the crane operator, the beam may crack if it is touched or dropped. And in some cases it will even break if it is not reinforced.
During installation, the foundation beam must rest on a stepped structure of support pillars. The steps can be made of brick or cast from concrete using formwork. The contact area should not be less than 200–300 mm. Otherwise, it will be difficult to secure the beam, which will lead to the risk of its displacement. The final stage in the construction of fundamental beams will be the processing of their surface. In this work, it is necessary to use waterproofing materials, for example, roofing felt or waterproofing to ensure the safety of the walls.
Creating formwork
The monolithic slab floor is poured into horizontal formwork, which you can make yourself or purchase a ready-made version. Using ready-made formwork provides two advantages: first, the structure is collapsible, and second, it comes with telescopic supports. With their help, the formwork is installed at the same level.
By the way, earlier we looked at how to make formwork from plywood.
However, many private developers prefer self-made formwork. In this case, it is recommended to adhere to the following rules:
- To make it, you need to take a 25-35 mm thick edged board or 20 mm thick plywood sheets. In the first case, it becomes necessary to tightly fit the boards to each other, and if there are cracks, it is recommended to use waterproofing material. Plywood sheets provide a smoother surface, while minimizing the risk of cracks.
- Vertical racks can be made from timber or logs with a diameter of 8-15 cm. Install the supports at a distance of 1 meter from each other and 20 cm from the walls. The height of the racks is adjusted according to the height of the wall; the upper edge of the formwork and the upper edge of the wall should be located at the same level.
- Crossbars are placed on top of the racks. A timber, I-beam or channel is suitable for this purpose.
- Horizontal formwork is laid directly on the crossbars. First come the cross beams, then the plywood or boards.
- The installation of the vertical parts of the formwork is carried out taking into account the approach to the walls by approximately 15-20 cm. Therefore, the vertical fence of the slab should be located at this distance from the internal level of the wall.
- The horizontality of the formwork and its level position are determined using a building level or level.
It will also be useful to study our material on the topic: calculation and installation of removable formwork.
Creating formwork for a monolithic floor slab
Reinforcement scheme
When reinforcing a slab foundation is carried out, the layout of the reinforcement must be drawn up strictly according to the technology.
In addition, reinforcement schemes for a monolithic foundation floor slab, if necessary, require an uneven order of placement of rods. Areas where it is planned to erect load-bearing partitions and columns are further reinforced. Such places are called squeeze zones. The reinforcement is laid in one layer with a reinforced concrete slab thickness of 15 cm or less. If the plan of a monolithic foundation assumes a layer size of more than 15 cm, it is recommended to reinforce it with frames. For a slab-pile foundation, calculations must be made separately, depending on the location and material of the piles. In any case, in order to correctly reinforce the foundation slab, the drawing must be drawn up based on careful preliminary calculations. Layout diagram of foundation reinforcements Source pingru.ru
Basic parameters of the plate
Let's look at the main components of the structure using an example. The diagram shows a grid with constant cell sizes. The distance between the rods must be the same. When calculating the loads, the steps of the rods are made every 20-40 cm. For brick buildings, 20 cm is suitable, and for light frame houses it is permissible to lay reinforcement less frequently. In any case, according to the building rules from the paragraph about “concrete and reinforced concrete structures” it is stated that the distance between the rods should not exceed the thickness of the base by 1.5 times.
A common laying method is in two rows. Their combined action will be ensured by the installation of vertical rods. The distances between such rods must be equal to the steps of the main steel structure, and twice the distance is allowed. According to the rules, the floor slab at the ends should be reinforced with U-shaped clamps, the length of which should be equal to two thicknesses of the base or more. The rod binding should cover the top and bottom rows. This technique ensures reliable perception of torques at the edge of the foundation and will make it possible to anchor the ends of the longitudinal rods.
Reinforcement of the foundation slab along the edges and laying in two rows Source ufa.masterdel.ru
Punching zones
In places where load-bearing vertical structures will rest on the foundation, the layout should be done by reducing the reinforcement steps. In the case when the reinforcement is laid every 20 cm along the main width of the slab, it means that under the partitions it is necessary to move to a distance of 10 cm. This method allows you to prevent the occurrence of punching and the formation of cracks.
If the interface zone coincides with a monolithic basement wall, the laying depth will be made in accordance with the height of the planned room. In this option, work is carried out with the base tied to the walls.
When reinforcing foundations, it is recommended to jointly tie the frames of monolithic walls and slabs. When pouring the foundation, you need to leave parts of the vertical rods that will serve as connecting links. These ends are inserted into the base, the edges are bent to approximately two parts of the height of the slab, and then they are tied to the main part of the frame.
After pouring and hardening of concrete, vertical rods are used to “tie” the walls to the base Source dvamolotka.ru
To make a competent calculation of building materials and reinforcement of a slab foundation, you will need a diagram and drawing. Data on the steps between the rows of reinforcement and its diameter must be entered.
Types of floors
Horizontal floor slabs are mainly necessary to provide separation between the floors of the structure. In this case, one side of such a platform serves as the floor for one floor, and the other as the ceiling. Floors are classified according to their purpose:
- Basement. Such slabs separate the first floor of the building from the basement.
- Interfloor. These floor platforms divide the floors of the building into different levels.
- Attics. In this case, floor slabs separate the space that is located under the roof of the building and the rest of the residential part of the building.
In addition, floor slabs also differ depending on the manufacturing technology:
- Monolithic. Such platforms are cast directly at their location and installation. Their special feature is reinforcement with steel rods.
- Prefabricated. Such structures are manufactured at the factory and are installed using separate elements.
- Prefabricated monolithic. A special feature of the design is the structure, which consists of blocks that are empty inside and a lightweight version of metal beams.
Characteristics of floors
When building a house with their own hands, each person is faced with the need to make interfloor ceilings, which will be found on each floor from the basement to the attic.
There are three options for such ceilings, each of which has its own nuances:
- wood (round timber and timber);
- slabs (reinforced concrete and hollow core);
- monolith (full and on metal beams).
Monolithic flooring is considered the most complex and expensive, because its production takes a lot of time (about a month), money and labor. However, in the end, the design of monolithic floors justifies itself 100%, because it is the most durable, has the best insulating properties, and almost never requires even cosmetic repairs.
In order to make a monolithic ceiling, you should decide in advance which type you will like, because... they have significant differences in all respects.
Differences will include reinforcement, concrete (thickness), support system and preparation time.
A full-fledged monolith will cost much more, its construction will require much more effort and time, but the structure will last for centuries. The thickness of the concrete in it will be twice that of its counterpart. But this option is not suitable for every floor. For example, there is no point in installing it at the ground floor level, because... the concrete will be poured just like that.
If the interfloor ceilings are installed on iron beams, each of them will be twice as thin, but its second half will be compensated by the strength of the metal. In this case, the structure will not last any less than the previous one, but it will be much easier to create something from it. This type will suit any modern design. In addition, much less concrete, reinforcing rod and plywood will be required.
Features of the work
It is worth noting that pouring a monolithic floor is considered not the easiest and cheapest option to implement, but in the end it is possible to obtain a structure that is distinguished by its versatility and durability. This makes monolithic reinforced concrete flooring the most popular among others.
If installation is done by yourself, then moisture-resistant plywood is used for formwork, the thickness of which should not be less than 2 centimeters. As for formwork boards, this parameter should not be less than 2.5 cm.
When constructing a building, in some cases there is a need to install a reinforcing element, which is called a belt. In this case, a reinforced concrete strip runs along the perimeter of the building and acts as a support for the structure.
In order to raise the mesh during the formation of the reinforcing layer, special stands made of plastic are used. The second layer of mesh should be laid out at the same distance from the top plane of the future structure. To attach two layers of mesh at the required distance, it is necessary to prepare special stands, which are made of reinforcing bars. All mesh layers and elements must be connected to each other with wire.
It is important not only to reinforce the monolithic floor to obtain a reliable structure, but also to moisten it after pouring, which is done within a week. Then constant moisturizing will no longer be required
However, it is still necessary to control the drying of the surface.
Do-it-yourself pouring and grounding of the slab
After completing the installation of the reinforced frame of the monolithic slab, it is necessary to carry out grounding. This procedure involves installing an outer ring made of galvanized strip. This ring will protrude from the outside of the slab, being its integral part. The grounding is equipped with connecting busbars, to which the rain drain elements and lightning rod will be attached. The busbars can also be taken out at the point where the electrical network is connected to the house to provide grounding for the internal electrical wiring.
The foundation is poured after completion of all work related to the installation of the reinforcing frame. During the process of mixing the solution, fiber can be added to the concrete if the requirements of SNiP require additional reinforcement of the concrete base. The filling process is carried out continuously until the entire volume is filled. Upon completion, the mixture must be freed from air bubbles by vibration compaction. The slab will gain the necessary strength after 4 weeks.How to choose?
When choosing a monolithic floor to be installed in a house, it is better to take all factors into account. For a building with several floors, it is better to use removable inventory formwork, which can be easily and quickly installed on site. In the private sector, beamless structures can be used. But if the load is significant, the force of the columns and supports may not be enough.
The interfloor space filled with reinforcement frame may require additional insulation for insulation and noise reduction. In this case, the space between floors is filled with concrete with the addition of expanded clay. The option with columns is more suitable for non-residential buildings, commercial, retail buildings or spaces with an open plan. For walls made of foam blocks, it is better to use lighter floors rather than a monolithic concrete slab. If a one-piece option is chosen, load calculations must be as accurate as possible.
Reinforcement of a monolithic floor. Longitudinal and transverse reinforcement
Concrete works great in compression. The reinforcement is tensile. By combining these two elements we get a composite material. Reinforced concrete, which uses the strengths of each component. Obviously, the reinforcement must be installed in the tensile zone of concrete and absorb tensile forces. Such reinforcement is called longitudinal or working. It must have good adhesion to the concrete, otherwise it will not be able to transfer the load to it. For working reinforcement, periodic profile rods are used. They are designated A-III (according to the old GOST) or A400 (according to the new one).
The distance between reinforcing bars is the reinforcement pitch. For floors it is usually taken equal to 150 or 200 mm. In case of pinching, a supporting moment occurs in the support zone. It generates tensile force in the upper zone. Therefore, working reinforcement in monolithic floors is placed both in the upper and lower zones of concrete. Particular attention should be paid to the lower reinforcement in the center of the slab, and the upper reinforcement at its edges. And also in the area of support on internal, intermediate walls/columns, if any, this is where the greatest stresses arise.
To ensure the required position of the upper reinforcement during concreting, transverse reinforcement is used. It is located vertically. It can be in the form of supporting frames or specially bent parts. In lightly loaded slabs they perform a structural function. Under heavy loads, transverse reinforcement is involved in the work, preventing delamination (cracking of the slab).
In private construction, transverse reinforcement in floor slabs usually performs a purely structural function. The supporting shear force ("shear" force) is absorbed by the concrete. The exception is the presence of point supports - racks (columns). In this case, it will be necessary to calculate the transverse reinforcement in the support zone. Transverse reinforcement is usually provided with a smooth profile. It is designated AI or A240.
To support the upper reinforcement during concreting, bent U-shaped parts are most widely used.
Installation of floor reinforcement.
Pouring the floor with concrete.