- Calculation of materials for construction
- Option 1 – for two cars with a residential attic floor
Aerated concrete as a wall material has many advantages. But there are also disadvantages. They are mainly associated with the low compressive strength of the porous material, which limits the number of storeys in buildings. High vapor permeability also creates difficulties, especially if heated rooms are improperly finished. However, in the case of outbuildings there are no such problems; here aerated concrete can show its best qualities. What is its advantage, and how to build a garage from aerated concrete with your own hands, will be discussed in this publication.
Advantages and disadvantages of building a garage from aerated concrete
The main advantage of blocks made of gas-filled concrete is their thermal conductivity, which is even more important for an unheated room than for a residential one. With the high resistance of the masonry to heat transfer, the temperature in the garage will be quite acceptable even without organized heating. The main thing is to do everything so that the masonry is not blown by the wind, and its heat loss is reduced to a minimum. What does this depend on?
First of all, it depends on the number of deviations in the geometry of the blocks. According to GOST 21520, three quality categories are provided for products made of cellular concrete:
| Parameter evaluation criterion | 1 category | 2nd category | 3 category |
| By lenght | 3 mm | 4 mm | 6 mm |
| By height | 1 mm | 4 mm | 5 mm |
| Width | 2 mm | 3 mm | 6 mm |
| In the difference between the lengths of the diagonals | 2 mm | 4 mm | 6 mm |
| In the straightness of the ribs | 1 mm | 3 mm | 15 mm |
| In the depths of broken corners and edges | 5 mm | 10 mm | 15 mm |
- The first and second categories include synthetic hardening (autoclave) products, since they are subject to more stringent requirements. They have their own GOST (31360), and the third category is not provided for at all. As can be seen from the table, the difference in permissible deviations is significant, and first of all it affects the thickness of the joints in the masonry.
- Due to the higher ability of the solution to conduct heat, the seams are cold bridges. But this is if blocks of category 2 or 3 are taken for masonry, which can only be mounted on the central substation. Thick seams can also be made using cement adhesive. In this case, heat will not escape through them, but a large overconsumption of the mixture will result in considerable costs.
- If you buy blocks of category 1, their higher cost can be compensated by savings on masonry mortar. They can generally be mounted on foam adhesive. 850 ml of PPU glue can replace a 25 kg bag of dry cement glue, which requires effort and money for delivery, loading and unloading, and mixing with water. The seams are very thin, and besides, adhesives based on polyurethane foam have a thermal insulation coefficient that is several times lower than that of aerated concrete itself.
- With thin seams, the masonry will not only retain heat better, but will also be less exposed to wind. The reason for this, by the way, may be the vertical seams between the blocks, the side edges of which are equipped with grooves. Such products are also on sale, but builders are not very fond of them. According to the technology, tongue-and-groove joints do not need to be filled with mortar, but such a connection does not provide the necessary tightness. So, it’s better to take regular straight blocks.
- Any aerated concrete building also loses heat through monolithic sections of the walls. In the case of a garage, this could be an armored belt along the top edge of the masonry, on which the floor slab will rest, or a reinforced concrete lintel over the gate opening. To fill them, it is better to use not traditional wooden formwork, but aerated concrete blocks with a U-shaped recess, specially designed for such work.
Another condition for the high thermal efficiency of aerated concrete walls is the mandatory finishing of the facade, which will protect the walls from wind and atmospheric moisture. It’s even better if there is an insulating layer under this finish. The less the masonry gets wet and freezes, the warmer your garage will be.
Which is better to attach a garage to a house made of aerated concrete or foam concrete?
Very often there is not enough space on a personal plot to build a separate garage, and the issue is resolved by attaching the premises to the main house. If it is built from cellular blocks, the same material can be used further. But this doesn’t really matter: you can attach a garage to a house made of aerated concrete from any other type of blocks, brick and even wood.
In the same way, a gas-block extension can be attached to walls made of brick, cinder block or lumber. The only question is that the extension should look harmonious against the background of the main building, and this is usually solved using finishing rather than structural material. For example, if the facade of the house is brick, the garage walls built from aerated blocks can, if not be faced with real brick, then be covered with panels simulating brickwork. When making an extension to a wooden house, you can use clapboard imitation timber or logs for finishing.
Joining two foundations
Thanks to the huge range of modern finishing materials, it is not at all difficult to decorate the extension in the same style as the house itself. Another thing is that you need to correctly connect the foundation and walls being joined, which is what we want to briefly talk about. Let's say you want to attach an aerated concrete garage to a brick house.
Here's how to connect a foundation:
- The main rule is that a structure of the same type as under the house should be formed under the extension, and it should be buried to the same level.
- If construction is carried out without a design, the developer cannot accurately know the characteristics of the soil on the site and be sure that it will not sag under the new structure. Therefore, it is better to forget about a rigid coupling and make a foundation with expansion joints.
- The height of the seam must correspond to the height of the entire base, the width is at least 50 mm. This is ensured by the formation of formwork for a new foundation.
- After the monolith has hardened, foam plastic is laid between it and the old tape or slab, and the seams themselves are covered on both sides with flat slate.
Extension to the wall
Expert opinion Vitaly Kudryashov builder, aspiring author
Ask a Question
Important: Expansion joints are also made between walls. However, seam connections on walls are only made if the foundations are also connected.
In the case of a rigid coupling, aerated concrete masonry is connected to brick (or any other) by means of anchoring. To do this, deep holes are drilled in the walls of the main building and, after filling them with joint sealant based on self-expanding cement, steel rods are inserted into them.
The remaining free ends are then laid into the masonry of the extension, choosing grooves for them or recessing them into horizontal seams. If the walls of a house or outbuilding are wooden, special flexible connections can be used to connect them. The joint between the walls is sealed with tow and covered with finishing material.
If there is an expansion joint on the base, it must also be on the walls. Unlike a foundation covered with a layer of soil, the aesthetics of the joint is important here. But first of all, the seam must be filled in such a way as to prevent wind blowing. It is quite difficult to provide all this, so it is better not to place the walls of the attached garage flush with the facade of the house, but to make an indentation, forming an internal corner. In this case, the joint will not only become less noticeable, but will also receive some protection from the wind.
An expansion joint is made on the wall as follows:
- A groove (groove) half a brick deep (12 cm) is cut into the wall of the house.
- The width of the groove depends on the thickness of the attached walls. If it is less than 200 mm (the walls in a garage are usually like this), the recess can be made 250 mm wide - so that there is 2-3 cm left on the sides for installing the seal. If the walls being attached are thicker, it is easier to form a ridge at their end that is the width of the groove.
Expert opinion Vitaly Kudryashov builder, aspiring authorAsk a Question
Note: The formation of a groove and a tongue is relevant only if stone walls are attached to stone ones (bricks, concrete blocks, sawn stone). If the walls of the house or extension are wooden, it is quite difficult to make the connection airtight without fines.
- As a shock-absorbing layer, many people insert a board wrapped in glassine or waterproofing into the groove of the expansion joint. But it is much easier to fill the seam space with polystyrene foam - not extruded, but the most ordinary, non-pressed one.
- The side space of the groove is filled with a special polymer seal or polyurethane foam.
- The decoration of the joint is done during the finishing process. If it is plaster, then the seam is sealed with a sealant specially designed for façade expansion joints. When used for finishing cladding materials, you can simply use some kind of decorative strip.
The walls from the inside of the garage are most often not finished with anything, but in the case of aerated concrete, it is better to plaster them. In the area of the expansion joint, the plaster is applied so that its layer on two perpendicular walls is not continuous, but the dividing seam is visible. If desired, it can be closed with a plastic corner glued to one shelf.
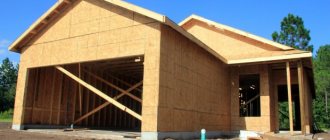
How to build a turnkey garage from aerated concrete blocks
To ensure that construction does not take a long time, and that the final structure fully meets the requirements and wishes of the customer, the process is divided into several main stages:
- calculation work and development of a preliminary design;
- preparation of design and technical documentation, drawing up estimates and its approval by the customer;
- arrangement of the foundation;
- construction of walls;
- internal and external finishing works (if necessary);
- delivery of the finished object to the customer.
During the construction process, if necessary, a number of related works are also carried out, such as installing doors and windows, connecting communications, and arranging an access area.
We are YTONG certified specialists
We are certified UNIKMA specialists
We are certified Bonolit specialists
We are BRAAS certified specialists
Make a request for construction
How to build a garage from aerated concrete with your own hands
Before you begin any construction, you need to decide on the size of the garage. The easiest way is to find a ready-made project or at least a drawing in which all the dimensions will be indicated. Of course, there will be no explication of the materials there, but having decided on the design of the garage, you can calculate their quantity using online calculators.
Calculation of materials for construction
Let’s take a garage measuring 5*8 m as an example, and let’s try to figure out what and how much is needed for its construction. Here's what we need to know for this:
- What kind of foundation will there be? In a garage it can only be strip or slab. It is inconvenient to do a pile one, since the floors will be too high.
- Will the inspection hole be filled?
- Will there be a basement?
- Will there be an attic in the garage?
- Exterior finishing option.
- Interior finishing option.
- Do you need an internal partition?
- Presence of a window.
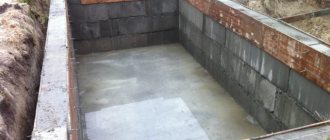
Let's consider the simplest design: a shallow foundation strip, 50 cm high and 30 cm wide. A red brick plinth wall 45 cm high. Concrete floors 15 cm thick, with an inspection hole 4.5 * 0.7 * 1.6 m. Wall thickness pits 200 mm. In front of the garage we will have an entrance ramp measuring 3.5 * 2.6 * 0.1 m. We will use online calculators for the calculation.
First the foundation tape. According to the calculation, 8.88 tons (3.7 m³) of M300 concrete (class B22.5) will be required to fill it. Longitudinal rod reinforcement with a diameter of 14 mm, total quantity 51.8 m. Transverse reinforcement with a diameter of 6 mm, in increments of 210 mm, total footage 189 m. The formwork will require 34 boards measuring 25*150*6000 mm.
Then the floors and inspection pit. The calculation shows that according to the specified dimensions of the garage, 10.76 m³ of M300 concrete will be needed to fill. To produce this volume you will need: 2.87 tons of M400 cement (58 bags of 50 kg); 5.45 tons of dry sand; 10.6 tons of gravel. For reinforcement, you can use masonry mesh cards with a cell of 100*50 mm. One card contains 2 m² of mesh, so for 40 m² of floor you will need 20 pieces. To this amount you need to add the area of the walls of the inspection pit, which also need to be reinforced.
Number of bricks per plinth. The total length of all walls is 26 meters. With a plinth height of 0.45 m and a masonry thickness of 1 brick, it will require 8013 bricks, 3.32 m³ of mortar and 260 m of reinforcing mesh.
How to choose the thickness of walls for a garage made of aerated concrete and calculate the number of blocks
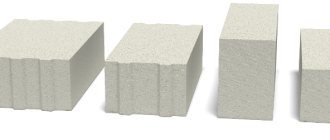
The size of the aerated concrete block for garage construction is selected depending on the thickness of the wall. Since in our example the thickness of the walls is 200 mm, for masonry you can take not only blocks with a thickness of 200 mm, but also blocks with a height of 200 mm.
That is, there is no difference: placing a block flat in a masonry or on an edge, this does not affect its load-bearing capacity in any way. Simply, when installed on an edge, the height and thickness change places. Let's say you took blocks measuring 600*300*200 cm. It is 300 mm wide and 200 mm high. But if you lay the blocks on a narrower edge, 300 will indicate the height of the masonry rows.
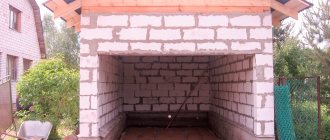
Let’s now calculate how many blocks our garage will need, including a transverse five-meter partition 75 mm thick, enclosing the utility room. The size of the opening in the gas silicate partition is 2.0 * 0.8 m. Its height, like that of the walls, is 2.7 m. The external walls have one window 1.5 * 0.9 m and an opening for a gate 3.0 * 2.2 m.
We enter all this data into the calculator, and we get the answer:
- 12.4 m³ standard blocks;
- 1,013 m³ partition blocks;
- 55 pieces of U-blocks (for armored belt and jumpers);
- 15 bags of glue.
Roof frame and roofing material
If the roof rise at the ridge is 30 cm, to assemble the rafter system you will need:
- Rafters with a section of 40*150 – 30 pcs. Laying step 60 cm.
- Ruberoid with an overlap of 10% - 6 rolls.
- Boards for sheathing 25*150 – 27 pcs. Installation pitch 35 cm.
You can also calculate the materials needed for roof installation using a calculator. Let's say we need to form a gable roof. With a box size of 5*8, the width of the slopes will be 3.25 m. We ask the calculator: roofing material - corrugated sheeting, and PVC soffit for lining the overhangs.
Calculation shows that a roof with an area of 52 m² will require 53.69 m² of profiled sheets (14 pieces). Additional elements and fasteners for them:
- Flat ridge 115*30*115mm – 5 pcs (10 m).
- Aero element of the skate – 2 pieces (10 m).
- End strip 80*100 mm – 7 pcs (14 m).
- Cornice strip 100*65 mm – 9 pcs (18 m).
- Self-tapping screws 4.8*35 – 500 pcs.
- Self-tapping screws 4.8*70 – 100 pcs.
- Self-tapping screws 5.5*19 – 250 pcs.
- Waterproofing film – 75 m².
- Soffits 3m long – 24 pcs.
- J-profile – 63 m.
- External corner 30 m.
Partition
To assemble the partition, it is more convenient to take tongue-and-groove blocks. It is important to level the base for laying the first row well and lay it with a two-layer strip of waterproofing material. The partition connection lines are marked on the walls and ceiling. Orders are established and the mooring line is tightened.
The first row is laid out on the mortar, and an extension is cut off at the end of the wall to fill the remaining space. Next, mount it with glue, starting from the end of the previous row. In general, everything is done as usual. The only thing you need to think about is how to connect the ends of the partition with the external walls and ceiling.
In our case, the easiest way to do this is by installing a galvanized rack profile for plasterboard 75*50 mm along the joint lines. The width of the profile back must correspond to the thickness of the partition. It is especially convenient to use it to attach the last row to the ceiling.
Alternatively, instead of a profile, you can use special flexible connections, one part of which is screwed to the load-bearing wall, and the other end is laid between the seams of the partition masonry. The easiest way to reinforce a partition is with fiberglass mesh - in every fourth row and under the lintel.
The lintel under the door can be made either from U-blocks or simply by placing a steel corner with a wide shelf across the opening. In the first case, wooden supports are first made. Then the blocks are mounted, filled with concrete, and only after it hardens the opening is freed from the supports.
Wall decoration
Even if you decide to leave the garage inside without finishing, there should be some outside, and we have already explained why. The best solution for aerated concrete walls is plaster, which can be applied either directly to the masonry or to the insulation installed on it. On the outside, special plastering compounds should be used, intended for application to cellular concrete masonry. On the inside, you can use regular cement-based plaster.
A good option for exterior decoration of a garage is thermal panels. These are panels formed on the basis of foamed polystyrene, with a front layer of stone or clinker tiles. True, the option is expensive. Polystyrene foam textured to look like pebble plaster will be somewhat cheaper. Using this material, the garage walls will not only acquire a noble appearance, but will also be additionally insulated.
If you want to finish the walls inside, in addition to plaster, you can use sheathing materials: lining, including plastic; OSB boards; DSP, which can also be textured. In general, almost all facade materials are suitable for interior decoration of a garage: long-length and plinth siding, decking (wood composite board), planken (heat-treated board). The whole question is the price. It doesn’t have to be budget-friendly, because garages are different from garages.
Design
A garage project is necessary for planning construction work, determining the quantity and cost of building materials.
There are 3 ways to get a garage project:
- order from specialists;
- find on our portal;
- do the calculation yourself.
Designing a garage yourself requires certain knowledge, including using a project from our portal. The features of the garage depend on the number of cars: for 2 cars or 1.
Basic parameters of a garage for 1 car:
- the optimal dimensions of the garage are 6x4x2.4 meters (LxWxH);
- gate width – 3 meters;
- wall thickness - 20 or 30 centimeters, depending on the region;
- roof - single-pitch or gable;
- inspection hole (if the foundation allows).
Basic building materials:
- gas blocks;
- cement;
- sand;
- crushed stone;
- glue;
- fittings;
- reinforcing mesh;
- roofing felt;
- film;
- board;
- timber
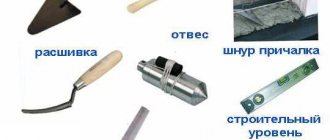
List of required tools:
- To prepare for laying:
- hacksaw;
- wall chaser;
- brushes.
- For masonry:
- notched spatula;
- carriage;
- mallet;
- plumb line;
- level.
To pour the foundation you will need a concrete mixer, shovels, and a tamper. The adhesive solution is prepared in a special container. When making the frame you will need a welding machine.
Aerated concrete garage projects
Custom design takes a lot of time and costs more, so it’s easier to turn to standard designs. Let's look at several options offered on specialized sites.
Option 1 – for two cars with a residential attic floor
The construction of such a garage is suitable for those who have problems with living square meters. It can be placed both in the country house and on a personal plot, if there is space for a building measuring 6.74 * 11.54 m. On the ground floor there is a garage with an area of 36.27 m² (for two cars), a technical room with a heating boiler and a small hall with a staircase leading up. In the attic, above the garage, there is a bedroom, and above the boiler room there is a bathroom.
The construction of the building is as follows:
- The foundation is a monolithic strip.
- Floors are on the ground without an inspection hole.
- The walls are made of aerated concrete 300 mm thick, with external finishing with clinker tiles.
- Interior finishing - gypsum fiber board cladding with mineral wool insulation.
- The ceiling is made of wooden beams.
- The roof is gable, the roofing material is bitumen tiles.
Option 2 – garage with basement and shed
This garage does not have an attic, but does have a basement. Its size in plan is 11.7 * 6.5 m, half of which is occupied by an outdoor carport. The garage room itself has a size of 6.5 * 6.3 m, under which there is a basement. The foundation under the garage itself is strip, and there are three pillars for the canopy. Aerated concrete walls are plastered inside and out. The ceiling is monolithic, the roof is gable and covered with metal tiles.
Option 3 – garage with terrace
This is a garage on one level, measuring 9.02 * 6.74 m. However, part of this area is allocated for a terrace, so the garage itself is smaller - 31 m. Its room is divided by a partition: in one half (19 m²) there is a car, in the other, Having a separate exit, you can make both a utility room and a rest room. Garage doors are located on the opposite side from the entrance. The foundation is also of a strip type, the walls are plastered on both sides. The ceiling is insulated from wood, the roof is hipped and covered with metal tiles.
Negative properties of aerated concrete blocks
The disadvantages of aerated concrete include: fragility, high moisture capacity. Low deformability means increased requirements for foundations and masonry. Swelling of the soil and failure to maintain the level will lead to destruction and cracking of the building materials from which the garage is built.
The porous material, when the temperature changes from the outside and inside of the garage, becomes covered with condensation at the border with colder air. Damp blocks will deteriorate over time, deteriorating the appearance of the garage.
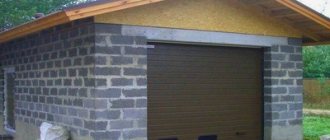
Cost of building a garage from aerated concrete
Projects can also be proposed for the construction of a turnkey aerated concrete garage. Accordingly, the client is offered approximate cost estimates. We focus on the cost of services on one of the specialized sites. For a standard garage with an area of 26 m² (6.5 * 4 m) they are asking 410 thousand rubles. The price is given for April 2020.
What does the client get for this money:
- The foundation is made of a 200 mm thick slab. At the base there is a 20 cm sand cushion and 10 cm crushed stone.
- External walls are made of gas blocks with a density of D500 (wall thickness 300 mm, height 2.5 m), with an armored belt.
- The ceiling is beam, made of timber 100*150 mm. Beam pitch 600 mm.
- Rafter system: Mauerlat 150*200 mm, rafters 50*150 mm, sheathing 25*100 mm.
- The roof is metal tile.
- Rehau plastic windows.
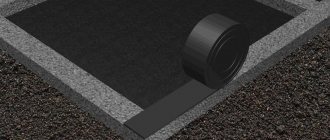
- Roller gates with electric drive (opening 2.4*2.0 m).
- Entrance door 2.05*0.96 metal.
- The interior door is paneled.
The customer, along with a set of documentation, receives a detailed estimate. Each company has its own prices, but in general they do not differ too much for one region.
Built houses
House 2 in KP Juulverne Total area: 211 m2 Individual project
Built
more details
House in KP Stepankovskaya Sloboda Total area: m2 Individual project
Built
more details
House in the village of Svyti Klyuchi Total area: 160 m2 Individual project
Built
more details
House, bathhouse, garage in the village of Borki Total area: m2 Individual project
Built
more details
House in microdistrict Losiny Park-1 Total area: 249 m2 Individual project
Built
more details
House and garage in Novofedorovsky Total area: 160+47 m2 Individual project
Built
more details
All built objects
Our company quite often orders the construction of garages from aerated concrete blocks, since with the affordable price of building materials, the construction speed is minimal. We guarantee that the construction of turnkey garages in Moscow and the Moscow region in our company will be carried out in a short time and only with high quality.
The basic principles of work have always been a professional and serious attitude towards clients. Regardless of how complex the order is, construction from aerated concrete blocks will be carried out within a predetermined time frame, and if necessary, we are ready to provide full consultations on all issues that interest you.