The access to the dacha or garden plot, as well as the parking area, is usually a dirt road or lawn. By setting up a parking space near your site, you will not only forget about dirty shoes and car mats forever, but also improve your garden. You can equip a platform for a car with your own hands without taking a hit on your budget. How to make a platform for a car in the country?
Brief overview of the article
- Types of parking spaces with your own hands
- Budget parking option
- Eco-parking
- Tile parking area for cars
- Concrete parking lot
- How to prepare a parking space?
- Choosing a parking space
- Car platform size
- Drainage
- Sequence of car parking construction
- Photo of the arrangement of the platform for the car
Types of parking spaces with your own hands
The type of coating largely depends on the capabilities of the owners, their preferences, climate and environment:
- Bulk parking is a site covered with crushed stone, granite or pebbles.
- Lawn or parking made of eco-material.
- Sidewalk tiles.
- Concrete.
- Asphalt crumbs.
- Rubber cover.
- Stone tiles.
- Parking grid.
The main differences between various materials are the features of installation, operation and financial costs. If possible, you can combine several materials and also make a canopy.
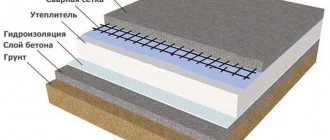
Sequence of laying layers
After the final selection of a parking lot, highlight the selected dimensional characteristics of the site (taking into account the water drainage system). Then carry out everything strictly according to the plan below:
- First, remove a layer of soil 30-35 cm deep.
- Remove all unnecessary stones, roots, level the area.
- Then, using a tamper, compact the soil thoroughly.
- Lay out geofabric. It should be 0.7-1 meters larger than the parking lot. When arranging a drainage system, wrap the drainage pipe in the “excess” geofabric.
- Add a layer of sand, level it, compact it. When compacted, the layer is 10-15 cm. If you want to make the work easier, wet the sand with water.
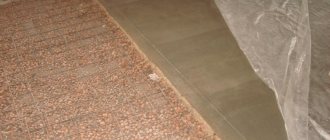
- Add a middle layer of crushed stone.
- Place a layer of coarse gravel (20-40 mm) on the sand, level it, compact it. Its thickness is 10 centimeters when finished.
- Medium gravel layer (5-20 mm). Level, compact. Its thickness should be 10-15 centimeters.
- The next layers will depend on the type of coating used.
Typically, the size of the layers depends on the structural properties of the soil and the load. For example, for loose and unstable soils, a road mesh is laid at the bottom of the pit for stabilization.
Second option: a regular layer of geofabric is laid between sand and gravel. The bottom layer is needed to stabilize the base and stop the growth of vegetation, which will be difficult to remove on your own.
Budget parking option
The most affordable way to make a landscaped area for a car near a garden plot is to fill it with crushed stone or pebbles.
If you use special textiles as a substrate, the coating will not mix with the soil for a long time. Otherwise, you will simply have to regularly add crushed stone, although this is not difficult to do, since the material is quite affordable. Crushed stone parking has both disadvantages and advantages. The main advantage of the site is the natural removal of moisture and additional equipment for drains and storm drains is not required in this case.
If the groundwater level in your area is high enough, then you will still have to think about additional drainage.
Water drainage
When you have decided on the dimensions, during the construction of the parking lot, resolve the issue with the drainage system. If you do not intend to do concreting, liquid may seep through the crushed stone or tiles.
If you decide to use a different material, it is better to make drainage. Its arrangement also depends on how much water stagnates in your summer cottage. If there is no drainage system, you need to sprinkle it with crushed stone, about 40 centimeters wide. Water will flow onto it and be completely absorbed into the soil.
If there is drainage, pipes must be laid along the perimeter of the parking lot 10 centimeters below the covering, and the upper part must be covered with crushed stone. The supplied pipes must be inserted into the drainage system.
Eco-parking
Recently, eco-grids for parking areas have been rapidly gaining popularity. It consists of durable plastic lattice sheets that are laid on a previously prepared area and partially covered with grass.
The weight of the car is redistributed, due to this the wheels do not sink into the ground and remain clean. This method of creating a parking lot has a lot of advantages, and the main one is multifunctionality.
The area can also be used as a recreation area, and caring for it is as simple as possible: you just need to occasionally irrigate the grass with water and trim it.
A parking lot made of plastic grating is not only convenient and practical, but also has an aesthetically attractive appearance. We also note the disadvantage of the site. It requires the purchase of lawn grass seeds, which are not so easy to find and are not cheap.
In addition, the lawn is demanding on climatic conditions and can freeze in severe winter frosts.
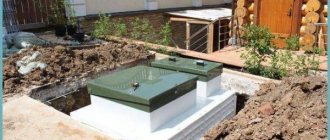
Before and after parking arrangement
Move the slider to the side to evaluate how the area has changed after the car parking was installed. You will see different parking options at the dacha.
Order service
Concrete parking lot
A platform made of concrete or asphalt chips is the most reliable and durable option, but only if all rules and requirements for construction are observed. Pouring a platform for a car from asphalt or concrete is a very labor-intensive and rather expensive process.
If the laying technology is violated, then cracks will soon appear on the coating, which can ruin the entire appearance of the site.
Plastix
Multifunctional plasticizing and water-reducing additive for concrete.
More details
Important!
To ensure the following characteristics of concrete: mobility P3-P4, frost resistance F150 and water resistance W6, at least 310 kg of cement CEM I/II 32.5 per 1 cubic meter of concrete is used. Recommended proportions by volume are:
- cement - 1 part;
- sand - 2.6 parts;
- crushed stone - 4.5 parts.
The concrete mixture can be mixed in a concrete mixer or using a construction mixer, or even manually with a shovel.
How to calculate the amount of cement
Knowing the concrete recipe, the overall dimensions of the site and the thickness of the concrete layer, it is easy to calculate the cement consumption.
For example, the dimensions of the site are 3x6 m, and the thickness of the concrete layer is 15 cm (0.15 m). Multiplying these numbers, we get 2.7 cubic meters. That's how much concrete it will take to fill the site. However, it is usually recommended to purchase materials with a margin of 10-15%, which means that you can round up to 3 cubes. With a cement consumption of 310 kg per cubic meter, we get 930 kg of cement. An impressive amount, but if you use CemPlast and Plastix plasticizers, you can save from 90 to 140 kg of cement.
The mixture is poured and leveled using the rule along the embedded parts or beacon slats, which, for small areas, can serve as sheets or formwork boards along the edges of the area.
The thickness of the concrete layer for the site should be at least 100 mm, but usually not more than 150 mm.
Since the site for the car is operated in the open air, it will necessarily be exposed to atmospheric precipitation, which may contain aggressive chemicals. To increase the water resistance of concrete, it is advisable to use the water-repellent additive CemAqua in the concrete mixture, which ensures volumetric water-repellency of concrete. The addition of CemAqua reduces water absorption and also prevents the appearance of efflorescence and mold on the surface of concrete and increases corrosion resistance.
Important!
All Cemmix additives are compatible with each other. It is advisable to use several types of additives in concrete (for example, to increase mobility, use 70% of the dosage of CemPlast or Plastix, and to increase water resistance - 30% of the dosage of CemAqua).
When making a concrete parking lot at low temperatures (below plus 5° C), antifreeze additives for concrete may be needed. Outdoor concreting is usually done in the spring and fall, since summer can be hot and the concrete can dry out. But in our latitudes the weather can be unpredictable; it is difficult to choose a time so that during the 4 weeks required for concrete to gain strength, the air temperature is +18–22° C. If concreting is carried out at an air temperature below +5° C, CemFrio or HotIce additives will allow you to obtain high-quality durable concrete.
Curing
After laying the concrete, it is necessary to give it 28 days to gain strength. These processes occur especially quickly in the first hours and days after installation. At this time, it is necessary to ensure optimal temperature and high humidity. Therefore, for the first 2–3 days, concrete should be watered with water 2–3 times a day and covered with film. After this, you can smooth out all the irregularities. After 5–7 days you can remove the formwork.
Finishing
The edges of the platform are sometimes covered with metal corners to prevent them from breaking.
What nuances to consider in order to make a strong and durable platform:
- To prepare the concrete mixture, only fresh cement is used. However, the use of plasticizers CemAqua, CemPlast and Plastix allows you to “reanimate” even stale cement.
- Materials must be purchased with a reserve of 10–15%.
- You can save at least 10% of cement without reducing the strength of concrete by using plasticizers CemAqua, CemPlast and Plastix.
- To replace complex mesh reinforcement, you can use Cemmix polypropylene or basalt fiber.
- If it is necessary to pour concrete at low temperatures, use antifreeze additives CemFrio and HotIce.
The use of modern additives for concrete mixtures allows you to do concrete work yourself at a professional level and obtain high-quality, beautiful and durable products, as well as save materials. You can buy fiber for concrete and other Cemmix additives in bulk from the manufacturer or in Leroy Merlin stores, as well as in retail construction networks and online stores.
You can buy CemPlast, CemBase CEMMIX without leaving your home, with discounts from 5 to 33%!!!!
Buy on Ozon
Buy on Yandex.Market
Buy on Wildberries
Buy at Leroy Merlin
Or you can find the nearest official dealer in your region on our map
← Types of concrete reinforcement: why reinforcement is required, what materials and methods are used in modern construction
How to make a porch for a concrete house →
Return to list
Comments
How to prepare a parking space?
Despite the fact that the materials for parking equipment differ greatly, they all require a carefully prepared site. Preparatory work is necessary in all cases. The main differences are in the type of lining material.
Let's look at step-by-step instructions on how to make a platform for a car.
Parking space dimensions
Before you build a platform for a car on your summer cottage, decide on its size. For one car, you can make a platform of 5 x 2.5 m. For large vehicles (for example, a jeep or minivan) you will need dimensions of 3.5 x 6.5 m. But if you park several cars at your summer cottage, then there should be even more space.
Choosing a parking space
The first thing you need to do when equipping a parking space is to choose its location. Most often, a site near a garage or gate is chosen for a parking space to ensure convenient access to the territory. If the place in front of the garage is in a low area, then you should think about choosing another, more suitable site.
To avoid having to constantly put the parking brake on the car, you should make sure that there is no height difference in the parking lot. If you decide to concrete or asphalt the site, then a slight slope is still needed to prevent moisture stagnation after rain.
Installation of curbs
When constructing a parking lot, do not forget about curb stones, they are very important and help solve several problems at once. If the platform for a car at the dacha is built from crushed stone, the fence will prevent it from crumbling. If the parking lot on the site is made of tiles, the curb will save you from sand being washed away. And the most important thing is that the site with side stones looks better.
Important! If you are going to build a garage or something similar, you can also install a small carport - a shelter that will help protect your car.
To build this building, you will need strong pipes to create a frame. And you will need to throw a tarpaulin or film over it. There is no point in making the structure high, as it will not protect the vehicle from slanting rain. The height of the frame structure should be about 2.5 m.
Car platform size
The size of the parking space, first of all, depends on the area of the site and the surrounding area, as well as on the dimensions of the car. For one car, it is enough to allocate an area of 10 square meters so that it can be approached from all sides.
If necessary, the length of the parking lot may be shorter, but then you will have to go around the equipment only in front or only in the back. If we are talking about parking two cars at the same time, then 15 square meters will be enough for comfortable opening of the doors.
Making a concrete parking lot
The best option
Tools needed for making
Selecting a location, taking measurements and calculating the area
The dimensions directly depend on the number of transport units that will be placed on it. For one car no more than 4 m long, a parking space 2.5 m wide and 5 m long is arranged.
Important! Concrete parking should not be built close to an existing foundation. Because under the influence of temperature, concrete expands, and this will lead to deformation.
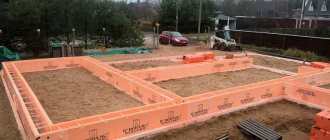
It is necessary to mark the area where the work will be carried out. In the corners you need to drive stakes, between which you need to stretch the cord. This will mark the boundaries of the parking area.
Site marking
Surface preparation
A layer of fertile soil (about 20-25 cm) should be removed so that in the future, plants rotting under the parking lot will not worsen its characteristics.
Preparing the base
Important! When carrying out work to prepare the foundation, you should make sure that there are no underground communications.
It is recommended to fill at a slight angle to allow water to drain. The base is carefully leveled and compacted. A sand and gravel cushion is poured.
First, sand is laid in a layer of about 10 cm. It should be leveled, moistened and compacted. Then crushed stone is poured. The thickness of the layer depends on the expected load. On average, 10 cm is usually enough. It also needs to be moistened and compacted well.
Preparing the pillow
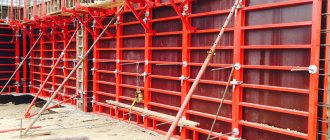
Installation of formwork
Before pouring, be sure to install wooden formwork. You can do without it by using soil to shape the parking lot, but formwork will allow you to create a more even outline.
In addition, we need to make an elevation above ground level. For the manufacture of formwork, boards or sheets of plywood are used. Check the correct installation using a level.
Before you start concreting, you can install drainage trays around the perimeter to drain water.
Reinforcement
Concreting is carried out with reinforcement with metal rods with a diameter of 10 mm. At intersections, the reinforcement is tied together using wire. Welding cannot be used in this case.
The reinforcement must rise above the gravel layer by at least 2 cm so that it can be placed in the body of the concrete screed. To do this you need to use supports.
Now you can pour concrete
Filling the parking lot
Work on concreting the base should be carried out in the warm season, at temperatures from +5 to +25 degrees.
Filling technology:
Before pouring, beacons are installed at a distance of 1 m from each other. To do this, use cement-sand slides.
- The solution can be poured only after the slides on which the beacons are installed have hardened, otherwise they may be knocked down.
- The horizontal position of the beacons must be controlled using a level.
- To concrete a place, you can use a purchased solution, however, if you have a concrete mixer, it is easy to prepare it yourself.
- The thickness of the concrete layer for parking is 20-25 cm.
- Let's start preparing the mixture.
For this you will need:
- Cement. You will need cement grade from M300. Its quality is regulated by GOST 30515-2013 “Cements”, GOST R 57293-2016 “General construction cement”, GOST 25328-82 “Cement for mortars”.
- Sand. It must comply with GOST 8736-2014 “Sand for construction work”.
- Crushed stone. Regulated by GOST 8267-93 “Crushed stone and gravel from dense rocks for construction work.”
- Water. The requirements for it are specified in GOST 23732-2011 “Water for concrete and mortars”.
The solution is mixed in the following proportions: sand - 3 parts, cement - 1 part, gravel - 2 parts. This ratio may vary depending on the load that the base must withstand.
Drainage
Drainage preparation is not always required. If the soil is porous and water leaves quickly after precipitation, then the solution to this issue can be omitted. In all other cases, drainage equipment is a necessity. Drainage equipment methods:
If the site is solid and water usually does not stagnate on it, then it will be enough to just pour crushed stone around the circumference. The width of the bulk path should be at least 30-40 centimeters.
If there is a drainage system made of pipes on the garden plot, the same installation can be installed near the parking lot.
Storm drains are installed along the perimeter of the parking space, flowing into the general sewer system.
To give the parking lot a more attractive aesthetic appearance, you can decorate it with curbstones. This way the site will look more neat and will not crumble if it is built of crushed stone or stone.
Polypropylene fiber
Universal polypropylene reinforcing fiber for adding to the solution.
More details
Reinforcement is a labor-intensive process. But today there are materials that successfully replace it. This is Cemmix polypropylene and basalt fiber, which is even used in the construction of concrete roads.
Adding fiber to a concrete mixture prevents its delamination, increases the strength and impact strength of concrete (if a heavy object falls on it, a dent will appear, not a crack). In addition, volumetric reinforcement provides the following advantages:
- increased resistance to shock loads by 5 times;
- increased abrasion resistance by 40–60%;
- increased fire resistance;
- reduction of shrinkage and cracking during strength gain;
- increasing density, water resistance, chemical resistance;
- increase in frost resistance up to F100;
- increasing the durability of concrete.
Important!
For 1 cubic meter of concrete mixture you will need only 900 g of Cemmix polypropylene fiber or 1–2 kg of Cemmix basalt fiber.
Concrete laying
The final layer of the “pie” of the car platform is a layer of concrete.
This coating should be as durable and even as possible. But in order to lay concrete evenly, you need to use a mixture of high mobility, and adding excess water reduces strength.
In this case, you cannot do without multifunctional plasticizing additives Cemmix: CemPlast or Plastix.
The use of plasticizing additives makes it possible to increase the mobility of concrete mixtures from P1 to P5 and obtain self-laying mixtures that do not require additional vibration treatment.
Plasticizers CemPlast and Plastix also provide the following advantages:
- saving cement (minimum 10%) and water (10–20%);
- increased activity of the binder component (cement);
- increasing the life of the concrete mixture and preventing its delamination;
- increase in early strength of concrete by 10–25%, and brand strength by 10–20%;
- reduction of shrinkage, prevention of cracking;
- increasing the strength, frost resistance, water resistance and durability of concrete.
The main components of the concrete mixture are cement (the binding component), water (necessary for hydration reactions to occur and the formation of the crystalline structure of concrete), as well as large and small aggregates.
When making a concrete pad, it is important to choose materials with the right characteristics.
Cement required grade 32.5-42.5 (or M400-M500 according to the old classification).
Sand is used of medium fractions.
Coarse aggregate - crushed stone, gravel, granite screenings - with a fraction size of 5–20 mm.
Solution recipes may vary. To obtain a concrete mixture with a strength class of at least B22.5, add 2–3 parts of sand and 2–4 parts of crushed stone to one part of cement. Take one part of water, and in order to make the solution mobile, use plasticizers CemPlast or Plastix.
Sequence of car parking construction
Once the location of the parking lot has been determined, it is necessary to take measurements and install markings. Next you need to complete the following steps:
- Remove a layer of soil at least 35 centimeters deep.
- Remove thick roots, stones, and level the prepared area.
- Compact the soil.
- Spread special textiles.
- Pour and level the sand. The sand cushion must be well compacted, and to make this easier, you need to fill it with water.
- Pour crushed stone or gravel.
- The further sequence of work depends on the type of coating used.
These instructions provide approximate recommendations for the depth and height of layers. The exact dimensions are determined based on the type of soil and the selected coating. In any case, it is necessary to adhere to the technological recommendations and recommendations of the coating manufacturer for the car area.
Take a look at the photo of the equipped area for cars near the garden plot, and you will see for yourself how your dacha will be transformed with a neat, clean parking space.
A dacha is a place intended not only for growing garden crops, but also a place for relaxation, for spending time with friends and family, which means that staying here, first of all, should be comfortable in all respects.
Features of sites with different surfaces
Coarse sand or fine granite chips (1-4 mm) are poured under paving slabs, bricks, flagstones, rubber tiles. Please note that for car parking, tiles need to be at least 50 mm (for paths, you can take from 30 mm). One more point: the smaller the size of the tiles used to pave the parking lot at the dacha, the less noticeable will be the inevitable “game” of the levels of the bricks.
Different coatings for summer cottage parking lots have their own installation characteristics.
Natural stone and concrete slabs
If you decide to make a parking lot from natural stone cut into slabs, it should also be 4-5 cm thick. You should not lay too large pieces: there is a high probability that they will break. They should not be placed closely, but leaving gaps of a couple of millimeters. The gaps are filled with sand, to which you can add abrasion-resistant lawn grass seeds. If you make the same paths, it will turn out beautifully, organically, and there will be no dirt.
With natural stone everything looks very decent
If the grass doesn’t appeal to you (it’s more difficult to clean, you have to cut it somehow), fill the gaps between the slabs with a mixture of sand and cement (1 part cement, 3 parts sand). Sweep it off the stones so that there is nothing on them and water the area (not with a stream, but with small drops, and so that it does not flow). The mixture will turn into concrete. It will take a certain amount of time to gain strength: 7 days at a temperature of +20°C to achieve 50% strength and another two weeks for complete “ripening”. Until the strength reaches 50%, it is advisable that there are no rainfalls during this period, and if they start, cover the area with polyethylene. Water itself is not scary, but streams that can wash away fragile concrete are scary.
This option has only one drawback: the high price of the stone. To reduce costs, you can use ready-made paving slabs in large format: 50*50 cm or so. They are also laid on a gravel-sand bed. Everything is the same, only the slabs are of artificial origin and have a clear geometry.
Concrete
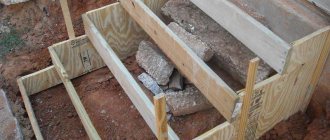
For a concrete site, you will need to install formwork around the perimeter. Then you will need to make a reinforcing frame in the form of a cage from a metal rod. A rod with a diameter of 10-15 mm is taken, a lattice is folded from it in increments of 10-15 cm, and tied at the joints with a special wire (knitting). The resulting mesh is placed on stops so that it is raised above the compacted crushed stone by 3-5 cm, and the layer of concrete on top should also be at least 10 cm (preferably 15).
If a concrete parking lot at a dacha is made for two or more cars, expansion joints will be required. To do this, wooden planks 0.7-1 cm thick are laid edgewise on a grid of reinforcement. The width of the planks is equal to the height of the concrete layer (they can be used as guides when leveling the concrete mixture). They are laid in increments of 2 meters.
Concrete parking for a car at the dacha in the process of being manufactured
In the case of concrete, you will have to wait quite a long time for your parking lot to start using. The concrete must stand for at least 28 days. And this is if the temperature does not drop below +20°C. At the same time, you need to ensure that the surface does not dry out. To do this, you need to water the area, and to prevent the water from drying out quickly, throw matting, old bags, etc. on top, throw a piece of polyethylene on top. This coating helps maintain humidity, equalizes temperature (local overheating is harmful) and protects the surface from drops that are inevitable when watering.
If you can’t wait that long, add an “accelerator” to the concrete. An additive that accelerates the hardening of concrete. The period may be reduced to 7-10 days. But carefully read the features of caring for such concrete.
Green lawn parking
When constructing a green parking lot, special grates are placed on a layer of gravel, the gaps of which are filled with fertile soil and sown with grass seeds. To park a passenger car, and sometimes even a jeep, a grate with a height of 10 cm is sufficient. If heavy vehicles (trucks with materials) are to be placed on the site for unloading, a grate is needed with a height of at least 15 cm.
The difference in the cost of gratings for green parking is significant. But the difference in price is usually justified: some eco-parking lots do not sag and look normal, while others crumple, turning the surface into a mess of soil and grass. Therefore, when choosing gratings, do not go for cheapness.
Lawn parking for cars at the dacha
Taking care of a grass parking lot is not very convenient: the rake gets stuck in the grate, and not every lawn mower can operate safely. Therefore, many owners of such sites are disappointed. But recently, another trend has appeared - instead of soil and grass, medium crushed stone is poured into the grates, and the top is covered with small crushed stone or pebbles. How is this option better than a regular bulk site? The platform is not pressed under the wheels of even a heavily loaded vehicle. This option is ideal for clay soils.
Photo of the arrangement of the platform for the car
Calculation of the required amount of coverage
The height of the crushed stone layer depends on the weight of the car.
What and how much crushed stone is needed for parking at the dacha depends on its design, and the latter determines the size and weight of the car. The main parameter of the site is the thickness of the layer of crushed stone and sand. On average, for a city car, a layer of 20 cm is enough. A heavier car - an SUV, a luxury car, will require a layer of at least 30 cm. For a minibus, you will have to make an even more solid base.
The volume of crushed stone is calculated by multiplying the parking area by the thickness of the layer. It is recommended to increase the volume by 15% to take into account the possibility of soil subsidence.
Characteristics of crushed stone for a car site
River gravel is an expensive but durable material for parking lots.
Choosing the right backfill material allows you to create a durable site and reduce costs. What crushed stone and what fraction is needed for parking at the dacha depends on the size of the car and the type of soil.
The following materials are distinguished:
- Limestone is a bad option for parking. It absorbs water too well and becomes loose. Such a site quickly becomes overgrown with grass and weeds.
- River gravel does not crumble, does not stick together, and does not lose density. However, such material is relatively expensive.
- Secondary crushed stone - brick and concrete scrap. Somewhat uneven, but compacts well. Attracted by low price and availability.
You can use coarse sand.
When backfilling, it is recommended to combine materials of different fractions. The bottom layer is formed from stone measuring up to 60 mm in diameter. For the top one, use a small stone - 10–20 mm in diameter. A small embankment fills voids and cracks and levels the site, while a larger one holds the load.
Technical parameters of crushed stone:
- Degree of purification - crushed stone cushion removes water. For parking, you need to choose a stone that contains as little dust as possible.
- Abrasion - too brittle material quickly collapses under the pressure of the wheels and ruts appear on the site.
- Frost resistance - crushed gravel is the most resistant, but in the southern regions, recycled stone is also suitable.
In addition to crushed stone, the site will need sand. It is allowed to take a larger ravine.
Place for a car at the dacha made of monolithic concrete
The construction of such a site begins traditionally. That is, we remove the soil to a depth of 300 mm.
Next, you need to lay down non-woven material and cover it with a 100 mm layer of sand.
After this, we level the sand, pour it with water and tamp it.
Next you need to install curbs. The height of the curb should be such that it ends up on the same level as the finished site.
Now we lay medium-fraction crushed stone 100 mm thick, level it and tamp it.
If installing curbs is not part of your plans, then it will be enough to make formwork from boards of the required height.
The next step is to lay the reinforcing grid and you can pour concrete in a layer of about 100 mm.
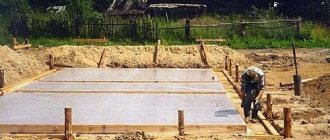
It’s good if you have the opportunity to bring ready-made cement mortar. Then all you have to do is first level it on the site and, using the rule, finally bring the surface of the site to an acceptable condition.
For example, before this.