A slab foundation is the strongest and most reliable foundation of all known types, but it is also the most expensive. The high price of such a foundation is due to the large number of costs for concrete and insulating materials, because the size of such a foundation is equal to the dimensions of the foundation of the house.
[contents]
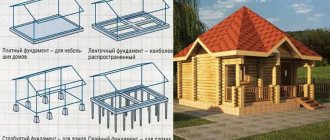
How to properly pour a monolithic foundation slab - diagram of the future foundation
A technology proven in practice, according to which a monolithic reinforced concrete slab is poured, guarantees the reliability of the foundation.
It is important to construct a multi-layer structure in the correct order. When thinking about how to pour a concrete slab, you should study the order of the foundation layers
Guarantees the reliability of the foundation - proven technology
Let's look at how the slab is constructed, starting from the soil level:
- geotextile fabric. Placed on a horizontal surface of compacted soil. The material acts as a separating layer between the sand-crushed stone cushion and the soil;
- damper cushion. Constructed from a mixture of sand and gravel. The bedding is designed to smooth out soil shifts and level the base. Drainage lines are located inside the massif;
- layer of footing. It is formed from concrete mortar. The footing allows you to plan the surface and increase the load characteristics of the foundation slab;
- waterproofing. It inhibits the penetration of ground moisture to the base of the base and allows you to maintain the required moisture concentration in the concrete solution;
- crumbly or sheet insulation. The thermal insulation layer reduces heat loss, which helps ensure a comfortable indoor temperature;
- permanent or composite formwork. The formwork is erected along the contour of the foundation slab, gives it the required shape, and also prevents moisture from seeping out of the concrete during hardening;
- reinforcement grid. Does not allow the concrete base to crack under the influence of loads and soil reaction. The power frame extends the service life of the foundation;
- layer of concrete. After gaining operational strength, the concrete absorbs the weight of the structure and evenly distributes the load over the area of the foundation surface.
Advantages and disadvantages
The main advantages of a monolithic foundation are:
- Low construction cost compared to other types of foundations. The slab is poured directly from a concrete mixer truck, without the involvement of highly qualified specialists and the use of expensive equipment.
- The good bearing capacity of foundations of this type is due to the large area and structural integrity.
- Thanks to the common slab on which the walls of the structure are located, their integrity is ensured, even during seasonal swelling of the soil.
- The design of the monolithic slab ensures the absence of large labor costs for excavation work.
The absence of large volumes of excavation work significantly reduces the estimated cost of the foundation being built due to the unnecessary use of heavy equipment (bulldozer, excavator, etc.) on the site.
One of the main disadvantages of a monolithic slab is the inability to combine the structure of this foundation and the basement.
For those who have groundwater close to their site, this is not necessary, but for dacha construction in the absence of groundwater, such a disadvantage can be critical.
The second disadvantage of this design is the high material consumption. Requires a lot of concrete and reinforcement.
The reinforcing mesh needs to be knitted, and in large volumes of slab bases this requires a lot of time.
And the third disadvantage of a monolithic slab is that pouring can only be done under favorable weather conditions.
But after comparing all the pros and cons, we can conclude that when constructing this type of foundation, there is a lot of savings on other materials and work, so such a foundation cannot be called particularly expensive.
Device
How to make a foundation slab? A slab for this type of base is not just some kind of concrete product. Because of its characteristic features, it is also called a pie plate, because it consists of several layers of different materials.
During pouring, as the monolithic foundation-slab technology says: the thickness of each layer must be calculated separately.
The composition of the “pie” is as follows:
| Layer | Purpose |
| Geotextiles | Necessary to ensure the strength of the base of the slab. It is an obstacle to mixing the cushion and soil. |
| Pillow | It is intended to make the support for the slab level, serves as drainage and creates a layer that is susceptible to heaving. |
| Concrete base | Provides waterproofing properties and also increases the level of load-bearing capacity. |
| Waterproofing | Considering that any structure located in the soil is exposed to moisture, such a layer is necessary to prevent this effect. In addition, the waterproofing layer prevents concrete from leaking, which maintains the strength of the material after hardening. |
| Thermal insulation | Not every slab is equipped with this layer. It is necessary if a warm basement is designed in the building or the slab is located close to the soil surface. |
| Formwork | To maintain the shape of concrete while it hardens. It can be built removable or remain in the structure. |
| Reinforcement | Due to the high compressive strength of concrete, it is necessary to create reinforcement with metal rods so that the material does not subsequently undergo cracking and can last as long as possible. |
| Concrete | Thanks to this layer, all loads from the building are absorbed. In most cases, reinforced concrete is used because it has more durable characteristics. |
Step-by-step installation instructions
Setting up a slab foundation with your own hands is quite labor-intensive, but to make the process easier, step-by-step instructions are provided. By performing all work according to this algorithm, you can achieve positive results and obtain a high-quality slab foundation.
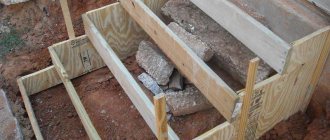
Site preparation
We prepare the site. We remove foreign objects, clear the grass and begin the breakdown according to the diagram of the future structure. Let's start digging a pit. This process can be carried out using an excavator. But try to remove the bottom layer 15-20 cm deep by hand. The depth of a pit for an ordinary private house can be about 0.5 m. If you plan to build a house with a basement, then the pit should be made deeper.
Arrangement of the drainage system
A properly organized drainage system will protect the base from erosion
Now, if desired, you can make a drainage system. To do this, you need to dig trenches perpendicular to the perimeter. Lay geotextiles at the bottom and pour crushed stone on top. Then pipes made of two-layer polyethylene with holes are installed.
Pipes must be laid with the holes up and with a certain slope, which should be in the ratio: 1 m of pipe – 1 cm of slope. It is also necessary to lay pipes in compliance with the given technology and along the perimeter of the slab foundation.
In this case, the dimensions of the pit must be expanded by 1-1.5 m. Laying pipes around the perimeter must also be done with a slope. You need to start from the middle of the foundation wall to its corners. Then the pipes are covered with crushed stone and covered with geotextiles.
Carrying out work before pouring
The next stage is the arrangement of the sand cushion. You can also make a sand and gravel pillow. It must be done to reduce the effect of moisture on the monolithic slab. The thickness of the pillow is usually 20-25 cm. The pillow is carefully compacted and spilled with water. Tamping must be done until there are no traces of shoes left on its surface. It is best to make a pillow in layers. Pour and spill every 10 cm.
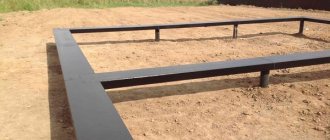
Now you need to install the formwork. It is better to make the formwork removable. It is necessary to install only on the outside of the future slab. In this case, it is necessary to check the following points: the surface of the formwork boards adjacent to the slab must be flat, the boards must be carefully connected to each other, only in this case the formwork will help to obtain a perfectly flat surface.
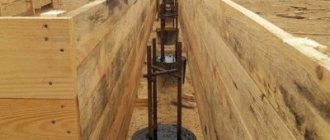
Reinforcement and filling
The foundation frame is created using reinforcement
To prevent cement liquid from leaking into the sand when pouring concrete, we lay a waterproofing layer. This process must be done in two layers using roofing felt.
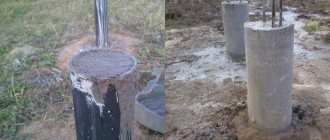
We proceed to the installation of the reinforcing frame. For this, special steel reinforcing rods with a diametrical cross-section of 10 mm or 15 mm are used. The rods are connected to each other with wire. Supports of the same size are laid on roofing felt under the bottom layer of the reinforcing belt.
This is necessary so that the reinforcing bars are hidden in the concrete. Then, using auxiliary rods, we connect the lower layer of the reinforcing belt with the upper one.
Let's start pouring concrete. To obtain a truly monolithic slab, concrete should be poured fairly quickly. It is better to use ready-made concrete. In the case of pouring concrete by yourself, it must be remembered that the interruption in the supply of concrete should not exceed one hour.
Watch the video to see how the base slab is reinforced and poured.
This is how we get a monolithic slab. The main thing to get a quality result is to follow the above step-by-step instructions. It is also necessary to properly dry the slab. To do this, it is covered with polyethylene or at first constantly spilled with water throughout the week.
How to calculate a reinforced concrete slab yourself?
How to calculate a reinforced concrete slab yourself?
To calculate a monolithic foundation slab you need to know:
- Groundwater level;
- Parameters of the soil on which the foundation will be placed;
- The amount of soil freezing;
- The total weight of the building, it includes the weight of the box, roof, furniture installed in it, household appliances and residents;
- Size of snow and wind load;
- The weight of the plate itself.
As a result of calculating the specified parameters, it is possible to determine what pressure the entire structure will exert on the ground. Then you need to refer to SNiP 2.02.01–83 and determine the maximum pressure on the ground at the building site. Let's look at an example:
- The weight of the building is 19 tons;
- Roof weight 3 tons;
- The weight of the foundation slab is 20 tons.
Possible snow and wind loads will add 7.5 tons on top, for a total load of 49.5 tons.
With a building size of 6x6 meters, the surface area of the foundation will be 36 square meters or 360,000 square centimeters. The load on the ground will be the difference between the weight of the structure and the area of the foundation, resulting in 0.13 kg per square meter. centimeter. This load is acceptable for any soil.
When calculating the thickness of the monolith, it is imperative to take into account the following parameters:
- Distance between layers of reinforcing mesh;
- The height of the concrete layer on and under the outer layers of the reinforcing mesh;
- Reinforcement dimensions.
Practice shows that the traditional slab thickness is 200–300 millimeters. If we take into account that under it there should be a compacted sand cushion with a total height of up to 300 mm, then the thickness of the composition is 600 mm. It is necessary to understand that this parameter changes depending on the type of soil and the weight of the building.
The volume of concrete is equal to the product of the perimeter of the foundation and its height, and the required volume of sand or crushed stone is calculated in the same way. Based on the calculations carried out, the required amount of waterproofing, reinforcement, etc. will be known.
Stages of foundation construction
First you need to mark the site on which the future structure will be located. Please note that the formwork will take up some space; to make it more convenient to work with it, add about a meter to the sides of the pit.
In order for the pressure on the slab to be uniform in the future, the platform is leveled. There should be no bumps or drops at the bottom of the pit. the drainage system must be done immediately. To do this, you can dig transverse trenches to drain water. Geotextiles are placed on their bottom. Then you need to lay plastic pipes with pre-drilled holes. All this is covered with fine crushed stone and again covered with geotextile.
Substrate for the foundation
general information
The essence of the slab base is a reinforced concrete slab, which is placed on a layer of soil up to 300 mm. Crushed stone or sand is mixed with the soil. The thickness of the monolithic foundation slab itself is 20 - 40 cm.
For the construction, monolithic slabs or prefabricated slabs can be used, which are poured at the construction site. Slab foundations on heaving soils, as well as slab foundations on bulk sandy soils, show themselves to be the most effective compared to other types of construction.
Despite the fact that the monolithic type of slab is considered more reliable, when choosing how to make a slab foundation, it is preferable to pour the slab on site. This is explained by the fact that the process of transporting and laying a monolithic base is quite labor-intensive and expensive, but building a pie slab is very simple.
This type of foundation is suitable not only for the construction of large industrial or residential facilities: it is also suitable for small outbuildings, for example, you can make both a slab foundation for a bathhouse and a monolithic slab foundation for a garage with your own hands.
A separate article on our website discusses all the pros and cons of a slab base. Sometimes, in addition to the slab, combined types are used, for example, a pile-slab foundation or universal ones, for example, from road slabs.
Tools and building materials needed to pour the foundation slab
As with any construction work, to pour a slab foundation, you will need tools and materials for manufacturing:
- area measuring instruments;
- tools or equipment for digging a pit;
- cement, water, gravel, sand;
- lumber, nails, hammer (for formwork construction);
- materials for waterproofing, thermal insulation;
- reinforcing rods, wire;
- concrete mixer or other equipment for mixing concrete;
- vibrating rammer;
- polyethylene or roofing felt.
With such a set of tools and building materials, you can build a high-quality tiled foundation.
Pouring using a concrete pump
This is the most expensive and most convenient foundation pouring. Concreting occurs as follows - a specialized machine, using an extendable boom, can deliver the concrete mixture over a distance of 30 to 50 meters, which allows pouring even in places with difficult or impossible access to the formwork. Due to the high cost, concrete pumps are mainly used only in construction on large projects.
DIY pouring
You can pour the slab under the foundation yourself. This is the cheapest method of filling, but quite labor-intensive and time-consuming. To do this, you can use one or more concrete mixers, it all depends on how many people are involved in pouring the foundation slab. You can do without them by mixing the concrete mixture with shovels in a trough, but the concrete will not have the same quality as when using a concrete mixer, and the time costs will increase significantly. If you use a small concrete mixer with an operating volume of up to 50 liters, then pouring one cube of the finished mixture will require approximately 20 completed cycles. Mixing concrete takes approximately 3 – 5 minutes. But in order to make a batch, you need to put sand, cement, water and crushed stone into a concrete mixer, and then deliver the finished concrete to the formwork. Then the approximate cycle will be 10-15 minutes. It follows from this that one cube is filled in 5 hours of work. The whole process can be sped up by more people using a larger concrete mixer. Sand, crushed stone, water and cement, as well as the concrete mixer itself, should be located next to the formwork. This will save time and effort spent on delivering building materials and the finished mixture, which will be poured into the formwork.
Reinforcement schemes used
The classic reinforcement scheme for a monolithic slab is two rows of mesh made of AIII rods with a diameter of 12 to 16 mm. The cell size of both meshes is in the range of 20–25 mm, so the thickness of the reinforcement is selected based on a minimum steel content of about 0.2% in both cross sections of the slab.
Installation of fittings begins with the installation of spacer plugs, ensuring a protective layer thickness of 50 mm. Longitudinal reinforcement bars are laid on the plugs, located in increments of 20–25 cm, and transverse reinforcement bars on them, thus forming a mesh. All intersections of the reinforcement are connected, a vertical rod is welded to every third one to distance the top row of reinforcement.
The longitudinal rods of the third row are welded to the rods, then those that do not have a rigid fixation to the vertical structural reinforcement are placed in the mold. The transverse ones are placed and tied onto the welded longitudinal rods, then the remaining ones are lifted from below and tied to them, while maintaining the nominal installation pitch. If it is necessary to increase the length of the reinforcing bars, they are connected with an overlap of at least 50 nominal diameters.
If, according to the design, the slab has lower stiffening ribs, they are formed by trenches in the preparation layer, reinforced with sheet permanent formwork. In this case, the space between the trenches - the so-called sandboxes - is tightly compacted and leveled along the upper edges of the rib formwork. Reinforcement of the protrusions is carried out with U-shaped mortgages, which are subsequently connected to both rows of the reinforcing mesh of the slab. As working reinforcement for the ribs, two rows of rods are used, located in the lower corners of the U-shaped anchorages. When installing rib reinforcement, we must also not forget about the minimum protective layer of 50 mm.